
Your Ultimate Guide to Basement Ceiling Finish Options
Finishing your basement ceiling is a bigger deal than you might think. It’s one of those final-touch decisions that completely transforms a concrete lower level into a warm, inviting part of your home. The right choice affects everything from the room's overall vibe and brightness to how sound travels.
Ultimately, you're looking for that sweet spot where looks, budget, and practicality all meet.
Why Your Basement Ceiling Finish Matters
Let’s be honest, nobody gets excited about a ceiling—until it's done right. A great basement ceiling is the unsung hero of a remodel. It’s like the fifth wall of the room, pulling everything together. It can make a low ceiling feel higher, cleverly hide all that ugly plumbing and ductwork, and still give you a way to get to them when you need to.
This is especially true for us here in Orem and the rest of Utah County, where a finished basement is practically a standard feature. Getting the ceiling right doesn't just make your home more enjoyable; it's a solid investment that boosts its value down the line.
Key Factors to Consider Early On
Before you start pinning your dream basement on Pinterest, it's smart to think through a few practical things first. Every basement is different, and figuring out these details from the get-go will save you a ton of hassle and money later on.
- Ceiling Height: If you're working with low clearance, you'll want a finish that hugs the joists, like drywall or even just painting everything out. Got more height to play with? Then a drop ceiling system becomes a great option.
- Utility Access: Think about what’s running overhead. Do you have plumbing shut-offs, electrical boxes, or HVAC dampers up there? A drop ceiling is a lifesaver for easy access, while drywall means cutting a hole every time something needs a tweak.
- Moisture Levels: Basements can get damp, it’s just their nature. The material you choose needs to handle a bit of humidity without sagging, warping, or becoming a breeding ground for mold.
- Budget: This is a big one. Costs swing wildly, from a super affordable coat of paint on exposed joists to the premium look of tongue-and-groove wood planks.
A well-done basement remodel is one of the smartest ways to invest in your home. Numbers from across the industry consistently show that finishing a basement can net you a 70-75% return on your investment when you sell. You can dig deeper into the ROI of basement conversions with detailed market analyses.
At the end of the day, the perfect ceiling for your basement is the one that fits your life—your style, your needs, and your budget. Thinking through these factors now ensures you’ll end up with a beautiful, functional space that adds real value to your Utah home.
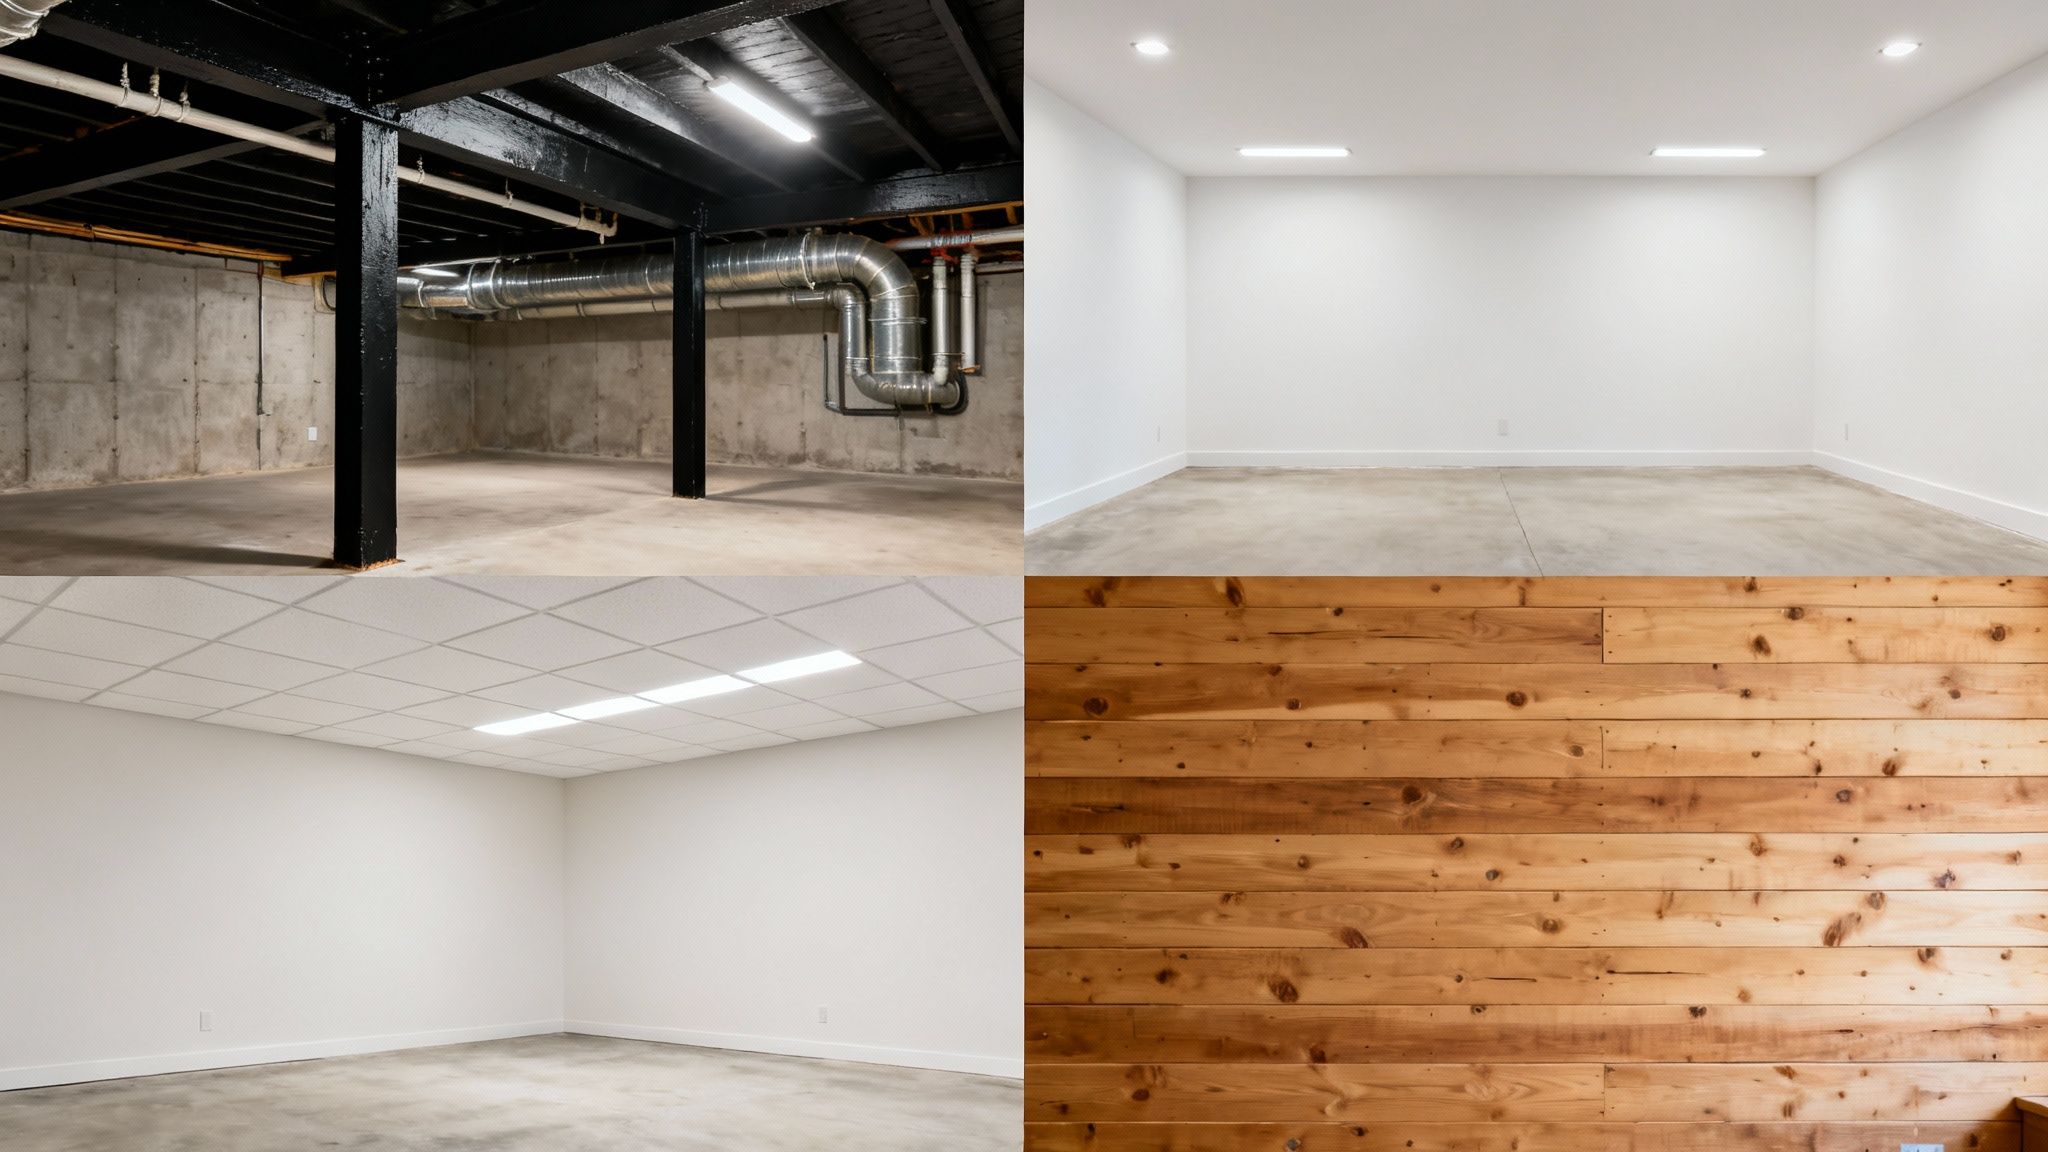
Comparing the Top Basement Ceiling Options
Choosing the right finish for your basement ceiling is a pivotal moment. It's where the space really starts to feel less like a cellar and more like a living room, office, or den. This isn't just about covering up joists and pipes; it's a careful balancing act between how you want it to look, how easy you need it to be to access utilities, and what your budget can handle.
Let's dive into the four most common choices people make and get a real-world feel for what each one brings to the table.
The Polished Look of Drywall
If your goal is to make the basement feel like a seamless, natural extension of the rest of your home, drywall is almost always the answer. It gives you that smooth, clean, continuous surface we're all used to seeing upstairs. When you drywall a basement ceiling, you're essentially telling everyone, "This isn't a basement; it's just the lower level."
But that beautiful, finished look has a major catch: access. Once that drywall is screwed in, taped, and mudded, getting to the plumbing, wiring, and ductwork hiding above it becomes a real project. It means cutting a hole and then dealing with the messy aftermath of patching, sanding, and repainting. To get around this, many homeowners will install small, discreet access panels near critical components, like the main water shut-off valve.
- Best For: Creating a high-end, cohesive look that perfectly matches the upstairs living areas.
- Keep in Mind: It’s the least forgiving option if you ever need to do maintenance or repairs down the road.
The Practical Genius of Drop Ceilings
Drop ceilings—you might also hear them called suspended or T-grid ceilings—are the undisputed champions of practicality. The system is simple: a metal grid hangs down from the joists, and lightweight tiles or panels are just dropped into place. Their biggest selling point? Instant, hassle-free access to everything above. A leaky pipe or a plan to run new speaker wire is no big deal; you just pop a tile out of the way.
And forget those old, stained, porous squares you remember from school classrooms. Modern drop ceiling tiles have come a long way. You can now find them in an incredible range of styles that mimic everything from pressed tin and coffered wood to sleek, modern textures. Many are also designed with acoustics in mind, which is a huge bonus for a basement home theater or a noisy kids' playroom since they help deaden sound transfer between floors.
The numbers back up their popularity. Drop and suspended ceiling tiles are used in over 55% of residential installations precisely because they blend accessibility with modern aesthetics. Good quality tiles can improve soundproofing by up to 50 decibels and, when you add insulation on top, can even help trim energy bills by as much as 20%. You can dig deeper into these market trends and the benefits of ceiling tiles to see why they're such a common choice.
The Industrial Vibe of an Exposed Ceiling
For anyone trying to squeeze every last inch of height out of a low basement, leaving the ceiling exposed is a fantastic route. This approach is all about cleaning up and painting the joists, pipes, ductwork, and wiring—everything that's already there. A single, uniform color like flat black, crisp white, or a deep gray transforms the mechanical mess into an intentional, industrial-chic look.
The biggest win here is maximum headroom. It can make a basement that feels cramped and low suddenly seem open and surprisingly spacious. You also get completely unobstructed access to all your utilities. The real work, however, is in the prep. Every wire and pipe needs to be neatly organized and secured so it looks deliberate, not just forgotten. The painting itself is also a beast, requiring a ton of patience to get into every nook and cranny.
Pro Tip: When you're painting an exposed ceiling, a paint sprayer is an absolute lifesaver. It lays down a much more even coat than a brush or roller ever could and easily gets into all those tight spots around pipes and conduits in a fraction of the time.
The Rustic Warmth of Wood Planking
Nothing injects character and warmth into a room quite like real wood. A ceiling finished with tongue-and-groove or shiplap planks can completely redefine a basement, turning it into anything from a cozy cabin retreat to a sophisticated man cave. The natural grain and rich texture of wood offer a high-end, custom feel that no other material can truly replicate.
Of course, that premium look comes with a premium price tag, making wood one of the more expensive options on our list. Wood is also incredibly sensitive to moisture, so this is a choice reserved only for basements that are bone-dry and have excellent humidity control. In a damp Utah basement, wood planks can warp, swell, or become a breeding ground for mold. But for the right space, a wood ceiling is a beautiful investment that never goes out of style.
Before we move on, here's a quick-glance table to help you weigh the pros and cons of these popular options side-by-side.
Pros and Cons of Basement Ceiling Finishes
| Drywall | Creates a seamless, high-end finish; easily paintable; matches the rest of the home. | Difficult to access plumbing and wiring; installation is messy and labor-intensive. | Basements designed to be a true extension of the upstairs living space. |
| Drop/T-Grid | Excellent, easy access to utilities; huge variety of styles; great for acoustics and hiding imperfections. | Can reduce ceiling height slightly; some still perceive it as a "commercial" look. | Home theaters, workshops, or any basement where future access is a priority. |
| Exposed | Maximizes ceiling height; provides an industrial, modern aesthetic; cost-effective materials. | Requires meticulous prep work to look clean; can be noisy; all utilities are visible. | Basements with low ceilings or for homeowners wanting a loft or industrial style. |
| Wood Plank | Adds significant warmth and character; high-end, custom appearance; timeless appeal. | Expensive; susceptible to moisture damage; can be complex to install. | Dry basements in homes aiming for a rustic, cozy, or high-end architectural look. |
Ultimately, choosing your basement ceiling finish comes down to what you prioritize most. Is it looks, access, or budget? This simple flowchart can help point you in the right direction.
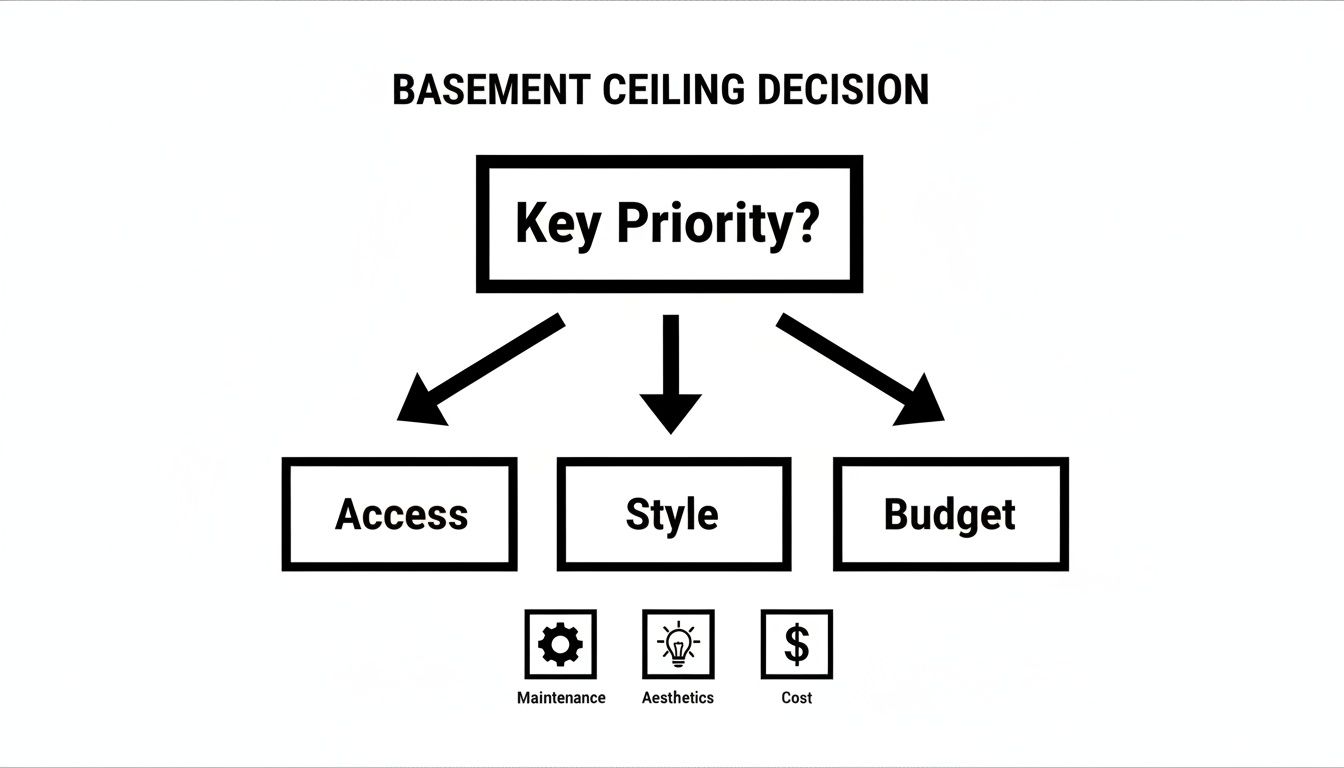
As you can see, if easy access is your number one concern, a drop ceiling is the obvious choice. But if you're laser-focused on style, drywall or wood might be calling your name. Each option offers a unique set of trade-offs, so it’s all about finding the one that aligns with your specific vision for your new space.
Budgeting for Your Basement Ceiling Project
Let's talk about the dollars and cents. Figuring out the true cost of finishing your basement ceiling is the first real step in any successful renovation. It’s easy to get a quote for materials and think you’re done, but the total investment often has a few other moving parts that can sneak up on you. Planning for everything from the get-go is the secret to keeping your project on track and avoiding budget headaches later.
Think of it like buying a car. A simple, painted exposed ceiling is your reliable sedan—it’s affordable, practical, and does its job well. On the other end of the spectrum, a custom tongue-and-groove wood ceiling is the luxury SUV—it delivers a high-end look and feel but comes with a much bigger price tag. Your budget is what ultimately steers you toward the right choice for your home.
Breaking Down the Core Costs
The lion's share of your budget will go to materials and labor, and these can swing pretty wildly depending on the ceiling type you choose. Here’s a rough sketch of what you can expect for a professional installation here in the Orem area:
- Exposed/Painted Ceiling: This is almost always the most wallet-friendly route, typically landing between $2 to $4 per square foot. The cost here is mostly in the prep work—cleaning and organizing all those pipes and joists—plus quality primer and paint.
- Drop Ceiling (Suspended/T-Grid): A classic choice that falls squarely in the mid-range, a drop ceiling usually runs from $4 to $8 per square foot. The price really hinges on the tiles you pick. Basic acoustic panels keep costs down, while designer or patterned tiles can push you toward the higher end of that range.
- Drywall Ceiling: If you want that clean, finished look that matches the rest of your house, drywall is the way to go. It’s also one of the more labor-intensive finishes, putting the price between $3 and $6 per square foot. We break this down even further in our guide on the cost of drywalling a basement.
Uncovering Hidden Project Expenses
The quote for your ceiling finish is just one piece of the puzzle. A handful of other tasks might be needed to get the space ready, and these "hidden" costs can inflate your budget if you haven't accounted for them.
Remember that your basement ceiling is more than just a surface; it's a critical part of your home's infrastructure. Investing in what's behind the ceiling—like insulation and efficient ductwork—pays dividends in comfort and energy savings for years to come.
For example, while you have everything open, it’s the perfect time to address drafts or inefficient HVAC runs. Understanding the cost of air duct sealing can have a big impact on your home's energy efficiency and your family's comfort, making it a smart investment during a reno.
A few other potential costs to keep on your radar include:
Demolition: Have an old, busted-up ceiling that needs to go? Tearing it out and hauling it away will likely add $1 to $2 per square foot for labor and disposal.
Electrical Work: This is the time to add recessed lighting, install a ceiling fan, or run wiring for speakers. Hiring an electrician can cost anywhere from a few hundred to several thousand dollars, depending on how ambitious your lighting plan is.
Plumbing or HVAC Adjustments: You'll often find a stray pipe or duct that hangs just a little too low, killing your headroom. Rerouting these is a job for a pro and the cost can vary significantly based on the complexity.
Insulation and Soundproofing: Don't skip this! Adding insulation between the floor joists is a game-changer for reducing noise from upstairs and keeping your basement comfortable. Expect to add $1.50 to $3.50 per square foot for materials like fiberglass batts or Rockwool.
Navigating Moisture and Building Codes
Before you get caught up in paint colors and lighting fixtures, let's talk about the two things that will absolutely make or break your basement project: moisture and building codes. Here in Utah, basements are a fantastic bonus space, but they're also ground zero for dampness. Skipping over these fundamental issues is like building a beautiful house on a shaky foundation—it’s just a matter of time before problems surface.
Getting this part right isn't just about passing an inspection. It’s about protecting your investment, keeping your family safe, and ensuring the beautiful space you create actually lasts.
Taming Basement Moisture
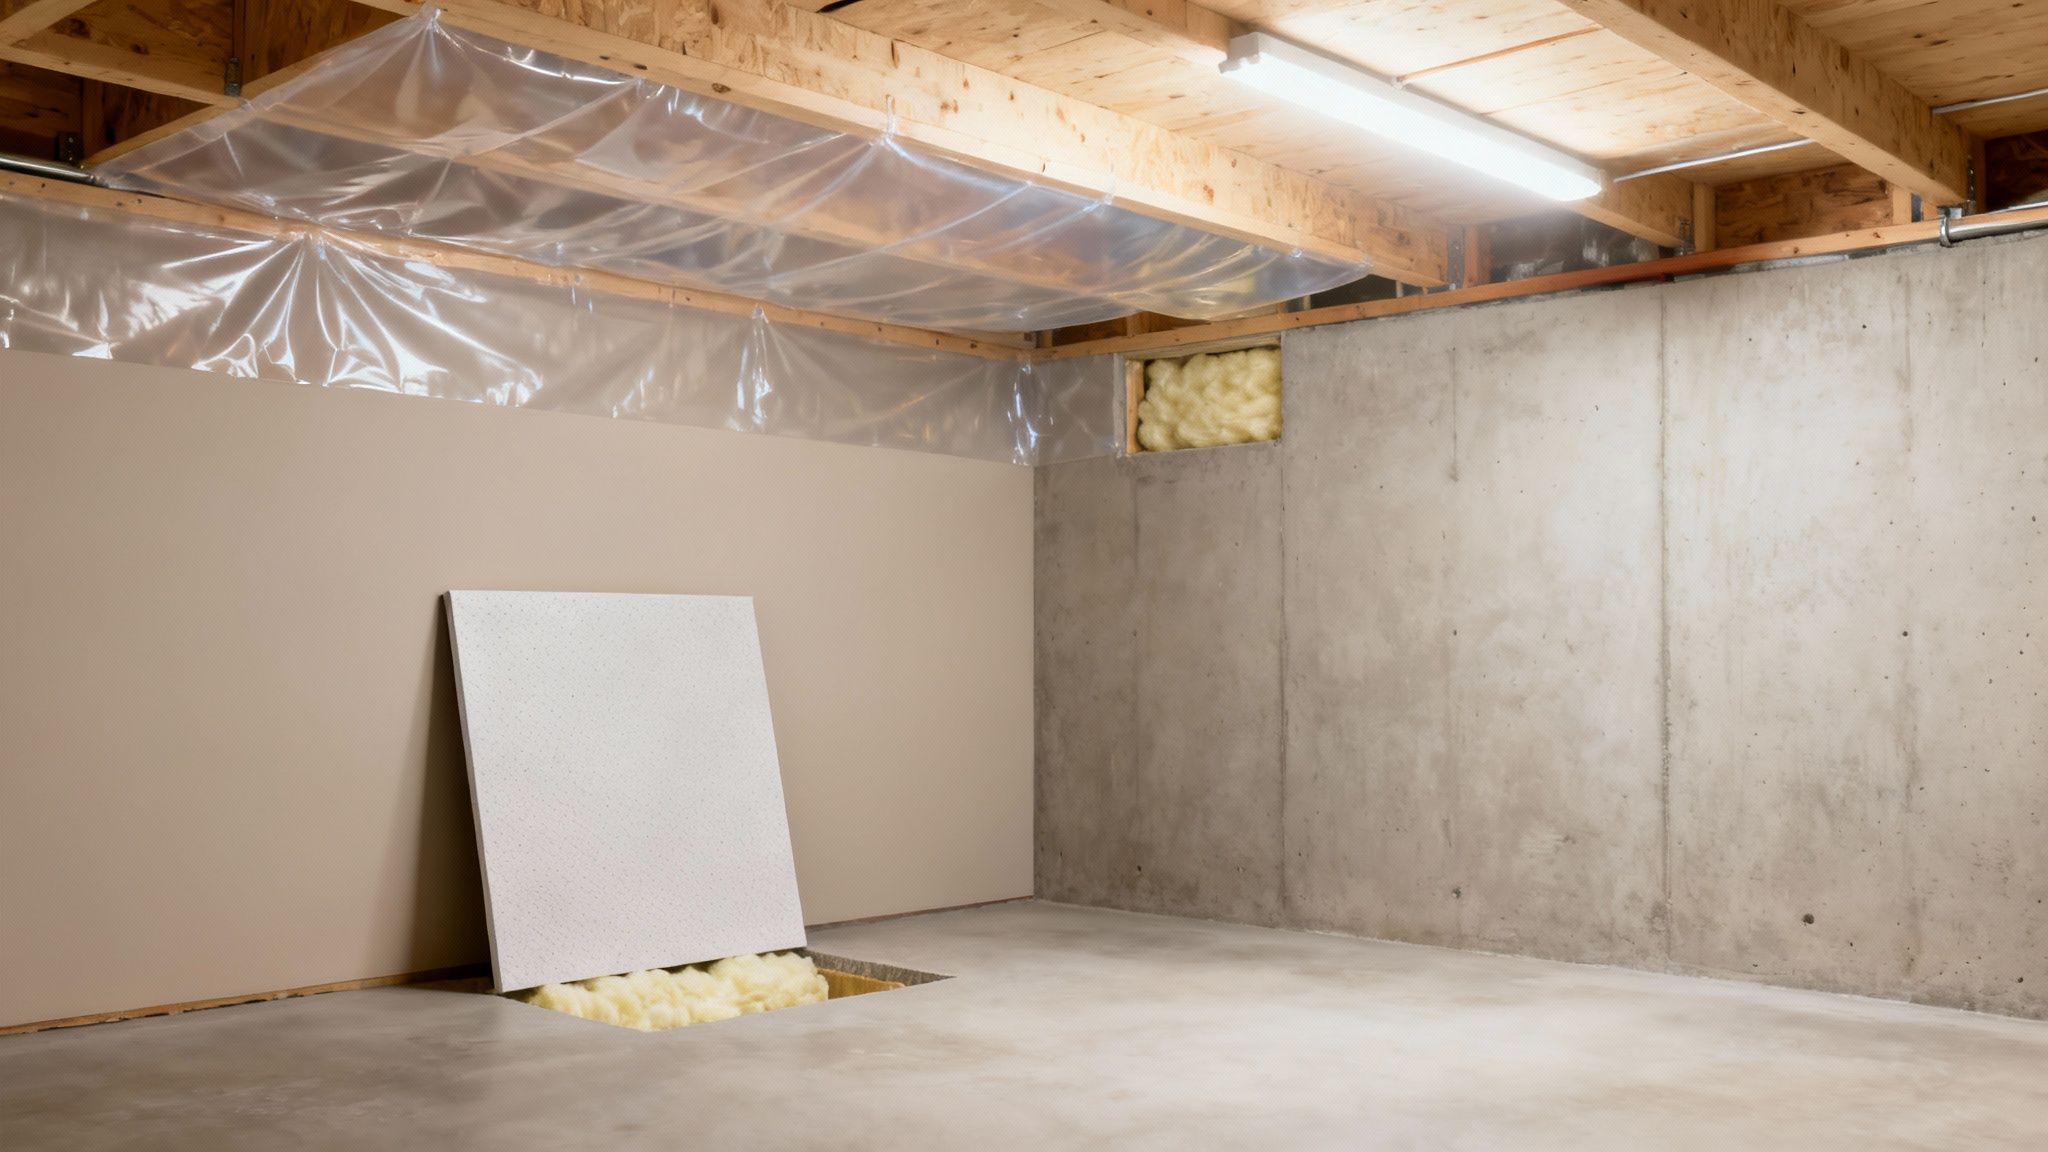
Moisture is the arch-nemesis of any finished basement. It seeps through foundation walls, causes that all-too-familiar musty smell, and creates the perfect environment for mold and damaged materials. Your ceiling finish is a critical part of your defense strategy.
Before you even buy a single ceiling tile, do a thorough inspection. Look for water stains on the joists or that white, powdery stuff (called efflorescence) on the concrete walls. These are red flags. Solving the root cause with proper waterproofing, exterior grading, or even a good dehumidifier is completely non-negotiable.
Once you’re confident the space is dry, you can choose ceiling materials that add another layer of protection. Think about using:
- Mold-Resistant Drywall: This isn't just regular drywall. It's treated to inhibit mold and mildew growth, making it a brilliant choice for any below-grade space.
- Vapor Barriers: A simple plastic sheet installed above your ceiling finish can work wonders, preventing moisture from upper floors from condensing in the cooler basement air.
- Specialized Ceiling Tiles: Many modern drop ceiling tiles are engineered specifically for basements, offering built-in resistance to moisture, mold, and sagging.
Understanding Utah Building Codes
Building codes aren't just suggestions—they're the law, designed to make sure your new living space is safe. While the rules might vary a bit between Orem and Provo, some key regulations for basement ceilings are pretty consistent across the board.
A code-compliant basement ceiling finish does more than just satisfy inspectors. It actively contributes to the safety and resilience of your home, turning a vulnerable area into a protected and valuable living space.
A finished ceiling can dramatically improve a basement's ability to withstand moisture—a huge deal when you consider the 15% annual moisture damage rate in unfinished areas. More importantly, a proper ceiling is a crucial fire-safety component. It can be the upgrade that helps your project pass inspection, unlike the 85% of unfinished basements that typically fail without it.
One of the first things an inspector will pull out a tape measure for is ceiling height. For a basement to be legally considered "habitable," most codes require a minimum finished ceiling height of 7 feet (often dropping to 6 feet 8 inches under beams and ducts). To get into the nitty-gritty, you can read our detailed guide on basement ceiling height requirements.
Other code essentials you can't ignore include:
- Fire-Blocking: You'll need to seal the gaps between joists with approved materials. This simple step is designed to slow the spread of a fire.
- Electrical Safety: Any new wiring for lights or outlets has to be up to code. This usually means hiring a licensed electrician and getting a separate permit.
- Egress: If you're adding a bedroom, you absolutely must have a proper egress window or door that provides a clear escape route in an emergency.
Tackling these moisture and code requirements head-on from the start will save you a world of headaches. It ensures your project runs smoothly, passes inspection, and gives you a safe, durable, and comfortable new space for your family to enjoy.
Deciding Between DIY and a Professional Contractor
One of the biggest forks in the road for any basement ceiling project is deciding whether to tackle it yourself or call in a pro. There's no single right answer—it really comes down to a gut-check on the project's complexity versus your skills, tools, and free time.
Making the right call here from the get-go can be the difference between a project you’re proud of and a major headache that costs you more in the long run.
Think of it like working on a car. Painting your ceiling joists or putting in a simple drop ceiling is like changing your own oil. With the right supplies and a good YouTube video, most people can get it done and feel great about it.
But finishing drywall to a perfectly smooth, seamless surface? That’s like rebuilding a transmission. It takes a delicate touch, specialized tools, and a feel for the work that only comes from doing it over and over. One wrong move, and the mistake is glaring.
When DIY Is a Great Option
For a lot of homeowners, the cost savings and sheer satisfaction of doing it yourself are too good to pass up. You're probably a great candidate for a DIY ceiling if your project looks something like this:
- Painting Exposed Joists: This one is more about patience than anything else. If you're comfortable with a paint sprayer and a whole lot of masking tape, you can absolutely nail this look. It’s tedious but not technically difficult.
- Installing a Standard Drop Ceiling: Got a simple, square room? A basic T-grid ceiling is a fantastic DIY project. The parts are literally designed to snap together, and the process is pretty logical if you take your time and follow the instructions.
- Simple Wood Planking: If you're putting up something like beadboard or shiplap directly onto the joists in a small space, it's very manageable for a handy person with a miter saw and a nail gun.
When to Call in a Professional
On the other hand, some jobs just demand a level of precision that you only get from years of experience. It's time to call a pro when the job involves things like:
- Flawless Drywall Finishing: This is the big one. Taping, mudding, and sanding drywall so the seams completely disappear is a true art form. A pro makes it look effortless, but this is the number one thing that makes a DIY job look, well, DIY.
- Complex Electrical Work: Installing pot lights, ceiling fans, or running new circuits isn't just tricky—it's a serious safety issue. This kind of work almost always requires a licensed electrician to stay up to code.
- Boxing in Ductwork and Pipes: Building soffits to hide ugly HVAC runs and plumbing takes real framing and finishing skill. You want it to look like an intentional architectural feature, not a clunky box stuck on the ceiling.
The True Cost of a DIY Mistake: It's so easy to underestimate the time and skill needed for a pro-level finish. A poorly installed ceiling can sag, show ugly seams, or hide electrical hazards. Fixing those mistakes often costs way more than just hiring the right person in the first place.
Choosing the right professional is just as important as the decision to hire one. You can learn more about finding the best renovation contractor to make sure you're partnering with someone you can trust. It’s the best way to guarantee your new ceiling is beautiful, safe, and built to last.
Adding Lighting and Soundproofing Solutions
A great basement ceiling is more than just a cover-up for joists and pipes. It's a key part of making the space feel like a genuine extension of your home. Two things that make a world of difference are lighting and soundproofing. Nail these two, and you'll transform a dark, echoey basement into a bright, quiet, and inviting retreat.
Let's be honest, most basements are starved for natural light. That's why your lighting plan is so critical. The right lighting can make the room feel bigger, warmer, and less like a cave. And the type of ceiling you pick directly impacts your lighting choices.
Matching Lighting to Your Ceiling Type
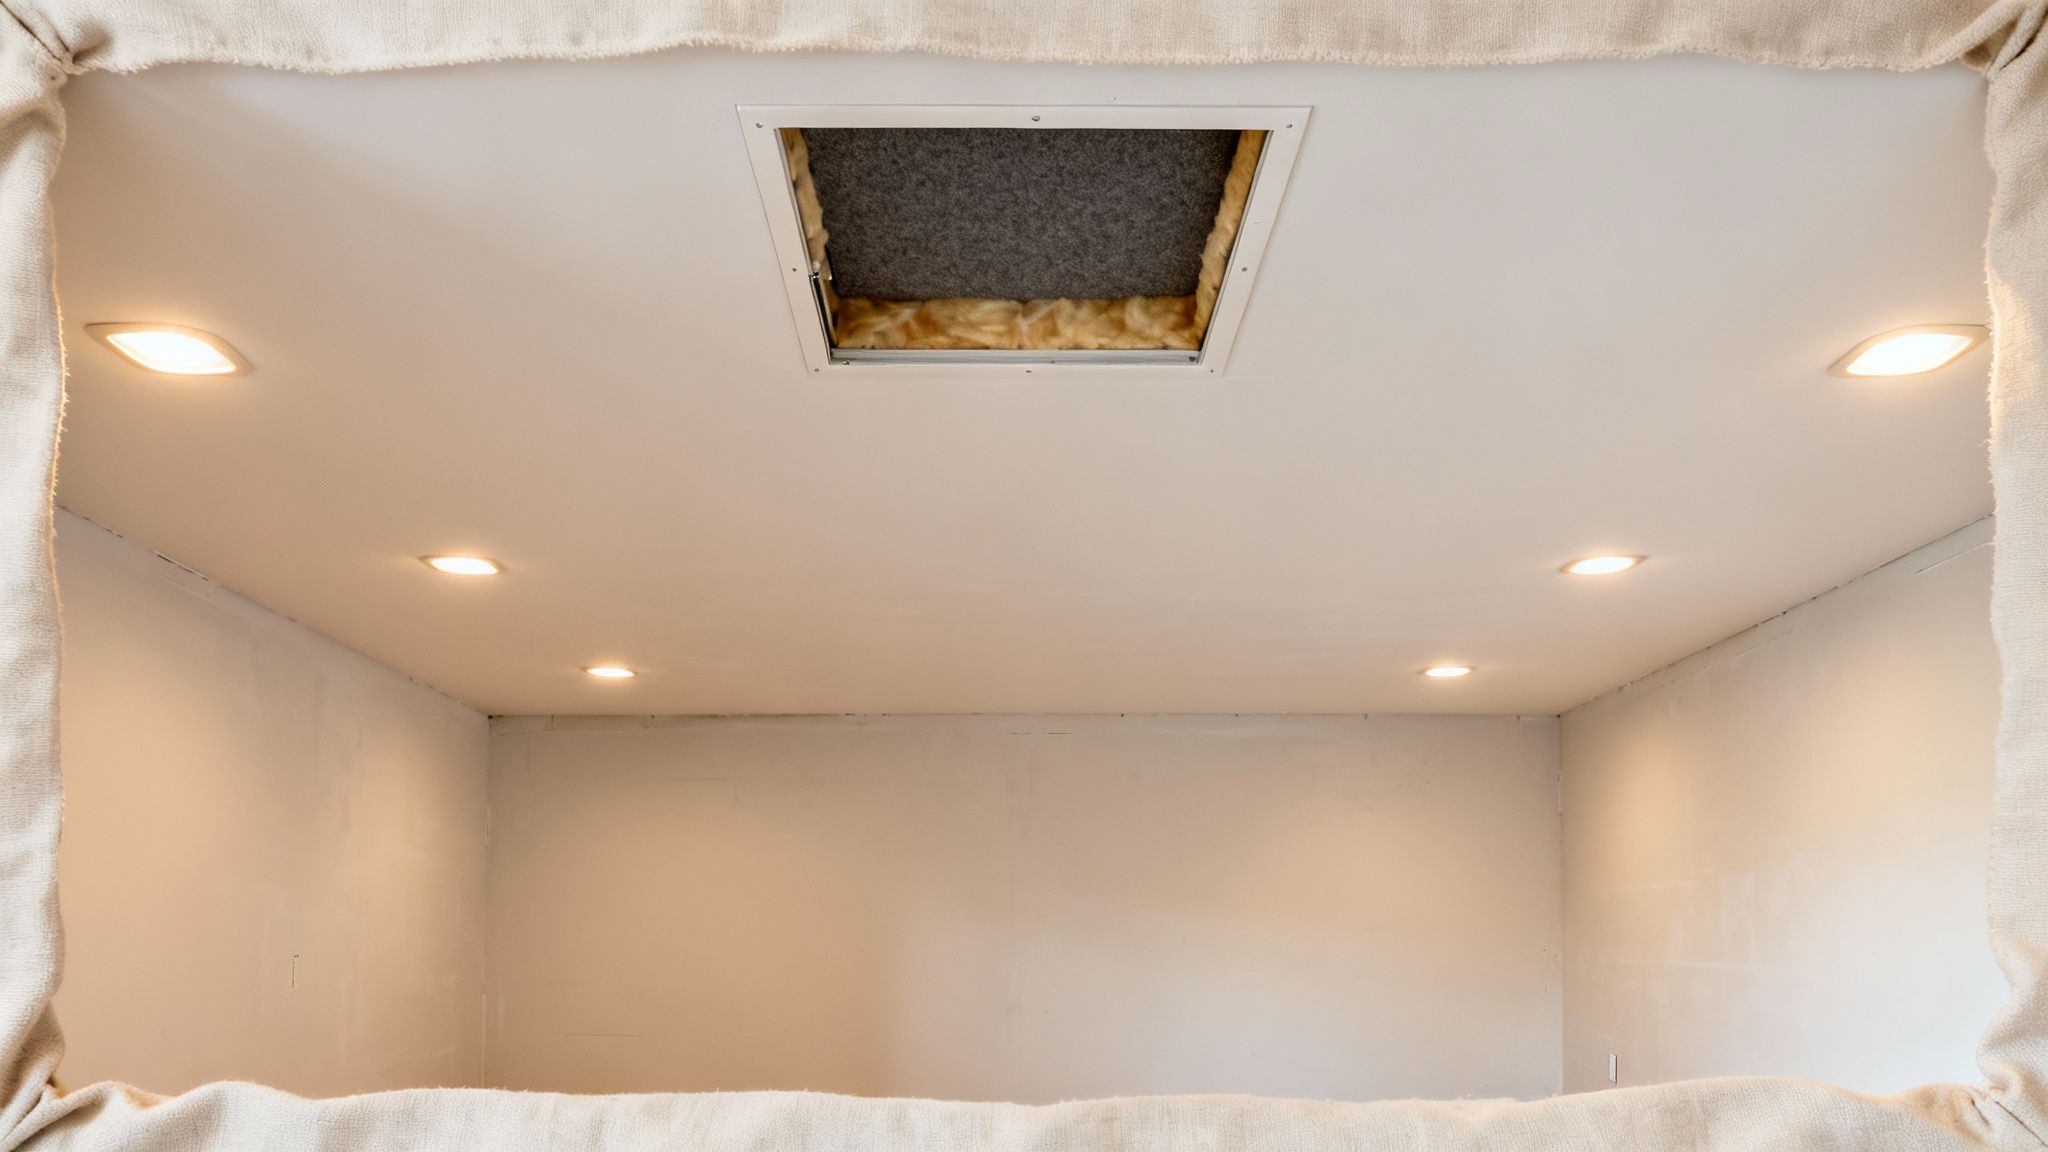
A smooth drywall ceiling is the classic backdrop for recessed lighting (you might know them as pot lights or can lights). They sit flush, giving you a super clean, modern look that saves every precious inch of headroom. Because they spread light so evenly, they're fantastic for making a basement with low ceilings feel much taller and more open. If you're leaning this way, our guide on how to install recessed lighting in a ceiling breaks down the whole process.
If you're going for an industrial or exposed joist look, track lighting is a fantastic, flexible option. You can mount the tracks right onto the joists and point the individual light heads wherever you need them—perfect for highlighting a dartboard, a piece of art, or a workbench.
Drop ceilings have their own clever lighting solutions. You can pop out a standard tile and replace it with an integrated LED light panel. These fit right into the grid and bathe the room in bright, even light, which is ideal for a home office or gym setup.
Creating a Quieter Home with Soundproofing
Footsteps from upstairs, the rumble of the furnace, or movie night in the basement home theater—sound has a way of traveling. Good soundproofing is what separates a truly peaceful home from a noisy one, and your basement ceiling is the front line in that battle.
Soundproofing isn't a luxury; it's an investment in your home's comfort. By reducing noise transfer between floors, you create separate, serene environments, allowing a lively basement gathering to coexist peacefully with a quiet upstairs.
Here are the most effective ways to soundproof your basement ceiling:
- Acoustic Ceiling Tiles: If you're installing a drop ceiling, make sure to look for tiles specifically made for sound absorption. They have a higher Noise Reduction Coefficient (NRC), which means they do a much better job of soaking up sounds within the room itself.
- Insulation: This is a big one. Stuffing the cavities between the joists with sound-dampening insulation makes a huge difference. Products like Rockwool Safe'n'Sound are dense and specifically engineered to absorb sound vibrations, not just provide thermal insulation.
- Resilient Channels: For those installing drywall, this is the professional's secret weapon. These are thin metal strips that you attach to the joists before the drywall goes up. The drywall then screws into the channels, not the joists, creating a tiny air gap that effectively disconnects it from the floor framing above. This simple separation stops vibrations from passing through.
A Few Common Questions We Hear About Basement Ceilings
No matter how well you plan your basement project, a few questions always pop up. It's totally normal. Getting these sorted out early can save you a ton of headaches and second-guessing later on.
Let's walk through some of the most common things people ask us when they're trying to pick the right ceiling finish. Think of this as your project FAQ.
What's the Best Way to Handle Low Ceilings?
If you're dealing with a low ceiling, every inch counts. Your best bet is to either paint everything exposed or go with a direct-mount drywall ceiling.
Painting the joists, pipes, and ductwork a single uniform color (black is a popular choice for that industrial loft vibe) tricks the eye and makes the space feel more open. Alternatively, attaching drywall directly to the joists gives you a clean, finished look without sacrificing precious headroom. You can then paint it a light color to really brighten the space and make it feel taller.
One thing to steer clear of with low ceilings is a traditional drop ceiling. The grid system alone will steal at least a few critical inches of height, which you just can't afford to lose.
How Do I Get to My Pipes if I Install Drywall?
This is a big one. A drywall ceiling looks fantastic and seamless, but it does hide all your plumbing and wiring. The solution is simpler than you might think: access panels.
These are purpose-built panels that install flush with the drywall surface. You can even paint them the same color as the ceiling, so they blend in and become nearly invisible. The trick is to be strategic. Before the drywall goes up, take a moment to map out crucial spots like main water shut-off valves or key electrical junctions. That way, you can place an access panel right where you'll need it most.
Is a Wood Ceiling a Good Idea for a Basement?
A beautiful wood ceiling, maybe with tongue-and-groove planks, can bring an incredible amount of warmth and character to a basement. It feels custom and high-end. But—and this is a big but—it’s only a good idea in a basement that is guaranteed to stay dry.
Wood and moisture are not friends. In a damp or even just humid environment, wood can warp, swell, or even rot over time. If you're going this route, you have to be absolutely sure your basement is properly waterproofed and has good airflow. It's definitely a bigger investment, but for the right basement, the visual payoff is huge.
Ready to turn that basement into a space you'll love? The team at Northpoint Construction has seen it all and can help you figure out the perfect ceiling for your home, from simple and clean drywall to custom woodwork. Contact us today to get your project started here in Orem or anywhere in Utah County.