

Basement finishing ceiling: basement finishing ceiling ideas, costs, and styles
When you're finishing a basement, the ceiling is way more than just an afterthought—it’s the fifth wall that ties the whole space together. Your choice here sets the tone for the room, dictating everything from its character and headroom to its everyday usability. It's what hides the plumbing, wrangles the wiring, and ultimately completes the look.
You really have three main routes you can go: the clean, seamless finish of drywall, the easy-access convenience of a drop ceiling, or the trendy, industrial vibe of an open-joist design.
Choosing The Right Basement Finishing Ceiling
For homeowners here in the Orem and Provo area, a finished basement is gold. It’s the perfect spot for a family room, home office, or guest suite. That's why picking the right ceiling is such a foundational decision. This isn't just about looks; it has a huge impact on your lighting, acoustics, and any future maintenance you might need to do. Things like your current ceiling height, the potential for moisture, and your budget will all point you toward the best fit.
This simple decision tree can help you visualize which path makes the most sense based on what you value most.
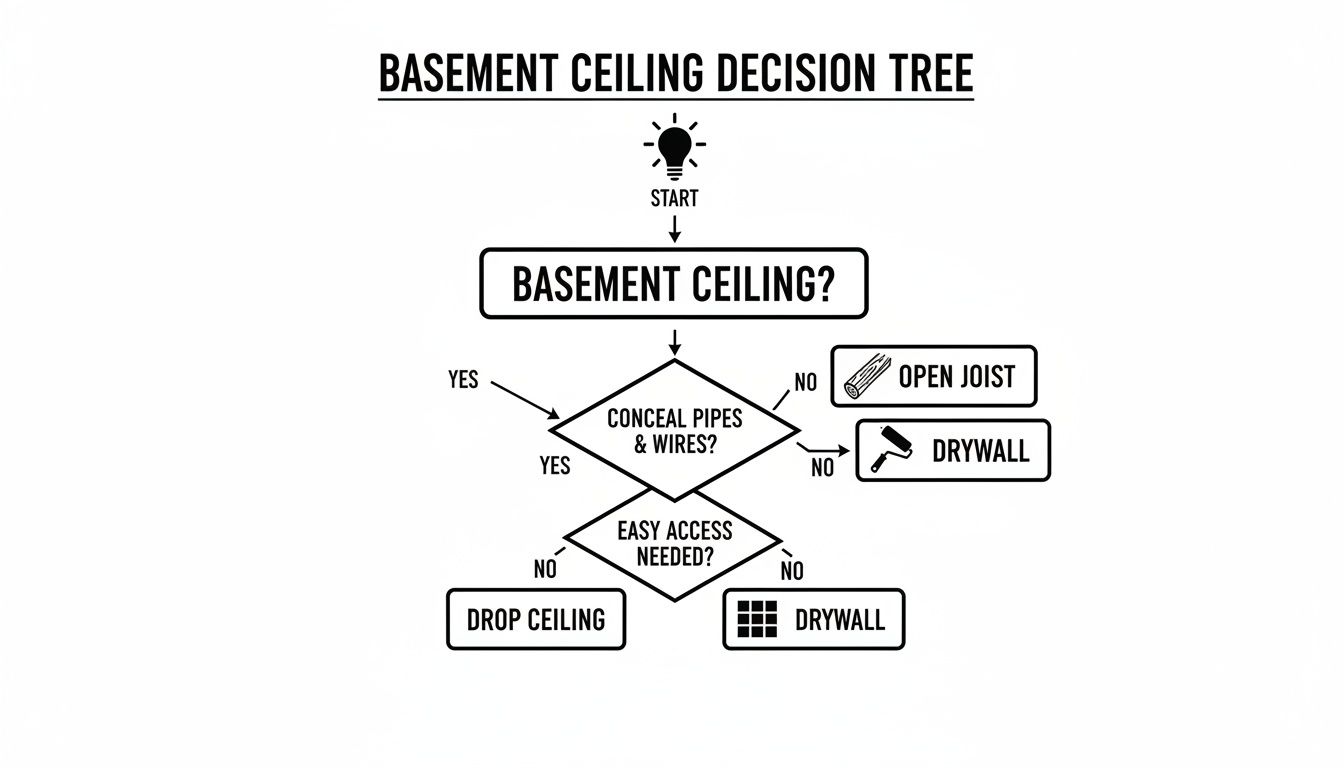
As you can see, drywall is all about that seamless, "finished" look. Drop ceilings, on the other hand, are built for practicality and access. And if you’re after an industrial or modern-rustic style, leaving the joists exposed is the way to go.
Understanding Your Primary Goals
Before you start pricing out materials, take a minute to figure out what you really need from your ceiling. Is the top priority a polished, "upstairs-quality" finish? Or is having easy access to plumbing shut-offs and electrical junction boxes a non-negotiable?
- Aesthetics: If you want your basement to feel like a natural extension of your home, nothing beats drywall. It creates a smooth, continuous surface that makes the space feel truly finished.
- Functionality: If your basement ceiling is a maze of critical plumbing and wiring, a suspended or drop ceiling is your best friend. It gives you unbeatable access for future repairs without ever having to break out a sledgehammer.
- Headroom: Working with a lower-than-average ceiling? Painting the joists and everything between them a single, uniform color can create a clever illusion of height and openness.
This push for more livable space is a big deal. The global basement finishing market is expected to hit a staggering USD 43.2 billion by 2033. That growth is fueled by homeowners just like you who are looking to add real value and function to their properties. And since every finished basement needs a ceiling, the demand for both materials and skilled contractors is climbing, especially in booming markets like Utah’s Wasatch Front.
If you're looking to pair your new ceiling with great lighting, this comprehensive guide to LED lighting installation is a fantastic resource for planning out modern, efficient options.
Comparing The Top 3 Basement Ceiling Options
When you start thinking about finishing your basement ceiling, you'll find that three options pop up again and again. Each has its own personality, offering a different mix of style, function, and cost. The best one for your Orem or Provo home really comes down to what you want to achieve with the space.
Let's break down the big three: classic drywall, the super-practical suspended ceiling, and the trendy open-joist look.
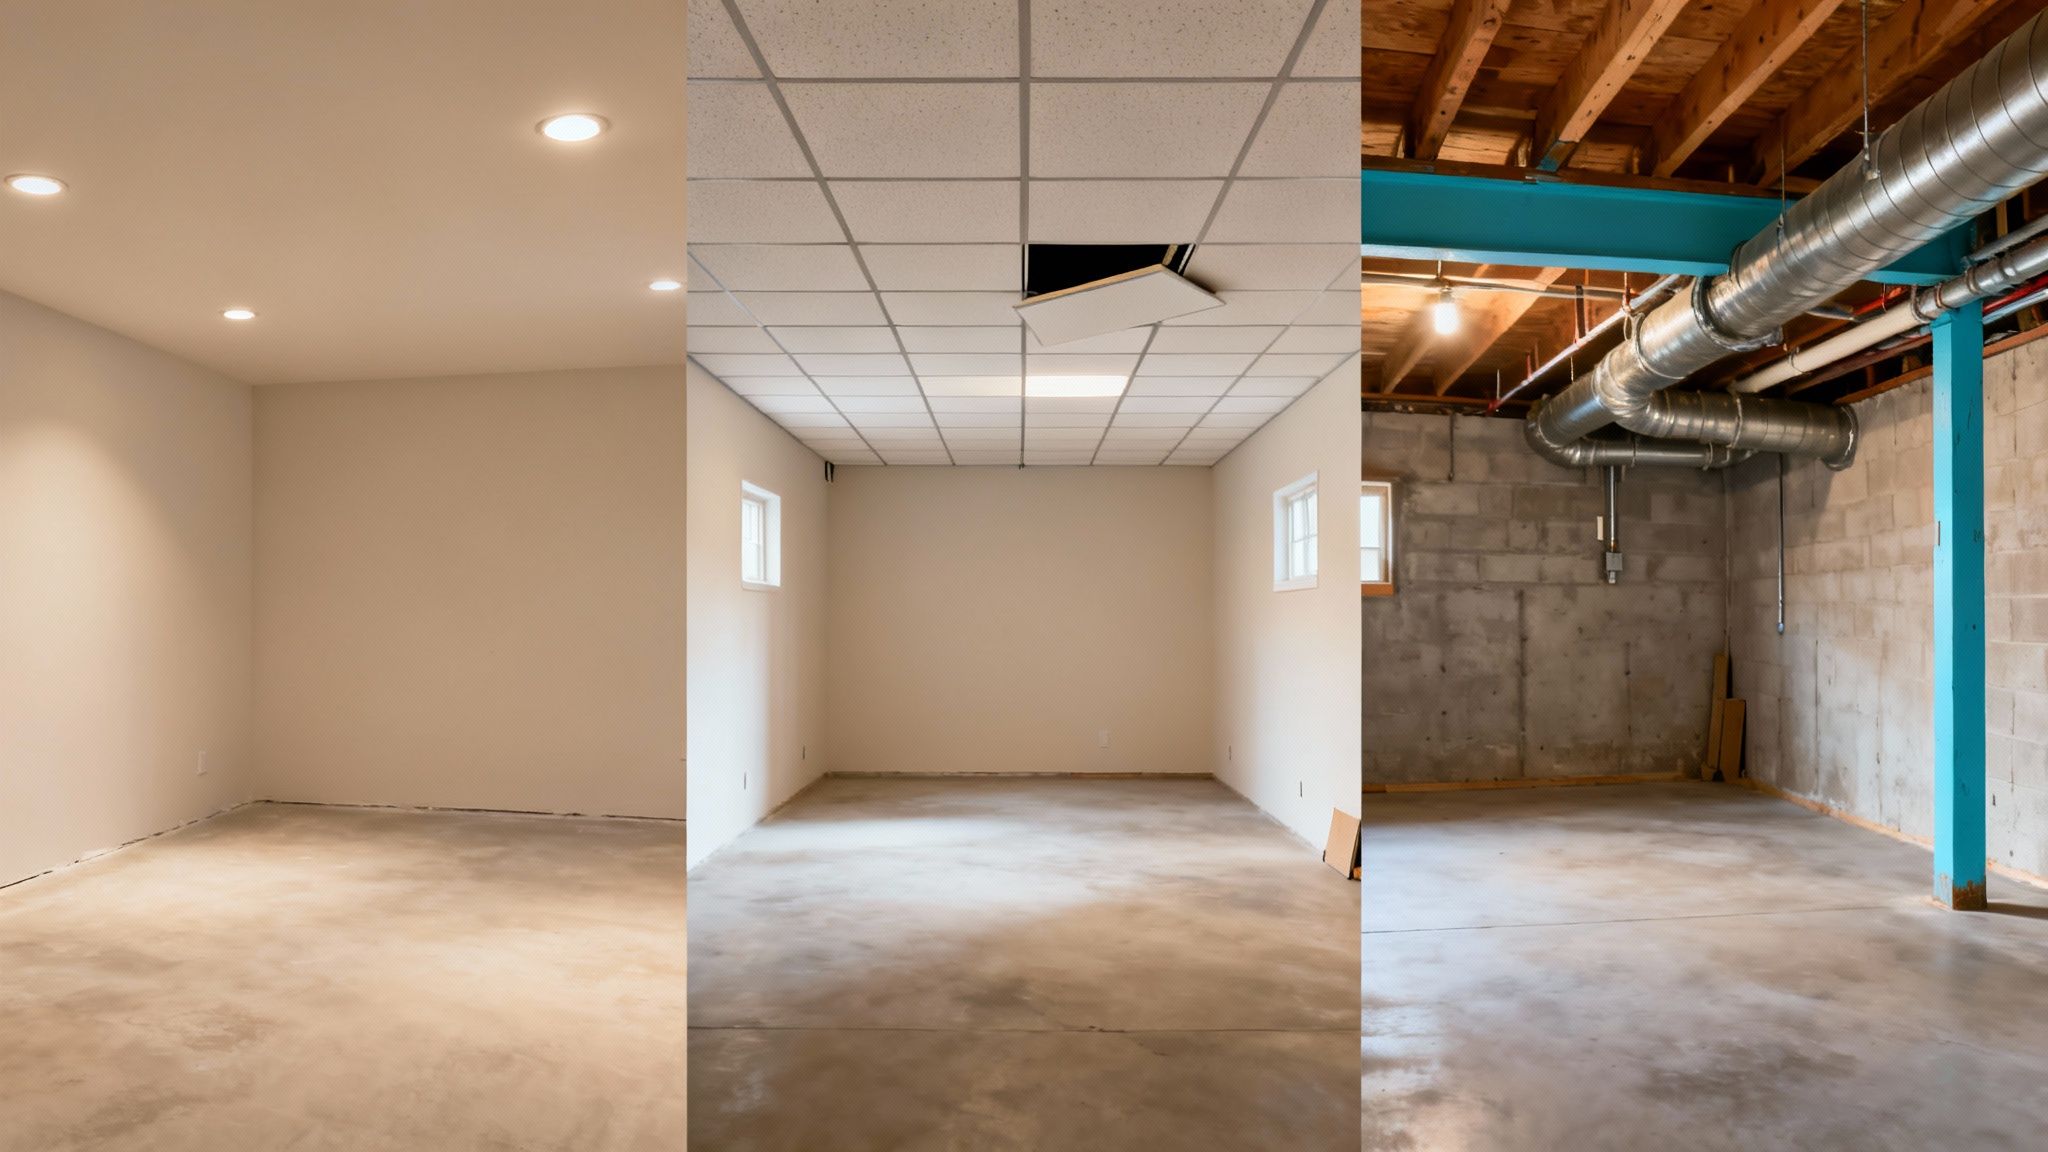
Option 1: The Seamless Finish of Drywall
If you want your basement to feel less like a basement and more like a seamless extension of your upstairs living space, drywall is the gold standard. It gives you a smooth, solid surface that completely hides away all the joists, pipes, and wiring. This creates that polished, "finished" look that feels high-end and intentional.
But that beautiful finish comes with a catch: accessibility. If you ever have a plumbing leak or need an electrician to run a new wire, you’ll have to cut into that perfect ceiling. Repairing it is a whole process—cutting, patching, mudding, sanding, and repainting. It's a real headache for what might be a simple fix.
The Big Trade-Off: With drywall, you're choosing a top-tier aesthetic over easy access later on. It’s perfect for creating a premium feel, as long as you’re prepared for more disruptive repairs if the need ever arises.
Option 2: The Ultimate Practicality of a Suspended Ceiling
Most people know this as a "drop ceiling." It’s a simple system: a lightweight metal grid hangs from the joists above, and finished tiles are simply dropped into place. The killer feature here is unbeatable access. Got a leaky pipe? Just pop a tile out, make the repair, and pop it right back in. No mess, no demolition.
This makes it a go-to choice for basements, where so much of a home's mechanical guts are located. And don't worry, we're not stuck with the old-school office look anymore. Modern tiles come in a huge variety of styles, including designs that mimic wood, tin, and other decorative finishes.
The main downsides are a bit of lost headroom—you'll typically give up 3 to 6 inches—and the visible grid lines, which some homeowners just can't get past if they're aiming for a completely smooth look.
Option 3: The Modern Vibe of an Open Ceiling
Lately, the industrial, loft-style look has become a really popular choice. The idea is to leave all the joists, ductwork, and pipes exposed and then paint everything—and I mean everything—a single, uniform color. Black, dark gray, or white are the most common choices.
This approach works wonders for making a low basement feel much taller and more open. It adds a ton of architectural character to a space that might otherwise feel a bit plain. The main things to consider are sound (there's no solid barrier to muffle noise from upstairs) and dust, which can collect on all those exposed surfaces. It's also a very specific aesthetic that has to fit the overall style of your home.
Basement Ceiling Options At A Glance
To make the decision a little easier, it helps to see the key differences side-by-side. Think about what matters most to you—looks, access, or height—and see which option lines up best.
| Aesthetics | Polished, seamless, traditional | Functional, gridded appearance | Industrial, modern, spacious |
| Accessibility | Very poor; requires demolition | Excellent; simply lift tiles | Fully accessible but not hidden |
| Headroom Loss | Minimal (about 1/2 inch) | Moderate (3-6 inches) | None; can increase perceived height |
| DIY Friendliness | Difficult to finish perfectly | High; very DIY-friendly | Moderate; requires extensive prep |
| Best For | Home theaters, guest suites | Utility rooms, workshops | Low ceilings, modern designs |
Ultimately, there’s no single "best" ceiling, only the one that’s best for your project, your budget, and your long-term needs.
How Much Does a Basement Ceiling Cost?
Figuring out the cost of a new basement ceiling is the first real step in setting a practical budget. But here’s the thing: the final price isn't just about the materials you pick. It's a blend of labor, the complexity of your space, and all the little details that come up along the way. Think of it like buying a car—the sticker price for the base model is one thing, but adding the sunroof, leather seats, and upgraded stereo changes the final number pretty quickly.
Let's dig into the typical costs per square foot for the most common ceiling options we see here in the Orem and Provo areas. These numbers include both materials and professional installation, so they should give you a solid ballpark figure to start with.
Estimated Costs by Ceiling Type
- Painted Open Joists: This is almost always the most budget-friendly path forward, usually running $2 to $6 per square foot. The cost is nearly all labor—the time it takes to properly clean, prep, and spray all the joists, pipes, and ductwork.
- Suspended (Drop) Ceilings: A standard drop ceiling will typically land somewhere between $4 and $10 per square foot. Your basic acoustic tiles are on the lower end of that range, while fancier decorative or moisture-resistant tiles will push the price toward the higher end.
- Drywall Ceilings: Because it's the most labor-intensive option, drywall is also the most expensive, generally ranging from $5 to $12 per square foot. The painstaking work of hanging, taping, mudding, and sanding to get that seamless finish takes a lot of skill and time.
These figures are a great starting point, but they don't tell the whole story. To get a much sharper estimate for your entire project, check out our basement finishing cost calculator. It can give you a more detailed breakdown based on the specifics of your home.
Hidden Factors That Can Affect Your Budget
That price-per-square-foot number is only part of the equation. Every basement has its own quirks, and the unique layout and condition of yours will absolutely introduce variables that can add to the total cost. It's so important to get ahead of these potential expenses to avoid any sticker shock later on.
Key Takeaway: The biggest variable is almost always the complexity of your basement's existing infrastructure. A simple, wide-open rectangle is always going to be cheaper to finish than a space chopped up by low-hanging ductwork and plumbing runs.
Here are a few of the most common "hidden" costs to keep on your radar:
- Soffits and Bulkheads: Got some low-hanging ductwork or pipes? Your contractor will need to build soffits (essentially framed boxes) to conceal them before the ceiling goes in. This adds a surprising amount of labor and material costs.
- Electrical and HVAC Work: Putting in new recessed lighting, moving wires, or shifting HVAC vents around requires licensed pros. This work is almost always billed separately from the ceiling installation itself.
- Prep Work: If you’re painting the joists, they might need some serious cleaning first. Or maybe the subfloor above needs a few repairs. This kind of prep adds to the labor hours on the invoice.
- DIY vs. Professional: You can definitely save money on labor by doing it yourself, but be careful. A botched drywall job or a crooked drop ceiling grid can cost more to fix than it would have to just hire a pro from the start, wiping out any savings you thought you had.
Technical Details You Can't Afford To Ignore
It’s easy to get caught up in the look of your new basement ceiling, but if it isn't safe, compliant, and built for the unique environment of a basement, all that beauty is for nothing. The technical details are what really protect your investment. Skipping over these essentials can lead to failed inspections, expensive do-overs, and a space that’s just plain uncomfortable.
Let's walk through the absolute non-negotiables.

Building Codes and Ceiling Height
Before you even think about buying materials, you have to get familiar with local building codes. Here in Orem and Provo, the city has specific rules for finished basements designed to make sure they're safe and truly livable. One of the biggest hurdles is often ceiling height.
Most codes require a minimum finished ceiling height of 7 feet across the main living areas of the basement. This one rule makes a huge difference, turning a space that could feel like a cave into one that feels open and welcoming. Getting this right is critical, and our guide on basement ceiling height requirements gets into the nitty-gritty of what you need to know.
Another big one is fire-blocking. This means installing fire-resistant materials—like solid wood blocks or specific types of insulation—inside concealed spaces to slow down a fire if the worst should happen. It's a non-negotiable safety feature, and believe me, inspectors look for it.
Moisture Management and Material Choices
Basements are, by their very nature, damp. This isn't a maybe; it's a certainty. That means choosing your materials isn't just a style decision—it's a critical part of building a space that lasts. Using the same stuff you'd use upstairs is a surefire recipe for mold, mildew, and rot.
A basement is a below-grade environment, which means you're fighting a constant battle against potential humidity and water vapor. Choosing the right materials isn't an upgrade; it’s a necessity for a healthy, long-lasting space.
To stay ahead of moisture problems, you need to use materials built for the job:
- Moisture-Resistant Drywall: Often called "green board" or "purple board," this type of drywall has a special coating that actively inhibits mold growth. It's the standard for any below-grade finishing.
- Acoustic Tiles: If you’re going with a drop ceiling, make sure the tiles are rated for high-humidity areas. Many modern tiles give you both moisture resistance and sound control in one package.
- Metal Components: For a suspended ceiling grid, always use galvanized steel or aluminum. They won't rust or corrode when the air gets damp.
Insulation for Sound and Thermal Control
The right insulation in your basement ceiling joists does double duty. First, it’s a thermal barrier. It helps keep your new space comfortable year-round—warmer in the winter, cooler in the summer—which can make a real dent in your energy bills by easing the load on your HVAC system.
Second, and just as important, it's fantastic for soundproofing. By packing insulation between the joists, you can dramatically cut down on the noise traveling between the basement and the main floor. This is a game-changer if you’re dreaming of a home theater, a playroom for the kids, or a quiet office where you can actually focus. Materials like mineral wool and rock wool are top choices because they are excellent at dampening sound.
This need for functionality is a huge market driver. The U.S. ceiling tiles market, valued at USD 2.08 billion in 2023, is expected to jump to USD 3.88 billion by 2030. A lot of that growth is coming from basement remodels where homeowners want better acoustics and easy utility access, making suspended systems incredibly popular. You can see more data on this growing market and its trends.
DIY Installation vs. Hiring a Professional
You’ve picked out the perfect ceiling for your basement. That’s a huge decision! But now comes the next big question: Are you going to install it yourself, or is it time to call in the pros?
This is the point where a lot of homeowners in Orem and Provo hit the pause button. It’s a classic showdown between the pride (and potential savings) of a DIY job and the speed and expertise of a professional contractor. The right answer really comes down to the ceiling you chose, your own comfort level with tools, and how quickly you want the job done.
Some basement ceiling projects are absolutely perfect for the weekend warrior. If you've decided on a suspended or drop ceiling, that's a very doable DIY project for anyone who can confidently measure, level, and make precise cuts. Painting an open-joist ceiling is another great DIY option—it's mostly about taking your time and being thorough with the prep work.
On the other hand, some ceilings require a level of skill that you just can't get from watching a few online videos. Drywall is the perfect example. Hanging the heavy sheets is one thing, but getting that flawless, smooth finish is a true art. Taping, mudding, and sanding without leaving behind any tell-tale seams or tool marks is incredibly tough for a beginner. A bad drywall finish can make even the most expensive basement renovation feel cheap.
When to Call in the Pros
Bringing in an experienced contractor to handle your basement ceiling gives you one thing you can't buy at a hardware store: peace of mind. Professionals don't just show up with a truck full of tools; they bring years of on-the-job experience that makes them incredibly efficient.
Here’s what you’re really paying for when you hire a pro:
- Code Compliance, Guaranteed: A professional knows the local Orem and Provo building codes inside and out. They’ll make sure everything from fire-blocking to electrical box placement is done right, so you don't have any nasty surprises during an inspection.
- A Flawless Finish: With materials like drywall, a pro is the difference between an "okay" job and a stunning, professionally polished ceiling that looks like it’s always been there.
- Getting Your Time Back: A project that could consume all your weekends for a month might only take a professional crew a few days to knock out.
- Warranty and Accountability: Good contractors stand behind their work. If something goes wrong down the road, you have a warranty to lean on. That’s a safety net you just don't get when you're on your own.
The Bottom Line: Any money you think you're saving with DIY can vanish in a heartbeat if you end up having to pay a pro to come in and fix mistakes. It's smart to weigh the upfront cost of hiring a contractor against the potential cost—and major headache—of a project that goes sideways.
Thinking About the DIY Route?
If you’re still leaning toward tackling this yourself, it’s time for an honest gut check. A great DIY result depends on having the right skills, the right tools, and, maybe most importantly, enough time to see it through without cutting corners.
For a drop ceiling, you'll need to get comfortable with the basics. A clean, professional-looking grid starts with knowing how to handle the materials, including skills like properly cutting ceiling tiles.
If you're managing a bigger project and want more guidance, check out our guide on DIY basement remodeling for some helpful planning tips. In the end, whether you hire a pro or do it yourself, the goal is the same: a beautiful, safe, and functional ceiling that completes your new living space.
Answering Your Top Basement Ceiling Questions
Finishing a basement is a big undertaking, and we've found that the ceiling is often where homeowners have the most questions. It makes sense—it’s a huge surface that ties the whole room together, affecting everything from the overall vibe to your budget. Let's tackle some of the most common questions we hear from folks right here in the Orem and Provo areas.
What's the Most Affordable Way to Finish a Basement Ceiling?
For a truly budget-conscious project, the open ceiling is almost always the winner. We’re talking about cleaning up all the exposed joists, pipes, and ductwork and then spraying everything one solid color. Think black, white, or a dark gray—it creates a cool, industrial loft vibe and gives you every last inch of headroom.
The savings come from using very few materials, mostly just primer and a lot of paint. Keep in mind, though, that the prep work can be a real beast. If you're looking for a more traditional finished look, a basic suspended ceiling with standard acoustic tiles is usually the next most affordable route for a basement finishing ceiling.
My Basement Ceiling is Low. How Can I Make It Feel Taller?
This is the classic basement dilemma! Making a low ceiling feel higher is all about creating an illusion. The painted open-joist ceiling we just mentioned is fantastic for this because it literally removes the lower ceiling plane, drawing your eye up into the rafters.
If you’d rather have a smooth, finished look, here are a few tricks of the trade:
- Go Light with Paint: A crisp white or a paint color that's a shade or two lighter than your walls will make the ceiling feel like it's floating away.
- Rethink Your Lighting: Stick with recessed lighting (often called can lights). They sit flush with the ceiling, so there's nothing hanging down to visually shrink the space.
- Pick the Right Tiles: If you go with a drop ceiling, choose simple, flat tiles. Heavily textured or patterned tiles can make a ceiling feel lower and busier.
It's amazing what the right paint and lighting can do. You can trick the eye into seeing more space than is actually there, making even a standard 7-foot basement feel surprisingly open and airy.
Do I Really Need Special Materials for a Basement Ceiling?
Yes, you absolutely do. This is one area where you can't cut corners. Basements are below ground, which means they're naturally more humid and susceptible to moisture issues. Using the same materials you would upstairs is just asking for trouble with mold and mildew down the road.
It's crucial to use products made for this kind of environment. That means choosing mold- and moisture-resistant drywall (you might hear it called "green board" or "purple board") and picking acoustic tiles specifically rated for basements. If you're putting in a suspended ceiling, double-check that the metal grid system is galvanized so it won't rust.
Ready to turn that dark basement into a bright, beautiful living space? The team at Northpoint Construction has been helping Utah homeowners do just that for years. We can walk you through all the options and make sure the job is done right. Visit us online to schedule your consultation today!