
Basement finishing on a budget: smart DIY tips
Finishing your basement without breaking the bank is totally doable, but it all comes down to smart planning and a willingness to put in some sweat equity. The secret isn't just about finding cheap materials; it’s about creating a functional layout, knowing where to spend and where to save, and making a strategic call on what you can DIY versus what needs a pro.
A successful project begins long before you pick up a hammer. It starts with a rock-solid, realistic plan.
Your Blueprint For a Budget-Friendly Basement
I’ve seen it a hundred times: the most expensive renovation mistakes happen when the planning phase is rushed. Think of your plan as your single most important tool for keeping costs in check. It's what separates a project that becomes a financial black hole from one that adds genuine value and comfort to your home.
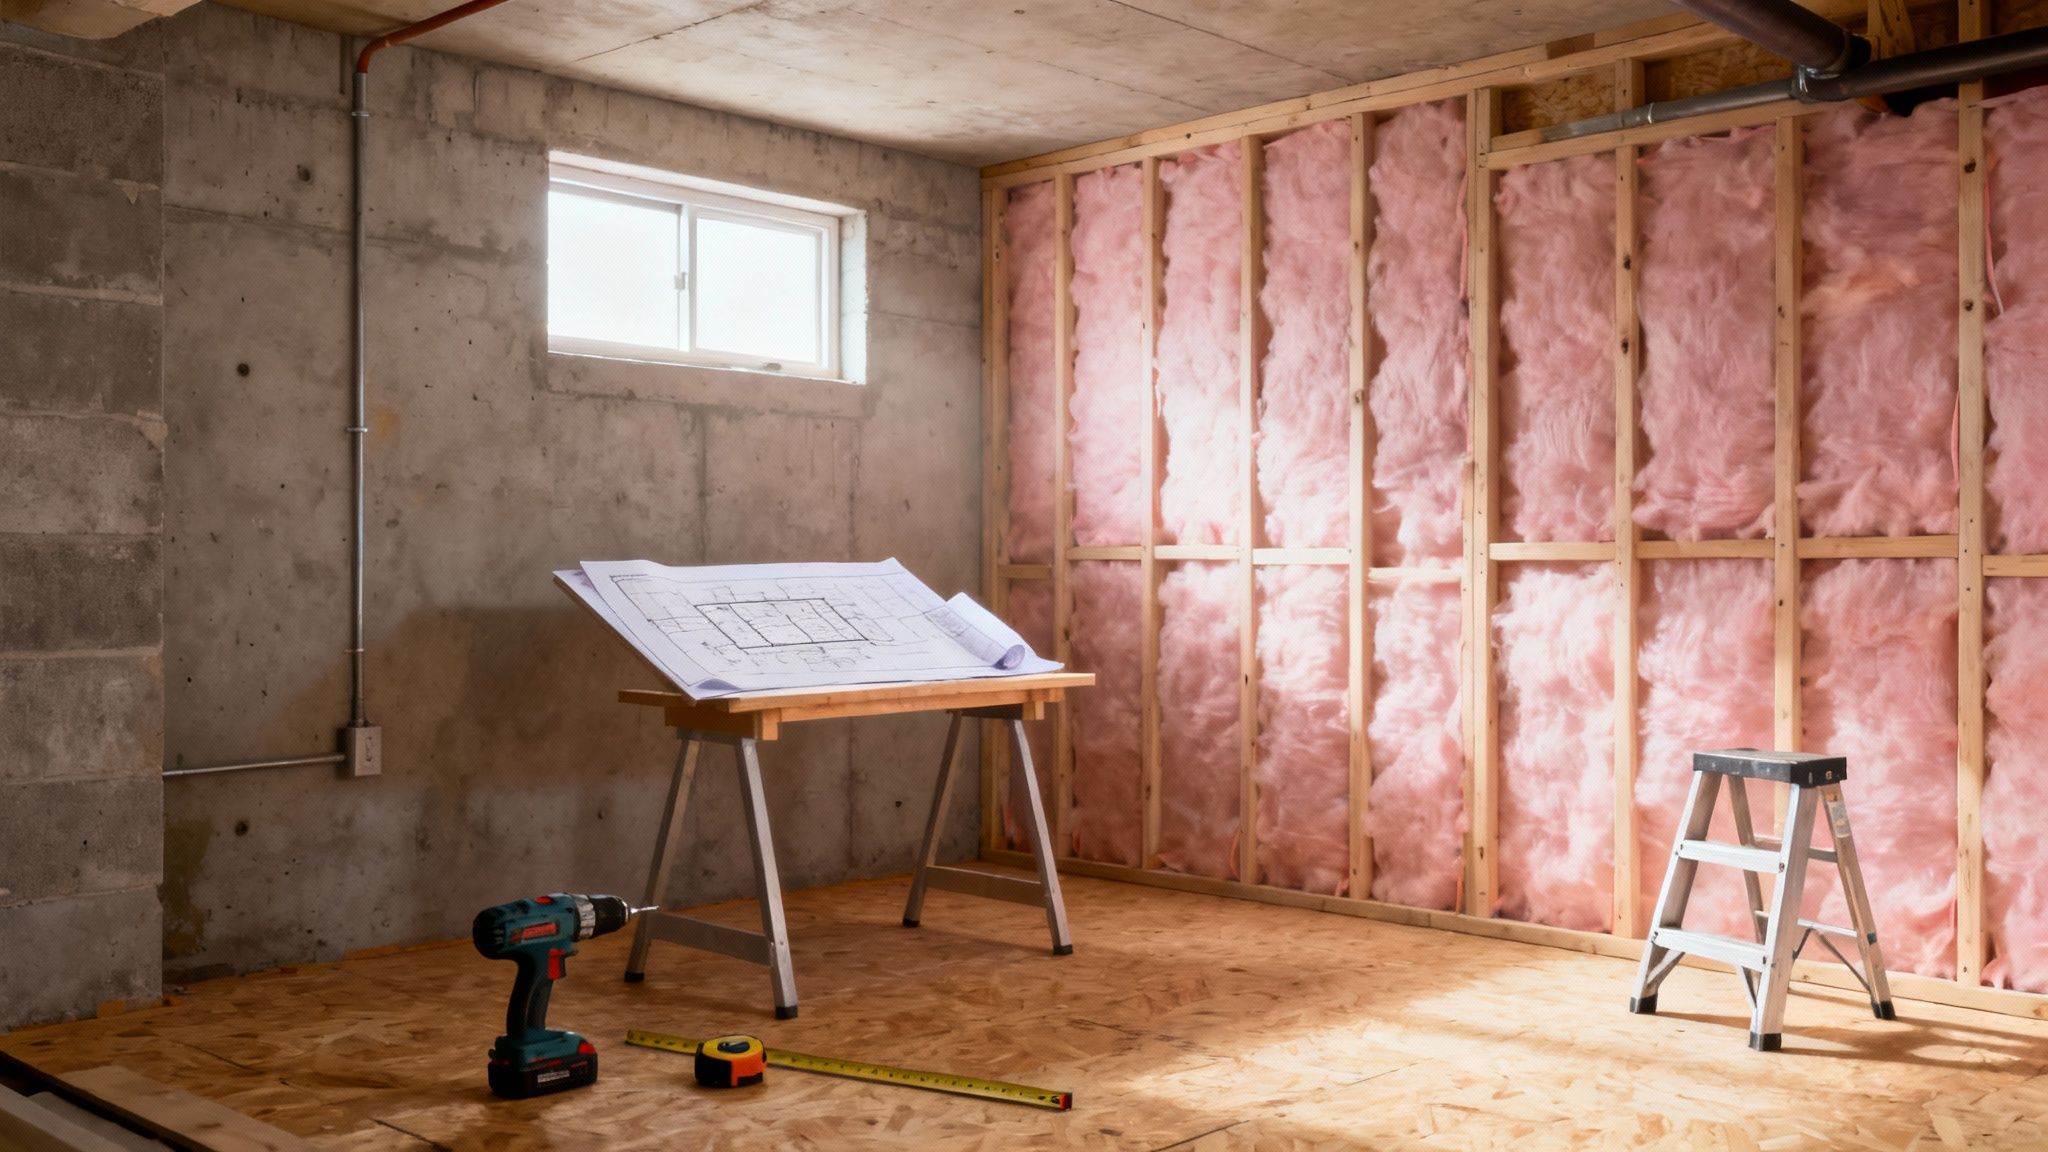
Before you start pinning design ideas on Pinterest, you need to get brutally honest with your existing space. Grab a good flashlight, a notepad, and walk through the entire basement with a critical eye. You're looking for any underlying issues that absolutely must be fixed before you even think about putting up walls.
Pay close attention to these areas:
- Moisture Intrusion: See any dark stains on the concrete? Smell a persistent musty odor? Notice a white, chalky powder on the walls (that’s efflorescence)? These are all tell-tale signs of water problems that need a solution first.
- Foundation Cracks: Tiny hairline cracks are usually just the house settling. But if you see wider gaps, horizontal cracks, or stair-step patterns in the concrete blocks, it’s time to call a structural engineer. Don't cover up a potentially serious problem.
- Ceiling Height and Obstructions: Pull out a tape measure. In most Utah communities, you need a minimum ceiling height of 7 feet for a space to be considered habitable. Make a note of all the ductwork, plumbing lines, and support posts you'll have to frame around.
Creating a Realistic Financial Plan
Once you have a clear picture of the space and its challenges, you can start building a budget. This isn't about guessing; understanding effective construction budget management is the key to staying on track.
For a typical 1,000-square-foot basement, homeowners in the U.S. can expect to spend somewhere between $7,000 and $23,000. Keep in mind that labor often eats up about 40% of that total, which is where DIY can make a huge difference. Initial costs like permits ($1,200 to $2,000) and necessary waterproofing ($1,900 to $6,500) can take a big bite out of the budget right from the start.
This simple process—assess, budget, permit—is the foundation of a successful project.
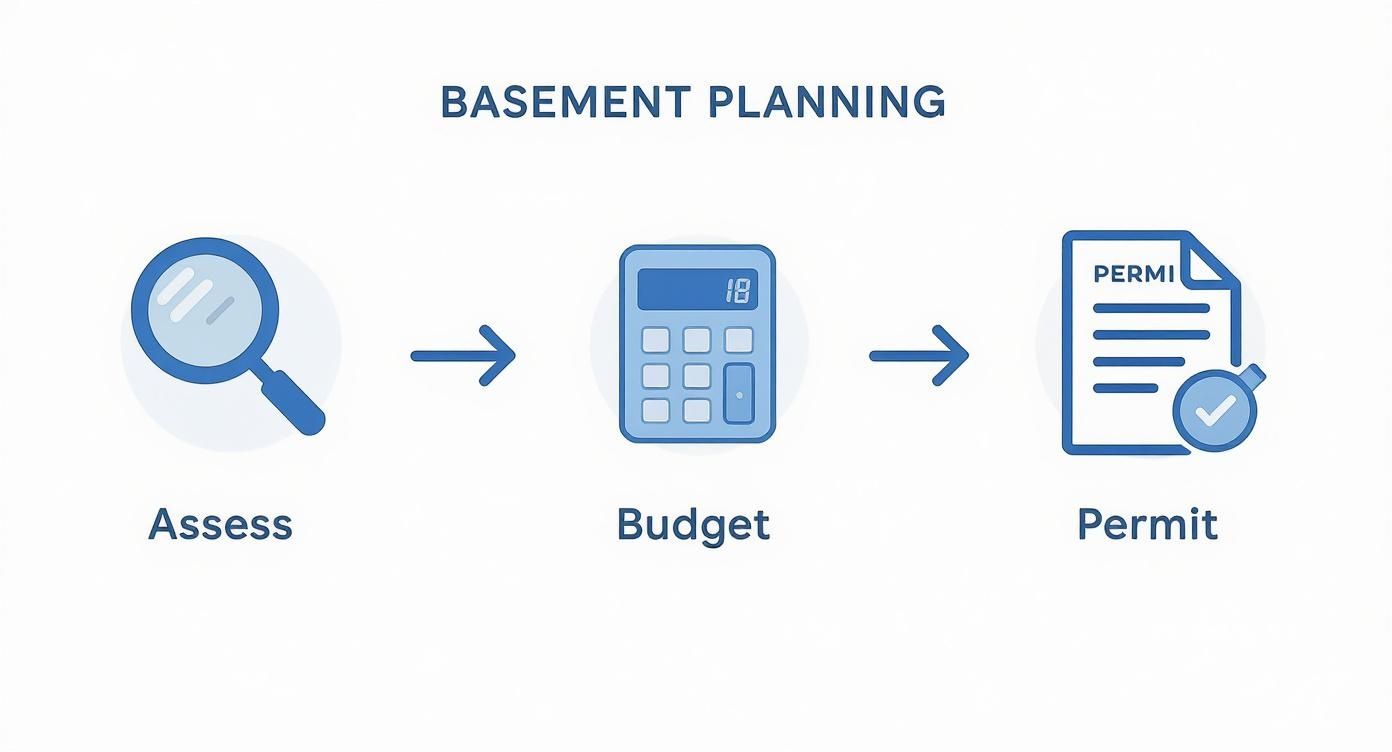
Tackling these steps in order ensures you don't get ahead of yourself and start building on a shaky foundation, both literally and financially.
To help you visualize where the money goes, here's a rough breakdown of costs. This table provides a clearer picture of the investment required for a standard basement project.
Budget Breakdown for a 1000 sq. ft. Basement Finish
| Permits & Inspections | $1,200 | $2,000 | $0 (Non-negotiable) |
| Waterproofing | $1,900 | $6,500 | Minimal (Pro recommended) |
| Framing & Lumber | $1,500 | $2,500 | 80-100% |
| Electrical & HVAC | $1,800 | $4,000 | 0-10% (Pro required) |
| Insulation | $800 | $1,500 | 90-100% |
| Drywall & Finishing | $2,000 | $3,500 | 50-70% (Taping is tricky) |
| Flooring | $2,000 | $5,000 | 90-100% (LVP, carpet) |
| Doors & Trim | $1,000 | $2,000 | 100% |
| Paint & Primer | $600 | $1,200 | 100% |
| Lighting Fixtures | $400 | $1,500 | 100% |
Remember, these are just estimates. Your material choices and local labor rates will make a big difference, but this gives you a solid starting point for your own budget.
Navigating Permits and Local Codes
Tempted to skip the permit process to save a few hundred bucks? Don’t do it. This is easily one of the most expensive mistakes you can make in the long run. The permit ensures your project is safe, up to code, and properly inspected.
A project without a permit can lead to hefty fines, orders to tear out all your hard work, and massive headaches when you eventually try to sell your home. It’s a classic case of being penny-wise and pound-foolish.
Your first stop should be your local city or county building department. For those of us in Utah County, cities like Provo and Orem have this information right on their websites. They'll give you a checklist of everything you need, which usually includes:
- A detailed floor plan showing dimensions, window/door locations, and where smoke detectors will go.
- An electrical plan outlining outlets, switches, and lighting fixtures.
- Proof that you're meeting egress requirements—meaning you have a window or door large enough to serve as an emergency exit from sleeping areas.
Getting that permit approved is your official green light. With a solid plan, a realistic budget, and the city's blessing, you’re finally ready to start turning that concrete box into a valuable part of your home.
Mastering Moisture Control and Insulation
Before you even think about framing a single wall, we need to talk about the two most critical elements of any basement project: moisture and insulation. Get this part wrong, and you're setting yourself up for a world of expensive headaches down the road. Trust me, dealing with mold, musty smells, and ruined drywall is a nightmare you want to avoid.
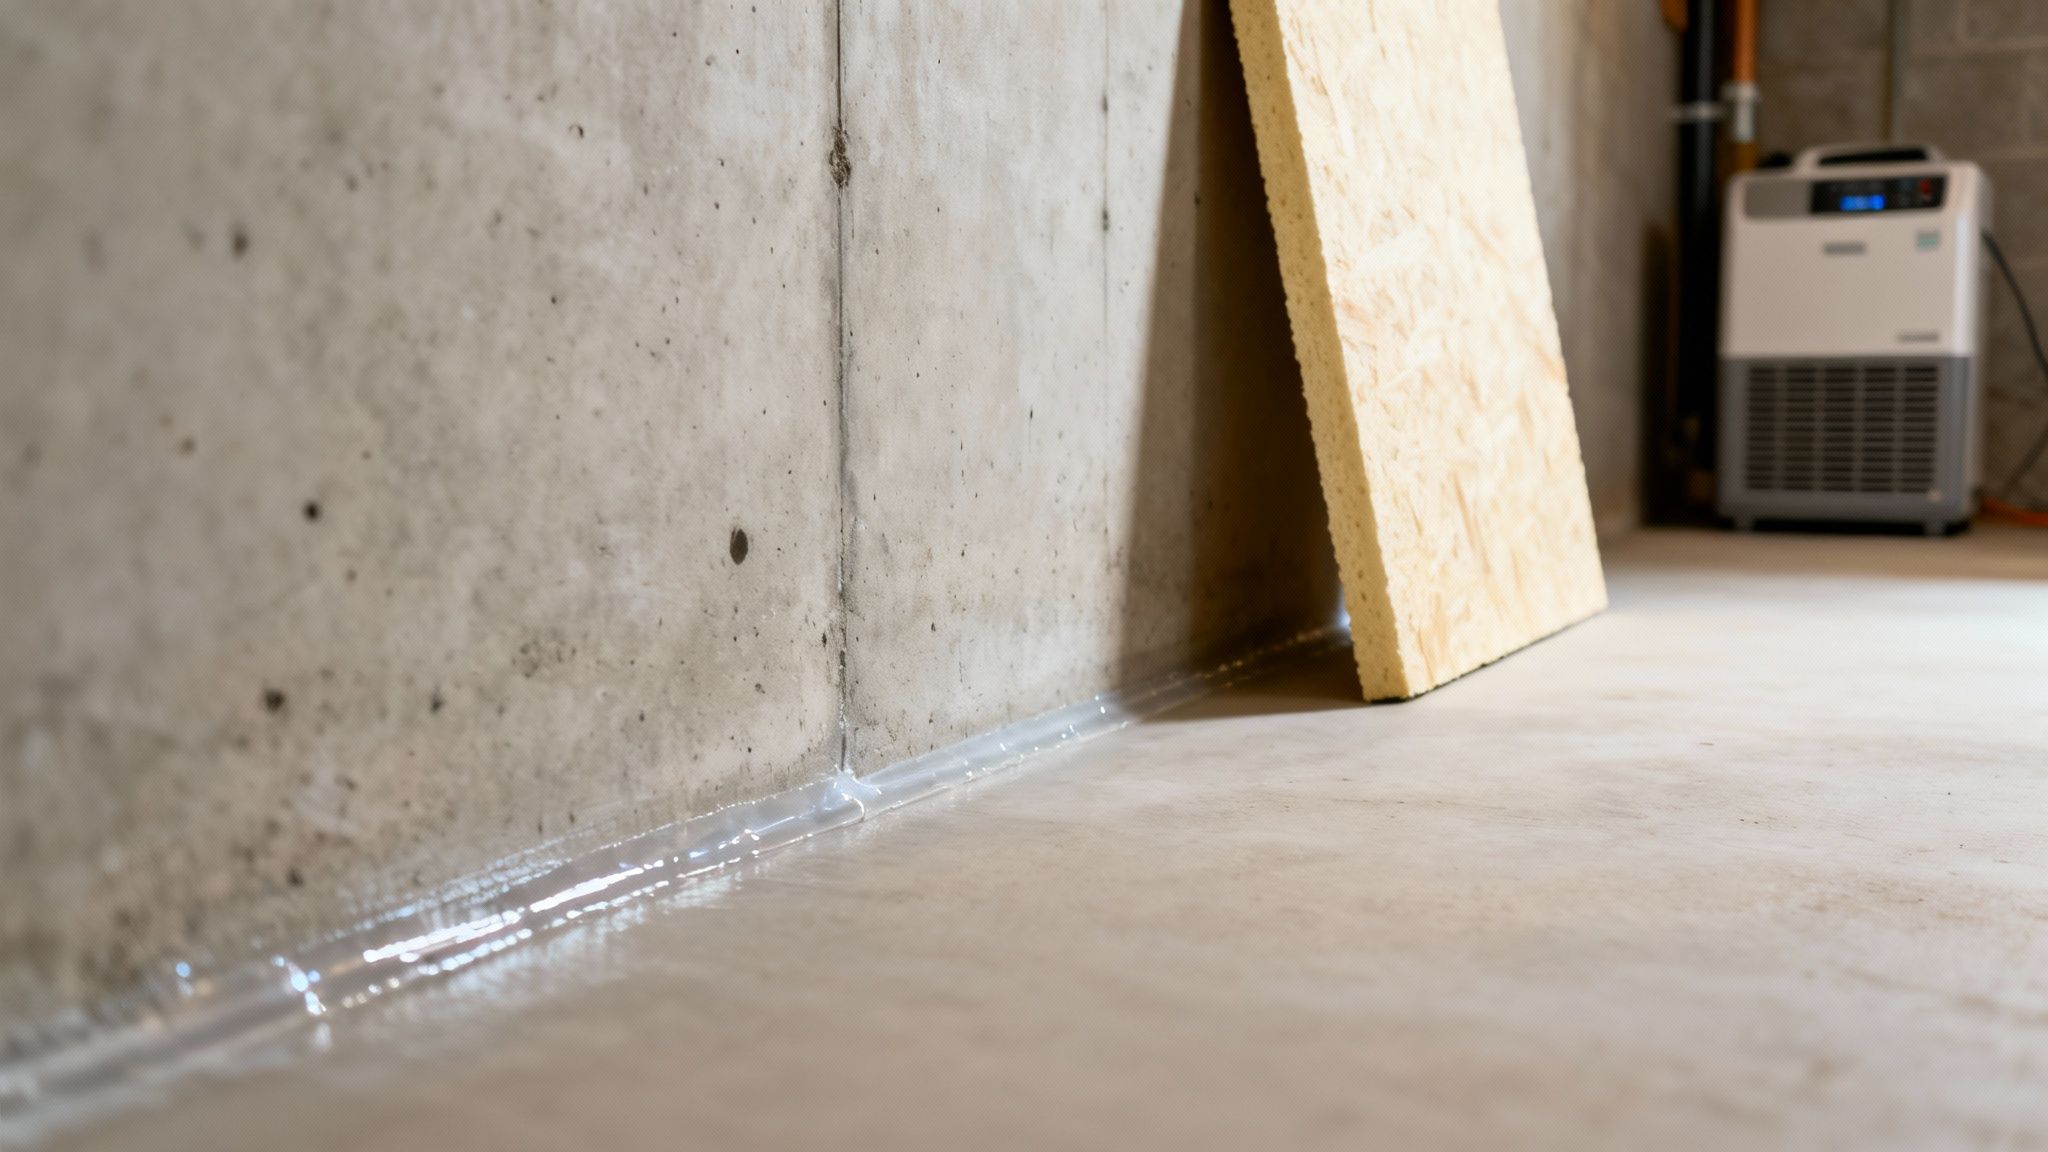
Your first line of defense isn't inside the basement—it's outside. Most water issues start with how water behaves around your foundation. Before you buy a single tube of sealant, take a walk around your house. Ensuring you have effective foundation drainage and grading is the most important step you can take.
Check your gutters and make sure your downspouts are dumping water at least four to six feet away from the house. Look at the dirt and landscaping; does it slope away from your foundation? If not, you may need to do some regrading. You’d be amazed how often fixing these simple exterior issues solves 90% of water problems without costing a fortune.
Sealing From the Inside Out
With the outside handled, it's time to create a barrier on the interior concrete walls to block any lingering water vapor.
Don't just grab a can of paint that says "waterproof" on it. That's a temporary fix at best. You need a dedicated masonry waterproofer or a cementitious sealant that’s designed to bond with and seal the concrete itself.
To get it right, prep work is key:
- Scrub the Walls: Get a stiff wire brush and remove any dirt, dust, or that chalky white powder called efflorescence.
- Fill Any Cracks: Use a hydraulic cement or an epoxy injection kit to patch any hairline cracks you find.
- Apply Two Thick Coats: This is not a one-and-done job. Roll on the sealant as directed, let it dry, and then apply a second coat. Don't skip this—the second coat is your real insurance policy.
If you want to get into the nitty-gritty, you can find a more detailed walkthrough right here: https://buildnp.com/blogs/how-to-waterproof-basement-walls/.
Choosing Budget-Friendly Insulation
Once you're confident the space will stay dry, you can insulate. This is what will make your basement feel like a real part of the home and not a chilly dungeon. It also makes a big difference in your energy bills.
Pro Tip: Your two best friends for insulating a basement are Expanded Polystyrene (EPS) and Extruded Polystyrene (XPS) rigid foam boards. They give you a thermal break and a vapor barrier all in one shot, and they won’t get ruined if they ever get damp.
These foam boards are perfect because they don’t absorb moisture, unlike fiberglass batts. You just glue them directly to the clean concrete walls with a compatible foam board adhesive. Once they're up, you can build your 2x4 stud walls right in front of them.
Now, that doesn't mean fiberglass insulation is out. It’s still a fantastic, low-cost way to boost your R-value. Just never put it directly against the concrete. Instead, after your foam board is up and your walls are framed, you can fill the stud cavities with inexpensive fiberglass batts. This hybrid method gives you the best of both worlds: the moisture resistance of foam and the low cost of fiberglass.
Smart Framing and Drywall Strategies That Save
This is the part of the project where things get really exciting. Once the framing and drywall go up, your basement sheds its concrete shell and finally starts looking like a collection of actual rooms. But this is also where material and labor costs can sneak up on you, so a bit of smart planning goes a long way.
One of the best money-saving tricks I've learned is to design your layout with standard material sizes in mind. A sheet of drywall is 4x8 feet, and framing lumber comes in common lengths like 8, 10, or 12 feet. If you plan your room dimensions in multiples of these numbers, you dramatically cut down on waste. Fewer cuts mean less scrap heading to the dumpster and less time spent on the saw.
Efficient Framing for Uneven Floors
Let's be honest: basement floors are almost never perfectly level. When you start putting up your walls, you're bound to find gaps under the bottom plate. The secret is to build your walls straight and true first, and then deal with the uneven floor.
Here's a simple and effective way to tackle it:
- Build On the Ground: Assemble your wall frames flat on the floor. It's much faster and helps you ensure every corner is perfectly square.
- Stand and Shim: Once a wall is built, lift it into place and grab your level. Use it to get the wall perfectly plumb (that’s vertically straight). You'll then slide durable composite or pressure-treated wood shims into the gaps between the concrete and the bottom 2x4 plate.
- Secure Firmly: With the wall plumb and shimmed, nail the top plate to the ceiling joists. Then, use a powder-actuated nailer or concrete screws to fasten the shimmed bottom plate securely to the floor.
Following this process guarantees your walls are perfectly straight, which makes hanging the drywall a million times easier. And don't forget to frame around any existing ductwork or pipes. Building soffits or "boxes" to hide them is far, far cheaper than paying to relocate your HVAC or plumbing.
Making Smart Choices with Drywall
Drywall isn't a one-size-fits-all product. For most of your walls and ceilings, standard 1/2-inch drywall will do the job just fine. But there are a couple of key spots where a small upgrade is a very wise investment.
Any area with potential moisture—think a bathroom or even a small laundry nook—demands moisture-resistant drywall. It's often called "green board." It costs a little more per sheet, but trust me, it's cheap insurance against dealing with mold and water damage down the road.
The real skill with drywall isn't hanging it; it's the finishing. Taping and mudding the seams to get that perfectly smooth, invisible finish is an art that takes a lot of practice. This is often the stage where a DIY project starts to look… well, like a DIY project.
You can definitely learn to do it yourself, but many homeowners find that hiring a pro just for the taping and mudding is money very well spent. A good drywall finisher can make an entire basement look flawless in a couple of days, leaving you with a surface that’s ready for primer. For a deeper look at what to expect, our guide breaks down the cost of drywalling a basement.
Remember that labor is a huge piece of the puzzle. While materials are a big ticket item, labor often eats up 40% of the total budget, making it the largest single cost. For perspective, professional framing can run between $7 and $16 per square foot, while drywall installation typically costs $1.50 to $3 per square foot. These numbers can change depending on where you live and how complex your project is, so always get a few local quotes. To see a more detailed cost analysis, Norman Builders provides a helpful breakdown.
Affordable Flooring and Ceiling Ideas
The flooring and ceiling are, without a doubt, the two surfaces that can completely change the character of a basement. Get them right, and you transform a concrete bunker into a cozy, inviting part of your home. The best part? When you're finishing a basement on a budget, smart choices here deliver the biggest visual punch for your dollar.
Forget about what you'd install upstairs, like traditional hardwood. Down below, the game is all about moisture resistance and durability. Thankfully, modern materials let you have both without sacrificing style.
High-Impact Budget Flooring Options
These days, the market is flooded with great-looking, DIY-friendly flooring that can handle the unique challenges of a below-grade environment. The trick is to pick something that won’t warp, grow mold, or fall apart if it gets a little damp.
Here are my top recommendations for a tough and budget-friendly basement floor:
- Luxury Vinyl Plank (LVP): This is the undisputed king of basement flooring for good reason. LVP is 100% waterproof, incredibly tough against scratches and scuffs, and most products use a click-lock system that makes installation a surprisingly simple weekend project.
- Water-Resistant Laminate: A close second to LVP, today's laminate floors offer stunningly realistic wood looks for less money. The key is to specifically buy a product rated for high moisture resistance, as standard laminate will swell and ruin if it gets wet.
- Polished or Painted Concrete: Don't overlook the floor that's already there! You can seal and polish your existing concrete slab for a sleek, industrial vibe at a minimal cost. Another great route is to use high-quality epoxy floor paint, which adds color and creates a durable, seamless surface that’s a breeze to clean.
To help you weigh your options, I've put together a quick comparison of the most common budget-friendly materials. For a deeper dive, you can learn more about the best basement flooring options to see what really fits your home and lifestyle.
Flooring & Ceiling Options Cost vs. Benefit Analysis
This table breaks down the most popular budget-friendly choices to help you decide where to invest your money based on cost, durability, and how easy they are to install yourself.
| Luxury Vinyl Plank (LVP) | $2.50 - $5.00 | Excellent | High |
| Water-Resistant Laminate | $2.00 - $4.00 | Good | High |
| Painted/Sealed Concrete | $1.00 - $3.00 | Excellent | Moderate |
| Carpet Tiles | $1.50 - $4.00 | Poor to Fair | High |
Ultimately, LVP often provides the best all-around value for basements, but a well-executed painted concrete floor can deliver a stunning modern look for the absolute lowest cost.
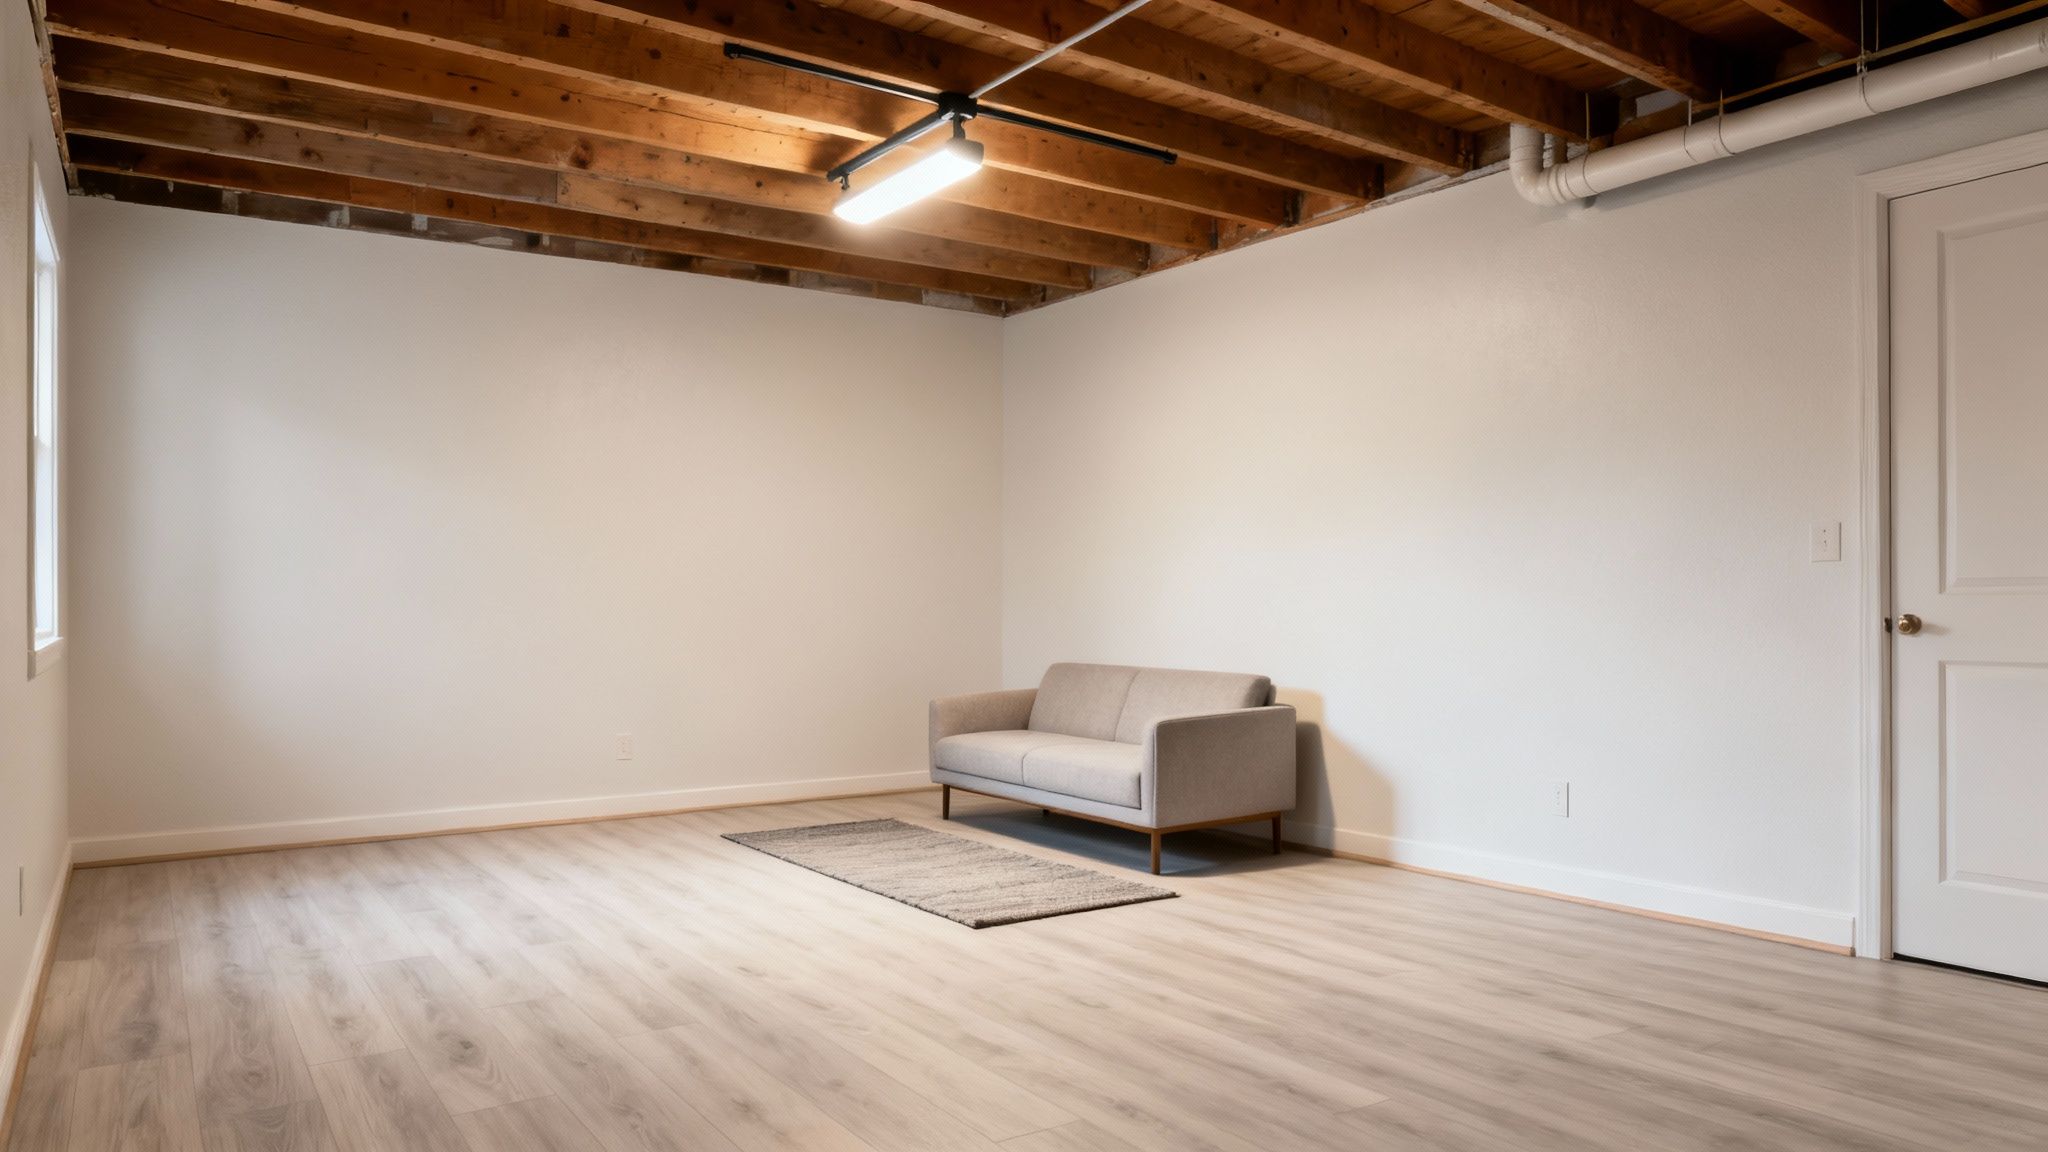
Creative and Cost-Effective Ceiling Solutions
Hiding the maze of ductwork, wiring, and plumbing in your ceiling can eat up a huge chunk of your budget. A standard drywall ceiling is a clean look, but it's a ton of work and makes getting to those pipes or wires later a massive headache.
Think beyond drywall. The smartest budget ceiling solutions either embrace the basement's industrial character or prioritize easy access, saving you money upfront and major headaches down the road.
A modern drop ceiling is a fantastic, practical solution. Forget those dingy, stained tiles from your old school's library. Today's suspended ceiling systems offer clean, stylish panels that look fantastic and let you pop a tile out in seconds when you need to run a new cable or fix a leak.
Even better for your wallet is the industrial-style painted ceiling. This is the ultimate budget hack. You simply spray everything—the joists, pipes, ducts, and the subfloor above—a single, uniform color like black or dark gray. The dark color makes all the "stuff" visually recede, creating an illusion of height and a cool, urban-loft feel. It’s a high-impact look for little more than the cost of a paint sprayer rental and a few gallons of paint.
Making Your Basement Bright and Comfortable Without Breaking the Bank
Let's talk about the two things that truly make a basement feel like part of your home: good lighting and comfortable air. It’s easy to think these will blow your budget, but with some smart planning around your electrical and HVAC, you can create a bright, cozy space for a lot less than you might expect.
Great basement lighting is all about creating layers. The go-to for many is a grid of recessed can lights, but that's often the most expensive route. It means a ton of wiring, complex installation, and a hefty bill from the electrician. A layered approach is not only cheaper but often looks better and feels more intentional.
I always suggest starting with modern track lighting. It's a fantastic budget-saver because you can run multiple, aimable lights from a single electrical box. This gives you the power to spotlight a game table, wash a feature wall with light, or brighten up a dark corner—all without the cost and hassle of wiring individual fixtures.
A Smarter, Cheaper Lighting Plan
Once you have a base layer of track lighting, you can fill in the gaps with other fixtures to create that warm, inviting feel. This is where you can get creative and save a lot of money.
- Wall Sconces: These are great for adding a bit of style and softer, ambient light. You can find options that don't require fishing new wires through the ceiling, which is a big win.
- Floor and Table Lamps: You can't beat lamps for flexibility. They're the ultimate plug-and-play solution, letting you change the entire mood of a room without calling an electrician.
This mix-and-match strategy gives you a much more dynamic and interesting result than a flat ceiling of can lights, and you’ll likely save hundreds in labor and material costs.
Know Where to Draw the Line with DIY Electrical
I get it. When you're trying to save money, the temptation to do everything yourself is strong. But electrical work is the one area where you absolutely cannot cut corners.
My Strongest Advice: You must hire a licensed electrician. They are the only ones who can legally and safely tie your new basement circuits into the main panel and sign off on the permit. This is non-negotiable for safety and for passing your inspection.
That said, there's still room for you to save on labor costs. Talk to your electrician first, but most are fine with homeowners doing the prep work. This can include:
Laying out where all your outlets, switches, and fixtures will go.
Drilling the holes through the studs for the wires to pass through.
Pulling the actual Romex wire from each box back toward the main panel.
By handling this "grunt work," you're paying the electrician for their expertise, not for their time doing basic labor. Just make sure you get their blessing on your plan before you start.
Smart Ways to Heat and Cool Your New Space
Heating and cooling the basement doesn't have to mean a whole separate, expensive system. The simplest and most affordable route is usually just tapping into what you already have. An HVAC pro can often extend the ductwork from your existing furnace and AC unit right into your new rooms, as long as your system has the capacity to handle the extra square footage.
If extending ducts isn't a good option, your next best bet is a ductless mini-split system. These things are amazing. They're super-efficient and give you independent temperature control for the basement. While they cost more upfront than adding a few vents, they can save you real money on utility bills over the long run, making them a wise investment for your finished space.
When to DIY and When to Hire a Pro
The biggest budget question you'll face is deciding where your own sweat equity can make the most impact. Doing the work yourself is hands-down the best way to slash costs, but you have to be brutally honest about your own limits. The last thing you want is to spend your time and money on a mistake that a professional has to tear out and fix anyway.
Take a good, hard look at your skills, the tools you own (or can borrow), and how much free time you realistically have. Things like painting, laying modern click-lock flooring, and installing baseboards are fantastic DIY projects. They're forgiving, don't require a workshop full of specialized tools, and can save you thousands of dollars.
Tasks Best Left to the Professionals
On the other hand, some jobs are simply not worth the risk. When it comes to your home's major systems, it's time to call in the pros. No exceptions.
- Licensed Electricians: For your family's safety and to pass inspection, a professional absolutely must be the one to tie new circuits into your main electrical panel. Bad wiring isn't just a code violation; it's a massive fire hazard.
- Plumbers: Cutting into main drain lines or running new water pipes requires a pro's touch to prevent catastrophic leaks, sewer gas issues, and ensure everything slopes correctly.
- HVAC Technicians: Extending your home's ductwork isn't as simple as it looks. A technician needs to calculate airflow and system load to make sure your new basement space is comfortable without making your upstairs rooms freeze or swelter.
I've seen it time and again: homeowners try to save a few hundred bucks on licensed trades, only to fail inspection and end up with a huge, hazardous mess. Budget for these experts from day one. It’s the smartest money you'll spend on the entire project.
The Financial Payoff of a Well-Executed Project
Whether you do it all yourself or hire out the whole thing, finishing your basement is almost always a solid financial move. On average, homeowners can expect to get back up to 70% of what they put into the project when they sell their house.
Considering that labor can eat up anywhere from 10% to 40% of the total project cost, every single task you can handle yourself directly pads your pocket and boosts that return on investment. The National Association of Realtors consistently ranks basement remodels as a high-value project. If you want to dive deeper, you can explore more data on basement finishing costs to see how the numbers shake out across the country.
So where's the sweet spot? A hybrid approach often works best. You can hire a crew for the framing and drywall—the "bones" of the room that really benefit from a practiced hand for a flawless finish. Then, you can step in and take over the painting, flooring, and trim work. This gives you a professional-grade foundation while still letting you save a bundle on the finishing touches.
Common Questions About Finishing a Basement on a Budget
When you start looking into finishing your basement, a ton of questions pop up, especially when you're trying to watch every penny. Let's tackle some of the most common ones we hear from homeowners.
So, What's a Realistic Budget for a Basement Finish?
This is the big one, right? For a typical 1,000-square-foot basement where you're rolling up your sleeves and doing most of the work, a realistic price tag falls somewhere between $7,000 and $15,000.
Of course, that number can swing based on a few key things:
- Permits: You can't skip these. Depending on your city, they can run anywhere from a few hundred bucks to over a thousand.
- Egress Window: Planning on a legal bedroom down there? You'll need an egress window. This is a big-ticket item, often costing between $2,500 and $5,000.
- Hiring Pros: Bringing in an electrician or a plumber will be your biggest cost after materials. Drywall finishing is another area where many people choose to hire out for a pro-level look.
Can I Actually Do This Myself?
You absolutely can, but you have to be honest about your skills and your patience. A lot of the work is perfect for a determined DIYer. Things like laying down LVP flooring, painting, and installing baseboards are fantastic ways to save a ton of cash.
But some jobs are non-negotiable—leave them to the licensed pros. This means any work inside your main electrical panel, cutting into main plumbing lines, or making major changes to your furnace and ductwork. Trying to tackle these yourself isn't just risky; it's a recipe for failed inspections and major safety hazards.
The smartest way to finish a basement on a budget is almost always a hybrid approach. You handle the jobs you're comfortable with and hire out for the critical trades. You still build a ton of sweat equity but get the peace of mind that the important stuff is done right.
What's the Absolute Cheapest Way to Get a Finished Basement?
If "cheap" is the name of the game, think industrial-chic. Instead of covering the concrete floor, clean it and seal it with a high-quality epoxy or concrete paint. It's durable and surprisingly stylish.
For the ceiling, forget drywall. Paint everything—the joists, pipes, and ductwork—a single dark color like black or charcoal gray. This makes the ceiling visually recede and creates a cool, modern, open-loft vibe. This minimalist strategy slashes costs by avoiding the two biggest material and labor expenses: flooring and ceilings.
Ready to transform your basement without the stress? The expert team at Northpoint Construction specializes in creating beautiful, functional living spaces that fit your budget. From initial planning to the final touches, we ensure a professional finish that adds lasting value to your home. Contact us today for a consultation