
Home Theater Basement Ideas: Create a Stunning Entertainment Space
That underutilized basement holds incredible potential. It's not just extra storage; it's a blank canvas waiting to become the heart of your home's entertainment. With its natural sound insulation and light control, a basement is the perfect setting for a dedicated home theater. But where do you begin? Transforming this space involves more than just a big screen and comfy chairs. It requires a thoughtful blend of design, technology, and construction know-how to achieve a truly immersive experience.
This guide explores 10 transformative home theater basement ideas, moving beyond the basics to give you actionable insights for creating a space that rivals a commercial cinema. We'll cover everything from foundational room preparation and acoustic treatments to advanced audio-visual systems and smart home integration. You will learn how to implement specific concepts like tiered stadium seating for perfect sightlines, immersive Dolby Atmos surround sound, and integrated smart controls that set the scene with a single touch.
We'll also dive into the practical details that make a significant difference, including dedicated equipment closets, strategic ambient lighting, and hidden in-wall infrastructure for a clean, professional finish. Whether you're planning a complete renovation or looking to upgrade an existing setup, these concepts will provide the inspiration and practical steps needed to bring your cinematic vision to life. Our goal is to ensure every movie night is an unforgettable event, turning your basement from an afterthought into a premier destination for entertainment.
1. Tiered Stadium Seating Layout
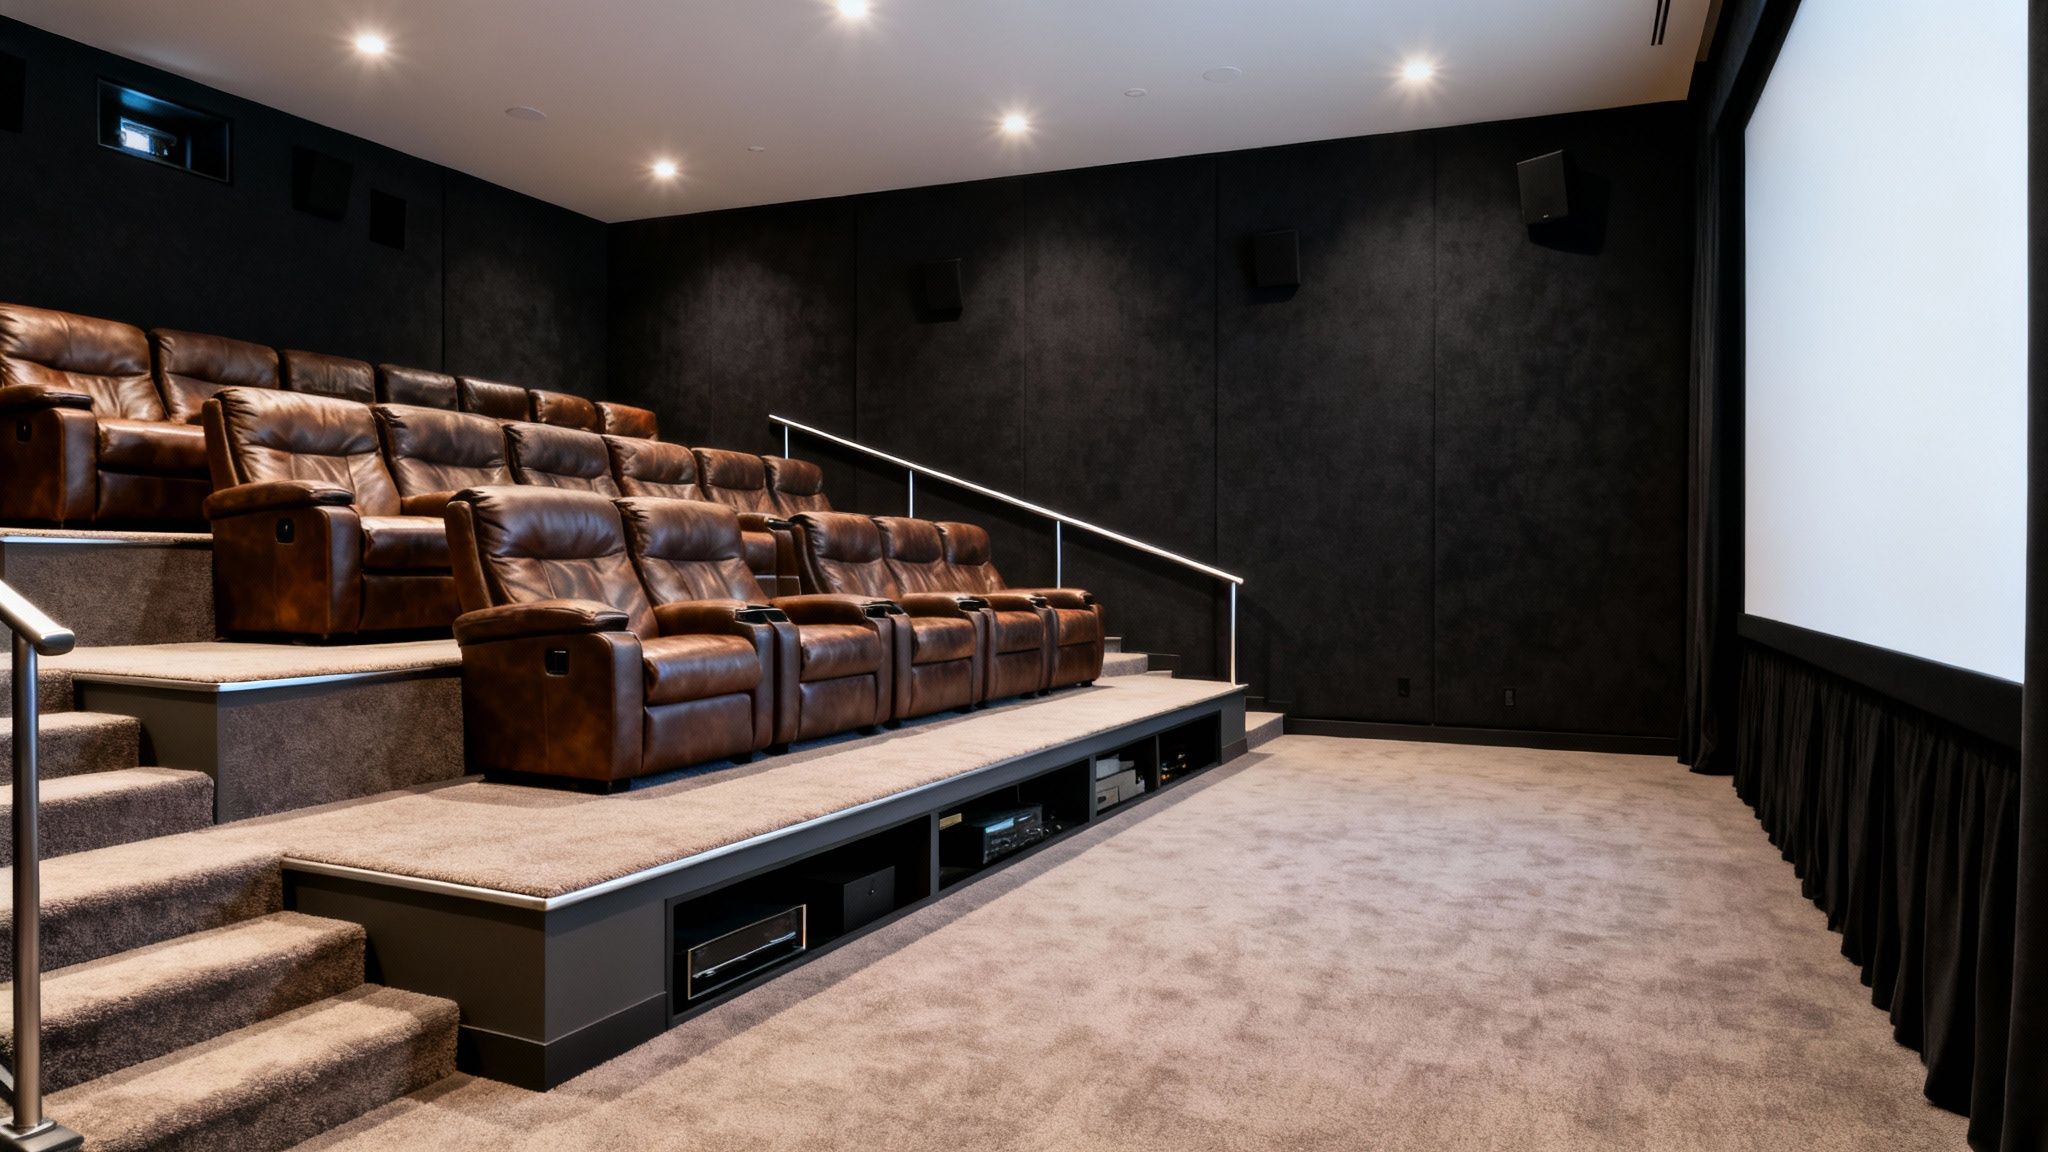
For the ultimate cinematic experience, few home theater basement ideas can rival the authenticity and functionality of a tiered stadium seating layout. This design mimics commercial theaters by creating a sloped or stepped floor, ensuring that every seat in the house has a perfect, unobstructed view of the screen. By elevating each subsequent row, you eliminate the common problem of heads blocking the view, making it ideal for hosting movie nights for larger groups of family and friends.
This approach transforms a standard basement into a dedicated, high-performance media sanctuary. The raised platforms, known as risers, are not just for seating; they define the room's acoustics and sightlines, creating an immersive environment that draws everyone’s focus to the action on screen. This layout is a hallmark of high-end home theaters and is frequently showcased by custom integration firms like Crestron and Control4.
How to Implement Tiered Seating
Successfully building a tiered seating arrangement requires careful planning, especially regarding space and safety. The platforms are typically constructed from a sturdy wood frame and finished with carpet to absorb sound.
- Ceiling Height: This is the most critical factor. Each riser will consume vertical space, so you need a basement with adequate clearance. A minimum of 8 feet is workable, but 9-10 feet is ideal to maintain a comfortable, open feel. For a detailed guide on this, you can learn more about local basement ceiling height requirements.
- Riser Dimensions: Plan for a riser height of 7-12 inches per step. The platform depth should accommodate the full range of motion for reclining seats, typically requiring at least 6-7 feet per row.
- Seating Space: Allocate 36-42 inches of width per seat to provide ample elbow room and space for cupholders or small side tables.
- Smart Storage: The empty space within the risers is a perfect opportunity for hidden storage. Use it to house AV components, media collections, or even a small bar fridge.
- Safety First: For taller risers, install step lighting and sturdy handrails to prevent trips and falls in a darkened room. Consider adding a ramp or leaving the front row at floor level for wheelchair accessibility.
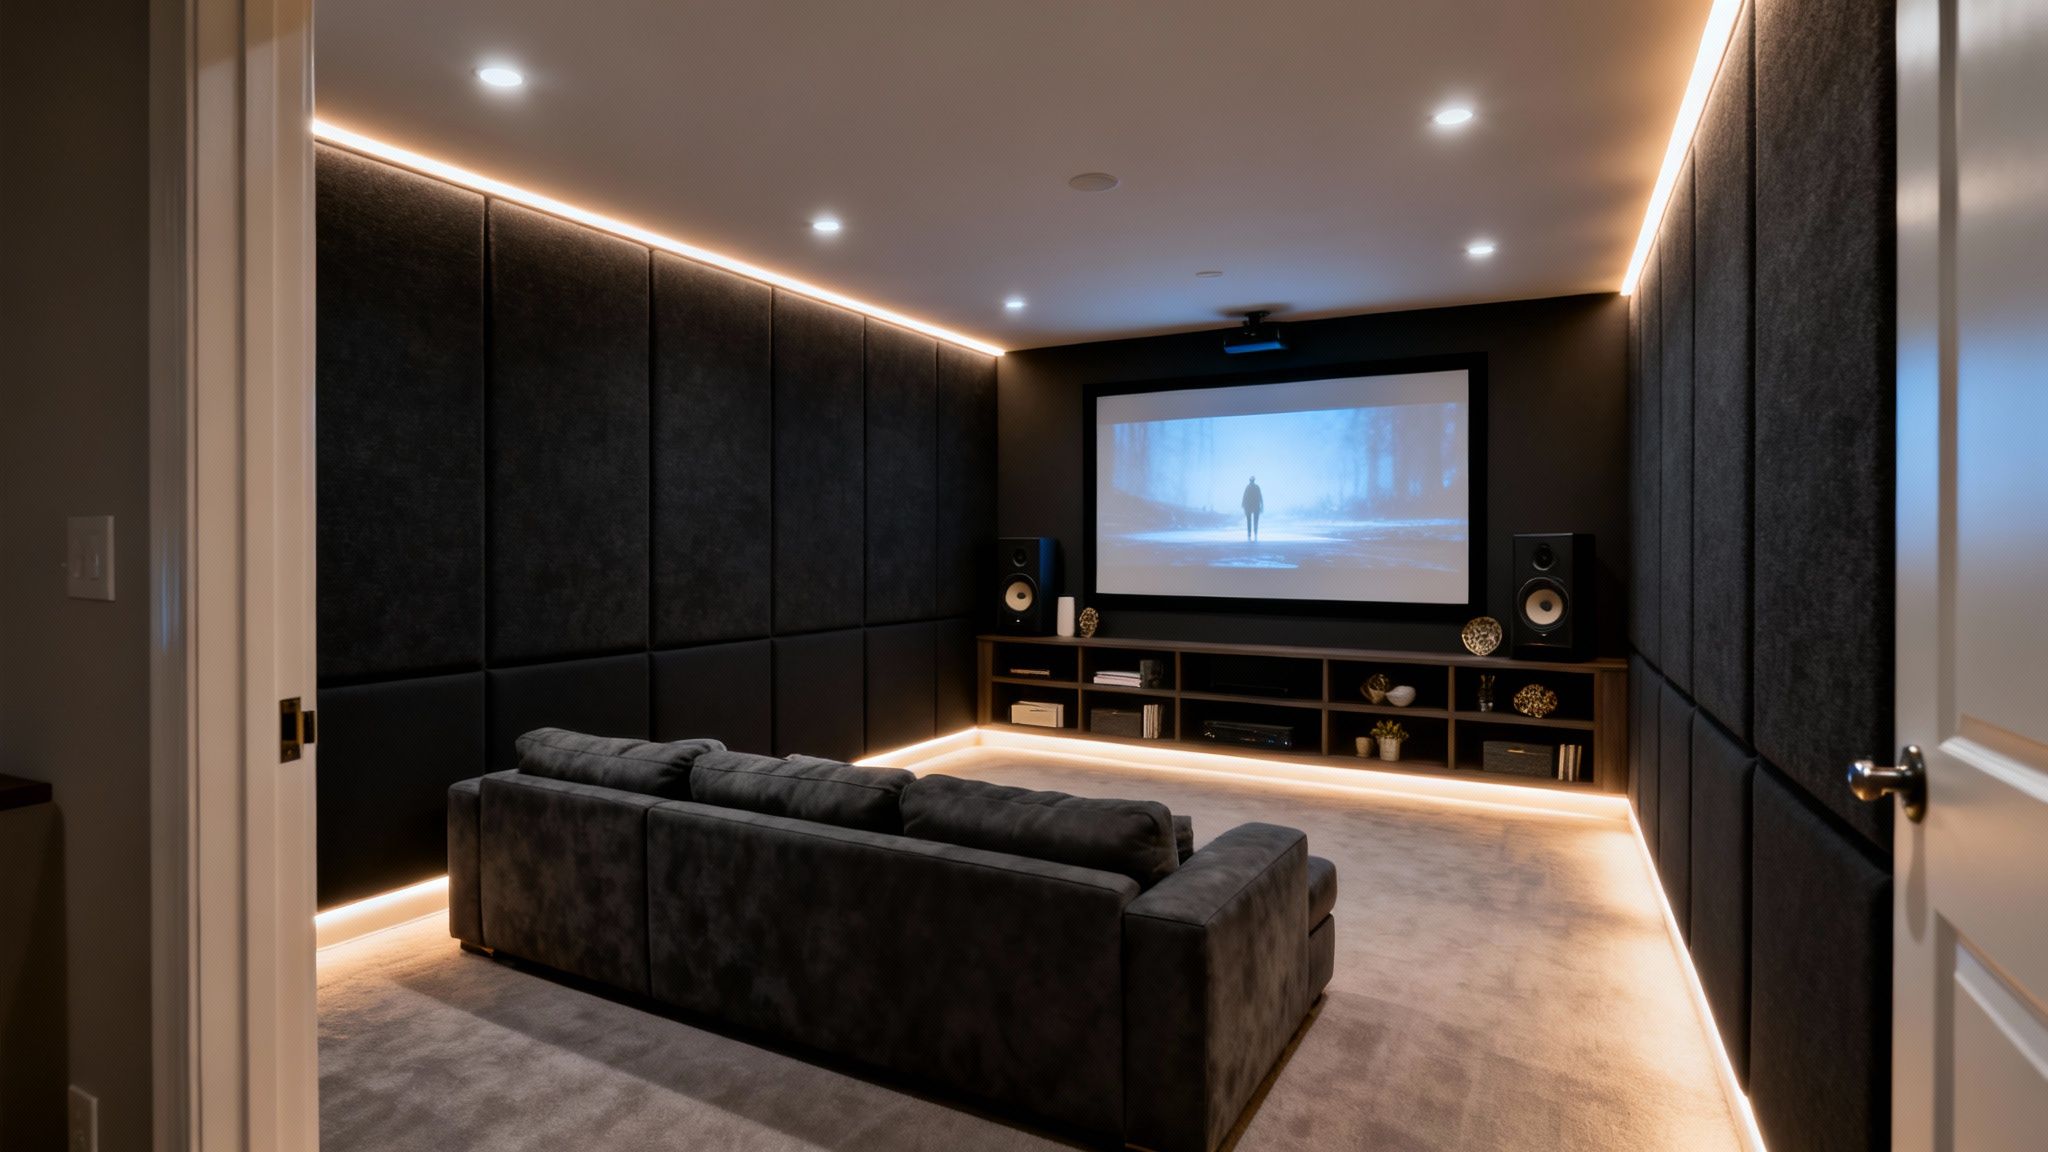
2. Acoustic Panel Wall Treatment
One of the most impactful home theater basement ideas for achieving truly professional-grade sound is the strategic use of acoustic panel wall treatments. This approach moves beyond simply adding speakers and focuses on controlling the room's sound behavior. By installing sound-absorbing panels, bass traps, and diffusers, you can eliminate echo, tame harsh reflections, and prevent muddy bass, ensuring dialogue is crisp and sound effects are precisely located.
This technique is essential for transforming a concrete basement, which is naturally prone to reverb, into a sonically balanced and immersive listening environment. Without acoustic treatment, even the most expensive audio system will sound muddled and chaotic. Leading acoustic solution providers like GIK Acoustics and ATS Acoustics specialize in creating products that manage sound reflections, a critical step for any serious home cinema.
How to Implement Acoustic Wall Treatments
Effective acoustic treatment is more about precision than sheer quantity. Proper placement is key to addressing specific sonic issues and achieving a balanced sound profile without making the room sound overly "dead."
- Prioritize First Reflection Points: These are the spots on your side walls, ceiling, and floor where sound from your front speakers bounces before reaching your ears. Place absorptive panels here to enhance clarity and stereo imaging.
- Tame the Low End with Bass Traps: Low-frequency sound waves build up in corners, creating a booming, indistinct bass response. Placing dedicated bass traps in the corners of your basement is the most effective way to tighten up the low end.
- Combine Absorption and Diffusion: While absorption panels soak up sound energy, diffusers scatter it. Using a combination, especially on the back wall, helps create a more spacious and natural-sounding room.
- Plan for Surface Coverage: Aim to treat at least 15-25% of your wall and ceiling surface area. For a standard basement, this means a combination of several wall panels and four corner bass traps.
- Aesthetics Matter: Modern acoustic panels come in various colors and can be wrapped in custom decorative fabrics to match your theater's design. Some can even be printed with high-resolution images or movie posters, blending function with form.
3. Immersive Surround Sound System (Dolby Atmos)
While visuals are crucial, truly immersive home theater basement ideas are built on exceptional audio. A Dolby Atmos surround sound system elevates the experience from simply watching a movie to being completely enveloped by it. Unlike traditional 5.1 or 7.1 setups that broadcast sound horizontally, Dolby Atmos adds height channels, allowing audio to move around you in a three-dimensional space. Rain will sound like it’s falling from above, and helicopters will feel like they are flying directly overhead.
This object-based audio technology gives sound designers the ability to place and move specific sounds precisely, creating a more realistic and impactful soundscape. High-end integrators and premium A/V receiver brands like Denon and Yamaha champion this technology as the modern standard for a dedicated cinema room. It transforms your basement from a media room into a true auditory sanctuary, where every subtle detail of the soundtrack is brought to life with breathtaking clarity.
How to Implement Dolby Atmos
Proper speaker placement and calibration are essential for achieving the full Dolby Atmos effect. Planning for this during the construction or renovation phase is the most effective approach.
- Plan Your Layout: Common configurations include 5.1.2 (five surround speakers, one subwoofer, two height channels) or 7.1.4 (seven surround speakers, one sub, four height channels). Your choice depends on room size and budget.
- Speaker Placement: Install in-ceiling speakers for the most authentic overhead sound. For optimal coverage, position them slightly in front of the main seating row and angle them toward the listeners.
- A/V Receiver is Key: You need an A/V receiver that can decode the Dolby Atmos format. Models from brands like Yamaha, Denon, and Marantz offer excellent options with built-in calibration tools like Audyssey or YPAO to optimize sound for your specific room.
- Consider Up-firing Speakers: If in-ceiling installation isn't feasible, Dolby Atmos-enabled speakers that sit on top of your front towers can bounce sound off the ceiling to create a similar height effect.
- Don't Forget the Subwoofer: A powerful subwoofer (or two for larger rooms) is critical for delivering impactful low-frequency effects. Proper placement is key to achieving smooth, room-filling bass without dead spots.
4. Motorized Theater Seating
While layout and acoustics are crucial, the true centerpiece of comfort in any home theater basement is the seating itself. Motorized theater seating elevates the viewing experience from simply watching a movie to indulging in a luxurious, personalized event. These premium recliners feature integrated motors that allow for smooth, precise adjustments of the backrest and footrest, letting each viewer find their perfect angle for maximum comfort during long films or binge-watching sessions.
This type of seating is a cornerstone of modern home theater basement ideas, focusing on user experience above all else. Beyond basic reclining, high-end models from manufacturers like Octane Seating and Palliser Furniture often include premium features like built-in massage and heating functions, cooled cupholders, and accessory docks for tray tables or tablet holders. This transforms each seat into a personal command center for relaxation and enjoyment, making it a worthy investment for any dedicated media room.
How to Implement Motorized Seating
Integrating motorized seating requires more than just choosing a style; it demands careful planning for power, space, and functionality to ensure a seamless fit into your basement theater.
- Plan for Power: Every motorized seat needs electricity. Before your walls are finished, plan the location of floor outlets for each seating group. This avoids messy extension cords and creates a clean, professional installation.
- Measure for Recline: These seats need significant space. Ensure you have at least 36 inches of clearance between rows to allow for a full recline without bumping into the row behind. For those envisioning plush, adjustable seating in their home theater, dive into the ultimate recliner buying guide to explore various styles and features.
- Choose the Right Size: Select a seat width that provides ample room for users, typically between 30 and 33 inches. Consider testing different models in a showroom to find the most comfortable fit.
- Functionality First: Think about how you’ll use the space. Do you need integrated tray tables for snacks? USB ports for charging devices? Choose features that align with your family’s viewing habits.
- Professional Delivery: Due to their weight and electronic components, it is highly recommended to budget for professional delivery and setup to avoid damage to the chairs or your home.
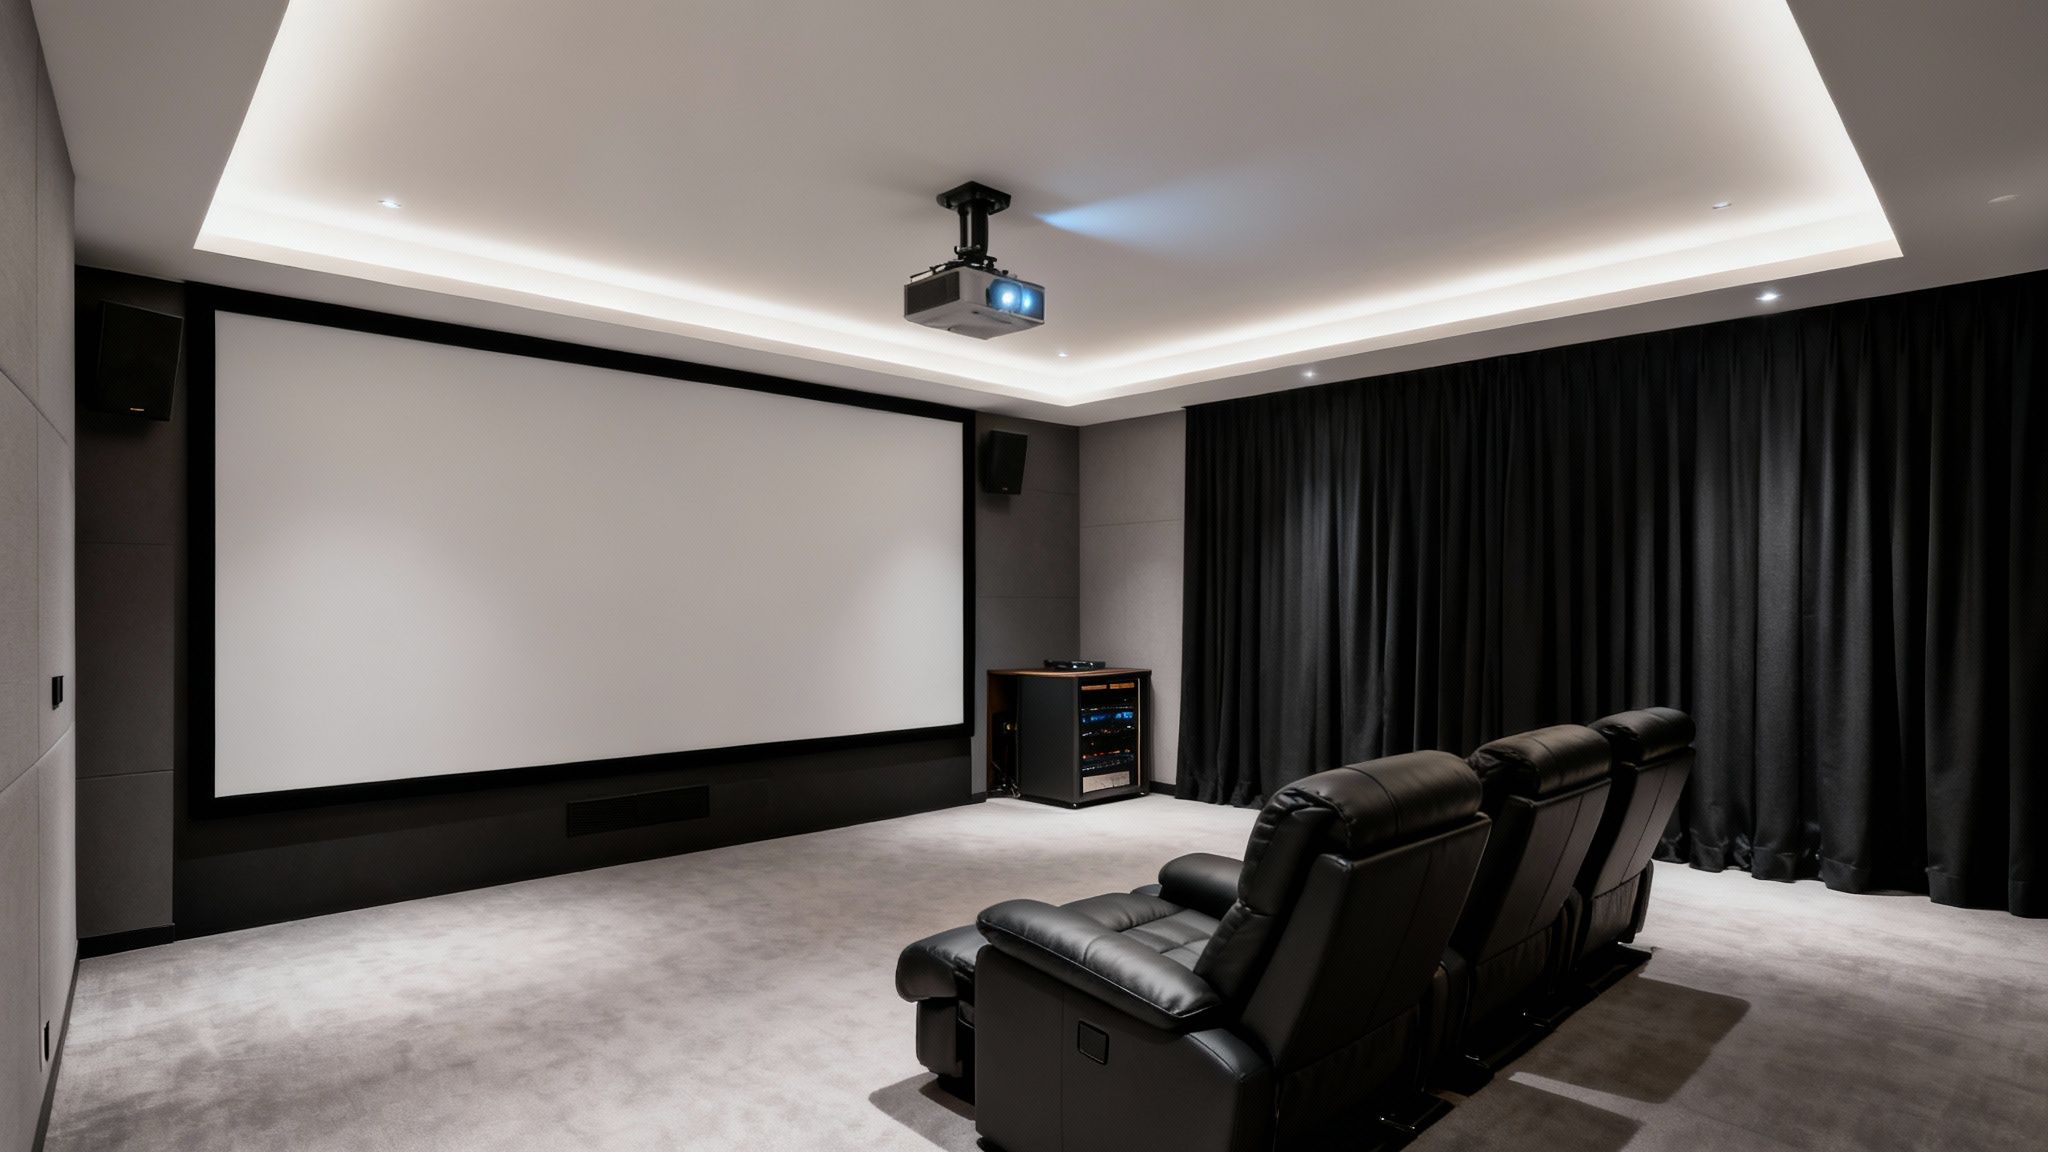
5. Projector-Based Display System
For a truly authentic and large-scale cinematic experience, nothing beats a projector-based display system. This setup uses a high-definition projector to cast a massive image onto a dedicated screen, delivering a viewing size that even the largest TVs struggle to match. This approach is the cornerstone of many high-end home theater basement ideas, as it provides the scale and immersion of a commercial cinema right in your home. Modern 4K laser projectors from brands like Epson and JVC offer incredible brightness, contrast, and color fidelity, creating a stunningly sharp and vibrant picture.
The goal is to replicate the professional cinema environment, where the display fills your field of view and pulls you into the action. A projector system, when paired with the right screen and controlled lighting, transforms a simple room into an exclusive screening venue. It’s a solution favored by cinephiles and custom installers for its ability to produce an unparalleled, larger-than-life visual experience. You can see more in-depth examples when you learn more about projector systems for a basement home theater.
How to Implement a Projector System
Setting up a projection system requires careful consideration of room dimensions, ambient light, and component placement. Success depends on creating the ideal environment for the projector to perform at its best.
- Throw Ratio: Select a projector with a throw ratio that matches your basement's dimensions. This number determines how large the image will be from a specific distance. Short-throw models are excellent for smaller rooms where space is limited.
- Ambient Light Control: Projectors perform best in near-total darkness. Ensure your basement has no light leaks from windows or other rooms. Use blackout curtains and dark, non-reflective paint on walls and ceilings.
- Screen Selection: Pair your projector with a high-quality screen. Motorized screens that retract into a ceiling housing offer a clean, minimalist look when not in use. An acoustically transparent screen is ideal if you plan to place speakers behind it.
- Professional Calibration: To achieve perfect color accuracy and contrast, have your system professionally calibrated using a colorimeter. This step unlocks the full potential of your equipment, ensuring the picture looks exactly as the director intended.
- Mounting and Placement: A ceiling-mounted projector provides a clean, professional installation and keeps the unit out of the way. Plan for a viewing distance of 15-20 feet for large screens to avoid eye strain.
6. Dedicated Server/Equipment Closet
For a truly professional and high-performance setup, one of the most impactful home theater basement ideas is creating a dedicated server or equipment closet. This design involves building a separate, enclosed space specifically to house all the noisy and heat-generating AV components like receivers, amplifiers, media servers, and networking gear. By isolating this hardware, you eliminate distracting fan noise and blinking lights from the main viewing area, creating a more immersive and cinematic atmosphere.
This approach is a cornerstone of high-end custom installations, ensuring the theater remains sleek, uncluttered, and acoustically pure. It centralizes all your technology in one managed environment, which simplifies cable management, protects expensive equipment from dust, and makes maintenance or upgrades significantly easier. Professional integrators like those who specialize in Savant or Control4 systems almost always recommend this strategy for reference-level theaters.
How to Implement a Dedicated Equipment Closet
A well-planned equipment closet requires more than just spare room; it needs proper electrical supply, ventilation, and accessibility to function correctly. The goal is to create a stable environment that keeps your gear running optimally.
- Ventilation is Key: AV equipment generates significant heat, which can shorten its lifespan. Install dedicated ventilation, such as an exhaust fan ducted to the outside or another part of the basement, to maintain a consistent, cool temperature.
- Sufficient Power: High-performance amplifiers and processors are power-hungry. Install at least two or three dedicated 20-amp circuits to prevent tripped breakers and ensure clean, stable power delivery.
- Organized Racking: Use a professional-grade server rack from brands like Middle Atlantic or Tripp Lite. This keeps components neatly stacked, promotes airflow, and makes accessing rear-panel connections simple.
- Plan Cable Runs: Run in-wall conduit from the closet to the projector, speakers, and screen locations. This future-proofs your setup, allowing for easy cable additions or replacements without tearing into drywall. Label every cable at both ends.
- Noise and Vibration Isolation: Insulate the walls and use a solid-core door for the closet to contain equipment noise. Consider placing the rack on an isolation platform to prevent vibrations from transferring through the floor.
7. Multi-Zone Audio Distribution
A truly modern home theater basement idea extends beyond a single room, embracing the entire lower level with multi-zone audio distribution. This approach allows you to pipe high-fidelity sound from your theater system or other sources into adjacent areas like a game room, bar, or gym. It creates a cohesive entertainment environment where you can enjoy background music, the big game’s audio, or different content in separate “zones” simultaneously, all controlled from a central hub or smart device.
This setup transforms your basement from a collection of separate rooms into one integrated entertainment space. By networking speakers and control systems, you can seamlessly transition from the immersive surround sound of a movie to ambient music at the bar without missing a beat. This level of control and flexibility is a signature feature of high-end smart homes, often implemented using systems from specialists like Sonos or integrated control platforms like Control4.
How to Implement Multi-Zone Audio
Setting up a multi-zone audio system requires a balance of technical planning and an understanding of how you’ll use the space. The goal is to deliver clear, reliable audio to each designated area with independent control.
- Wireless vs. Hardwired: Wireless systems like Sonos offer incredible flexibility and are easier to install in a finished basement. Hardwired systems, planned during a remodel, provide superior reliability and are often preferred for permanent, high-performance installations.
- Zone Amplification: Each zone needs its own power. This can be achieved with a multi-zone amplifier that powers several areas from a central rack or by using individual smart amplifiers (like the Sonos Amp) for each zone.
- Logical Grouping: Plan your zones based on activity. Common groupings include “Theater,” “Bar Area,” and “Game Room.” This allows you to play the same audio across multiple zones or different sources in each.
- Speaker Placement: Consider the primary use of each zone. In-ceiling speakers are great for ambient background music, while in-wall or freestanding speakers might be better for a dedicated listening area.
- Independent Volume Control: The key to a functional multi-zone system is the ability to adjust the volume in each area independently. This ensures the movie in the theater doesn't overpower a quiet conversation at the bar. Most modern systems handle this through a simple app interface.
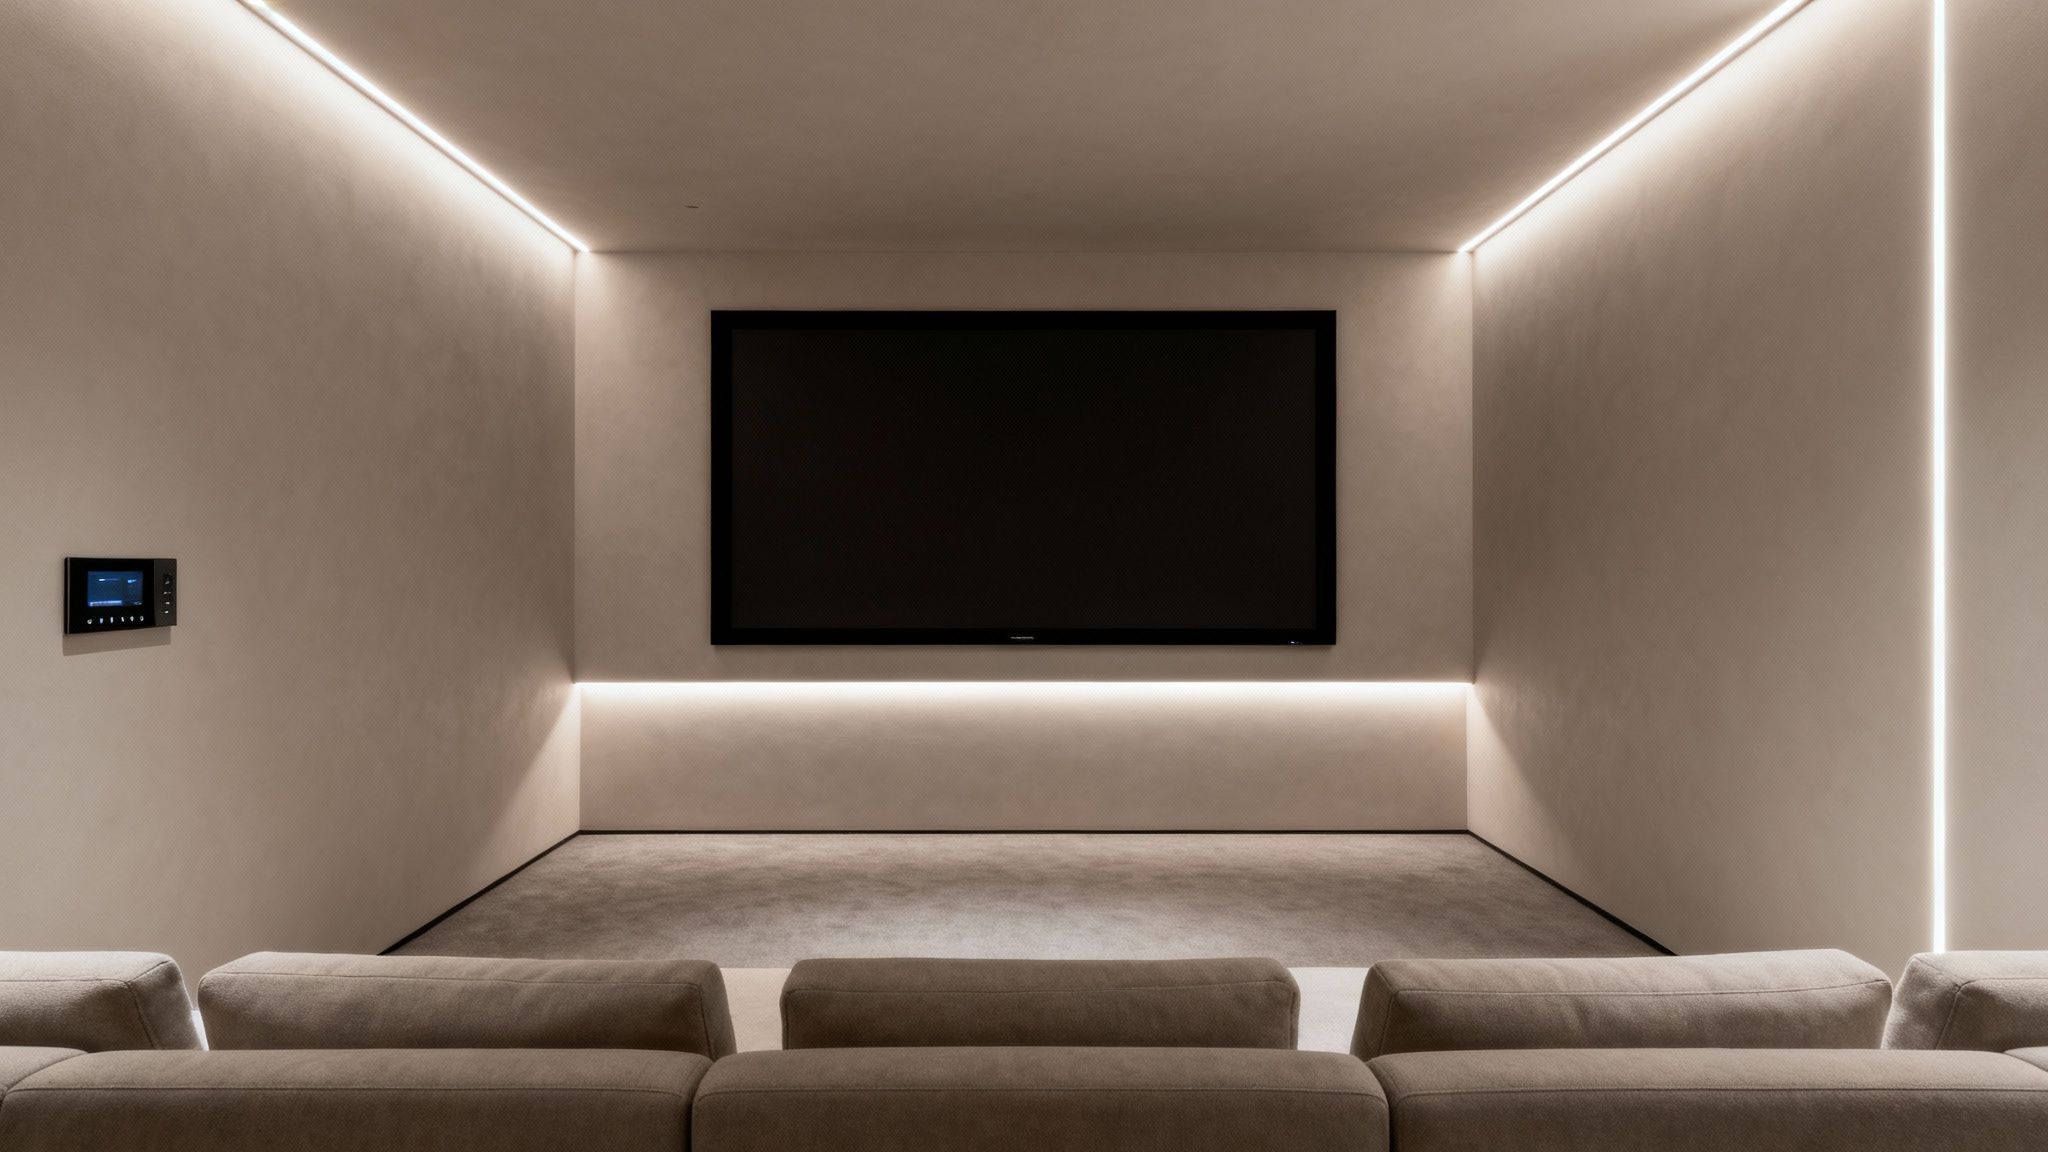
8. Ambient/Bias Lighting Installation
One of the most impactful and surprisingly affordable home theater basement ideas is the integration of ambient or bias lighting. This involves placing a subtle light source, typically LED strips, behind the screen or along architectural features like coves or soffits. This gentle glow reduces eye strain by decreasing the harsh contrast between a bright screen and a pitch-black room, making marathon movie sessions far more comfortable.
Scientifically proven to improve perceived black levels and image contrast, bias lighting makes your picture appear richer and more vibrant. It's a professional-grade touch that adds a layer of polish and immersion, turning a simple viewing area into a sophisticated media environment. This technique is championed by organizations like the Imaging Science Foundation (ISF) and is easily achieved with products from Philips Hue or custom installations.
How to Implement Ambient and Bias Lighting
Adding effective accent lighting is a project that can range from a simple peel-and-stick application to a fully integrated custom system. The key is subtlety and precision.
- Color Temperature: For true bias lighting, use a neutral white light source calibrated to 6500K (D65). This industry standard ensures it doesn't skew the on-screen colors. For ambient mood lighting, you can use color-changing LEDs.
- Brightness Level: The light should be subtle. A good rule of thumb is to set its brightness at approximately 10% of your screen's maximum brightness to avoid creating a distraction.
- Placement is Key: Mount LED strips on the back of your TV or projection screen, aiming the light at the wall behind it. For room-wide ambient effects, hiding strips inside ceiling coves or soffits creates a beautiful, diffused glow. Get more ideas on this by learning about different approaches to finishing basement ceilings.
- Use Diffusers: To prevent "hot spots" or visible dots from the individual LEDs, place the strips inside an aluminum channel with a frosted diffuser cover for a smooth, even line of light.
- Smart Integration: Connect your lighting to a smart home system like Control4 or even just Alexa or Google Home. This allows you to create automated scenes, such as dimming the lights when a movie starts.
9. Hidden Cable Management and In-Wall Infrastructure
One of the most impactful home theater basement ideas for achieving a clean, professional aesthetic is a meticulously planned in-wall infrastructure for cable management. This approach involves running all AV, data, and power cables through conduits or wall cavities, completely concealing them from view. The result is a sleek, uncluttered space where the focus remains on the screen and sound, free from the visual distraction of tangled wires.
This isn't just about aesthetics; it's a foundational element of a high-performance system that ensures signal integrity and simplifies future upgrades. By planning cable routes before the drywall goes up, you create a robust, organized network for HDMI, speaker wire, Ethernet, and power. Professional AV integrators and custom home builders, who often work with structured cabling systems from brands like Belden and Panduit, consider this a non-negotiable step for any serious media room.
How to Implement Hidden Cabling
The key to successful hidden cable management is pre-planning, ideally during the construction or renovation phase of your basement project.
- Plan and Document: Map out the exact locations for your screen, projector, speakers, and AV rack. Create a detailed diagram of all cable runs before the walls are closed. Take photos of the wiring before installing drywall for future reference.
- Use Oversized Conduits: Install conduits (plastic or metal tubes) that are wider than your current needs. A 1.5 to 2-inch conduit is a good choice, as it provides ample space to pull new cables, like a future-generation HDMI, without opening up the walls.
- Leave Pull Strings: After running your initial cables, leave a nylon pull string inside each conduit. This simple step makes adding or replacing a cable later an incredibly easy task.
- Separate Power and Signal: Run high-voltage power cables separately from low-voltage signal cables (like HDMI and speaker wire) to prevent electrical interference that can degrade audio and video quality.
- Install Ample Outlets: Strategically place multiple duplex outlets near your AV equipment. Consider dedicated 20-amp circuits to provide clean, stable power for demanding components. To ensure a clean and efficient setup, it's beneficial to consult a comprehensive home smart wiring guide.
- Label Everything: Clearly label both ends of every single cable. This will save you immense time and frustration during setup and troubleshooting.
10. Integrated Smart Home Control System
To elevate a home theater from a simple media room to a truly seamless entertainment sanctuary, integrating a smart home control system is one of the most impactful home theater basement ideas. This approach centralizes command over all your technology-lighting, audio, video, temperature, and even motorized shades-into a single, intuitive interface. Instead of juggling multiple remotes, you can use a sleek touchscreen, a smartphone app, or even voice commands to orchestrate the entire experience.
With a single tap, you can activate a "Movie Night" scene that dims the lights to the perfect level, lowers the projector screen, powers on the AV receiver and projector, and sets the volume to your preferred starting point. This level of automation, often managed by sophisticated systems from brands like Control4 or Crestron, removes all friction, allowing you to immerse yourself in the content instantly. It’s the behind-the-scenes magic that defines a high-end, professionally designed media space.
How to Implement a Smart Control System
Integrating a smart system is most effective when planned during the initial construction or renovation phase, as it often requires specialized low-voltage wiring.
- Plan for Wiring: Decide on your control system before drywall goes up. Professional systems like Crestron and Savant require specific wiring that is much easier and cheaper to install during construction. This ensures a reliable, hardwired connection for all components.
- Create Intuitive Scenes: Program preset "scenes" for different activities. For example, a "Gaming" scene might have brighter, more dynamic lighting and audio settings optimized for surround sound effects, while a "Sports" scene could brighten the room for social viewing.
- Automate Startup and Shutdown: Create a one-touch sequence to power everything on and another to shut it all down. This simple automation prevents components from being left on by mistake and simplifies operation for guests and family members.
- Integrate Lighting and Content: Go beyond simple on/off commands. Program your system to automatically adjust lighting when you press play or pause, bringing the lights up slightly when the movie is stopped and dimming them back down when it resumes.
- Voice Control Integration: Thoroughly test voice commands with systems like Amazon Alexa or Google Home. Ensure they can reliably trigger your custom scenes and control individual components like volume or input selection.
Home Theater Basement Ideas — 10-Point Comparison
| Tiered Stadium Seating Layout | High — structural modifications, permits | High — $3,000–$10,000+, risers, space, ceiling height | Unobstructed sightlines and cinema-like atmosphere | Dedicated basements for larger groups/families | Clear views, immersive feel, efficient depth use |
| Acoustic Panel Wall Treatment | Medium — placement planning, acoustic assessment | Medium — $2,000–$8,000, wall area, possible consultant | Reduced reverberation, clearer dialogue and balanced bass | Critical listening rooms, dialogue-heavy home theaters | Improved audio clarity, controlled reflections, reduced bleed |
| Immersive Surround Sound (Dolby Atmos) | High — in-ceiling installs, complex calibration | High — $5,000–$20,000+, AV receiver, ceiling speakers | Three-dimensional, height-enhanced audio immersion | High-end home theaters, gaming and film enthusiasts | Realistic 3D sound, industry standard, future-proof |
| Motorized Theater Seating | Medium — electrical wiring and layout planning | High — $1,500–$5,000+ per seat, power circuits, space | Premium comfort and adjustable seating experience | Luxury setups and frequent long viewing sessions | Maximum comfort, customization, elevated aesthetic |
| Projector-Based Display System | Medium — mounting, light control, calibration | Medium–High — $3,000–$10,000+, screen, room darkening | Large-format, cinema-style imagery with flexible sizes | Dedicated dark rooms or large-screen viewers | Big-screen immersion, cost-effective for large displays |
| Dedicated Server/Equipment Closet | Medium — ventilation, electrical planning | Medium — $2,000–$5,000, 4x6 ft min, cooling and circuits | Isolated heat/noise, cleaner theater, easier maintenance | Systems with many components or professional installs | Equipment longevity, tidy cabling, simplified upgrades |
| Multi-Zone Audio Distribution | High — control programming and wiring | Medium–High — $3,000–$8,000+, zone amps, control system | Independent audio per area, multi-room streaming | Entertaining homes, multi-use basements, whole-home audio | Flexible zones, scalable, simultaneous independent playback |
| Ambient/Bias Lighting Installation | Low — simple install and routing | Low — $200–$500, LED strips, small power supplies | Reduced eye strain, improved perceived contrast and ambiance | Any home theater seeking comfort and visual enhancement | Affordable, easy to install, enhances perceived image quality |
| Hidden Cable Management & In-Wall Infrastructure | Medium–High — requires pre-planning or retrofit work | Medium — $1,000–$3,000, conduit, structured cabling | Clean appearance, safer environment, future-proof wiring | New construction or major renovations | Professional look, easier upgrades, improved safety |
| Integrated Smart Home Control System | High — integration and programming complexity | High — $5,000–$20,000+, controllers, ongoing maintenance | Centralized automation and one-touch control of systems | Luxury smart homes and users wanting centralized automation | Convenience, automation, scalable centralized control |
Bringing Your Vision to Life with Professional Expertise
Creating the ultimate basement home theater is a journey that transforms an underutilized space into a premier entertainment destination. We've explored a wide spectrum of home theater basement ideas, moving from foundational concepts to advanced technological integrations. Each element, when thoughtfully implemented, contributes to a cohesive and breathtaking final result.
Reviewing the journey from a simple idea to a fully realized theater highlights the importance of a strategic, detail-oriented approach. It's not just about buying expensive equipment; it's about making every component work in harmony within the unique environment of your basement.
Recapping the Cornerstones of a Great Basement Theater
The ideas we've covered form a blueprint for success. Let's revisit the core principles that make the difference between an average media room and a truly cinematic sanctuary:
- The Foundation of Experience: The physical layout is paramount. Ideas like Tiered Stadium Seating and a Dedicated Equipment Closet are not just luxuries; they are fundamental design choices that dictate comfort, audio-visual performance, and long-term usability. Getting the room's structure right from the beginning prevents costly retrofits later.
- Acoustic and Visual Immersion: A stunning picture and powerful sound can be completely undermined by a poor environment. This is why Acoustic Panel Wall Treatments and an Immersive Surround Sound System like Dolby Atmos are so critical. They manage sound reflections and place you directly in the middle of the action, creating an experience that commercial theaters strive for.
- Seamless Integration and Control: Modern theaters are defined by their ease of use and clean aesthetics. Mastering Hidden Cable Management and implementing an Integrated Smart Home Control System elevates the entire experience. It removes clutter and complexity, allowing you to control lighting, audio, and video with a single touch, making the technology feel effortless and intuitive.
- The Finer Details of Comfort and Ambiance: Beyond the core technology, elements like Motorized Theater Seating and Ambient/Bias Lighting add layers of comfort and professional polish. These features reduce eye strain, enhance perceived contrast, and provide a level of personalized comfort that makes every movie night feel like a special event.
From Inspiration to Implementation: Your Actionable Next Steps
Armed with these home theater basement ideas, you are now equipped to move forward with clarity and confidence. The next phase is about translating this vision into a tangible plan. Begin by prioritizing which of these concepts are "must-haves" for your family's lifestyle and which are "nice-to-haves" that can be incorporated if the budget allows.
Consider the unique challenges of your basement. Is moisture a concern? Is the existing electrical capacity sufficient for high-demand AV equipment and specialized lighting? Are there structural elements, like support columns or low ductwork, that need to be cleverly integrated into the design? Answering these questions early on is essential.
While a DIY approach can be tempting, the complexity of a high-end basement theater often warrants professional guidance. The intersection of electrical work, HVAC modifications, structural framing, low-voltage wiring, and precise acoustic calibration is where a seasoned expert provides immense value. A professional ensures that your investment is not only safe and compliant with local building codes but also optimized for peak performance. They can foresee challenges you might not, saving you time, money, and frustration. For homeowners ready to take that next step, partnering with a specialist who understands the nuances of basement transformations is the most reliable path to achieving the home theater of your dreams.
Ready to turn your vision into a stunning reality? The team at Northpoint Construction specializes in custom basement finishing and remodels, with the expertise to manage every detail of your home theater project from initial design to final calibration. Contact Northpoint Construction today to start planning the ultimate entertainment space for your home.