
How to Add a Bathroom in a Basement: Easy Step-by-Step Guide
Putting a bathroom in the basement is a project that really comes down to a few critical phases. You've got the initial planning and layout, a hard look at your existing utilities, picking the right plumbing approach, and then all the finishing work. Getting this right from the start is all about creating a solid blueprint before a single hammer swings or a pipe is cut.
Your Blueprint for a Successful Basement Bathroom
Turning a dark, forgotten corner of your basement into a beautiful, functional bathroom is one of the smartest home improvements you can make. It seriously boosts your home's value and makes the space so much more usable.
But let's be real—this isn't like remodeling an upstairs bathroom. A basement project has its own unique quirks, from dealing with potential dampness to figuring out the plumbing puzzle. That’s why a detailed plan isn't just a nice-to-have; it’s the only way to keep your project from going off the rails on time and budget.
The very first thing you need to figure out is the location. This decision is almost always dictated by your home's existing plumbing. The closer you can get to your main sewer and water lines, the better. Why? Because it dramatically cuts down on plumbing costs. Digging long trenches through a concrete slab is a tough, expensive job.
Look for a spot directly underneath a main-floor bathroom or kitchen, or find the main vertical drain stack—that's your sweet spot. The same logic applies to electrical and HVAC; tapping into nearby circuits and ductwork makes life a lot easier.
Setting a Realistic Budget
Once you’ve scouted a location, it’s time to talk money. The cost of a basement bathroom can be all over the map, depending on the size, the quality of fixtures you choose, and who's doing the work.
Here’s a quick look at what you might expect.
Basement Bathroom Project Cost Tiers
| DIY / Budget | $3,000 - $8,000 | Basic fixtures, simple layout, homeowner handles most labor, up-flushing toilet system to avoid concrete work. |
| Mid-Range | $8,000 - $15,000 | Contractor-managed, better quality finishes, sewage ejector pump, custom shower, standard vanity. |
| High-End | $15,000+ | Fully custom design, premium materials (e.g., stone tile), luxury fixtures, steam shower, heated floors, extensive lighting. |
To dial in your budget, you’ll need to factor in a few key items:
- Plumbing: Is an up-flushing toilet the answer, or will you need to install a more robust sewage ejector pump?
- Electrical: Don't forget the costs for new wiring, GFCI outlets, light fixtures, and a good exhaust fan.
- Finishes: This is where costs can really climb. Think about your choices for tile, flooring, vanity, and paint.
- Labor: Are you hiring a general contractor to handle everything, or are you planning to manage the plumbers, electricians, and other trades yourself?
Conducting a Site Assessment
Before you get too attached to your plans, you need to do a serious assessment of the space. This is where you hunt for any red flags that could stop your project in its tracks.
Moisture is enemy number one in a basement. Look for any signs of water getting in—damp spots on the walls, a musty smell, or that white, chalky powder on the concrete called efflorescence. You have to solve any water issues before you start building. No exceptions.
Next, get out your tape measure and check the ceiling height. Most building codes require a minimum ceiling height of 7 feet for finished living areas, and that includes bathrooms. Remember to account for what you'll be adding—the thickness of your new flooring, the drywall on the ceiling, and any recessed lighting. This is one of the key differences between a finished vs unfinished basement and what it takes to make the space truly livable.
Pro Tip: Grab some painter's tape and mark out the footprint of the toilet, sink, and shower right on the basement floor. It’s a simple trick, but it’s the best way to get a real feel for the space and make sure you’re not creating a cramped, awkward layout.
Navigating Permits and Building Codes
Before you even think about buying a single 2x4 or breaking up concrete for plumbing, your most important work happens on paper. I know, tackling the world of building permits and local codes feels like a bureaucratic headache. But trust me, it's a non-negotiable step that protects your investment, ensures your family’s safety, and keeps you out of a world of trouble.
Skipping this part is a massive gamble. I've seen it happen: a homeowner finishes a beautiful bathroom only to have an inspector demand they tear it all out because the plumbing vent wasn't up to code. Unpermitted work can also blow up in your face when you try to sell, leading to expensive last-minute fixes or even killing the deal entirely.
Think of Permits as Your Best Friend
A building permit isn't just a piece of paper; it's your project's insurance policy. It guarantees that a city inspector will review your plans and sign off on the work at critical stages, confirming that everything meets current safety standards. This is absolutely essential for a project involving the trifecta of plumbing, electrical, and structural changes.
Getting a permit forces you to think through every single detail—from the exact placement of the toilet to the type of wiring you’ll use. This upfront planning is invaluable. It’s what turns a vague idea into a legitimate, value-adding home improvement.
Finding Your Local Building Authority
Every city, county, and town plays by its own rules. Your first move is to pinpoint your local building or planning department. A quick Google search for "[Your City/County] building department" will almost always get you the website or phone number you need.
When you get in touch, just tell them what you're doing: "I want to add a three-piece bathroom in my unfinished basement." Ask them exactly what you need for the permit application. These folks are your best resource, and they're there to guide you, not to block your project.
One of the biggest myths is that building departments are looking for ways to say no. In my experience, their goal is just to make sure all work is done safely. If you approach them with clear plans and a cooperative attitude, the whole process goes much, much smoother.
They'll give you a checklist of the required documents, which will definitely include some detailed plans and drawings.
Assembling Your Permit Application Package
Your application is the official story of your project. The more professional and complete it is, the faster it gets approved. Sloppy, incomplete plans are a surefire way to get stuck in a cycle of delays and questions from the plan reviewer.
Here’s a rundown of what you’ll most likely need to submit:
- A Detailed Floor Plan: This needs to be drawn to scale. It must show the new bathroom's dimensions, the location of the toilet, sink, and shower, plus any doors and windows.
- A Plumbing Diagram (DWV Plan): The "Drain-Waste-Vent" plan is crucial. It shows how the new fixtures will connect to your home’s main sewer line and vent stack, specifying all pipe sizes and slopes.
- An Electrical Plan: This drawing maps out all outlets, switches, light fixtures, and the exhaust fan, showing the circuit path back to your breaker panel.
- A Written Scope of Work: This is a simple description of everything you plan to do, from framing and drywall to tiling and painting.
Understanding the essential building codes and regulations is a massive help here, ensuring your plans are compliant from the start.
Key Basement-Specific Codes to Watch For
Basements have their own set of rules you can't ignore. While the fine print varies by location, inspectors will always be looking closely at these specific areas:
- Ceiling Height: Most codes require a minimum finished ceiling height of 7 feet. Don't forget to account for the thickness of your flooring, drywall, and any low-hanging ductwork.
- Ventilation: A properly sized exhaust fan that vents directly to the outside (not into the attic or a crawlspace) is almost always mandatory to control moisture and prevent mold.
- GFCI Protection: For safety in a potentially damp environment, every single electrical outlet in a bathroom must be a Ground Fault Circuit Interrupter (GFCI) protected outlet. No exceptions.
- Egress: This may or may not apply. If you're only adding a bathroom, you're usually fine. But if your project includes finishing a bedroom, you must have a proper egress window or door for fire escape.
Solving the Basement Plumbing Puzzle
Let's be honest: plumbing is the single biggest hurdle you'll face when adding a bathroom to your basement. Upstairs, gravity is your best friend. But in a basement, you're below the home’s main sewer line, which means you have a fundamental problem to solve—how to make water flow uphill.
It’s a challenge, for sure, but one with a few really smart solutions. The route you take here will have the biggest impact on your project's final cost, how messy it gets, and just how much of your concrete floor you'll need to break apart.
Dealing with Below-Grade Drainage
Your first big decision is figuring out how you’ll get waste out of the toilet and into the main drain. Forget the old-school method of trenching your entire floor for a moment; modern plumbing gives us much better options.
Choosing the right system comes down to your budget, your stomach for cutting into the concrete slab, and your preference for long-term maintenance. The most common approaches are:
- Up-Flushing (Macerating) Toilets: These are often the path of least resistance. A macerating toilet integrates a grinder and a pump into a single unit that sits behind the toilet. When you flush, it liquefies waste and then pumps it up through a small pipe to connect with your main sewer line. No major concrete work needed.
- Sewage Ejector Pumps: This is the more traditional, heavy-duty solution. It involves cutting a small pit into your concrete floor to install a sealed basin. All the bathroom fixtures drain into this basin. Once the waste hits a certain level, a powerful pump automatically kicks on and sends everything up to the main line.
The core principle is simple: if your new fixtures are lower than your home's main drain pipe, you need a pump to move the waste uphill. There’s no way around it.
Comparing Basement Toilet Plumbing Options
Both macerating units and ejector pumps will get the job done, but they're built for different scenarios. Think of a macerating system as the perfect fit for a guest half-bath that won't see constant use, or in situations where breaking concrete is an absolute no-go.
A sewage ejector pump, on the other hand, is a true workhorse. It’s the go-to for a full, high-traffic bathroom and is designed to handle the combined waste from a toilet, sink, and shower without breaking a sweat.
Here’s a quick breakdown to help you compare these systems side-by-side.
| Up-Flushing (Macerating) Toilet | Guest bathrooms, low-traffic areas, slab foundations where cutting concrete is difficult. | Minimal concrete work, lower installation cost, self-contained unit. | Can be noisy, may struggle with non-flushable items, less robust for heavy use. |
| Sewage Ejector Pump | Full, high-traffic family bathrooms with a shower, sink, and toilet. | Very reliable, handles solid waste and multiple fixtures easily, long-term durability. | Requires breaking concrete to install the basin, higher upfront cost, more complex installation. |
| Traditional Gravity-Fed Plumbing | Homes where the main sewer line is already located below the basement floor. | No mechanical parts to fail, silent operation, very low maintenance. | Extremely rare scenario, requires extensive and costly concrete trenching. |
Ultimately, the choice comes down to balancing the upfront installation hassle against the system's long-term performance and durability.
This infographic gives you a great visual on how the two main pump systems stack up in terms of cost and installation.
As you can see, the main trade-off is between the lower initial cost of an up-flushing unit and the more permanent, powerful installation of a sewage ejector pump.
Don't Forget to Vent
Getting the waste out is only half the battle. You absolutely must have proper venting for every single fixture—toilet, sink, and shower. This is non-negotiable.
A vent pipe doesn't carry water; its job is to let air into the drain lines. Without it, flushing the toilet or draining the sink would create a vacuum, leading to slow drains, gurgling noises, and a much bigger problem: siphoning water out of the P-traps.
That U-shaped pipe under your sink isn't just there to catch a dropped wedding ring. It holds a small amount of water that acts as a physical barrier, blocking foul-smelling and potentially dangerous sewer gases from creeping into your home. Proper venting protects that water barrier. In most cases, you’ll need to run a new vent pipe up through the walls to connect with your home's existing main vent stack, which usually exits through the roof.
For a deeper look at what this all adds up to financially, you can explore this detailed guide on the cost to install a bathroom in the basement.
Bringing the Bathroom to Life: Framing and Utilities
Once your plumbing rough-in is complete and the layout is locked in, it’s time to watch your bathroom take shape. This is where those lines on the floor finally start to look like a room. Framing the walls and running the basic electrical and ventilation lines is what sets the stage for everything else.
Getting the Framing Right from the Ground Up
The first, and most important, part of framing in a basement is what you put directly on the concrete. Your bottom plate—the piece of lumber that anchors the wall to the floor—absolutely must be pressure-treated wood. This isn't just a suggestion; it's a critical step for longevity.
Why? Concrete is like a sponge. It can pull moisture up from the ground, and that constant dampness will rot standard lumber in no time. Pressure-treated wood is specifically designed to resist moisture and decay, ensuring the foundation of your new walls stays solid for decades.
Building Walls That Are Strong and Straight
With the pressure-treated bottom plate secured to the floor, you can start building the rest of the wall frames. Take your time here. Walls that aren’t perfectly straight (or plumb) and square will create a domino effect of problems when it comes time to hang drywall, install a door, or fit your vanity.
A foolproof trick for perfect corners is the 3-4-5 method.
Measure 3 feet out from the corner along one wall and make a mark.
Measure 4 feet out along the other wall and make another mark.
The diagonal line between those two marks should measure exactly 5 feet. If it does, you've got a perfect 90-degree corner.
As you erect the walls, use a 4-foot level to check for plumb. Check each stud in a few spots before you lock it into place. A few extra minutes of precision here will save you hours of headaches down the road.
An experienced take on the "wet wall": For the wall that will hide your main plumbing stacks and water lines, build it with 2x6 studs instead of standard 2x4s. That extra two inches of depth gives you plenty of room for pipes without having to cut notches into the studs, which can seriously compromise the wall's strength.
Roughing In the Electrical
Now that you have a wooden skeleton for the room, you can run the electrical wiring. Unless you have serious electrical experience, this is the point to call in a licensed electrician. Faulty wiring isn't just a code violation; it’s a major fire hazard. Safety first, always.
A proper electrical plan for a bathroom needs to cover a few basics:
- Lights: You'll need wiring for your main ceiling fixture and a vanity light.
- Switches: Think about where a light switch feels most natural—almost always right inside the door.
- Outlets: Bathroom outlets are required by code to have GFCI (Ground Fault Circuit Interrupter) protection. This is a non-negotiable safety feature that prevents shocks in a wet area. You’ll need at least one near the sink.
- Exhaust Fan: The fan needs its own power, which can be wired to its own switch or linked to the main light switch.
During the rough-in phase, the electrician will pull all the wires through the studs and install the plastic or metal boxes where your outlets, switches, and lights will eventually go. It all gets done before the drywall goes up.
Installing and Venting the All-Important Exhaust Fan
You can’t overstate the importance of good ventilation in a basement bathroom. Basements are already prone to dampness. Add in the steam from a hot shower, and you have a perfect recipe for mold and mildew if you don't get that moist air out.
An exhaust fan isn't just a nice feature; it's a code requirement in most places for a reason. The golden rule is to vent it directly to the outside of your house. Do not, under any circumstances, vent it into the ceiling joists or another part of the basement. All that does is move your moisture problem somewhere else.
The process involves cutting a hole through the rim joist (the wood framing that sits on top of your foundation wall) and running a duct from the fan unit straight outside. This is the only way to truly get the humidity and odors out of your home, keeping your new bathroom feeling fresh and dry.
Waterproofing and Finishing Your New Space
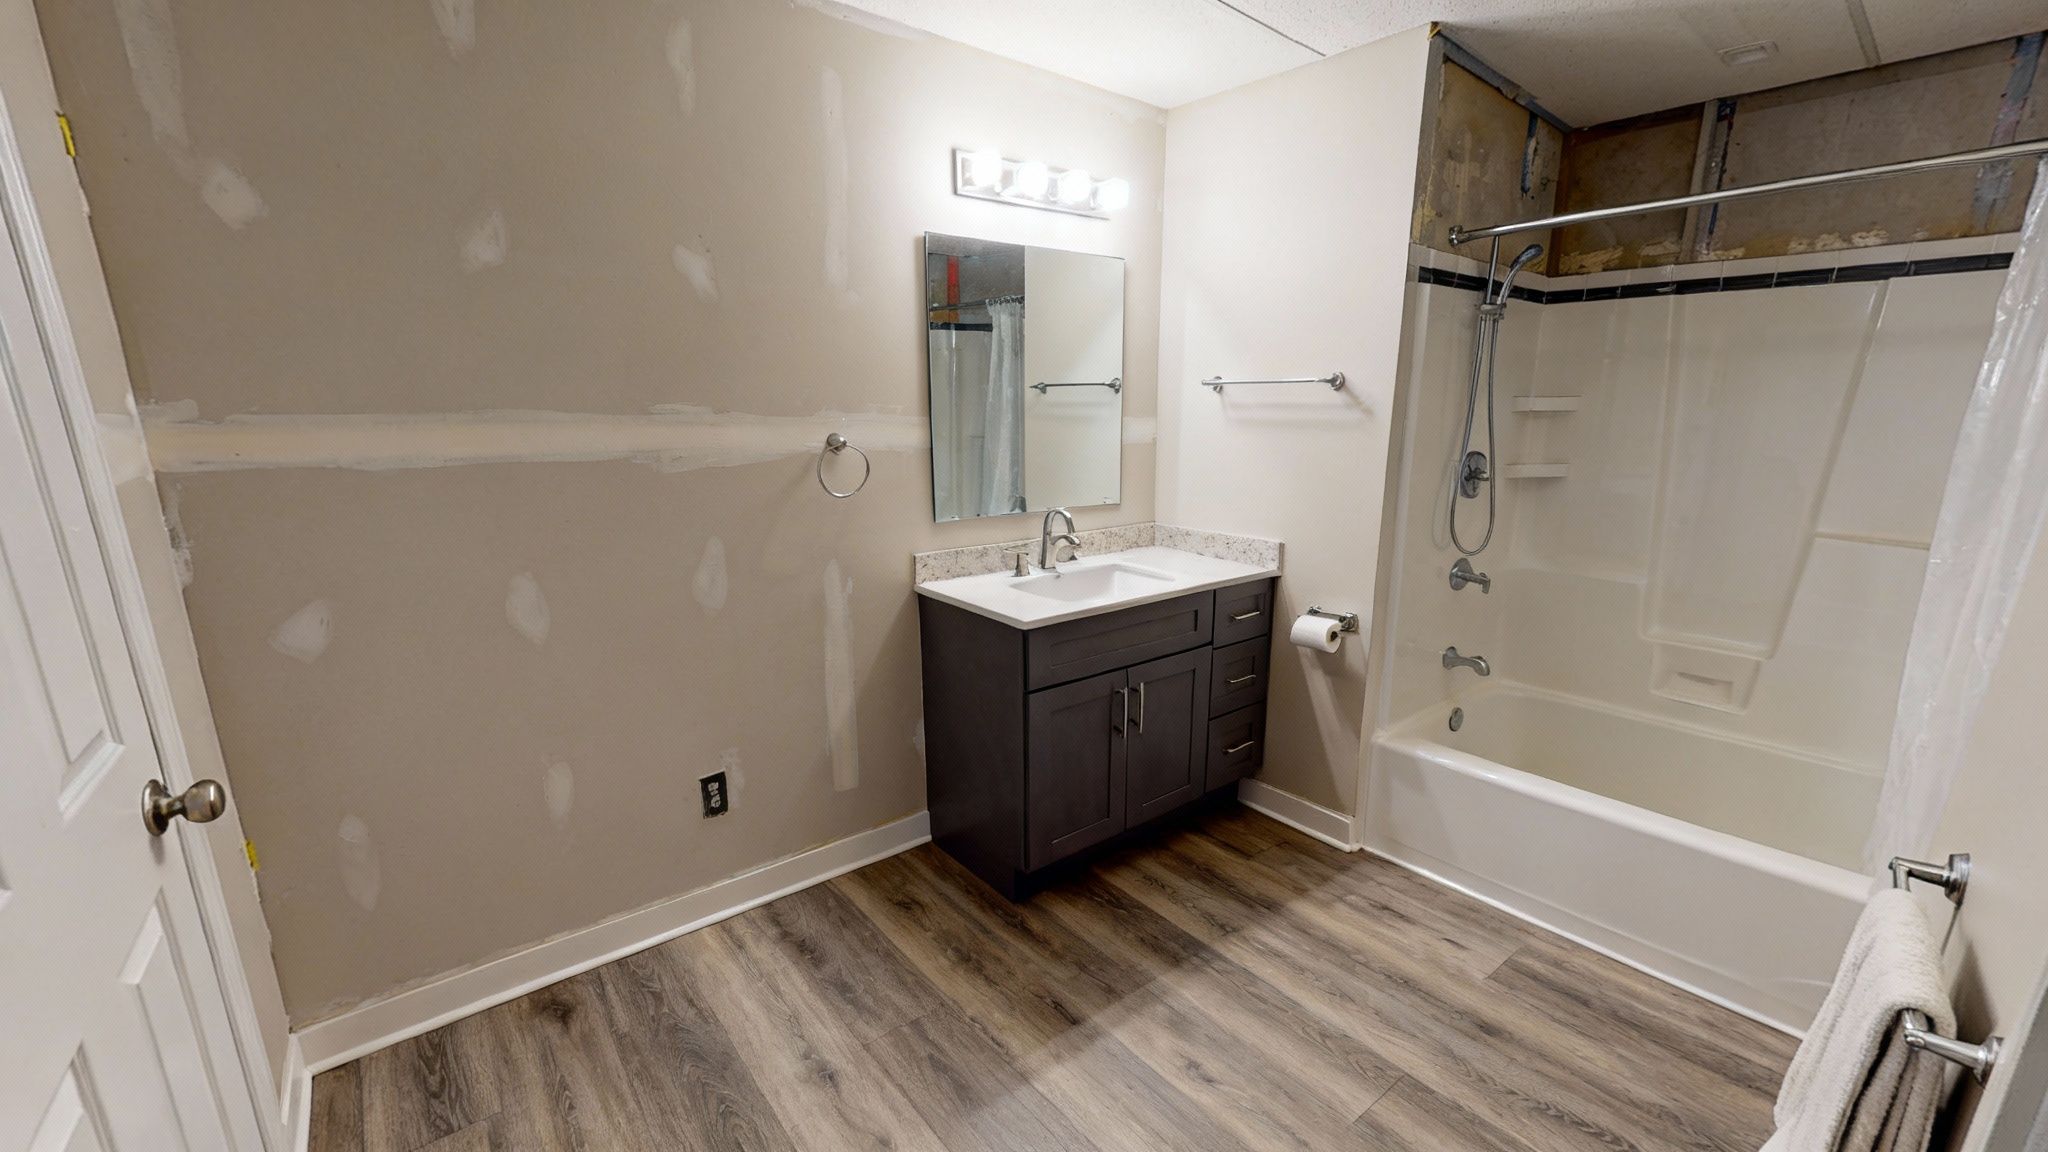
Now for the fun part. With the framing, plumbing, and electrical rough-ins done, your project finally starts looking less like a construction site and more like an actual room. This is where your vision comes to life, but before you get lost in tile samples and paint swatches, we need to tackle the single most critical job: waterproofing.
Let’s be clear: moisture is the arch-nemesis of any basement project. Skipping or skimping on this step is asking for a future filled with mold, musty smells, and expensive repairs. You have to create a completely sealed, impenetrable barrier to protect your investment from groundwater and humidity. This isn't just for the shower—it's for the entire space.
Creating a Watertight Shell
Your first line of defense starts with the walls. Any surface that's going to get hit with water, especially inside the shower, needs something tougher than standard drywall. The go-to material here is cement board. It’s the industry standard for a reason—it simply won't rot, swell, or disintegrate when wet.
Once the cement board is up, you’ll apply a waterproofing membrane right over it. You have a couple of great options here. You can use a liquid-applied membrane, which you roll on like thick paint, or a sheet membrane that you install using thin-set mortar. Either way, the goal is to create a seamless barrier that stops water from ever touching the wood framing behind your walls.
The floor, particularly inside the shower, gets the same treatment. It starts with a sloped mortar bed designed to guide every drop of water toward the drain. A waterproof membrane is then installed over that mortar bed before a single tile is laid. This system ensures any moisture that gets past the grout has a clear path to the drain.
Choosing Materials Built for Basements
With the heavy-duty waterproofing done, you can confidently move on to the finishes. For a basement bathroom, every material you choose should be evaluated for its durability and moisture resistance. This is no place for materials that can warp or absorb water.
- Drywall: Outside of the shower, stick with moisture-resistant drywall (often called "green board"). It’s specifically treated to prevent mold from taking hold in damp, humid environments.
- Flooring: Your best options are Luxury Vinyl Plank (LVP) or ceramic/porcelain tile. Both are 100% waterproof, a breeze to clean, and come in countless styles. We dive deeper into this in our guide on the best basement flooring options: https://buildnp.com/blogs/best-basement-flooring-options/
- Paint: When it's time to paint, go for a high-quality paint with a satin or semi-gloss finish. These sheens are far better at repelling moisture than flat finishes and are incredibly easy to wipe clean.
Don't forget that your exhaust fan is a crucial part of your finishing strategy. To get it right and prevent long-term moisture problems, check out this comprehensive guide to bathroom exhaust fan installation.
Lighting and Design to Banish the Basement Feel
The final details are what will elevate your new bathroom from a functional space to a genuine retreat. Lighting is your most powerful tool for shaking that "basement" vibe.
A classic rookie mistake is installing a single, dim light in the center of the ceiling. It just creates shadows and makes the room feel like a cave. You need a layered lighting plan to make the space feel bright and inviting.
Start with a good overhead light for general room illumination. Then, add a dedicated vanity light over the mirror—this gets rid of annoying shadows when you’re shaving or getting ready. If you really want to step it up, put a waterproof recessed light right inside the shower stall. It’s a game-changer.
Finally, think about scale when choosing fixtures. A huge, bulky vanity can make a small bathroom feel cramped. Consider a pedestal sink or a wall-mounted "floating" vanity to open up the floor and create an illusion of space. Pairing these with light-colored paint and tile will reflect light all around the room, making it feel airy and bright. These are the thoughtful touches that will make you forget you're even in a basement.
Got Questions About Your Basement Bathroom Project?
Even the best-laid plans can leave you with a few nagging questions. When it comes to finishing a basement, adding a bathroom is a huge value-add, but it comes with its own unique set of challenges. Let's tackle some of the most common things homeowners ask me about.
What's the Real Bottom Line on Cost?
This is always the first question, and for good reason. On average, you can expect a basement bathroom to run anywhere from $8,000 to $25,000. It's a wide range because the final number really hinges on the plumbing situation.
Just getting the plumbing roughed in can set you back $2,000 to $10,000, especially if we have to break up the concrete floor. Then you have electrical, which usually adds another $1,000 to $5,000. If your new bathroom sits below the home's main sewer line (which is common in basements), you'll need a sewage ejector pump, and that's another $1,000 to $3,000 installed. Keep in mind that labor is a huge part of the equation, typically making up 50-60% of the total project cost. You can dive deeper into these basement bathroom cost estimates to get a better handle on your own budget.
Can I Really Put in a Bathroom Without Smashing Up My Concrete Floor?
Absolutely. This is probably one of the biggest relief-points for homeowners. The magic solution here is an up-flushing or macerating toilet. These clever units sit right on top of your existing floor. When you flush, a pump inside grinds up the waste and sends it uphill through a small pipe to your main sewer line. No jackhammering required.
They’re a fantastic choice for a half-bath or a guest bathroom that won't see a ton of traffic. However, if you're planning a full bath with a shower that the whole family will use daily, I usually recommend biting the bullet and installing a more heavy-duty sewage ejector pump. It’s just a more robust, long-term solution for high-volume use.
My Two Cents: For a simpler, less invasive project, an up-flushing toilet is a game-changer. It can save you thousands in labor and headaches, making it the perfect option for adding a convenient powder room downstairs.
How Do I Make a Basement Bathroom Not Feel Like a Dungeon?
Nobody wants a dark, concrete cave for a bathroom. The trick to making the space feel bright and welcoming comes down to three things I always focus on: lighting, color, and materials.
- Layer the Lighting: A single bulb won't cut it. You need a strategy. We always install recessed lights for overall brightness, put a great-looking fixture over the vanity so you can actually see your face, and add a waterproof light in the shower. Good lighting is the fastest way to make a small space feel open.
- Go Light with Your Colors: This one’s simple. Light paint colors—think soft whites, pale grays, or even a light seafoam green—bounce light around the room. Combine that with light-colored tile on the floor and in the shower, and you've instantly made the space feel bigger.
- Pick Your Materials Wisely: A clear glass shower door does wonders by keeping the sightlines open, unlike a shower curtain that just chops the room in half. I also love using pedestal or floating vanities because they show more of the floor, which creates an illusion of more space.
Is an Exhaust Fan Really Necessary?
Yes. 100%. Don’t even think about skipping it. An exhaust fan in a basement bathroom isn't just a nice-to-have, it's your primary defense against moisture. Basements are already prone to dampness, and once you start adding steam from a hot shower, you’re creating a perfect breeding ground for mold and mildew.
Building codes are very clear on this: the fan must vent directly to the exterior of your home. Some people are tempted to just vent it into a ceiling joist bay, but that just moves the humid, mold-prone air to another part of your house. A properly installed, powerful fan is non-negotiable for protecting your investment.
Ready to turn that underused basement space into a beautiful and functional part of your home? The team at Northpoint Construction specializes in high-quality basement finishing and home remodeling projects. We serve homeowners in Orem, Provo, Lehi, and surrounding Utah communities. Let us help you add lasting value and comfort to your home. Contact us today for a consultation.