
How to Add a Bathroom to a Basement The Right Way
Adding a bathroom to your basement is a fantastic upgrade, but getting it right all comes down to the prep work. The whole process really boils down to four critical starting points: finding your existing plumbing lines, sketching out a layout that actually works, getting the right permits, and bringing in licensed pros for the plumbing and electrical. If you nail this initial planning, you'll save yourself a world of headaches and a surprising amount of money down the road.
Planning Your Basement Bathroom Layout
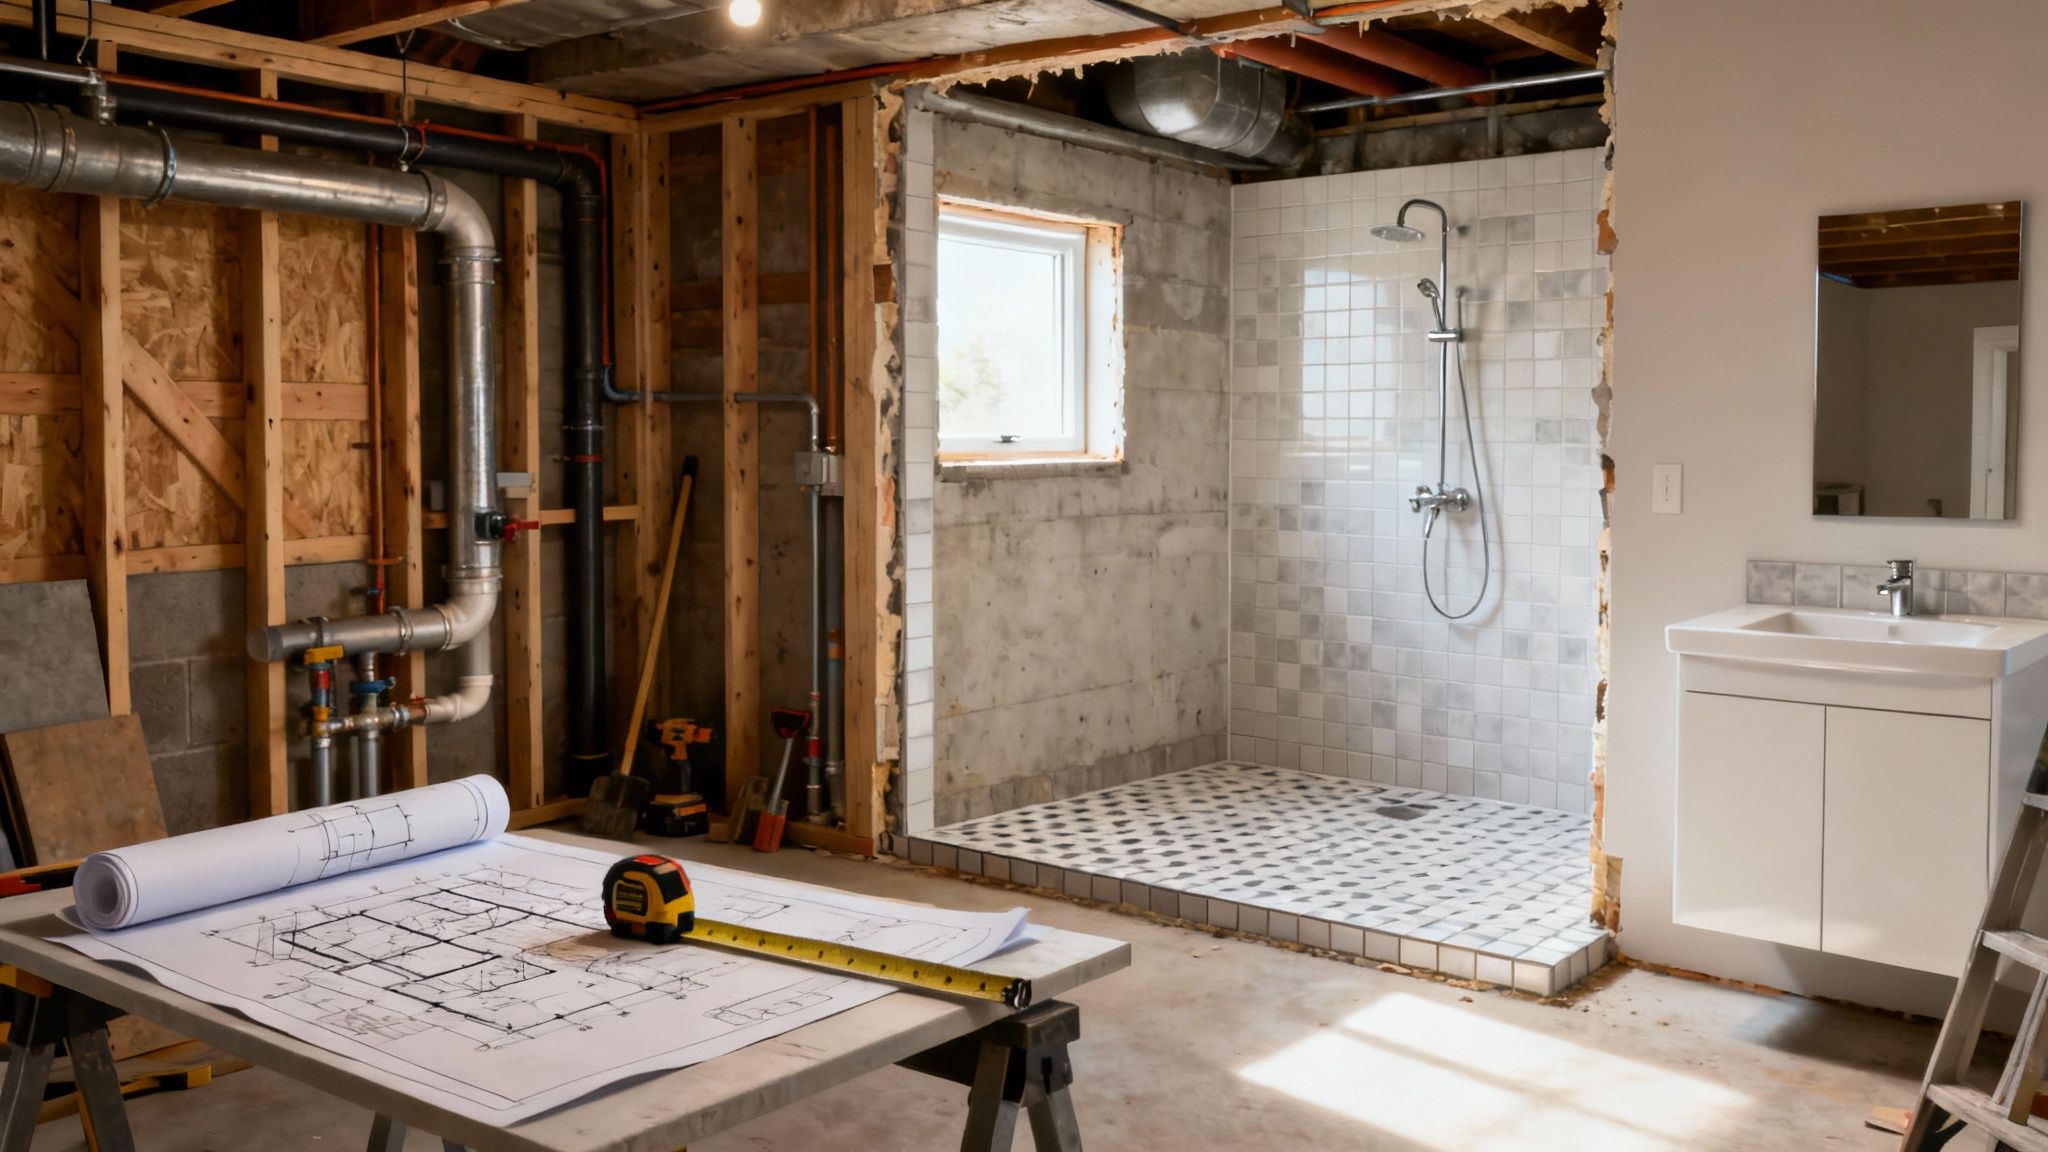
Before a single sledgehammer hits the concrete, you need a solid plan. This is where your vision for a new bathroom meets the reality of your home's bones. A thoughtful plan isn't just about avoiding mistakes; it's your best tool for keeping the budget in check.
First things first, you need to figure out the best spot for the new bathroom. This decision is almost always dictated by where your home’s existing plumbing and mechanical systems are hiding.
Find Your Plumbing and HVAC Runs
Your first mission is to locate your home's main vertical waste stack. It's the big pipe—usually 3 to 4 inches in diameter—that funnels all the waste from the upstairs bathrooms down to the main sewer line. The closer you can build your new bathroom to this stack, the better. It drastically cuts down on the amount of concrete you'll need to break up and the overall complexity of the plumbing. Shorter runs are always cheaper runs.
While you're at it, map out your HVAC ductwork. The easiest way to heat and cool the new space is by tapping into nearby supply and return vents. If you have to run new ducts across the basement, you'll end up with soffits or bulkheads that can lower your ceiling height and make the layout feel awkward.
Designing a Functional Space
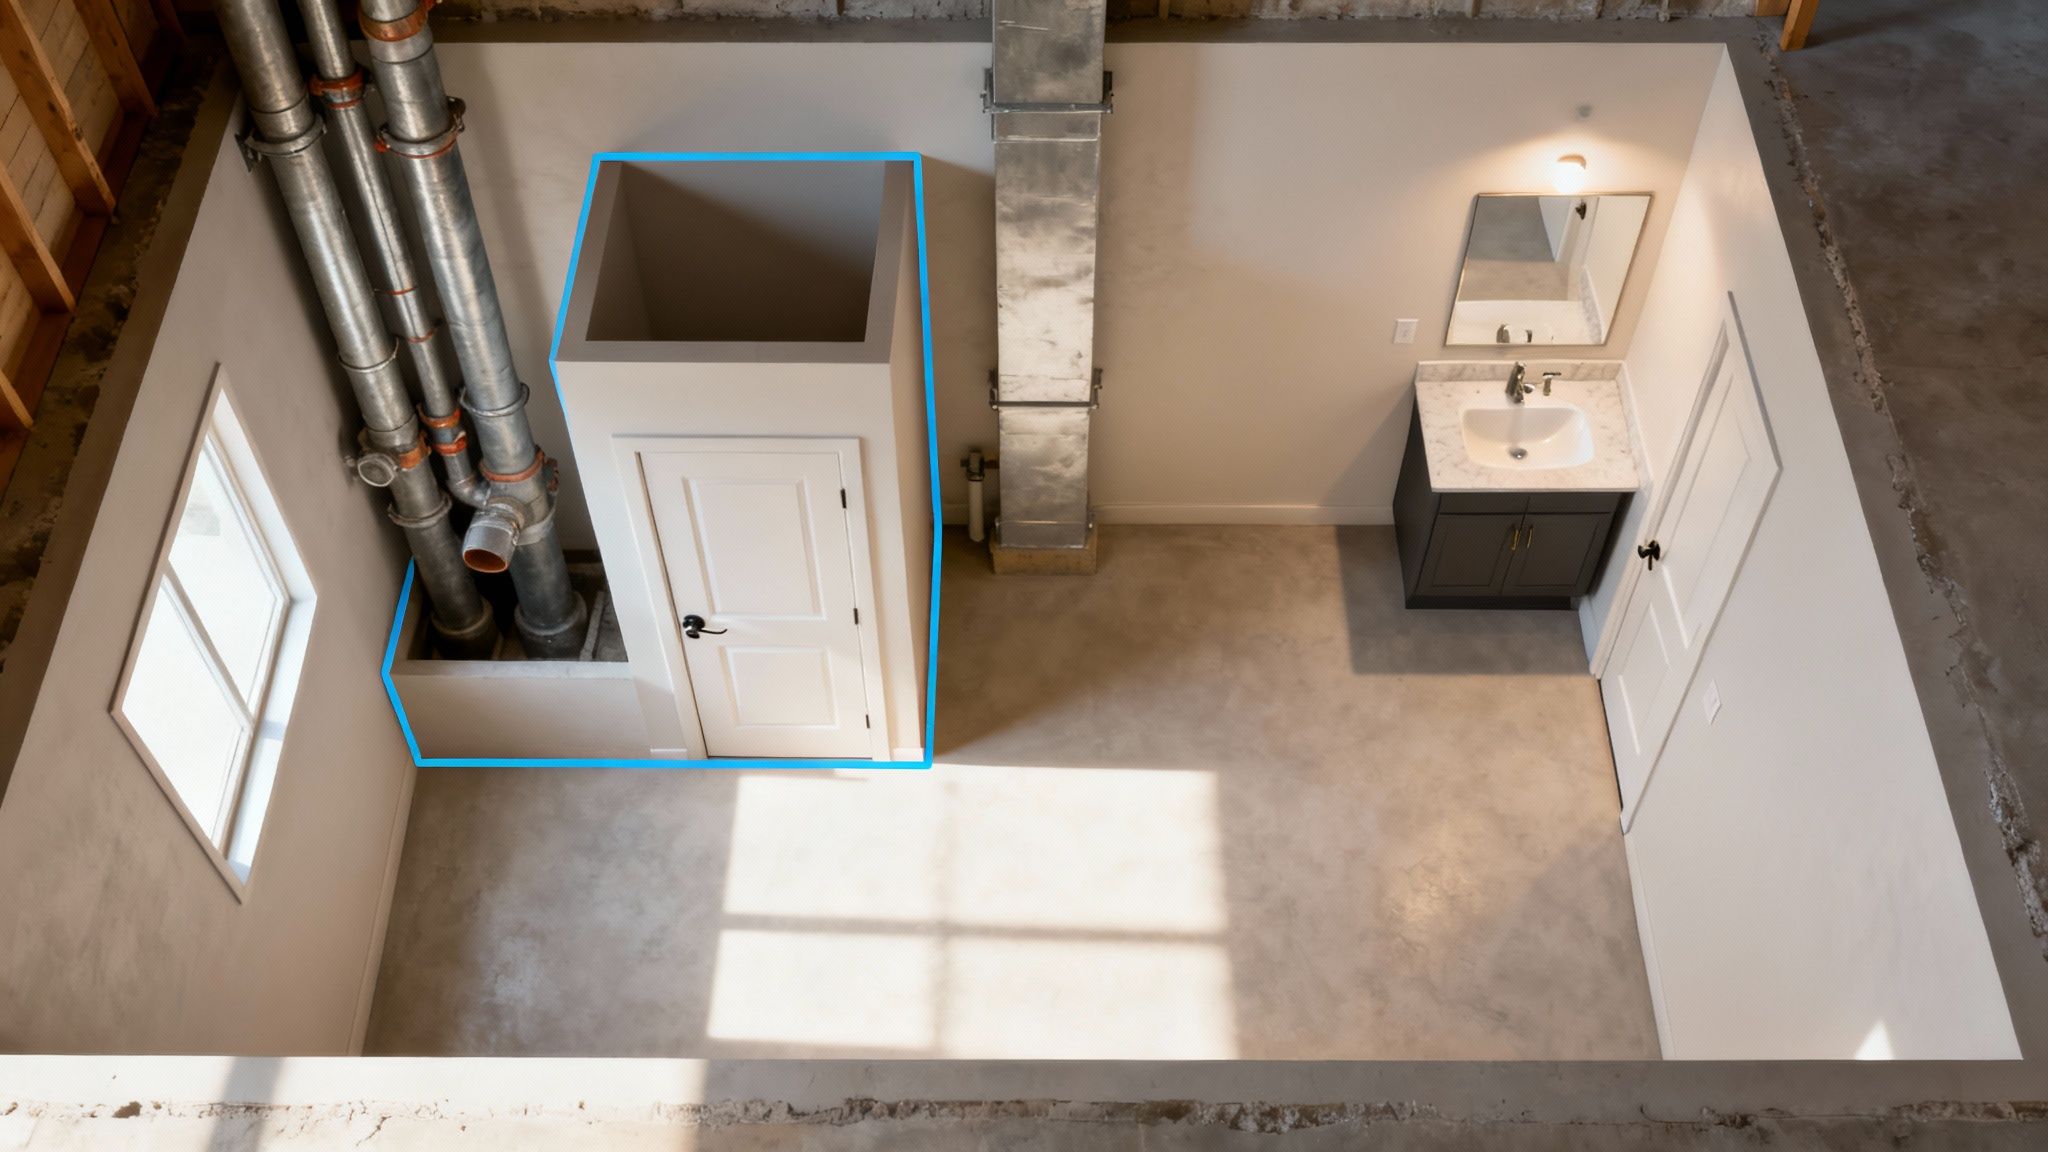
Once you’ve zeroed in on a location, it’s time to start sketching out the floor plan. Basements throw some unique curveballs your way, from low ceilings and support posts to a lack of natural light. But a smart design can turn these challenges into a space that feels surprisingly bright and open.
Keep these key layout details in mind:
- Door Swing: Make sure the door has a clear path to open without banging into the toilet or vanity. In a tight space, consider a pocket door or one that swings out into the main basement area. It's a classic space-saving trick for a reason.
- Fixture Placement: The most efficient and budget-friendly approach is to line up the toilet, sink, and shower along a single "wet wall." This consolidates all your plumbing into one area, simplifying the rough-in process.
- Shower Size: A standard shower footprint is 36x36 inches. If you've got the room to go bigger, it can make the whole bathroom feel more luxurious. Just don't forget to account for the ceiling height—you need enough vertical space for the shower pan and the correct drainage slope.
One of the most common rookie mistakes is forgetting about the "hidden" space plumbing requires. You have to budget for the thickness of the walls and the room needed behind the fixtures for all the drain lines and water supply pipes.
Often, a new bathroom is just one piece of a bigger basement project. Thinking about the differences between a finished vs unfinished basement can help you see how this new bathroom fits into your long-term goals. Getting the plan right at this stage is what makes the actual construction phase go smoothly.
Budgeting Your Project and Pulling Permits
Once you have a solid layout in hand, it’s time to tackle the two biggest hurdles: money and paperwork. This is the part of the project where your Pinterest board meets the real world of budgets and building codes. Trust me, you don’t want to swing a sledgehammer until you have a firm grip on both.
Before you even think about buying a single 2x4, you need to head down to your local building department (or, more likely, their website). A new bathroom, especially in a basement, involves plumbing and electrical work that absolutely requires a permit. Trying to fly under the radar is a terrible idea—it can lead to hefty fines, orders to rip out your hard work, and major headaches when you try to sell the house later.
Navigating the Permit Process
Think of the permit process not as a hassle, but as a safety net. It ensures that every critical piece of your project is done right and inspected by a professional. This isn't just about following rules; it's about making sure your home is safe.
Your local building department will have a checklist of what they need, but you can generally expect to provide:
- A to-scale floor plan: This shows where everything goes—the vanity, toilet, shower—and any new walls you're building.
- A plumbing diagram: This is the roadmap for all your new pipes, including drains, vents, and hot/cold water lines.
- An electrical layout: This details where you’re putting lights, switches, the exhaust fan, and crucially, the GFCI outlets required in bathrooms.
Getting these permits approved before work starts is non-negotiable. It allows an inspector to come in and sign off on the rough-in plumbing and electrical while the walls are still open.
Expert Tip: Securing permits might feel like it's slowing you down, but it’s the best insurance you can have. It’s a second set of expert eyes on the systems you can’t see, guaranteeing they’re safe and up to code before they get buried behind drywall.
Building a Realistic Basement Bathroom Budget
Alright, let's talk numbers. The final cost of a basement bathroom can swing wildly. A straightforward, no-frills setup might run you $8,000, while a more complex project with high-end finishes could easily top $25,000.
Why the huge range? A few key factors are at play. If your basement floor is below the home’s main sewer line, you’ll likely need a sewage ejector pump, which can add a few thousand dollars right off the bat. Remember, labor can easily eat up 50% to 60% of your total budget, so every decision matters. You can see a great breakdown of what to expect in this 2025 cost guide from Allure Baths & Kitchens.
To get a true sense of the cost, get detailed quotes from at least three different licensed contractors. A proper quote should itemize everything—labor, materials, fixtures, plumbing, electrical—so you can see exactly where your money is going and make fair comparisons. For a deeper look at budgeting, check out our guide on the cost to install a bathroom in the basement.
Here’s a rough breakdown of where your money will likely go.
Basement Bathroom Cost Breakdown
| Plumbing Rough-In | $2,500 - $6,000+ | The biggest variable. Costs increase significantly if you need to break concrete or install an ejector pump. |
| Framing & Drywall | $1,500 - $3,500 | Includes materials and labor for building the walls and ceiling. |
| Electrical Work | $1,000 - $2,500 | Covers new circuits, GFCI outlets, lighting, and an exhaust fan. Price depends on accessibility to your main panel. |
| Fixtures (Toilet, Sink, Shower) | $800 - $4,000 | A huge range depending on your taste. A basic toilet is cheap; a custom tile shower is not. |
| Flooring | $500 - $2,000 | Luxury Vinyl Plank (LVP) and tile are popular, durable choices for basements. |
| Ventilation | $300 - $800 | A good fan is crucial for controlling moisture. Cost depends on the length of the vent run to the exterior. |
| Permits & Inspection Fees | $200 - $750 | Varies by municipality but is a mandatory expense. |
This table should give you a starting point, but always leave a little wiggle room in your financial plan.
Finally, and I can't stress this enough, build a contingency fund into your budget. Aim for an extra 10-15% of your total estimated cost. Basements are famous for throwing curveballs—from discovering a hidden crack in the foundation to finding an old pipe right where you planned to put the toilet. That buffer is what keeps a small surprise from turning into a project-killing disaster.
Solving Basement Plumbing and Drainage Challenges
Plumbing is the heart of any bathroom, but a basement bathroom presents a unique puzzle. The biggest hurdle? Your basement floor is almost always below the main sewer line leaving your house. This means gravity—plumbing’s best friend—is working against you. Getting this part right is the single most important piece of the project.
Your home's existing plumbing setup will dictate the path forward. In a perfect world, your main drain line might be low enough to allow for a conventional, gravity-fed system. Honestly, this is pretty rare. Most of the time, you'll need a mechanical solution to pump wastewater up and out.
Up-Flush vs. Ejector Pump Systems
This is where your first major decision comes in. You'll likely need either an up-flush toilet system (sometimes called a macerating toilet) or a sewage ejector pump.
An up-flush system is a clever piece of engineering. It uses a compact unit, usually tucked right behind the toilet, that grinds waste into a slurry and pumps it away through a small pipe. This is often the go-to for DIYers or those wanting a less invasive option because it doesn't require you to break up your concrete floor.
The alternative is a sewage ejector pump, which is the more traditional, heavy-duty solution. This job is a bit more involved. It means cutting a hole in your concrete slab, digging out a pit, and installing a sealed basin with a powerful submersible pump inside. Your toilet, shower, and sink all drain into this basin. When the water level rises, the pump kicks on and forcefully sends the waste up to the main sewer line.
A common misconception is that up-flush systems are only for toilets. Many modern units come with extra inlets, allowing you to connect a sink and even a shower. This makes them a surprisingly capable all-in-one solution for a full basement bathroom.
The infographic below gives you a great visual of how these critical plumbing parts, including the pumps and venting, all fit together.
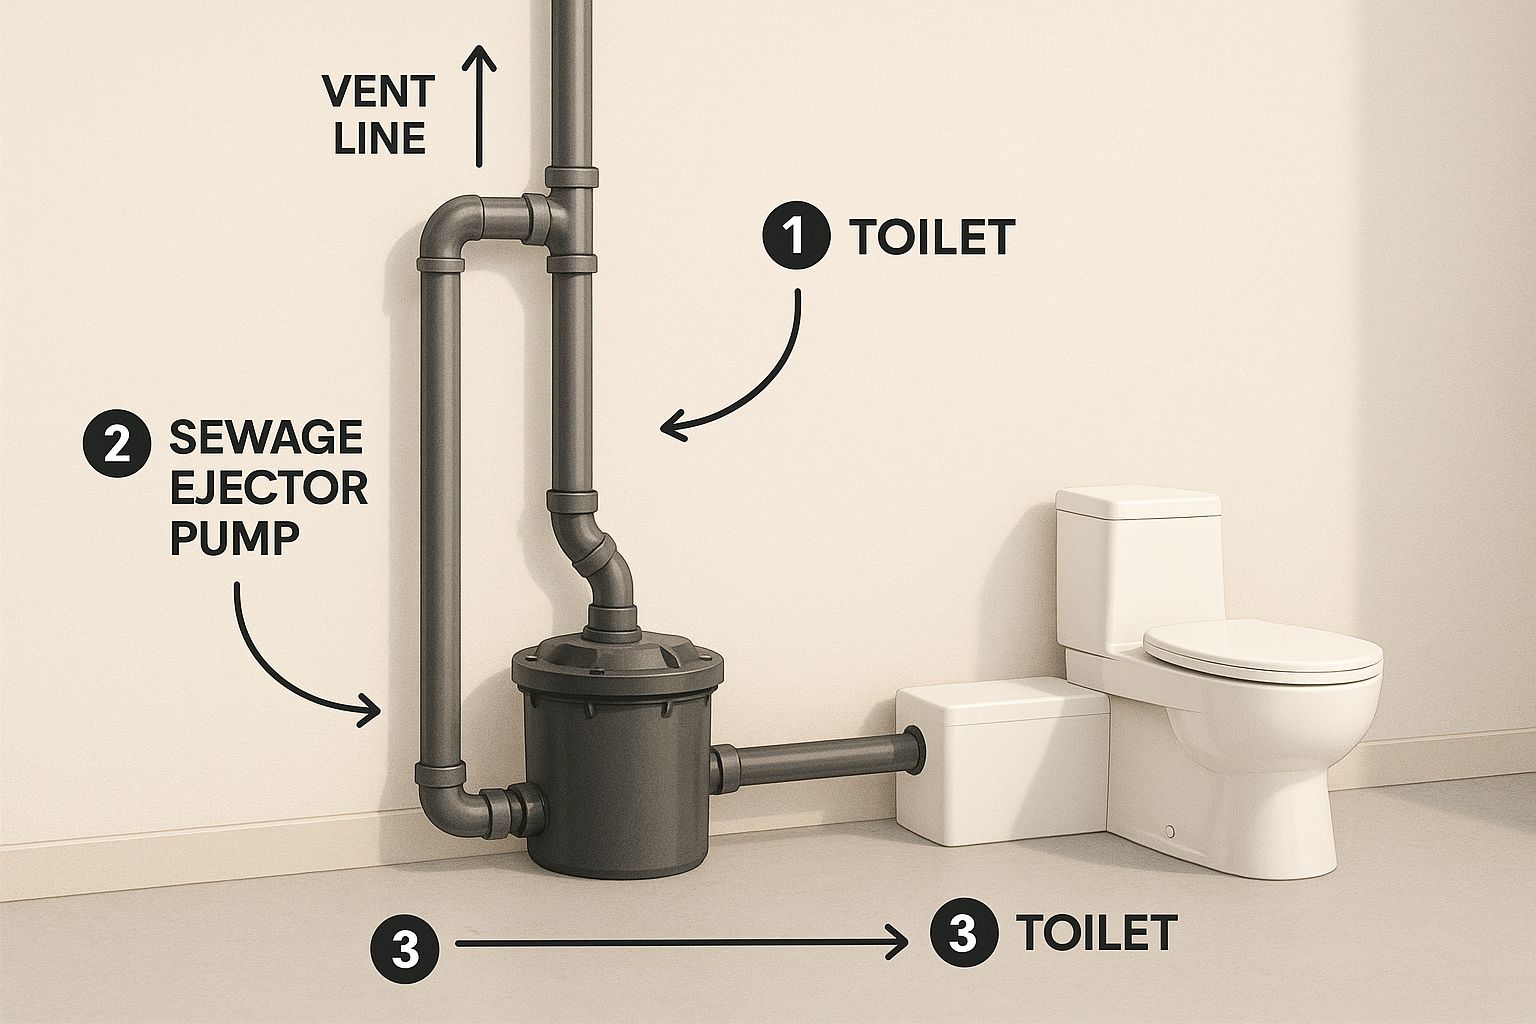
As you can see, both systems rely on a pump to do the heavy lifting, but the way they're installed is fundamentally different.
The Critical Role of Proper Venting
No matter which pump system you pick, proper venting is absolutely non-negotiable. Every single fixture—toilet, sink, shower—needs a vent pipe. This pipe allows air into the drain system, preventing a vacuum from forming as water flows out.
Without a proper vent, you'll get slow drains, weird gurgling sounds, and something far worse: the system will siphon the water right out of the P-traps.
Those U-shaped pipes under your sink and built into your toilet are called P-traps for a reason. They hold a small amount of water that creates a seal, blocking foul and potentially dangerous sewer gas from seeping into your home. An improper or missing vent makes them completely useless.
Vent pipes have to be routed correctly, either tying into your home's main vent stack or running all the way up through the roof. This is complicated work that must meet strict local building codes. It's truly a job best left for a licensed plumber. Getting the drainage and venting right from the start is the foundation for a safe, functional bathroom you'll be happy with for years to come.
Framing Walls and Running Utilities
Once the concrete dust settles from your plumbing work, it’s time to give your new bathroom its bones. This is where you’ll frame the walls, finally turning that open space into an actual room. Getting these walls perfectly straight and square is the foundation for everything that comes next, from drywall to tile.
Basements are rarely a blank slate. You’ll almost certainly have to contend with things like support columns, low-slung ductwork, or a web of existing pipes. Don't fight them; work with them. That pesky support post? It can disappear inside a wall or become the perfect anchor point for some built-in shelving next to the toilet.
Building a Rock-Solid Frame
The easiest way to build your walls is to assemble them flat on the floor and then hoist them into position. But before you start nailing, there's a critical first step: the bottom plate. This is the piece of lumber that sits directly on the concrete.
You absolutely must use pressure-treated lumber for this bottom plate. It’s your primary defense against moisture wicking up from the concrete slab and rotting out your frame over time. Once that’s secured to the floor with concrete fasteners, you can build out the rest of the frame. Take your time with a level and square—a wall that isn't perfectly plumb (vertical) and square will haunt you when you're trying to get a vanity to sit flush.
My Two Cents: Never, ever frame your new walls directly against the concrete foundation. Leave at least a one-inch gap. This air space is a simple but incredibly effective way to stop moisture from migrating from the foundation into your new drywall, which is your best bet for preventing mold down the road.
Weaving in Electrical and HVAC
With the studs exposed, the skeleton of your walls provides easy access for running wires and ductwork. This isn't just a matter of popping in an overhead light. A modern bathroom needs a thoughtful electrical plan.
You’ll be running wires for a few key things:
- GFCI Outlets: This is non-negotiable. Any outlet in a bathroom has to be a Ground Fault Circuit Interrupter (GFCI) for safety. Plan on at least one near the vanity for hair dryers, electric toothbrushes, and so on.
- Lighting: Good lighting makes a huge difference. Think in layers—maybe some recessed cans for general light and a dedicated fixture over the mirror so you can actually see what you're doing.
- Ventilation Fan: An exhaust fan is your number one weapon against mold and mildew. It needs to be sized correctly for the room and, crucially, vented all the way to the outside of your house. Don't just vent it into the space between your ceiling joists.
Now is also the time to run a heating and cooling duct into the space. Tying into your home’s existing HVAC system is the difference between a comfortable bathroom and a freezing cold cave every winter. Just like the plumbing, this is a job for the pros. A licensed electrician needs to handle the wiring to ensure it's safe and up to code, and an inspector will have to give it the green light before you can even think about putting up drywall.
Waterproofing and Finishing Your New Bathroom
Now for the fun part. With the rough-in work complete and the bones of your new bathroom in place, you get to start making it look like an actual bathroom. This is where you'll go from a skeleton of studs and pipes to a finished, polished space. But before you get to the tile and paint, you need to think about protection.
The first major step is putting up the walls, but don't just grab any standard drywall. For a bathroom—especially one in the basement—you need to use moisture-resistant drywall. You'll often hear it called "green board" for its signature color. This material is your first line of defense against the dampness and humidity that can lead to mold and mildew issues down the road.
Keep in mind, a new bathroom is often just one piece of a bigger basement puzzle. The average cost per square foot for a full basement remodel lands somewhere between $25 and $65. For a standard project, that means you could be looking at a total cost of $12,500 to $37,500. Knowing these numbers helps you choose finishes that make sense for your overall budget. You can find more insights on basement remodel costs to see how it all adds up.
Installing Waterproofing and Durable Flooring
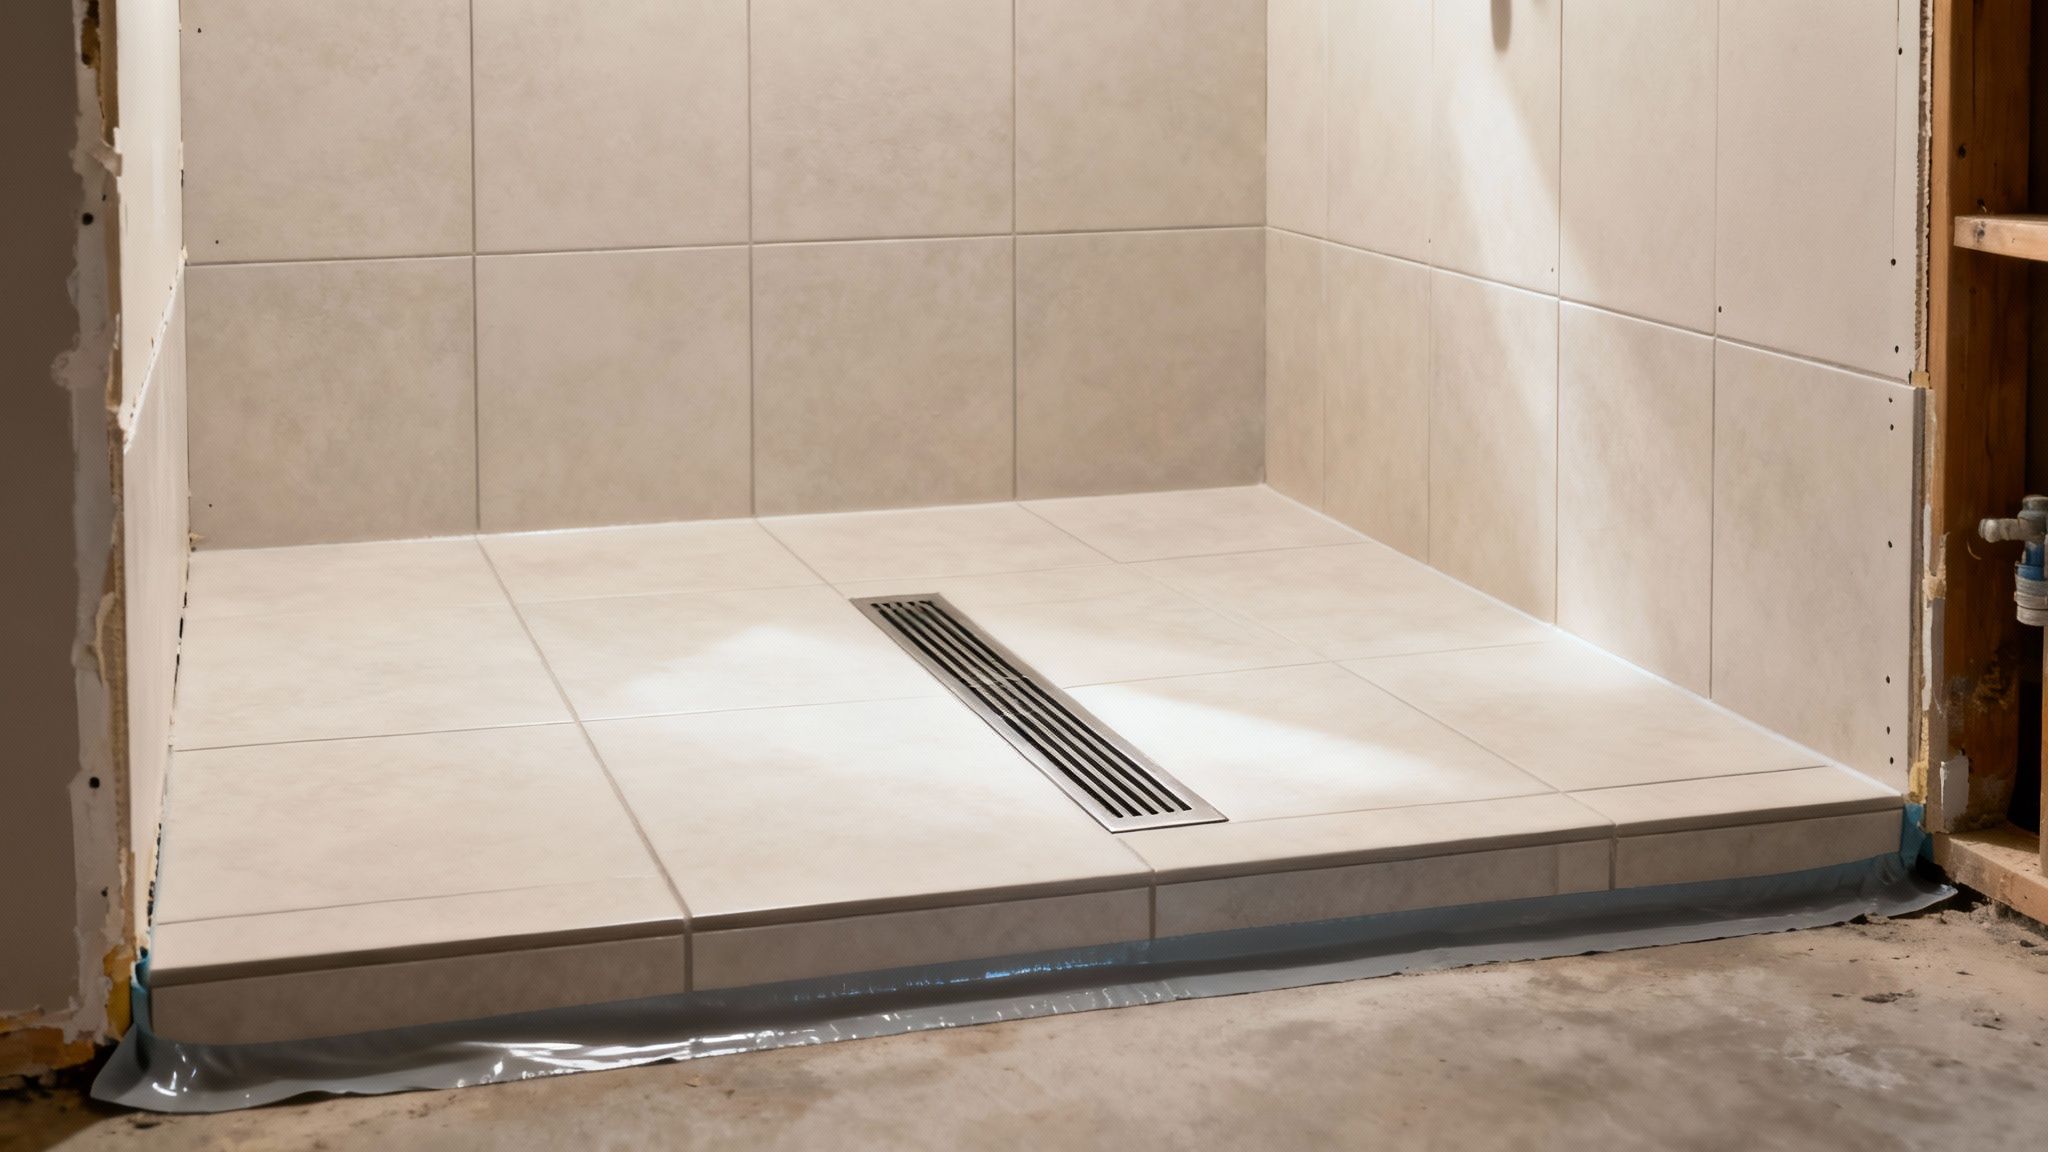
Once the drywall is hung and the seams are taped and mudded, it's time to shift your focus to the wettest part of the room: the shower. This is non-negotiable—you have to install a waterproofing membrane. You've got a couple of common options here, like a paint-on liquid membrane or a roll-on sheet membrane. Either way, the goal is to create an unbroken barrier that keeps water from ever reaching the wall studs behind your tile.
Pro Tip: Whatever you do, don't skip the waterproofing step to save a few bucks. I've seen the aftermath of a tiny leak behind a shower wall, and it's not pretty. Think of it as the cheapest insurance policy you'll ever buy to prevent thousands in future rot and mold repair.
With the walls protected, you can move on to the floor. You need something tough and 100% waterproof. Two of the best choices for basements are:
- Luxury Vinyl Plank (LVP): This stuff is practically made for basements. It's totally waterproof, clicks together for a simple installation, and won't warp or buckle if it gets damp.
- Porcelain or Ceramic Tile: The timeless choice for a good reason. Tile is incredibly durable and waterproof, but just remember to seal the grout lines. Grout itself is porous, and sealing it prevents stains and moisture from seeping in.
Bringing the Room to Life with Fixtures and Finishes
Now you're ready to install the pieces that truly define the space. Setting the toilet is typically first on the list, which is then followed by positioning the vanity and hooking up the sink. After that, you'll install the shower fixtures, like the control valve and shower head, before you start setting any tile on the walls.
Tiling is where a little patience really pays off, as it has a massive impact on the final look. Map out your pattern beforehand, use a good quality thin-set mortar, and take your time. Once the tile is set and grouted, you can finally paint. I always recommend a satin or semi-gloss finish for bathrooms; they stand up to moisture much better and are way easier to wipe down than flat paint. To get a better handle on this part of the job, check out our guide on the cost of drywalling a basement.
The final touches are your light fixtures and, most importantly, the ventilation fan. A properly sized fan that vents directly to the outside is your best weapon against humidity. It’s the key to keeping the air fresh and protecting all of your hard work for years to come.
Answering Your Top Basement Bathroom Questions
Even the most meticulously planned basement bathroom project will throw a few curveballs your way. Let's tackle some of the most common questions I hear from homeowners. Getting these answers straight from the start can save you a world of headaches and keep your project running smoothly.
One of the first things everyone wants to know is, "What's this actually going to cost me?" Realistically, adding a bathroom in a basement can range anywhere from $7,000 to $30,000. Most projects I've seen land somewhere in the $11,000 to $26,000 bracket. The final number really hinges on the size and whether you’re planning a simple half-bath or a full bathroom with a shower. You can dive deeper into what drives these figures by checking out this guide on bathroom addition costs.
Beyond the budget, the unique plumbing challenges of a basement are often the biggest source of confusion. Many homeowners wonder if they're automatically on the hook for specialized, more expensive plumbing.
Do I Really Need an Up-Flush Toilet or Ejector Pump?
Not always, but it’s a very common requirement for basements. It all comes down to one simple factor: the location of your home's main drain line in relation to your basement floor.
If your new toilet, sink, and shower sit below that main line, gravity won’t be on your side. In that case, you absolutely will need a pump system to get waste up and out. This could be an ejector pump that handles all the fixtures or a self-contained up-flush toilet. This is one of the first and most important conversations you’ll have with your plumber.
How Can I Stop Moisture and Mold in a Basement Bathroom?
This is, without a doubt, one of the most critical aspects of a successful basement project. You can't just build it like a normal bathroom; you have to actively fight potential moisture from day one. A solid strategy involves three key components:
- Choose the right materials: Start with a foundation of mold-resistant drywall and select flooring that's completely waterproof, like luxury vinyl plank (LVP) or porcelain tile.
- Create a waterproof barrier: In the shower, a waterproofing membrane (either a sheet membrane or a liquid-applied one) is non-negotiable. It goes behind the tile and creates a truly watertight seal.
- Ventilate, ventilate, ventilate: A powerful, properly-sized exhaust fan is your best friend. It needs to be vented directly outside—not into the attic or a crawl space—to pull all that humid air out of the room.
The biggest mistake I see homeowners make is skimping on the exhaust fan. It's not just an accessory; it's your primary line of defense against mold, mildew, and long-term moisture damage. It protects your entire investment.
Can I Just DIY My Basement Bathroom?
While a handy homeowner can definitely tackle some of the work—like framing the walls, hanging drywall, or painting—there are parts of this job that really need a pro.
Plumbing and electrical work, in particular, are governed by strict building codes and carry serious safety risks. A small wiring mistake could create a fire hazard, and a tiny plumbing leak behind a wall can lead to thousands in water damage and a major mold problem. It's just not worth the risk.
Ready to transform that underused basement into a beautiful and functional part of your home? The team at Northpoint Construction has the hands-on experience to manage your entire project, from the initial plans to the final walkthrough. Let us handle the complexities so you can enjoy the results.