
How to Improve Home Energy Efficiency: Utah Homeowner's Practical Guide
Improving home energy efficiency really boils down to a simple idea: using less energy to enjoy the same level of comfort, or even better. It’s a mix of smart physical upgrades, like sealing up those sneaky air leaks, and small behavioral shifts, like how you use your thermostat. The smartest way to go about it is to figure out where your home is losing the most energy first, then tackle the fixes that give you the most bang for your buck.
Your Starting Point for a More Efficient Home
Before you even think about spending money on upgrades, you need to get a clear picture of how your home is performing right now. I’ve seen it time and time again: homeowners jump straight to expensive projects like new windows, only to find their energy bills haven't budged. That’s because they never addressed the real culprit. Trying to make a home more efficient without an initial assessment is like trying to fill a leaky bucket—you’ll waste a lot of effort for very little result.
A home energy audit is that crucial first step. It gives you the hard data you need to make intelligent, cost-effective decisions. And the good news? It doesn't have to be some complex, expensive ordeal. You can actually do a lot of the initial checks yourself in just a single afternoon.
Simple DIY Energy Checks
You can get a surprisingly good feel for your home's energy weaknesses with just your own senses and a few household items. These simple tests help you pinpoint the most obvious energy-wasters without any fancy equipment.
- The Candle Test for Drafts: This one is an old-school classic for a reason. On a breezy day, carefully move a lit candle or an incense stick along your window frames, door jambs, and even around electrical outlets. If that flame starts to dance or the smoke wavers, you've just found an air leak that's costing you money.
- A Quick Look at Your Insulation: Pop your head up into the attic. Can you clearly see the tops of the floor joists? That's a tell-tale sign you probably don't have enough insulation. Also, look for insulation that’s compressed, shifted, or uneven, as these are all weak spots where heat is making a quick escape.
- Give Your HVAC System a Once-Over: Take a look at your furnace or air conditioner. How old is it? When was it last serviced? A system that's over 15 years old is almost certainly a fraction as efficient as modern units. Even something as simple as a clogged filter can force the system to work much harder, driving up your energy consumption.
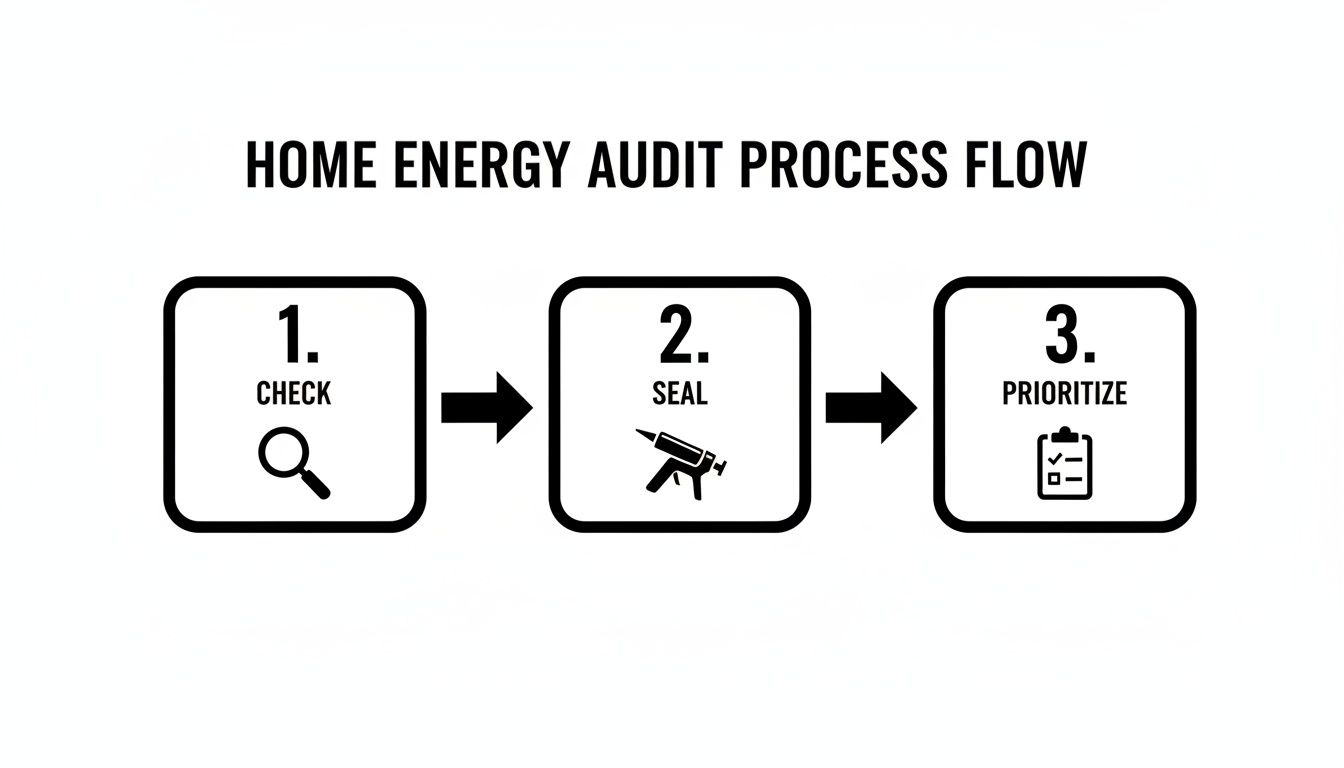
The real power of an audit isn't just in spotting problems; it's about using those findings to create a logical, prioritized action plan.
Think of a home energy audit as your roadmap. It turns pure guesswork into a targeted strategy, making sure you put your time and money where it will actually make a difference to your comfort and your monthly bills.
When to Call a Professional
A DIY audit is a fantastic starting point, but for a truly deep dive, nothing beats a professional. An expert energy auditor comes equipped with specialized tools like blower doors (to measure air leakage) and infrared cameras (to see hidden temperature differences).
You should seriously consider hiring a pro if you suspect there are major issues, you're planning a big renovation and want a comprehensive report, or you just want an expert to confirm your own findings. They’ll provide a detailed, prioritized list of recommendations you can use to plan your projects. This professional advice pairs perfectly with an annual home maintenance checklist to keep your entire property in prime condition.
If you’re looking for more strategies, this practical guide on how to reduce electricity bills is another great resource. Ultimately, this initial assessment lays the foundation for every other efficiency-boosting step you'll take.
Here's a quick look at how the priorities usually stack up after a typical home energy audit.
Home Energy Efficiency Priority Checklist
This table provides a general order of operations, starting with the fixes that typically offer the biggest impact for the lowest cost.
| 1 | Air Sealing (caulking, weatherstripping) | 10-20% on heating/cooling | $50 - $300 (DIY) |
| 2 | Add Attic Insulation | 10-15% on heating/cooling | $1,500 - $3,500 |
| 3 | HVAC Maintenance & Tune-up | 5-15% on heating/cooling | $100 - $300 |
| 4 | Upgrade to a Smart Thermostat | Up to 10% | $150 - $300 |
| 5 | Duct Sealing & Insulation | Up to 20% of conditioned air loss | $300 - $1,000 |
Of course, every home is unique, but this checklist gives you a solid framework for planning your attack on energy waste. Starting with the basics like air sealing and insulation almost always yields the fastest and most significant returns.
Seal and Insulate for Maximum Energy Savings
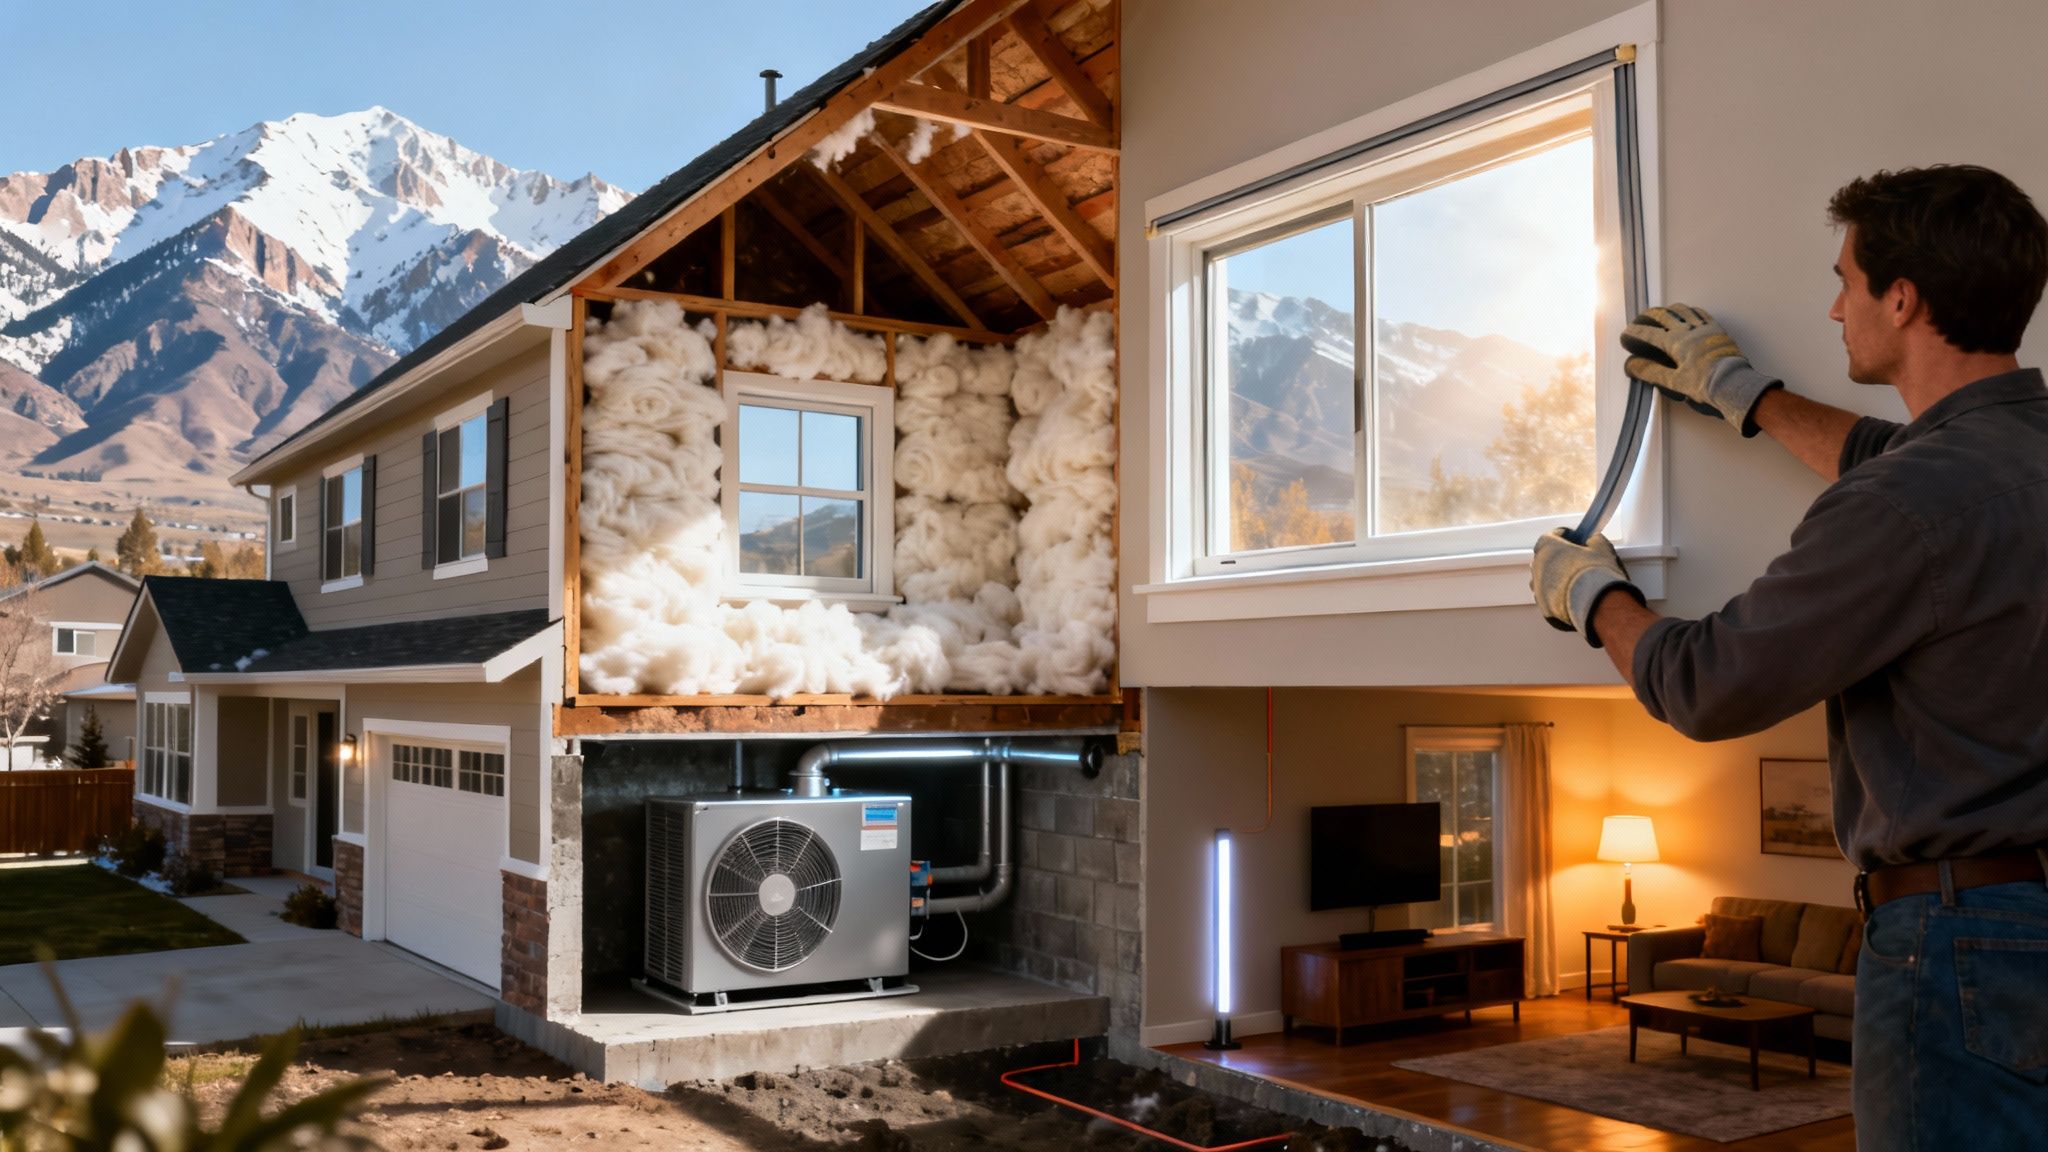
Once you know where your home is bleeding energy, it’s time to stop the bleeding. For most of us here in Utah, with our blazing summers and frigid winters, the biggest bang for your buck comes from sealing air leaks and beefing up your insulation.
Think of it as shoring up your home’s "envelope"—the shell that separates your cozy living space from the weather outside. A leaky, under-insulated house makes your furnace and AC work overtime, which is just a surefire way to get a sky-high utility bill. Tackling the envelope first is the foundational work that makes every other upgrade, from a new furnace to a smart thermostat, actually perform the way it's supposed to.
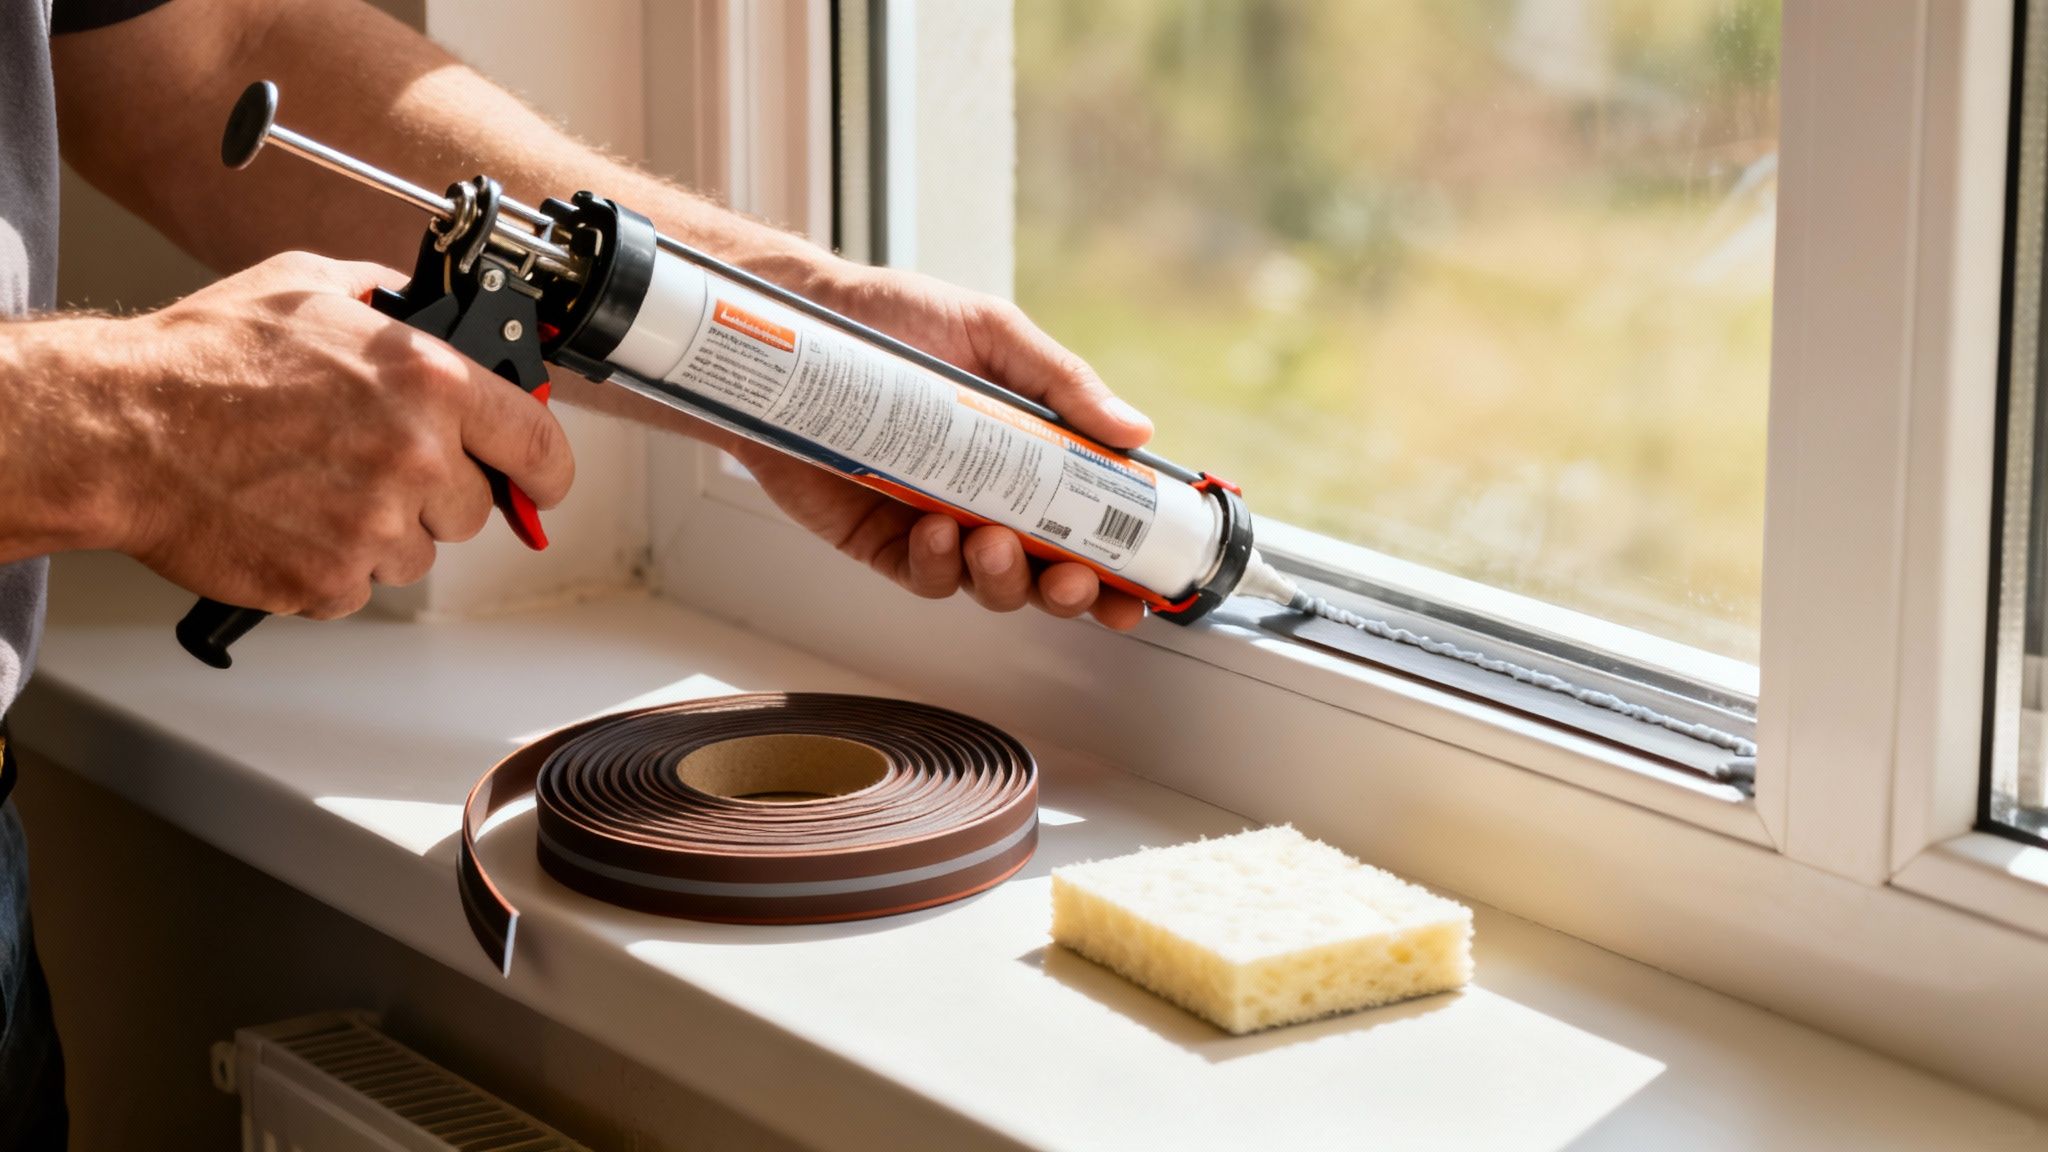
Hunting Down and Sealing Air Leaks
Air leaks are the invisible thieves robbing you of conditioned air. All those tiny gaps around windows, doors, pipes, and outlets might seem small, but add them all up, and you’ve basically got a window open 24/7. The good news is that sealing them is one of the cheapest and most effective DIY projects you can do.
With a caulk gun and some weatherstripping, you can make a serious dent in your energy waste over a single weekend. Here’s where to focus your attack:
- Window and Door Frames: Feel for drafts. Check where the trim meets the wall, both inside and out. A simple bead of caulk is all it takes.
- Electrical Outlets and Switches: These are classic culprits on exterior walls. You can buy cheap foam gaskets at any hardware store that you install behind the faceplates in seconds.
- Plumbing and Ductwork Penetrations: Crawl into your basement or attic and look for daylight where pipes and wires enter the house. Expanding foam sealant is your best friend for these bigger gaps.
The Power of Proper Insulation
After you’ve plugged the leaks, insulation is your next line of defense. Insulation’s job is to resist heat flow, which is measured by its R-value. A higher R-value means better thermal performance—it keeps the heat in during the winter and out during the summer.
Properly upgrading your insulation and sealing air leaks can cut your heating and cooling costs by up to 20%. In fact, up to 25% of a typical home's heat loss is straight through the walls, attic, and floors. This isn't small potatoes; it's a huge opportunity for savings.
A well-insulated attic is like a warm hat for your house. Without it, all that expensive heat you’re paying for just rises and escapes right through the roof.
Here in Utah, our climate demands some specific R-value targets to keep a home comfortable and efficient.
| Attic | R-49 to R-60 | Blown-in Cellulose, Fiberglass |
| Exterior Walls | R-13 to R-21 | Fiberglass Batts, Spray Foam |
| Floors/Basement | R-25 to R-30 | Foam Board, Spray Foam, Batts |
Choosing the Right Insulation
Not all insulation is created equal. Each type has its own strengths, making it better for certain spots in the house.
Fiberglass Batts: You know this stuff—the pink or yellow rolls. It's affordable and pretty straightforward for a DIYer to install in open attics or standard wall cavities.
Blown-in Cellulose or Fiberglass: This loose-fill material is perfect for blowing into finished walls or topping off existing insulation in an attic. It does a fantastic job of filling every nook and cranny.
Spray Foam: This is the high-performance option. It delivers the highest R-value per inch and creates an airtight seal all in one go. It’s more expensive and needs a pro to install, but for problem areas like basement rim joists, it can't be beat.
As you tighten up your home's envelope, don't forget that heat doesn't just go through insulation—it can also travel right through your wall studs. It's worth a moment to get familiar with understanding and fixing thermal bridging, a sneaky source of energy loss.
And remember, insulation only works if it's dry, especially in a basement. For tips on that, check out our guide on how to waterproof basement walls. A tight seal plus the right insulation is the one-two punch that really knocks out high energy bills.
Get Your Heating And Cooling Systems Dialed In
Your heating, ventilation, and air conditioning (HVAC) system is the undisputed heavyweight champion of your home's energy consumption. Here in Utah, where we swing from scorching summers to bone-chilling winters, this system is running almost non-stop. The key to slashing your energy bills isn't just about using it less—it's about making it run smarter, not harder.
The good news is you don't have to start with a massive, expensive overhaul. You can make a real difference with simple, low-cost maintenance that pays off immediately. Think of it as tuning up your car; you have to get the basics right before you even think about major upgrades.
Low-Cost Wins For Immediate Improvement
Before you even think about big-ticket items, let's focus on the basics. These simple maintenance tasks are the things people often forget, but they're incredibly effective at boosting your HVAC's performance and extending its life. A well-maintained system just flat-out uses less energy.
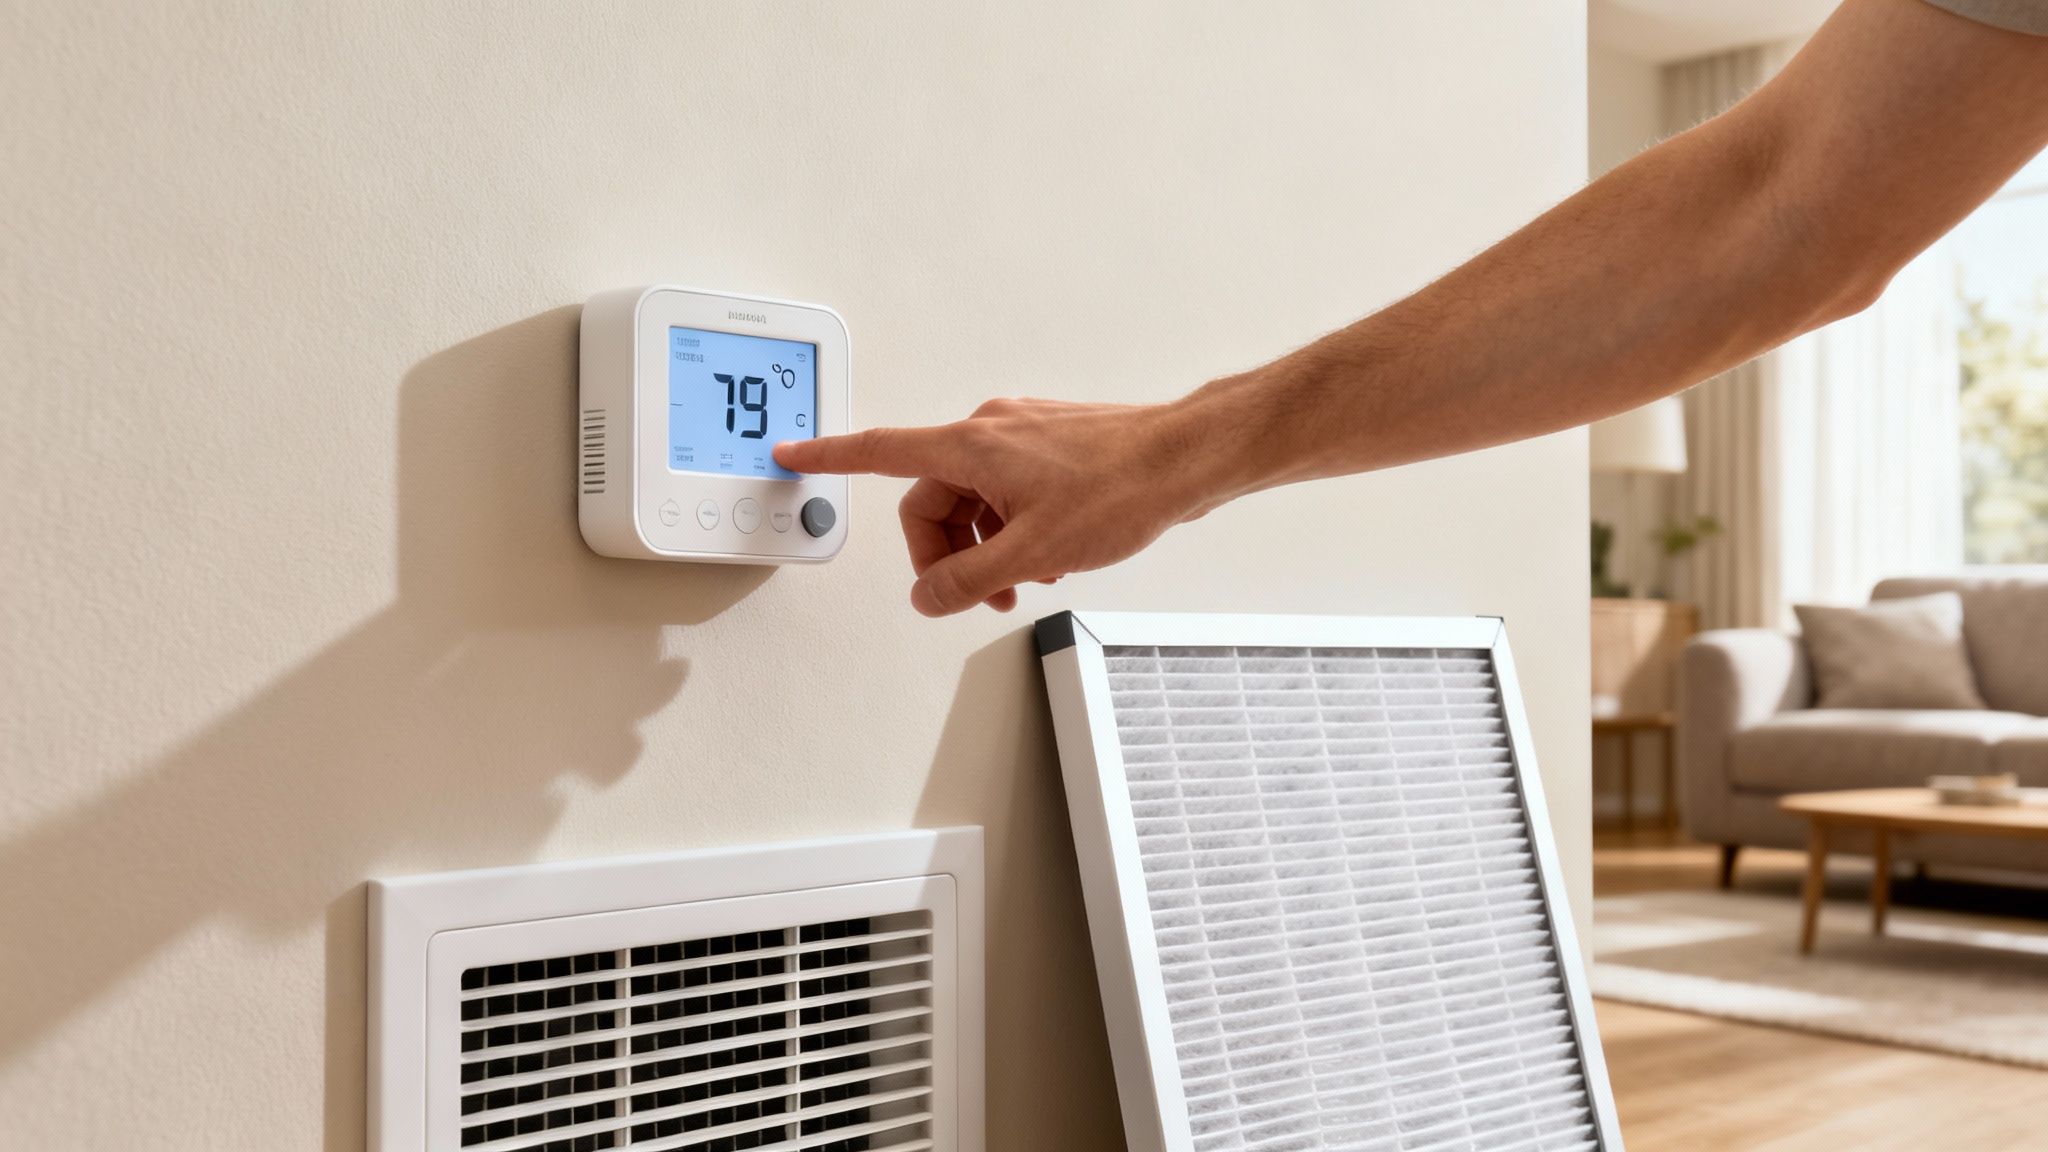
- Change Your Air Filters Regularly: A clogged filter is like forcing your system to breathe through a wet towel—it has to struggle. This restriction kills efficiency and can lead to expensive breakdowns. Check your filter monthly and swap it out at least every three months.
- Keep Vents and Registers Clear: It’s an easy mistake to make. A couch, a rug, or even heavy drapes can block a vent and prevent conditioned air from circulating. Do a quick walk-through and make sure every register has a clear path.
- Schedule Professional Tune-Ups: This is a no-brainer. An annual service call from a pro is a smart investment. A technician will clean the coils, check refrigerant levels, and make sure everything is running smoothly, catching small problems before they become massive energy drains. To get the timing right, check out our guide on how often to service your HVAC.
The Smart Thermostat Revolution
One of the single most powerful and affordable upgrades is swapping that old manual thermostat for a smart one. It’s a game-changer. A smart thermostat learns your family's routine and adjusts the temperature automatically, so you're not paying to heat or cool an empty house.
It can dial the temperature back after everyone leaves for the day and then bring it back to a comfortable level just before you get home. This simple automation is a massive source of savings.
A smart thermostat becomes the brain of your HVAC system. It takes the guesswork out of temperature control, turning a passive appliance into an active, energy-saving tool that works for you 24/7.
High-Efficiency Upgrades: The Long-Term Payoff
If your furnace or air conditioner is over 15 years old, it's likely time to start thinking about a replacement. I know the upfront cost feels steep, but the energy savings from a modern, high-efficiency unit are so significant that the system can often pay for itself over its lifespan.
Newer HVAC systems are leaps and bounds more efficient than their older counterparts. When you’re shopping, the ENERGY STAR® label is your best friend. It’s a certification that guarantees the appliance meets strict government efficiency guidelines—your assurance that you're investing in a product designed to sip, not guzzle, energy.
Before making a big investment, it helps to see how the numbers might shake out.
HVAC Upgrade Cost vs. Long-Term Savings
| Smart Thermostat | $150 - $400 | $50 - $180 | 1 - 3 years |
| High-Efficiency AC | $4,000 - $8,000 | $200 - $500 | 8 - 15 years |
| High-Efficiency Furnace | $3,500 - $7,000 | $150 - $400 | 9 - 18 years |
| Heat Pump System | $5,000 - $12,000+ | $400 - $1,000+ | 5 - 12 years |
While the initial cost of a full system like a heat pump is higher, its incredible efficiency delivers much faster payback through substantial annual savings, especially with available tax credits and rebates.
Embracing Modern Heat Pump Technology
For Utah's climate, modern heat pumps are a particularly compelling choice. A heat pump is an ingenious all-in-one system that handles both heating and cooling. In summer, it pulls heat from inside your home and moves it outside. In winter, it reverses the process, pulling residual heat from the cold outside air and bringing it inside.
The efficiency of these systems is truly remarkable. Since heating and cooling account for nearly 50% of an average home's energy use, a modern heat pump can be transformative. The best models achieve efficiencies over 300%, delivering three units of heat for every one unit of electricity they use. Combine that with a smart thermostat that can automatically trim usage by 10-15%, and you have a powerhouse combination.
This makes them an excellent choice for any homeowner looking for a single, hyper-efficient solution to handle our hot summers and cold winters, truly optimizing their approach to home comfort and energy savings.
Windows, Doors, and the Power of Habit
Once you’ve tackled the big-ticket items like insulation and your HVAC system, it’s easy to think the job is done. But some of the most consistent, long-term savings come from the smaller details: your windows, your doors, and your daily routines. These areas are where you can really fine-tune your home’s performance and take direct control of your energy bill.
Think about it—leaky, outdated windows can account for 25% to 30% of your heating and cooling costs. That’s a staggering amount, essentially like leaving a window cracked open 24/7. Swapping out old single-pane glass for modern double- or triple-pane units with a low-emissivity (low-E) coating is a game-changer. This invisible metallic film acts like a bouncer for heat, keeping the warmth inside during our cold Utah winters and reflecting the brutal summer sun back outside.
But a full-on window replacement is a major investment and isn't always in the cards. The good news is, you have some fantastic, more affordable options that still make a huge difference.
Smart Upgrades for Windows and Doors
Before you budget for a complete overhaul, let's look at some highly effective improvements. Often, a few of these smaller fixes can deliver the bulk of the benefits for a fraction of the price.
- Low-E Window Film: This is a brilliant DIY-friendly solution. Modern, high-quality window films can mimic the performance of a factory low-E coating, blocking solar heat gain in the summer and preventing heat from escaping in the winter.
- Thermal Curtains: Never underestimate the impact of good window treatments. Insulated curtains create a dead-air space between the fabric and the glass, providing another layer of insulation. Get in the habit of opening south-facing curtains on sunny winter days and closing them against the afternoon sun in the summer. It’s simple, but it works.
- Fresh Weatherstripping: The seals around your doors and windows get compressed, cracked, and worn out over time. Replacing them is one of the cheapest and easiest fixes you can do, and it immediately puts a stop to uncomfortable drafts.
Think of your daily habits as the small steering adjustments you make while driving. One single turn isn't a big deal, but thousands of them over a journey are what keep you on the road and headed toward your destination of lower energy bills.
Upgrading your home's hardware is only half the equation. The other half is all about how you live in the space.
Mastering Your Daily Energy Use
Building energy-smart habits costs nothing but a little awareness, and the payoff is huge. These aren't about making drastic sacrifices; they're about making small, repeatable choices that compound over time.
A ceiling fan, for instance, is a perfect example. Using it properly can make a room feel several degrees cooler, letting you bump the thermostat up a bit without feeling the heat. Just remember the rule: counter-clockwise in the summer to create a downdraft, and clockwise on low in the winter to push rising warm air back down.
Your thermostat’s programming feature is another powerful ally. Why pay to keep an empty house perfectly comfortable? Set it to ease up a few degrees when you’re at work or asleep. Automating these temperature changes means you’re saving money without even thinking about it.
Even simple shifts in your household chores can have a big impact:
Wash Clothes in Cold Water: Did you know that about 90% of the energy a washing machine consumes is just to heat the water? With today’s advanced detergents, switching to cold water for most loads slashes energy use without affecting how clean your clothes get.
Slay "Vampire Power": Many of your electronics are still sipping power even when they're turned "off." This is often called "phantom load." The easiest fix is to plug your home office or entertainment center into a single power strip and just flip it off when you're done.
Run Full Loads: Make your appliances work efficiently. Don't run the dishwasher until it's completely full. And on a nice day, think about using a clothesline instead of the dryer—it’s one of the biggest energy hogs in the average home.
These small, consistent actions put you in the driver’s seat, turning everyday choices into real, tangible savings on your monthly utility bills.
Time to Look at Your Lighting and Appliances
Once you’ve sealed up the drafts and your HVAC system is running smoothly, it's time to focus on the next layer of energy savings—the things you use every single day. The electronics and lights in your home might seem like small fish compared to a furnace, but their combined energy appetite adds up surprisingly fast.
Upgrading your lighting and major appliances is one of the easiest ways to get a quick win in your quest for a more energy-efficient home. It’s a high-impact, low-effort move that can immediately cut down your electricity bill. In fact, these changes alone can often shrink a home's electricity use by 10-15%. Just think about this: swapping out your old light bulbs for LEDs can slash your lighting costs by a massive 75-80%. You can read more about these impactful findings on theelectricityhub.com.
The Simple Brilliance of LEDs
For years, we all used incandescent bulbs. They were the standard, but they were also incredibly wasteful, turning about 90% of the energy they consumed into heat, not light. The shift to Light Emitting Diodes (LEDs) has been a complete game-changer for home energy savings.
LEDs aren't just a slightly better version of the old bulb; they're a whole different animal. They sip electricity and can last up to 25 times longer than their incandescent ancestors. That means fewer trips to the hardware store, less junk in the landfill, and real, tangible savings that show up on your bill year after year.
It's like trading in a gas-guzzler for a modern hybrid. You get the same, if not better, performance while using a fraction of the fuel. It’s a simple swap with a powerful and immediate return on your investment.
Picking the Perfect LED Bulb
Making the switch is easy, but walking down the lighting aisle can be overwhelming if you don't know what you're looking for. Forget everything you know about "watts" being a measure of brightness. With LEDs, you need to look for two key things on the box:
Lumens (Brightness): This number tells you exactly how bright the bulb is. That old 60-watt incandescent you’re replacing put out about 800 lumens. A modern LED can give you that same 800 lumens using only about 9 watts of power.
Kelvin (Color Temperature): This scale describes the color of the light itself, from a warm, cozy glow to a crisp, cool daylight. For living rooms and bedrooms, look for a lower Kelvin number (around 2700K) to create a warm, inviting atmosphere. For kitchens, bathrooms, and home offices where you need clear visibility, a higher number (5000K) will give you a cooler, bluish-white light that mimics daylight.
By matching the lumens and Kelvin to each room's purpose, you're not just saving energy—you're actually making your home more comfortable and functional.
What That Energy Star Label Really Means
Beyond lighting, your big appliances are the other heavyweights on your utility bill. We’re talking about the refrigerator, dishwasher, washing machine, and dryer. When it's finally time to replace one of these workhorses, the ENERGY STAR® label is your best friend.
That little blue sticker isn't just for marketing. It's a certification from the U.S. Environmental Protection Agency, guaranteeing that the appliance is engineered to do its job using significantly less power and water than standard models.
The refrigerator is a perfect example. A typical fridge from the early 2000s could easily use 1,000 kWh of electricity per year. A new ENERGY STAR model of the same size? It uses less than 400 kWh. That translates to saving $50 to $100 every single year. Over the 10-15 year lifespan of that appliance, the savings often completely pay for the higher upfront cost.
Smart Shopping Tips for Your Next Appliance
When you find yourself in the market for a new appliance, keep these practical tips in mind to get the most bang for your buck:
- Size it right. Don't buy a refrigerator or freezer that’s bigger than your family actually needs. An oversized, half-empty fridge is just wasting energy cooling air.
- Go for a front-loader. When it comes to washing machines, front-loading models are the clear winner. They use far less water and have faster spin cycles, which means your clothes come out less damp and spend less time in the energy-hungry dryer.
- Look for smart features. Many new dishwashers have an "air-dry" setting that skips the heated drying cycle, a huge energy hog. Some fridges have better insulation and more efficient compressors. These seemingly small details really do add up to long-term savings.
Putting your money into energy-efficient lighting and appliances is a no-brainer. It's a practical step that pays you back every single time you flip a switch or run a load of laundry.
Got Questions About Home Energy Efficiency?
It's completely normal to feel a bit overwhelmed when you start thinking about making your home more energy-efficient. You've got questions, and honestly, you should. Knowing where to start and what to expect is the only way to make smart decisions for your home and your wallet. Let's break down some of the most common things homeowners ask us.
Getting clear on these points helps you build a game plan. It’s all about putting your effort and money where it will count the most, ensuring every dollar you spend pays you back in comfort and lower energy bills.
What’s the Single Best Thing I Can Do to Improve My Home's Energy Efficiency?
For most homes, especially here in Utah where we deal with both freezing winters and scorching summers, the biggest bang for your buck comes from improving your home’s building envelope. That’s a technical-sounding term for a simple concept: air sealing all the leaks and then beefing up your insulation. These two things are a powerhouse combination.
Think of it this way: they work as a team to keep the air you've paid to heat or cool inside your house, while keeping the outside air out. This simple act dramatically lightens the load on your furnace and air conditioner, which are almost always the biggest energy hogs in any home. A professional energy audit will show you exactly where your home is leaking, but I can tell you from experience, the attic is almost always the main culprit.
Are Big-Ticket Items Like New Windows or Solar Panels a Good Investment?
Those major upgrades can definitely be worth it, but the timing is critical. You should only really consider them after you’ve handled the foundational stuff first. Putting a brand-new, high-efficiency furnace in a drafty, poorly insulated house is like trying to fill a leaky bucket—you're just wasting energy and money.
Our Pro Tip: Always, always, always prioritize air sealing and insulation first. Patch the holes in the bucket before you worry about what you're filling it with. Once your home's envelope is tight, you'll squeeze every last bit of performance and savings out of any other upgrades you make down the road.
New windows can be a fantastic upgrade, especially if you’re replacing old, single-pane units that are in bad shape. They make a huge difference in comfort. Likewise, solar panels are a great long-term play, but it makes far more sense to shrink your energy demand first. Doing so often means you can get away with a smaller, less expensive solar array to power your home.
Should I Tackle These Projects Myself or Call a Professional?
This one really boils down to your own skill level, the tools you have, and how much free time is on your calendar. Plenty of homeowners can confidently knock out a few of these projects over a weekend.
- Good DIY Projects: Applying fresh weatherstripping to doors, caulking gaps around window frames, and even laying down fiberglass batt insulation in an open, easy-to-access attic are all great projects for a handy person.
- When to Call a Pro: Things like installing spray foam insulation, replacing entire windows, or upgrading your HVAC system are in a different league. They require specialized training, expensive equipment, and a deep understanding of local building codes. These aren't the best places to learn on the job.
For the complex stuff, hiring a professional is about more than just convenience—it’s about safety and performance. A window that's installed incorrectly can leak air and water, making it even less efficient than the old one you just paid to remove. A pro ensures the job is done right so you actually see the energy savings you're paying for.
Ready to turn these ideas into a plan but not sure where to start? The team at Northpoint Construction can help you figure out your home's unique needs and tackle the projects that will make the biggest impact. From professional insulation to high-performance window and door installations, we help Utah homeowners build more comfortable, efficient homes. Let's get started. Visit us at https://buildnp.com to learn more.