
How to Install a Bathroom in a Basement: A Complete Guide for Homeowners
Adding a bathroom to a basement really comes down to three big phases: planning it out, getting the plumbing right, and then all the finishing work. The biggest make-or-break decision you'll face is how to handle the drainage. You either have to break up concrete for a traditional gravity-fed system or go with a less invasive (but more complex) up-flush or ejector pump setup. A successful project always starts with a rock-solid plan that tackles plumbing, moisture, and local codes from day one.
Your Project Blueprint for a Basement Bathroom

Putting a bathroom below ground is an incredible way to make your home more functional and add serious value. But let's be clear: this isn't like remodeling an upstairs bathroom. A basement project brings its own unique headaches—namely, how to get water to drain up, how to keep moisture at bay, and how to make the space not feel like a cave.
This is why your initial blueprint is everything. It's the phase where you make the big calls that affect every single step that follows, from busting up concrete to picking out faucets. Getting this part right means fewer costly surprises and a finished bathroom that actually works the way it's supposed to.
Starting with a Strategic Plan
The very first thing to do is figure out where this bathroom is going to live. Walk your basement and look for the path of least resistance. You want to find a spot that’s reasonably close to your home's existing plumbing and electrical lines. Every foot of pipe you have to run to connect to your main drain stack adds cost and complexity.
Keep these key factors in mind as you scout for the perfect location:
- Proximity to Utilities: Where are your main water supply lines and the main vertical drain stack? Tapping into nearby infrastructure will save you a ton of time and money.
- Ceiling Height: Here in Utah, most building codes require a minimum ceiling height of 7 feet. Keep a close eye out for low-hanging ductwork or support beams that could mess with your layout.
- Natural Light: If you're lucky enough to have an egress window, try to place the bathroom near it. Nothing makes a basement space feel bigger and more inviting than a bit of natural light.
Demystifying Local Codes and Permits
Before you even think about swinging a hammer, you have to get familiar with the local rules. Building codes aren't just bureaucratic red tape; they're there to make sure your home is safe. For anyone in the Orem area, that means your first stop should be the Utah County Community Development website.
A great primer on the entire process is understanding how to plan a bathroom renovation from a high level, which helps you define the scope and budget before getting bogged down in the technical details.
This screenshot shows the specific resources available for residential permits, highlighting the importance of securing official approval before construction begins. You'll need to submit detailed plans, including framing, plumbing, and electrical layouts, to get your permit.
Pro Tip: Don't think of the permitting process as a roadblock. Honestly, it's more like a free consultation. The inspections required—from rough-in plumbing to final electrical—are your guarantee that the work is being done right, whether by you or a contractor. It protects your investment and prevents a world of hurt later on.
Getting Started: Permits and Pre-Construction Planning
Before you even think about swinging a sledgehammer, the real work of a basement bathroom project begins. It’s all about smart planning and dealing with the necessary paperwork. This part isn’t glamorous—it's more about blueprints and bureaucracy than dust and debris—but getting it right is the single most important thing you can do to avoid major headaches, costly delays, and serious safety issues down the road.
Think of it as building the entire bathroom on paper first. This is where you catch potential problems, like realizing your planned drain line runs straight through a structural support beam, before you’ve already broken up the concrete. Good planning makes the actual construction phase smooth and efficient.
Designing a Layout That Actually Works
First things first: you need a solid floor plan. Get a tape measure and map out the exact dimensions of your chosen space. Be sure to note the location of every existing utility—plumbing stacks, water supply lines, electrical circuits, and any obstructions like HVAC ductwork or support columns. The goal here is to create a layout that works with what you already have, minimizing the expensive and complicated job of rerouting major systems.
Think about how the room will feel and function. A standard three-piece bathroom (toilet, sink, and shower) needs more breathing room than most people realize. One of the most common DIY mistakes is cramming fixtures too close together, which makes the bathroom feel claustrophobic and often violates local building codes.
As a rule of thumb, make sure you have at least:
- 30 inches of side-to-side space for the toilet.
- 21 inches of clear floor space in front of both the toilet and the sink.
- A 32x32 inch minimum footprint for a stand-up shower.
Here's a pro tip: use painter's tape to mark the outline of each fixture on the basement floor. This simple trick gives you a much better real-world sense of the space and helps you spot layout problems before you've committed to a plan. If you want to dig deeper into layout strategies, our guide on how to plan a bathroom renovation has some great tips that are just as relevant here.
Securing the Right Building Permits
With a layout in hand, it’s time to face the permitting process. Here in Orem and throughout Utah County, adding a new bathroom is a major project that absolutely requires a building permit. Don't think of this as just red tape; it's a critical safety check to ensure your plumbing, electrical, and structural work meets established codes.
To get your permit, you'll generally need to submit a package to the city that includes:
A Detailed Floor Plan: Shows the bathroom's dimensions, where the fixtures will go, and its location within the basement.
A Plumbing Diagram: This is a map of how the new drain, waste, and vent (DWV) system will tie into your home’s main plumbing. It also needs to show the hot and cold water supply lines.
An Electrical Plan: This lays out where you're putting outlets (which must be GFCI-protected), light switches, light fixtures, and the all-important exhaust fan.
The number one thing that holds up a permit is a vague or incomplete application. If you submit clear, accurate, and detailed plans, you’ll sail through the approval process. If you don't, you'll get sent back to the drawing board, and your project will be stalled before it even starts.
Understanding the Inspection Process
Getting the permit isn't the finish line—it’s the starting gun. It gives you the legal authority to start the work, but the project isn't officially done until it passes a series of inspections. Knowing these milestones ahead of time helps you schedule your project logically.
For a basement bathroom, you can typically expect two key inspections:
- Rough-in Inspection: This happens after all the new framing, plumbing, and electrical wiring is installed, but before you hang a single sheet of drywall. The inspector needs to see everything behind the walls to make sure it's up to code.
- Final Inspection: After the drywall is up, the fixtures are installed, and all the finishing touches are done, a final inspector will come out to give the entire project the official sign-off.
Passing these inspections is non-negotiable. It's the official verification that the work was done safely, which protects your family and the value of your home. Failing an inspection means tearing things out and doing them over, which is a massive waste of time and money.
Solving Basement Plumbing and Drainage Challenges
Let's be honest: plumbing is the biggest headache when you're putting a bathroom in a basement. Upstairs, gravity is your best friend. Downstairs? You're literally working against it. The whole game is about figuring out how to get wastewater from your new toilet, sink, and shower up to your home's main sewer line.
This isn't just a minor detail—it's the central puzzle of the entire project. Your home's main drain line is almost certainly higher than the basement floor, which leaves you with three main ways to tackle the problem. Each one has its own pros and cons when it comes to cost, mess, and long-term reliability. The path you choose here will shape your budget and schedule more than any other decision you make.
Thinking through this process step-by-step is key, from measuring the space to finalizing the layout.
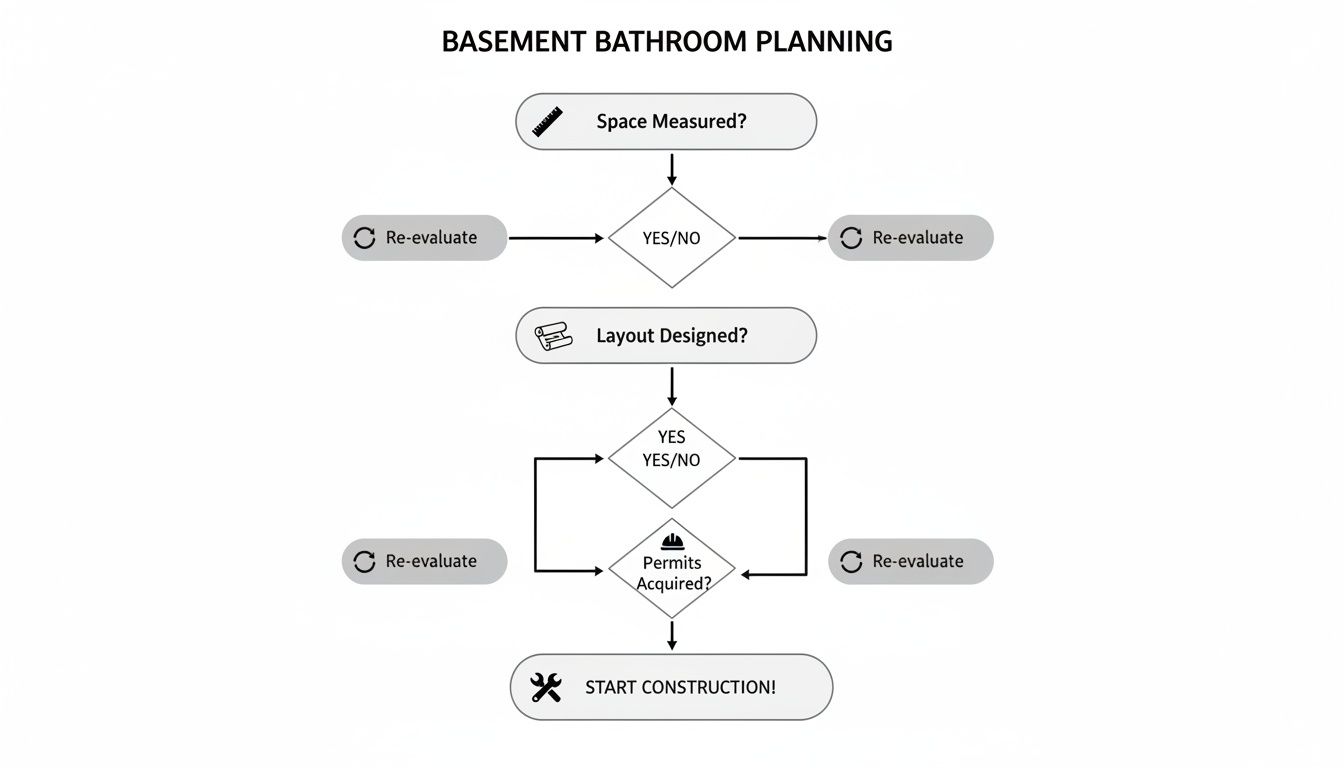
As you can see, a solid plan is built on a sequence of well-thought-out decisions. Nailing down the layout is a critical milestone before you ever pick up a tool.
Option 1: Gravity-Fed Plumbing (The Old-School Way)
The most straightforward method, at least in principle, is a traditional gravity-fed system. This means you’re bringing in a jackhammer to break up the concrete floor, digging trenches, and laying new drain pipes that slope down and away to your main sewer line.
Now, for this to even be an option, your main drain has to exit the house below the level of your basement floor. It's not common, but if you're one of the lucky ones, this is the gold standard. Why? No moving parts. No pumps to fail, no electrical bits to maintain. It just works. The downside is that it’s incredibly labor-intensive, messy, and usually the most expensive route because of all the concrete and excavation work.
Option 2: Up-Flush Toilets (The Less Invasive Fix)
If the idea of jackhammering your basement gives you anxiety, an up-flush toilet system might be the answer. Also known as a macerating toilet, this is a self-contained unit that sits right on your existing floor.
When you flush, waste goes into a macerating pump, which is a small box tucked behind the toilet. High-speed blades inside grind everything into a fine slurry, and the pump then forces it up through a small pipe to the main drain line. Most of these systems have extra ports so you can hook up a sink and shower, too.
The big win here is the minimal demolition. It’s a fantastic choice for already-finished basements or for anyone who wants to avoid the dust and disruption of concrete work. The trade-off? You’re relying on a mechanical pump. They can be a bit noisy and, like any appliance, will eventually need maintenance or replacement.
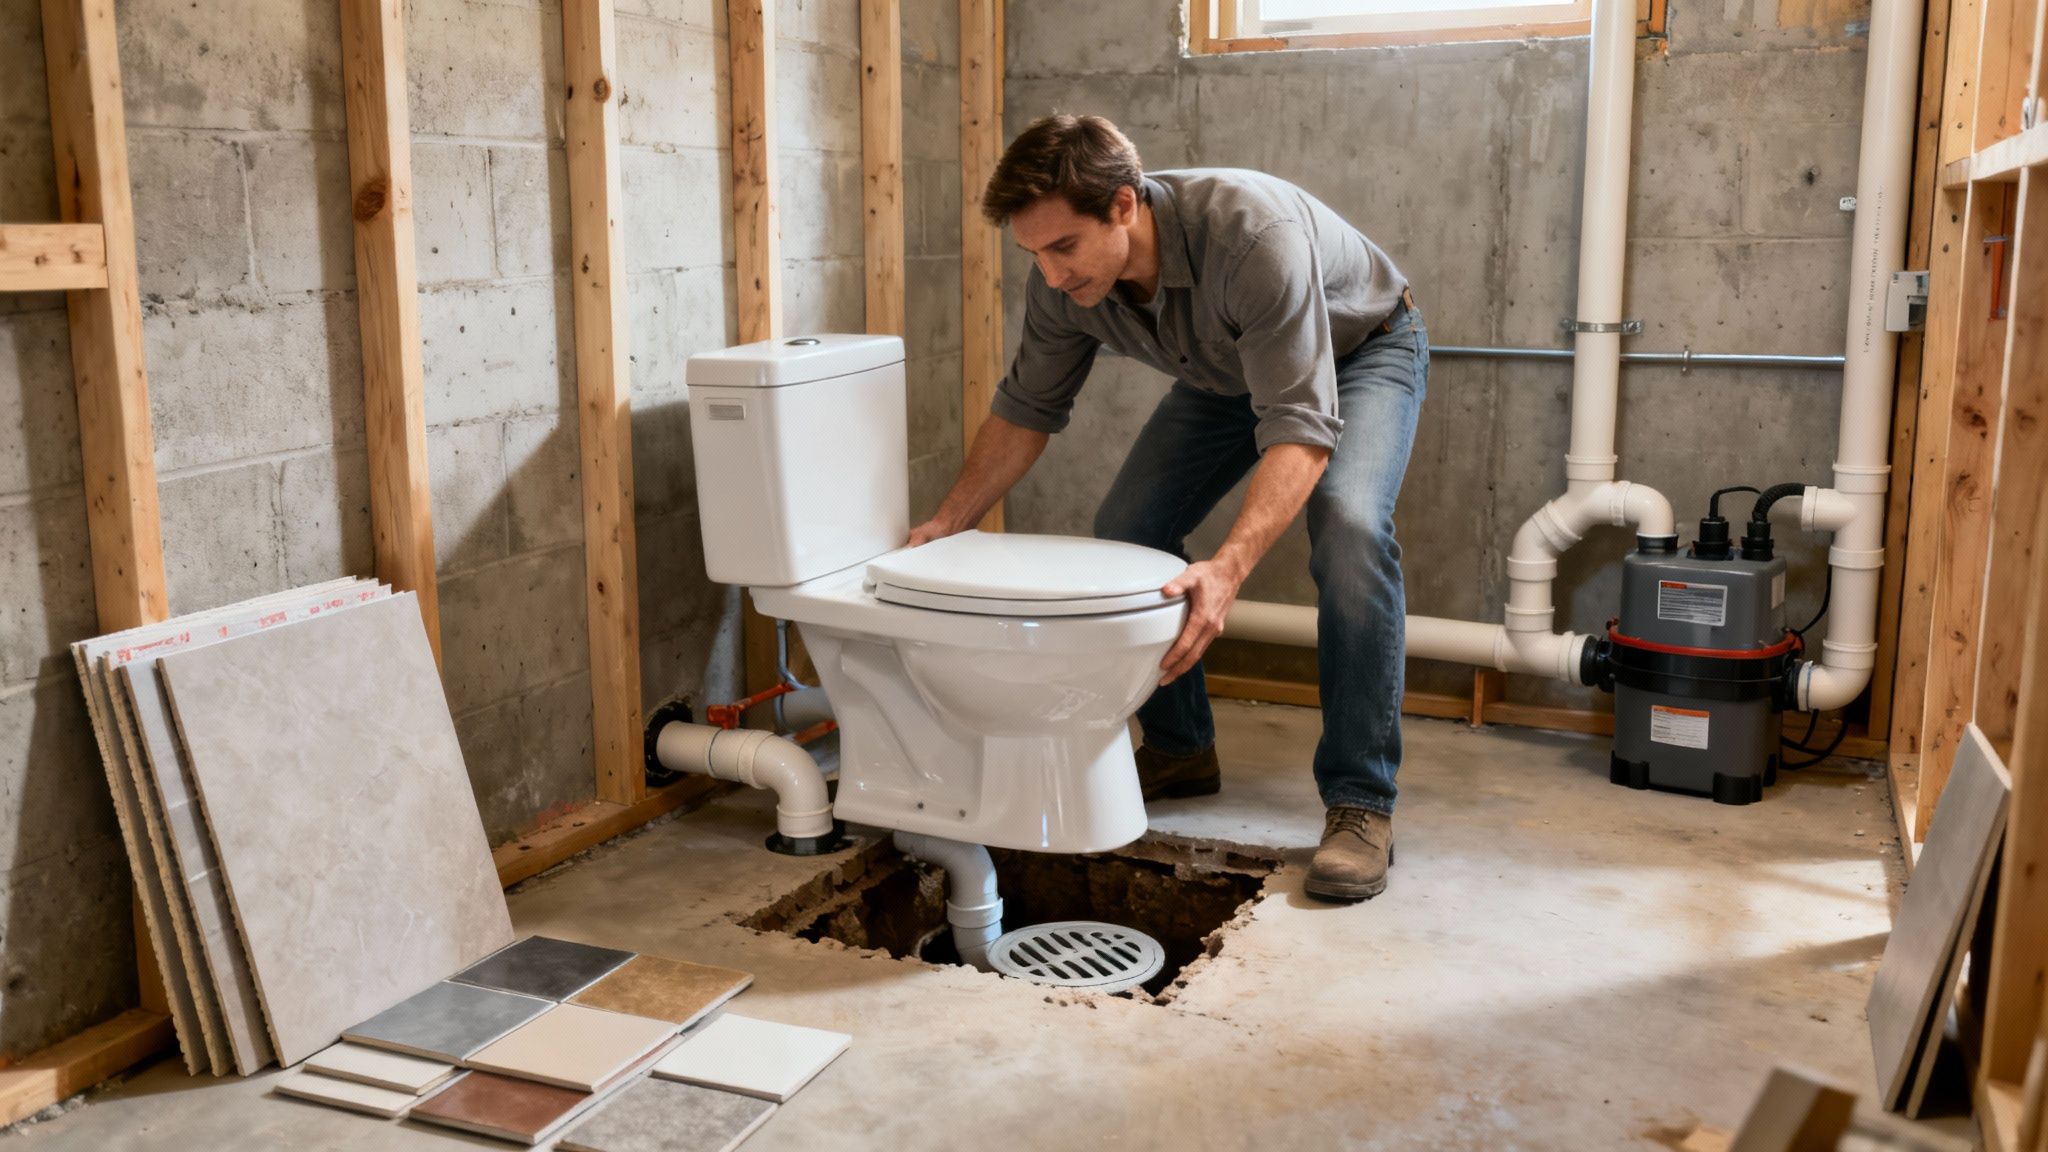
Option 3: Sewage Ejector Pumps (The Go-To Solution)
For most basement bathroom projects, the sewage ejector pump is the workhorse. It’s a hybrid approach that combines the reliability of gravity with the power of a pump. First, a hole is dug in the floor to install a sealed container called a sump pit.
All the new fixtures—toilet, sink, shower—are then plumbed with standard drain lines that slope down into this pit. Inside, a powerful pump with a float switch is on standby. Once the water and waste in the pit rise to a set level, the float kicks the pump on, and it ejects everything up and into the main sewer line.
This is a highly effective system that handles waste without needing any grinding. While you still have to break a small section of concrete for the pit, it's far less invasive than trenching for a full gravity system.
Basement Drainage System Comparison
Choosing the right system comes down to your home's layout, your budget, and how much disruption you're willing to tolerate. Here's a quick breakdown to help you compare the options side-by-side.
| Gravity-Fed System | High | Very High (major excavation) | Homes where the main drain is below the basement floor; long-term, maintenance-free reliability. |
| Up-Flush (Macerating) System | Low to Medium | Low (minimal floor disruption) | Finished basements, DIY-ers, and situations where breaking concrete is not an option. |
| Sewage Ejector Pump | Medium to High | High (requires a sump pit) | The most common and versatile solution for typical basement layouts; a reliable "best of both worlds." |
Ultimately, the best choice is the one that provides reliable, long-term performance for your specific situation.
The Financial Reality of Basement Plumbing
No matter which path you take, plumbing will eat up a huge chunk of your budget. For new basement bathrooms without existing rough-ins, it's not uncommon for plumbing to account for 30-40% of the total project cost. Running new pipe can cost $200-$400 per linear foot, pushing the total plumbing bill anywhere from $6,000 to $18,000. If you need a sewage ejector pump, plan on adding another $1,500-$3,000 to that figure.
Venting is another critical piece of the puzzle you can't ignore. Every single fixture needs to connect to a vent pipe that runs up through the house and out the roof. This system is what allows sewer gases to escape and prevents nasty odors from backing up into your new bathroom. If you want to dive deeper, this comprehensive guide to bathroom plumbing is a great resource.
Framing, Electrical, and Moisture-Proofing Your Space
Alright, the concrete dust has settled and the major plumbing work is behind you. Now comes the exciting part—giving your new bathroom its skeleton. This is where the outline on the floor starts to look like an actual room, complete with walls, power, and the all-important defenses against a basement's biggest foe: moisture.
Getting this stage right is about more than just aesthetics; it's about building a space that's safe, healthy, and built to last.
First up is framing the walls. The process itself is pretty straightforward for anyone with basic carpentry skills, but the materials you choose are crucial in a basement. While you can use standard lumber for the vertical studs and top plates, the bottom plate is a whole different ballgame.
That single piece of wood resting directly on the concrete floor must be pressure-treated. No exceptions.
Why is this so non-negotiable? Concrete acts like a sponge, wicking moisture up from the ground through a process called capillary action. If you lay a standard 2x4 on that slab, it will soak up that moisture over time, leading to rot, mildew, and a weak wall structure. The pressure-treated lumber creates a rot-resistant foundation for your framing, protecting the entire wall from the ground up.
Powering Up Your Basement Bathroom
With the walls framed out, it’s time to snake in the electrical wiring. A basement bathroom isn't like any other room in the house; it's a wet environment, and the electrical code reflects that. This is one area where you absolutely cannot cut corners.
Every single outlet in the bathroom must have Ground Fault Circuit Interrupter (GFCI) protection. This life-saving device instantly cuts the power if it detects a ground fault, preventing a severe electric shock. You can handle this in one of two ways: install a GFCI outlet as the first in the series (which protects all others downstream), or install a dedicated GFCI breaker in your main panel.
Lighting is just as important. Don't just stick a single fixture in the middle of the ceiling—it creates harsh, unflattering shadows. Think in layers:
- Vanity Lighting: Flank your mirror with sconces or place a light bar above it. This gives you clear, shadow-free light for shaving or getting ready.
- Shower Lighting: A dedicated, moisture-rated recessed can light right inside the shower is a game-changer for safety and visibility. It’s a small detail that makes a huge difference.
- General Lighting: A central fixture or a few other recessed lights can fill out the rest of the space with comfortable, ambient light.
Let's talk about the unsung hero of any bathroom: the exhaust fan. Basements already fight an uphill battle with humidity, and a hot shower will turn your new bathroom into a steam room. A powerful, properly vented exhaust fan is your number one defense against the mold and mildew that thrive in damp conditions. Make sure it vents directly to the outside—never into a ceiling cavity or attic space.
Winning the War Against Moisture
I can't stress this enough: waterproofing is the most critical part of this entire project. A below-grade space is naturally prone to dampness. If you don't manage that moisture from the very beginning, you’re setting yourself up for musty smells, peeling paint, and serious mold issues down the road.
Your defense has to be a multi-layered strategy, starting right at the concrete foundation.
Before any framing goes up, carefully inspect the foundation walls for cracks or any signs of past water intrusion. Patch these weak spots with hydraulic cement or an epoxy injection. Once repaired, roll on a quality waterproof membrane or sealant to the interior foundation walls. This creates your first line of defense. For a more detailed look at this process, our guide on how to waterproof basement walls covers all the essential steps.
After the framing and wiring are done, you'll move on to insulation and drywall. Be sure to install a vapor barrier on the warm side of the wall (facing into the bathroom) to stop condensation from forming inside the wall cavity.
And when it's time for drywall, skip the standard paper-faced stuff. Instead, spend a little extra on mold-resistant drywall (often called green board or purple board). This specially treated material is designed to inhibit mold and mildew growth, giving you a crucial final layer of protection in this high-humidity zone. Taking these steps now is the key to making sure your new bathroom stays as fresh and beautiful as the day you finish it.
Installing Fixtures and Applying Finishing Touches
This is the part everyone looks forward to. With the drywall up and the major systems hidden away, your project finally stops looking like a construction zone and starts feeling like an actual bathroom. All that careful planning is about to pay off as you bring the space to life.
The secret to a professional-looking finish is simply patience. If you rush through these final steps, you can easily undermine all the hard work you put into the plumbing and electrical. From setting the toilet just right to choosing the perfect paint sheen, every detail counts toward the final look and long-term durability of your new bathroom.
Setting Your Bathroom Fixtures Correctly
Getting the main fixtures—the toilet, vanity, and shower—installed is a huge milestone. Let’s start with the toilet. The process hinges on the wax ring you place on the closet flange. This simple part creates an absolutely critical watertight and airtight seal, preventing both leaks and nasty sewer gas from getting into your home.
When you set the toilet, press down firmly and evenly to compress that wax ring. Whatever you do, don't rock it back and forth, as that can break the seal you just made. Once it’s down, secure it with the closet bolts, tightening them just a little at a time and alternating sides. This helps you avoid cracking the porcelain base.
Next up is the vanity and sink. Precision is key here. Make sure the vanity is perfectly level before you even think about securing it to the wall studs. With the countertop and sink in place, you can hook up the P-trap, drain, and the hot and cold water supply lines. A pro tip: always use plumber's tape on every threaded connection to guarantee a leak-free fit.
Laying Down Durable Basement Flooring
Choosing the right flooring is probably one of the most important decisions you'll make for a basement bathroom. Unlike rooms upstairs, basement floors are in constant contact with a concrete slab that can introduce moisture. You need something that can handle it.
This is why Luxury Vinyl Tile (LVT) or Luxury Vinyl Plank (LVP) gets recommended so often. It’s 100% waterproof, tough as nails, and feels much warmer underfoot than traditional ceramic tile. Plus, modern LVP does a shockingly good job of mimicking real wood or stone, giving you a high-end look without the maintenance nightmare.
I’ve seen this mistake a few times: homeowners install a beautiful wood-look LVP that clashes with the carpet or other flooring right outside the bathroom door. To keep things cohesive, consider how the flooring will transition. If it doesn't flow naturally, a vinyl tile that looks like stone or ceramic often creates a more timeless and integrated design.
Regardless of your choice, subfloor preparation is non-negotiable. The concrete slab has to be clean, dry, and perfectly level. Take the time to pour a self-leveling compound to fill any dips or low spots. If you skip this, your vinyl planks will eventually start to separate at the seams.
Applying the Final Finishes
With the heavy lifting behind you, it's time for the final details that truly transform the room—tiling, painting, and installing all the accessories.
Tiling Tips
- Waterproof First: Before a single tile goes up in the shower, paint a liquid-applied waterproofing membrane over the cement board. Don't skip this.
- Start Level: Use a level to draw a guideline for your first row of tiles. Never assume the tub or shower pan is perfectly level—they rarely are.
- Grout and Seal: After the tile adhesive cures, grout the joints. Once the grout has fully cured (give it a few days), seal it. Sealing grout is essential for preventing stains and mildew down the road.
Painting is your chance to inject some personality. I always recommend a satin or semi-gloss finish for bathrooms. These sheens are built to handle moisture and are way easier to wipe clean than flat or eggshell paints. Lighter colors are also a great choice for making a small, windowless basement bathroom feel bigger and brighter.
Finally, you can install the fun stuff: your light fixtures, mirror, towel bars, and toilet paper holder. These are the small elements that make the bathroom truly functional and pull the whole aesthetic together.
Budgeting Your Project And Avoiding Common Mistakes
Turning that unused basement corner into a bathroom can feel overwhelming, but it all starts with a realistic budget and a heads-up on common pitfalls. Nail down your costs from day one, and you’ll dodge the surprise expenses that trip up so many homeowners. Learning from real-world blunders saves both time and frustration.
A budget should lay out every detail—from trenching for new drain lines to the final paint finish. It’s easy to fixate on shiny fixtures and forget the behind-the-walls work. In most cases, framing, electrical runs, and especially plumbing will eat up the bulk of your budget.
Breaking Down The Costs Of A Basement Bathroom
Every project has its unique quirks, but these ballpark figures give you a solid framework:
- $200 to $250 per square foot is the average installation cost.
- A half-bath usually falls between $3,000 and $12,500.
- A full bathroom can range from $8,000 to $25,000 depending on layout and finish level.
Key cost drivers include:
- Plumbing Complexity: Installing a gravity-fed drain means breaking concrete, while adding a sewage ejector pump tacks on $1,500 to $3,000 or more.
- Labor vs. DIY: Skilled trades often claim 40–60% of your total spend. Tackling painting or tile grout yourself can trim your bill.
- Fixtures and Finishes: A basic vanity might run a few hundred dollars; a custom solid-surface model can cost thousands.
- Permits and Inspections: In Utah County, expect fees of $100 to $500 based on scope.
Expert Tip: Build in a 15–20% contingency fund. Unexpected foundation quirks or rerouted plumbing are par for the course in basement work.
Common Mistakes To Avoid At All Costs
Knowing what trips people up can keep your timeline—and wallet—intact. Watch out for these missteps:
- Underestimating Plumbing: Proper slope, venting to block sewer gas, and the right pump system aren’t optional. Shortcut here, and you’ll pay for it later.
- Skimping On Ventilation: Basements hold moisture. A weak exhaust fan leads straight to mold and mildew. Always choose a fan rated for humid environments and vent it outdoors.
- Wrong Materials: Standard drywall and untreated lumber invite rot. Opt for moisture-resistant green board and pressure-treated framing when sitting on concrete.
For a deeper dive, check out our detailed breakdown of the cost of a basement bathroom.
At Northpoint Construction, we’ve tackled every curveball a below-grade bathroom can throw. If you’re in the Orem area and want a seamless, code-compliant install, let’s chat. Contact us today at Northpoint Construction for a personalized estimate.