
How to Install Recessed Lighting in Ceiling: A Homeowner Guide
Before you even think about cutting a hole in your ceiling, you need a solid game plan. Getting recessed lighting right is all about the prep work: mapping out your layout, picking the right gear, and making sure you’ve got the green light from your local building department.
Planning Your Recessed Lighting Layout
A well-thought-out plan is your most valuable tool here. Seriously. I've seen too many projects go sideways because someone rushed this step. The result? Uneven lighting, annoying glare, or dark corners. A great layout doesn’t just light up a room; it creates an atmosphere and highlights the things you love.
Your goal is to create a grid of light that provides balanced, overlapping coverage. Think of it as one cohesive lighting system, not just a bunch of individual fixtures sprinkled across the ceiling.
Calculating Spacing and Fixture Count
So, how many lights do you actually need? A good rule of thumb is to take your ceiling height and divide it by two. If you have a standard 8-foot ceiling, that means you should start by spacing your lights about 4 feet apart.
But that's just a starting point. The real answer depends on what you do in that room:
- Kitchens & Workshops: These are work zones. You need bright, focused light right where you're chopping vegetables or working on a project. I'd space fixtures tighter here, maybe 3 to 4 feet apart, especially over countertops.
- Living Rooms & Bedrooms: Here, you're going for a cozier, more relaxed vibe. Spacing the lights further apart, anywhere from 4 to 6 feet, will give you a soft, ambient glow that feels welcoming.
- Basements: This all depends on the basement's purpose. If it's a home gym, think like a workshop. If it's a media room, go with the living room approach. A smart layout is a huge part of finishing basement ceilings the right way.
One more pro tip: keep your lights at least 3 feet away from the walls. Get them too close, and you'll create ugly, harsh shadows called "scalloping," which visually shrinks the room.
New Construction vs. Remodel Housings
The kind of housing you buy depends entirely on whether your ceiling is open or closed. Picking the wrong one can turn a weekend project into a massive headache.
New-construction housings are for when you have the ceiling wide open and can see the joists. They have long mounting arms that you nail or screw directly to the wood framework before the drywall goes up. They’re rock-solid but only an option during a major renovation or new build.
Remodel housings, on the other hand, are what most DIYers will use. They're designed to be installed from below, through a hole in the existing drywall. You just push the housing up into the opening, and special clips pop out to grab onto the back of the drywall, holding it tight.
To make it simple, here’s a quick breakdown of which housing to choose for your project.
Recessed Lighting Housing Types At a Glance
| New-Construction | Open ceilings during a major remodel or new build. | Mounts directly to ceiling joists before drywall is installed. | Requires access to the ceiling framework from above. |
| Remodel | Existing, finished ceilings with drywall already in place. | Slips into a hole cut in the drywall and secures with clips. | The go-to choice for almost all retrofit lighting projects. |
Ultimately, if your drywall is already up, you absolutely need a remodel housing. They were invented to save you from tearing down your ceiling.
The Importance of IC-Rated Fixtures
Let’s talk safety, because this part is non-negotiable. IC-rated stands for Insulation Contact, and it means the fixture is built to be safely buried in your ceiling insulation without becoming a fire hazard.
If you have insulation in your ceiling (and you probably do), you must use IC-rated lights. A non-IC fixture, by contrast, needs a buffer zone—at least three inches of empty space on all sides—to let heat escape. Trying to use a non-IC can in an insulated ceiling is a serious fire risk.
Finally, think about the investment. For a typical setup of 6 to 10 lights in a kitchen or living room, expect the total cost to be around $1,200 to $2,500. Even if you DIY, the materials add real value to your home. Just don’t forget to pull an electrical permit, which usually runs between $50 and $250, to keep everything safe and up to code.
Getting Your Tools and Materials in Order
There’s nothing worse than being halfway through a project, covered in drywall dust, only to realize you’re missing a critical tool. Before you even think about cutting a hole, let's get everything you'll need laid out and ready to go. A little prep work here saves a ton of headaches later.
Think of it like cooking a meal—you get all your ingredients ready before you turn on the stove. This is your mise en place for a professional, and safe, installation.
Safety Gear and Cutting Tools
Let's start with the non-negotiables. Electrical work is serious business, and you need to treat it that way. The single most important tool you'll buy is a non-contact voltage tester. This little pen-sized gadget confirms, without a doubt, that the power is off before you touch a single wire. It’s cheap, easy to use, and could literally save your life. And don't forget a solid pair of safety glasses—drywall dust in your eyes is no fun.
Now for making those perfect circles in the ceiling. A ragged cut is a dead giveaway of an amateur job.
- Adjustable Hole Saw: This is the absolute best tool for the job. It attaches to your drill and lets you dial in the exact diameter for your light housings. The result? A perfectly clean, snug opening every single time.
- Drywall Jab Saw: This is your problem-solver. When you run into an unexpected framing member or need to make a small adjustment, a jab saw gives you the control you need for those tight spots.
- Stud Finder: Don’t even think about drilling without one. This simple device maps out the joists in your ceiling so you don't end up trying to cut a hole right through a 2x10. It’s a huge time-saver.
My Go-To Trick: After the hole saw does its job, I lightly trace the edge of the cut with a fresh utility knife. This scores the drywall paper and prevents it from tearing when you push the light housing through, leaving you with an incredibly sharp, clean edge.
Wiring and Electrical Supplies
With your cutting tools sorted, let's talk wiring. The type of wire you use is dictated by the circuit you're tapping into, and getting this wrong is a serious fire hazard. Most homes use 15-amp circuits for lighting, which requires 14/2 NM-B (Romex) wire. If you're working with a 20-amp circuit, you must step up to the thicker 12/2 NM-B wire.
Here's what you'll need to work with that wire:
- Wire Strippers: Don't try to use a knife. A proper set of strippers removes the outer sheathing and inner insulation cleanly without nicking the copper conductors.
- Wire Connectors: Commonly known as wire nuts, these are what you'll use to tie your new lights into the existing circuit. It’s smart to have a multi-pack with a few different sizes on hand.
- Fish Tape or Fishing Poles: If you're trying to run a new cable across a finished ceiling, these are your best friends. They let you pull wire through the ceiling cavity without having to cut a massive trench in your drywall.
Picking Out the Right Recessed Lights
Finally, the fun part—the lights themselves! This is where you set the whole vibe of the room. When you're looking to install recessed lighting in ceiling applications, LED technology gives you a ton of options, but it really boils down to two key specs.
Brightness (Lumens): This is simply how much light the fixture puts out. For a living room or bedroom where you want a comfortable ambiance, something in the 600-800 lumen range per light is usually perfect. For a kitchen or workspace where you need to see what you're doing, you'll want to aim for a brighter 900-1100 lumens.
Color Temperature (Kelvin): This is the color of the light itself, from warm and yellow to cool and blue.
- 2700K: Think of a classic, cozy incandescent bulb. This is great for creating a relaxing atmosphere in bedrooms and dens.
- 3000K: This is a fantastic middle-ground—a soft, neutral white that works just about anywhere.
- 4000K-5000K: This mimics bright, natural daylight. It’s crisp and clean, making it ideal for kitchens, bathrooms, and home offices.
A great feature to look for is "color-selectable" fixtures. They have a small switch on the housing that lets you choose the Kelvin temperature after they're installed. It’s a game-changer for getting the room's lighting just right.
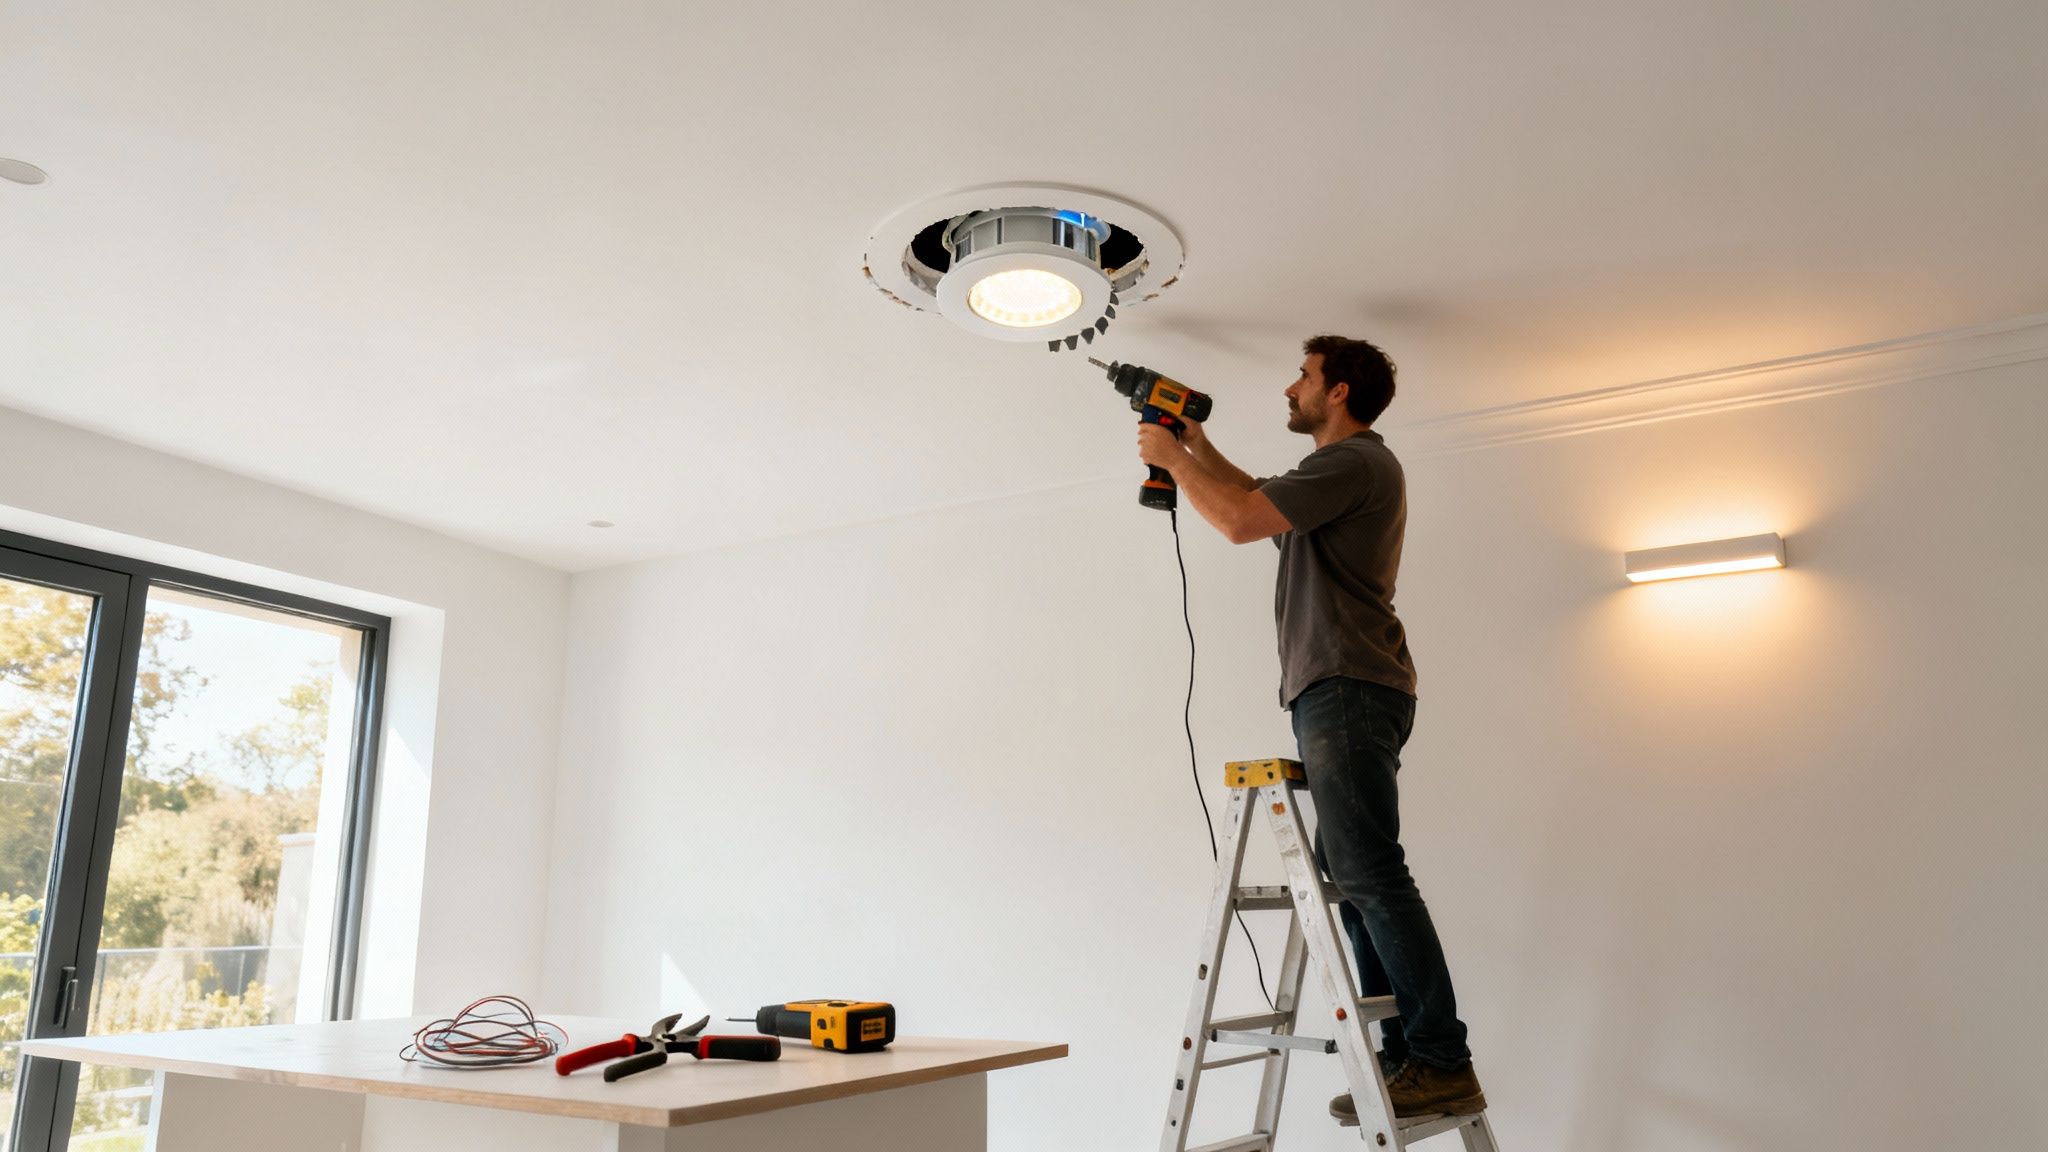
Getting Hands-On: The Installation Process
Alright, you've done the planning, you've picked your fixtures, and now it's time to make it happen. This is where the careful prep work pays off. We’re going to walk through this step-by-step, from the breaker panel to the final flip of the switch, turning that paper layout into a beautifully lit room.
This flowchart breaks down the essential tool categories you'll need. Think of it as your project's core workflow: safety first, then cutting, then the electrical work.
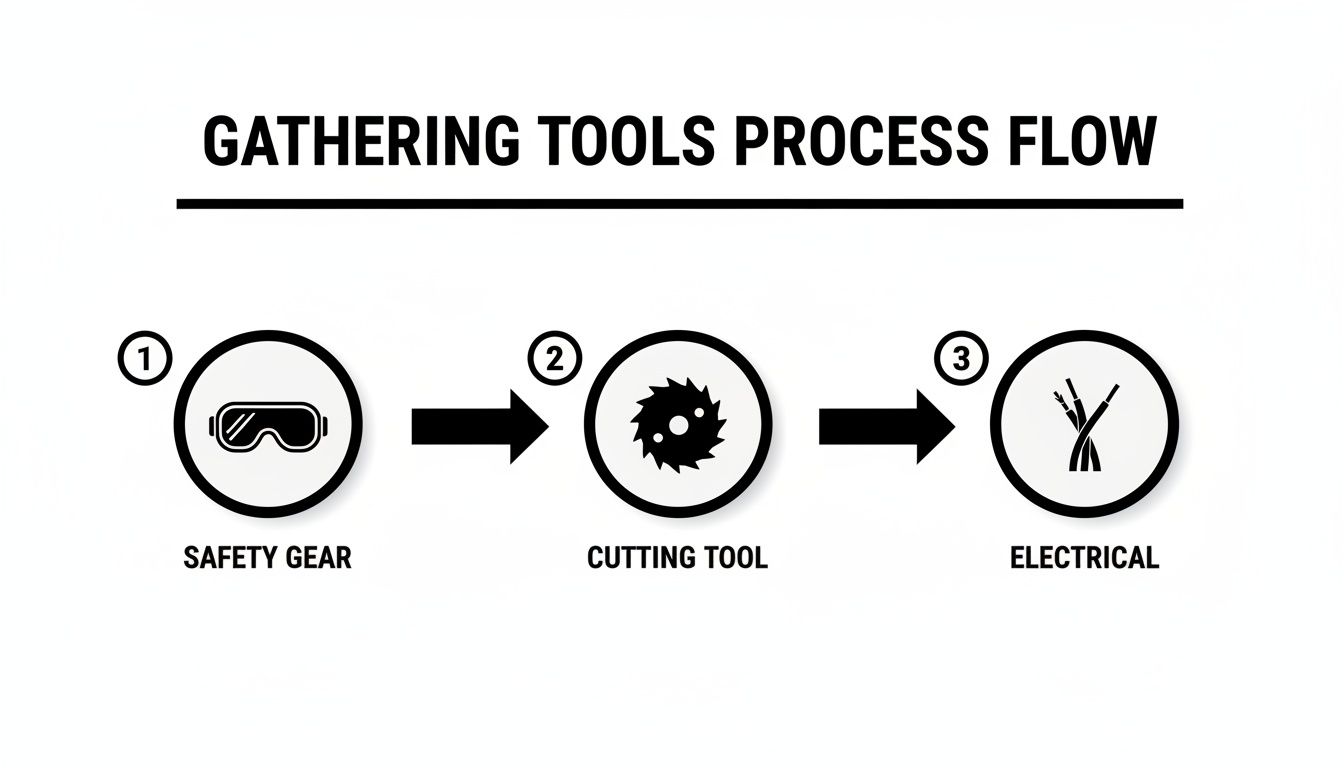
As you can see, getting your safety gear sorted isn't just a step; it's the foundation you build the entire project on.
Master Electrical Safety Before You Start
Before you even think about touching a wire or cutting a hole, you absolutely must kill the power. This is the most critical part of the entire job.
Head to your breaker panel and find the circuit for the room you're working in. Flip it firmly to the "OFF" position.
Now, walk back to the room and verify. Try the existing light switch. Nothing should happen. But don't stop there. This next part is non-negotiable: pull out your non-contact voltage tester and double-check. Wave the tip near the switch and any existing fixture wiring. It needs to stay silent and dark.
I can't stress this enough. I’ve seen my share of mislabeled breaker panels over the years. Never, ever trust the panel's label alone. Your voltage tester is the only thing that can give you 100% confirmation that the circuit is dead.
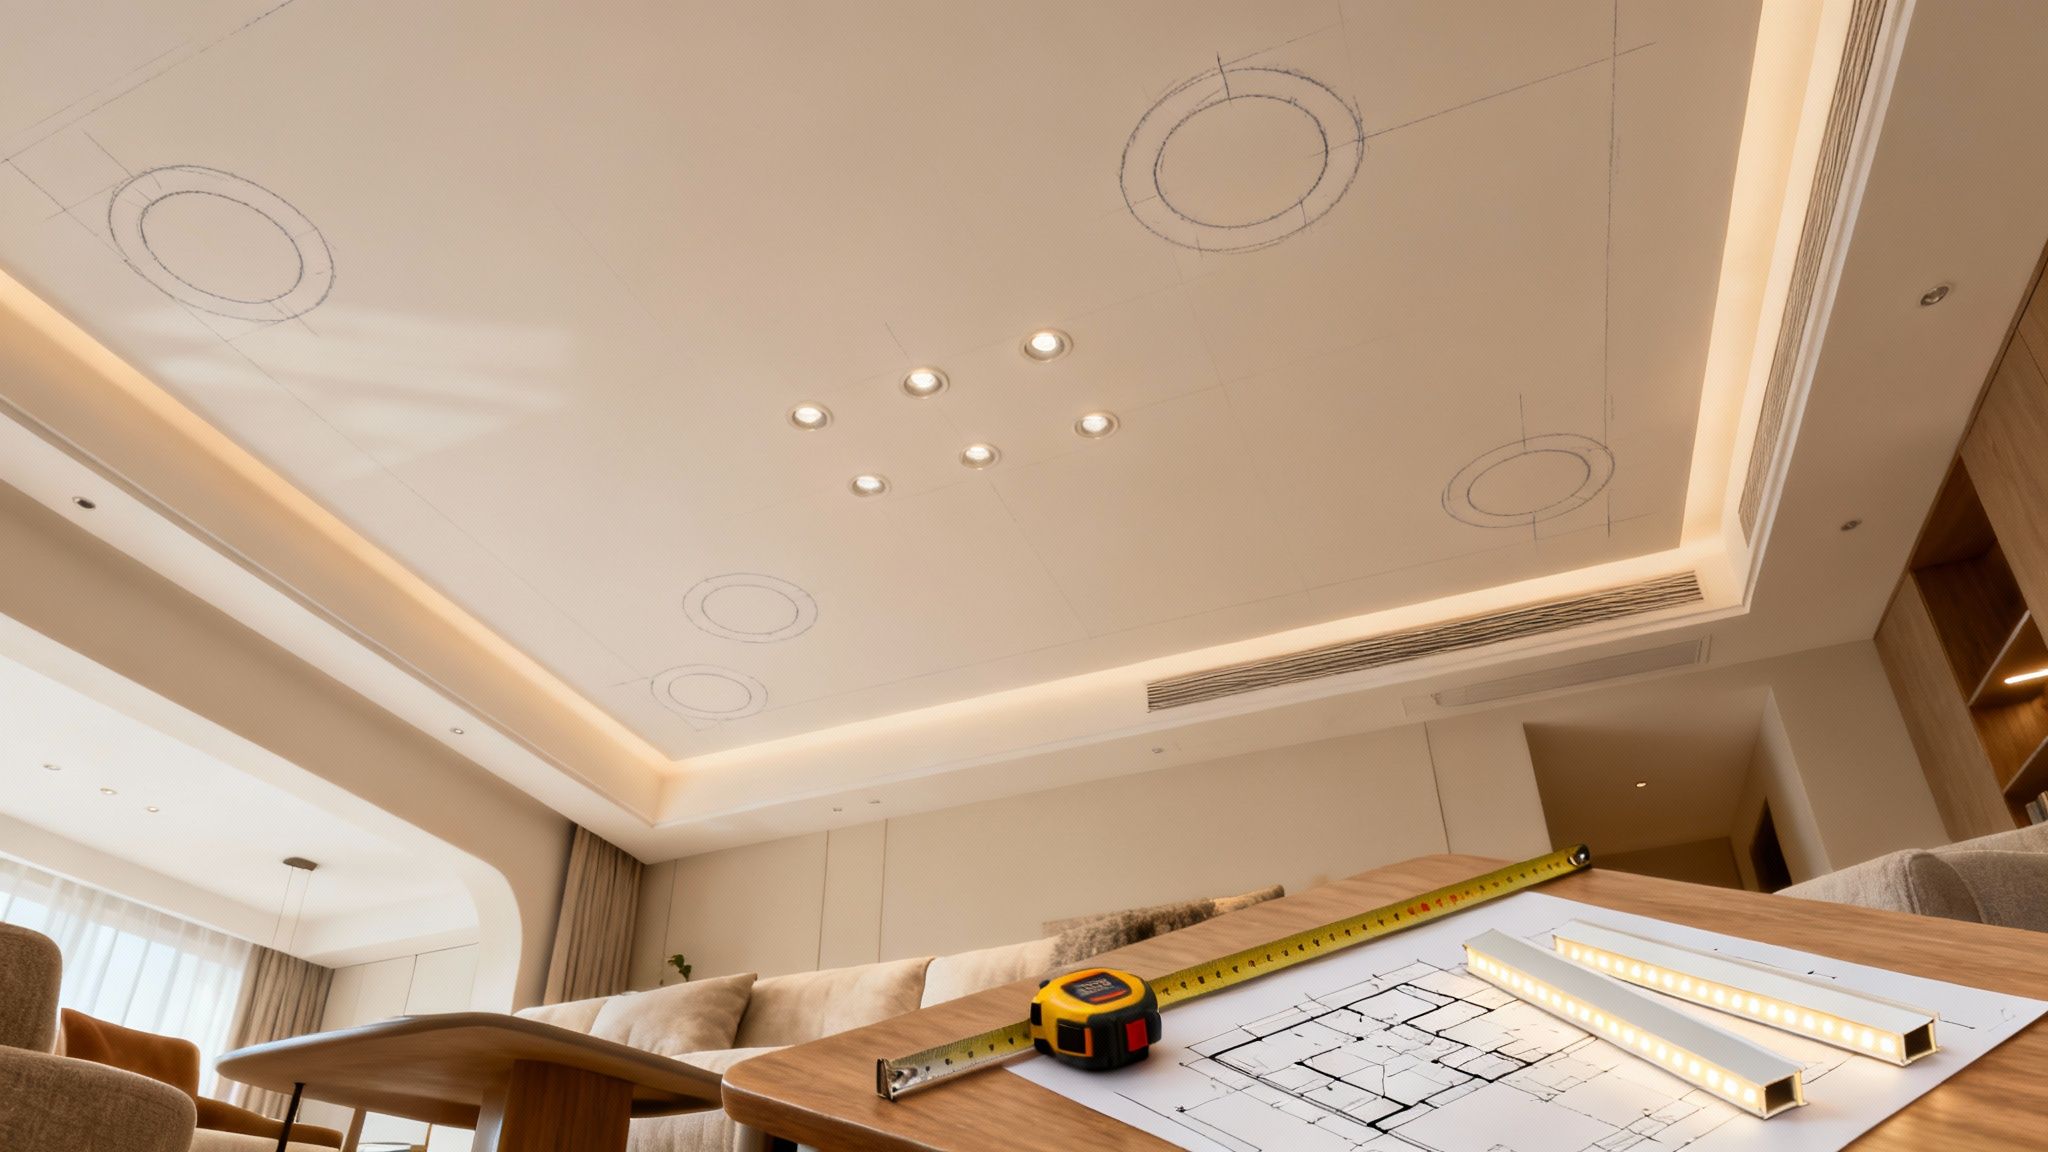
Transfer Your Layout to the Ceiling
With the power confirmed off, it's time to bring your plan to life. Grab your tape measure and start transferring the measurements from your sketch directly onto the ceiling. Use a pencil to make a small, light mark at the center point for each fixture.
This is where your stud finder earns its keep. Scan the ceiling over each pencil mark. You're feeling for open space between the ceiling joists. If the finder beeps, you've hit a joist.
No need to panic—it happens all the time. Just adjust your mark a few inches left or right to get into a clear joist bay. Try to keep your overall spacing as consistent as possible, and don't forget to maintain that three-foot buffer from the walls to prevent ugly shadows. Once every location is confirmed to be clear, you're ready to cut.
Cutting Clean Holes and Running Cable
Set your adjustable hole saw to the exact diameter specified on your recessed light’s instruction sheet—a snug fit is crucial for a clean, professional look. Pop it on your drill, place the pilot bit right on your pencil mark, get the drill level, and start cutting with steady pressure.
Let the saw do the heavy lifting. If you force it, you'll just tear the drywall paper. A good cut will produce a perfect "puck" of drywall, leaving you with a crisp opening. Go ahead and repeat this for all your light locations.
Next up is running the electrical cable. How you do this depends on your power source:
- Tapping an Existing Fixture: If you're replacing an old central light, you'll run your first new cable from that junction box to the nearest recessed light hole.
- Daisy-Chaining Lights: From that first light, you'll run shorter cables from one hole to the next, linking them all together.
- Running a New Circuit: For bigger jobs, you might need to run a brand-new, dedicated cable from the breaker panel. This is often where it's wise to call in a pro.
To thread the wire through the ceiling, fish tape is your best friend. Push it from one hole toward the next until you can see it. Tape your Romex cable securely to the hook and gently pull it back through. Make sure to leave about 18 inches of slack hanging out of each hole. You'll thank yourself later when you're not fighting with short wires.
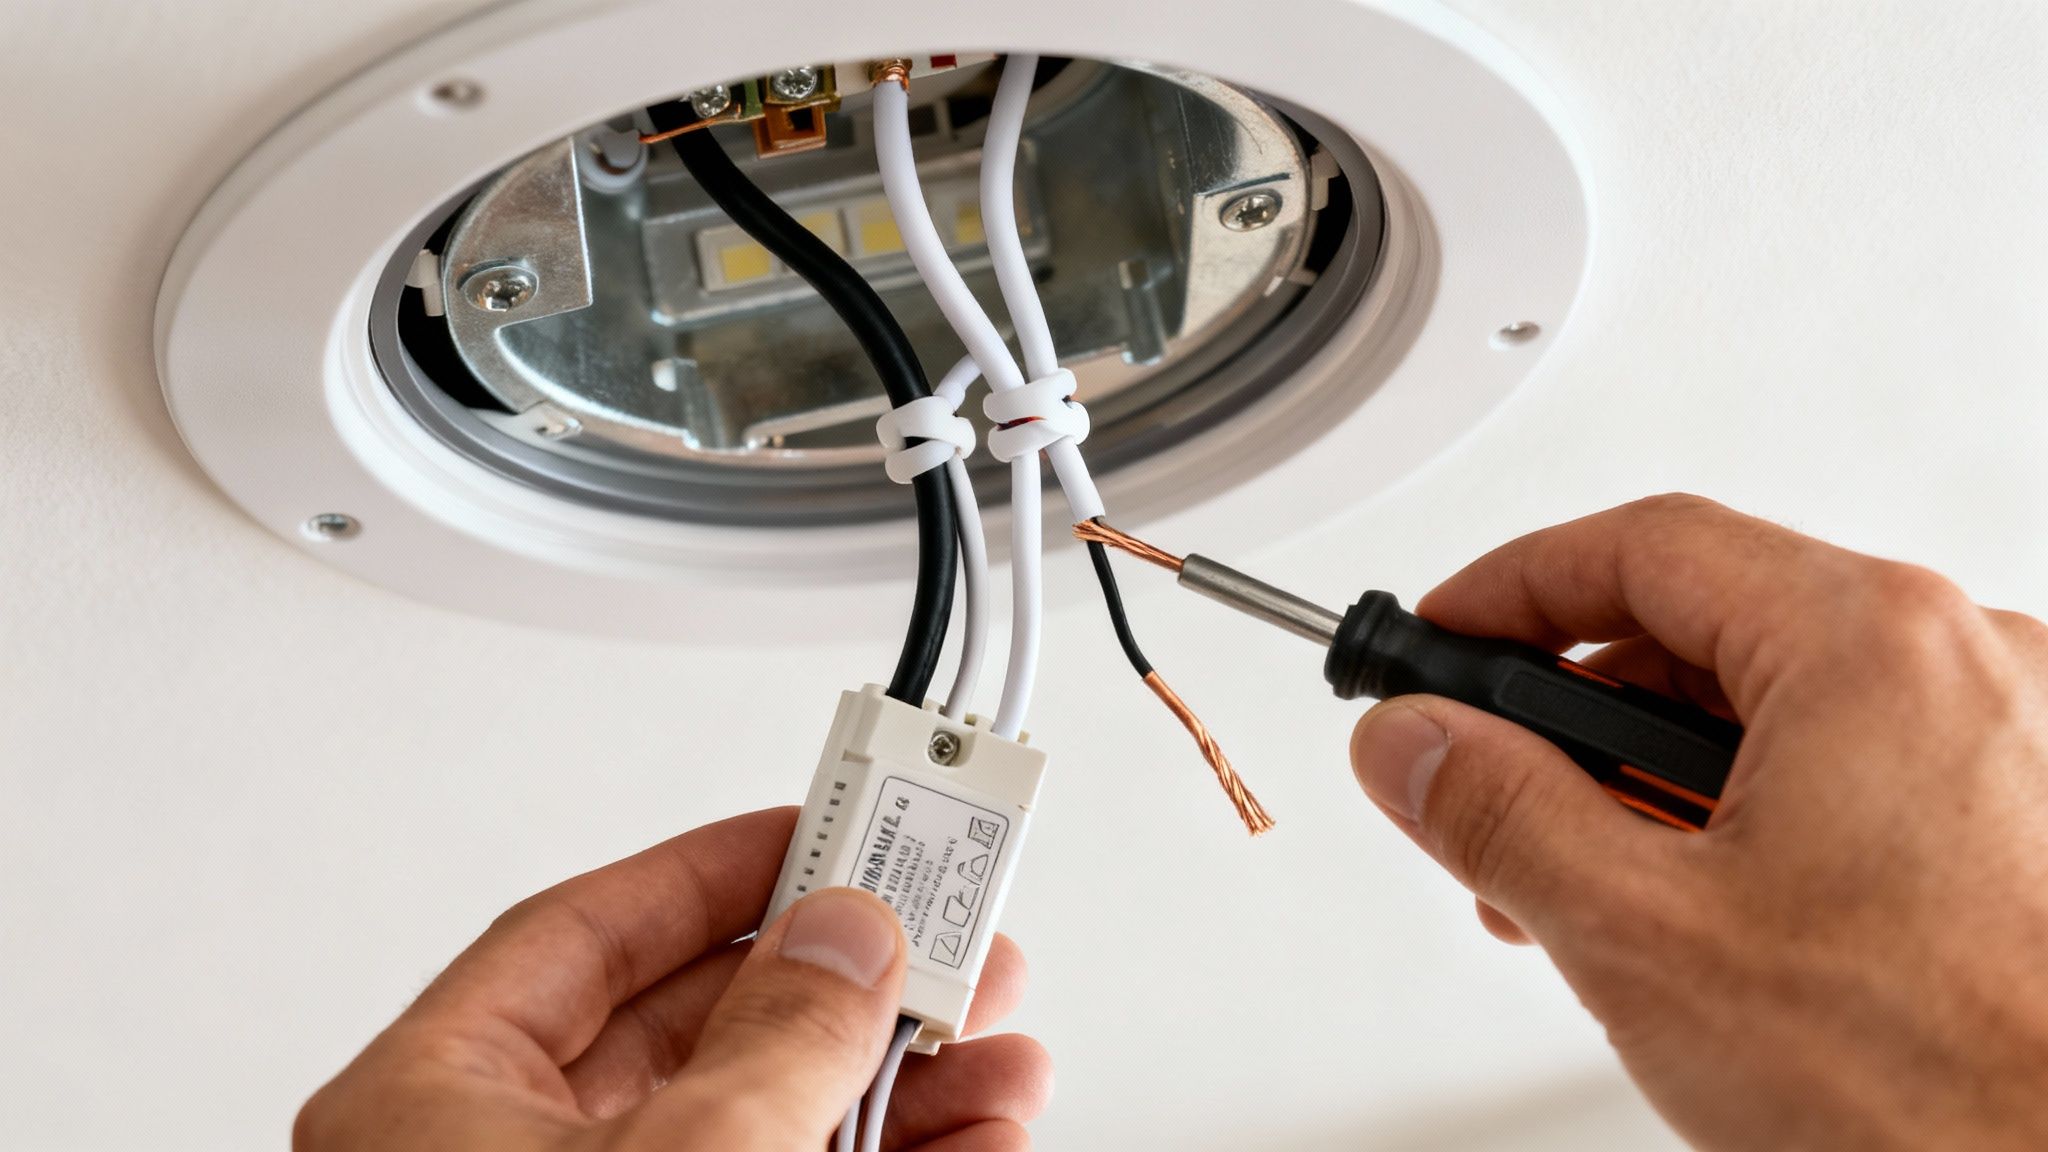
Connecting and Securing the Fixtures
With all your cables run, you can start wiring the housings. Each remodel-style can has a built-in junction box. Pop the cover open. Use your wire strippers to take off about ¾ of an inch of insulation from the black (hot), white (neutral), and bare copper (ground) wires.
Just follow the wiring diagram that came with your lights. It's pretty straightforward:
Twist all the black wires together and secure them with a wire nut.
Do the same for all the white wires.
And finally, connect all the bare copper ground wires.
Give each connection a light tug to make sure it's solid, then carefully tuck the bundles back into the junction box and snap the cover shut. Now, you can push the entire housing up into the ceiling hole. You'll hear the spring-loaded clips engage as they grab the back of the drywall, holding the can firmly in place.
For homeowners here in Utah, a good rule of thumb for spaces like a kitchen in Provo is to aim for one light per 4-6 square feet of ceiling area. So, a 200-square-foot room would need around 6 to 10 fixtures for even lighting. Using fire-safe IC-rated cans is also a must if they'll touch insulation—a key safety detail that aligns with Utah's focus on home value and safety. You can learn more about project costs from Angi.com.
To finish, just push your LED trim into the housing until it clicks into place. And that's it—your installation is complete
Wiring Your Lights for Safety and Function
Alright, this is where the rubber meets the road. Getting the wiring right isn’t just about making sure the lights turn on—it's about the safety of your home and everyone in it. Let’s walk through how to connect your new lights, focusing on the most common setup: multiple lights all running off a single wall switch.
Before you touch a single wire, you need to know what you’re looking at. In the standard NM-B cable (you probably know it as Romex) that you'll be using, there are three conductors inside, each with a critical job:
- Black Wire (Hot): This is the live wire. It brings the electrical current from your panel to the light.
- White Wire (Neutral): This one completes the circuit, carrying that current back to the source.
- Bare Copper Wire (Ground): This is your most important safety feature. If something goes wrong, it gives the electricity a safe path to the ground, preventing dangerous shocks.
Think of it like a simple circuit. The black wire is the "go" path, the white wire is the "return" path, and the ground is the emergency exit.
Connecting Multiple Lights in a Series
The most practical way to wire a row of recessed lights is to "daisy-chain" them together. Power flows from your switch to the first light, then from that light to the second, and so on down the line. It's clean and efficient.
Each recessed housing comes with a small junction box attached, and this is where all the magic happens.
You’ll start by running a cable from the switch box in your wall up to the junction box on the very first light. From there, you just need shorter pieces of cable to jump from one light to the next.
Inside each junction box (except for the last one), you'll have three sets of wires: one coming in (from the switch or the previous light), one going out (to the next light), and the fixture’s own wires. Your task is to group them all correctly.
It’s pretty straightforward:
Join all the black (hot) wires together.
Join all the white (neutral) wires together.
Join all the bare copper (ground) wires together.
Use a wire nut that's sized for the number of wires you're connecting. Twist the bare ends of the wires together clockwise first, then spin the wire nut on until it’s good and tight. Give each wire a gentle tug to make sure it’s secure.
Crucial Takeaway: A loose connection is a serious fire hazard. I can't stress this enough. Always double-check your connections. If a wire pulls out of the nut, take it all apart and do it again. A solid, tight connection is completely non-negotiable.
Upgrading to a Dimmer Switch
While you're at it, adding a dimmer switch is one of the best upgrades you can make when you install recessed lighting in ceiling fixtures. It gives you incredible control over the mood of the room, from bright task lighting to a soft, relaxing glow.
Just be sure to buy a dimmer specifically rated for LEDs. Older dimmers were built for incandescent bulbs and can make modern LEDs flicker, buzz, or fail prematurely. Installation is nearly identical to a standard switch—just connect your black, white, and ground wires according to the instructions.
Troubleshooting Common Installation Issues
Even with careful work, you might flip the switch and find something isn't quite right. Don't panic. Most issues are simple fixes. Here’s a quick guide to help you diagnose the problem.
| Lights Don't Turn On | Breaker is off or tripped. | Check your electrical panel. Reset the breaker. |
| One Light is Out | A loose connection in that light's junction box or the one before it. | Turn off the power. Check all wire nut connections for that specific fixture and the one feeding it power. |
| Lights Flicker or Buzz | Incompatible dimmer switch. | Ensure your dimmer is rated for LED fixtures. Replace if necessary. |
| Breaker Trips Instantly | A short circuit. A hot wire (black) is likely touching a ground (copper) or neutral (white) wire. | TURN OFF POWER IMMEDIATELY. Carefully inspect all your connections to find where the wires are crossed. |
Always remember to turn the power off at the breaker before you open anything up to investigate. Safety first, always.
Commercial Insights and Project Scope
While this guide is aimed at the DIYer, it's interesting to see how this plays out on a larger scale. The commercial sector actually makes up the bulk of the recessed lighting market, accounting for 57.23% of global revenue.
For businesses here in Utah, where we've seen electrical installation costs jump 15% in the last three years, smart lighting is a huge deal. A well-planned switch to smart LEDs can slash energy bills by an average of 40%. Tenant improvement jobs, which we handle all the time at Northpoint, involve everything from wiring new builds to using remodel kits for retrofits—all to keep business disruption to a minimum. You can dig into more market trends on MarketResearchFuture.com.
Whether you're lighting a living room or an office, the core principles are the same. If your project starts feeling too complex, like a full-scale basement finish, that's a good cue to take a step back. Our guide on DIY basement renovations can offer perspective on what’s involved in larger projects. Knowing your limits is just as important as knowing how to connect a wire.
Final Touches and Knowing When to Call a Pro
You've got the new lights in the ceiling, and the hard part is behind you. Now it's all about the finishing touches that make the installation look clean, professional, and—most importantly—safe. Don't rush this last leg of the race. This is where a good DIY job becomes a great one.
First things first, head back to your breaker panel and confidently flip that circuit back to the "ON" position. Walk into the room, flip the light switch, and enjoy that satisfying moment when your new lights blaze to life. But don't stop there; you need to check each one to make sure everything is working exactly as it should.
Performing a Final Safety Check
With the lights on, take a few minutes to do a quick but careful inspection. It's the final once-over to catch anything you might have missed.
- Test the Dimmer: If you installed a dimmer switch, slide it up and down. Watch for any flickering, buzzing, or inconsistent performance, which might signal an issue with the switch or bulb compatibility.
- Check Each Fixture: Walk under each light and look up. The trim should be sitting perfectly flush with the ceiling. If one is sagging, it probably means the housing's retention clips didn't fully grab the drywall.
- Look for Gaps: Check the seal around each trim ring. Small imperfections are normal, but if you spot any sizable gaps, a little drywall patching and paint will make it look seamless.
This final check is really for your peace of mind. It’s the confirmation that all your planning and hard work paid off with a safe, functional, and beautiful lighting upgrade.
Recognizing When to Hire a Professional
Even the most seasoned DIYer can run into unexpected problems. The real skill is knowing your limits and recognizing when it's time to put down the tools and call a licensed electrician. When it comes to your home's electrical system, there’s no room for ego.
Here are a few scenarios where you should stop what you're doing and pick up the phone:
- Discovering Aluminum Wiring: You cut into the ceiling and find dull, gray-colored wires instead of the familiar copper. Stop. Aluminum wiring is a different beast and requires special connectors and handling to be safe.
- An Overloaded Circuit: You flip the switch, and the breaker immediately trips. This is a classic sign that you've added too much load to the existing circuit. An electrician will need to diagnose the problem, which might involve running a whole new circuit from the panel.
- That Gut Feeling of Uncertainty: If at any point you feel hesitant or unsure about a connection you made, that's your sign. It is always, always better to be safe and have a pro double-check your work than to risk a fire hazard.
A professional's expertise isn't just about getting the job done—it's about the guarantee that it's done safely and up to code. There's no shame in calling for backup. In fact, it's the smartest move you can make when you're out of your depth.
Trying to figure out who to hire can sometimes be confusing. Understanding the difference between a general contractor vs subcontractor can help clarify who is best qualified for specialized electrical work like this. If you decide this project is better left to an expert, or if this has inspired other home improvement ideas, you can explore various professional home services. Making the right call here will ensure your home is safe and your brilliant new lighting is something you can enjoy, worry-free, for years.
Answering Your Top Recessed Lighting Questions
Even with a plan in hand, a few questions always pop up when you're getting ready to install recessed lighting. I get these all the time from homeowners, and getting the details right is what separates a frustrating project from a fantastic result. Let's clear up some of the most common uncertainties.
How Far Apart Should My Recessed Lights Be?
There's a simple rule of thumb that works great as a starting point: just divide your ceiling height by two. So, for a standard 8-foot ceiling, you'd aim for about 4 feet between each light. This gives you a nice, even wash of light without creating weird dark spots or overly bright "hot spots."
But that's just the beginning. The real answer depends on what you're using the room for.
- For Task Lighting: Think about your kitchen counters or a workbench. You need strong, direct light there. In those areas, I'd pull the spacing in to about 3 or 4 feet apart to really concentrate the light where you work.
- For Ambient Lighting: In a living room or bedroom where you want a comfortable, general glow, you can stretch that spacing out a bit, maybe to 4 or 6 feet apart.
- Keep Your Distance from Walls: A crucial tip I always give is to keep your lights at least 3 feet away from the walls. If you get them too close, you create this ugly scalloped light effect on the wall that just looks unprofessional.
Can I Put Recessed Lights in a Ceiling with Insulation?
Yes, you absolutely can, but this is a non-negotiable safety point: you must use IC-rated cans. IC stands for "Insulation Contact," and it means the fixture is built to be safely buried in insulation without creating a fire hazard.
If you use a non-IC-rated fixture, it needs several inches of empty space all around it to let heat escape. Piling insulation on top of one is a recipe for disaster. For insulated ceilings, it's IC-rated or nothing. It’s a simple choice that keeps your home safe.
New Construction vs. Remodel Housings: What's the Difference?
This one is actually pretty straightforward. It all boils down to whether you can see your ceiling joists.
New construction housings are for when the ceiling is wide open. They have long mounting arms that you nail or screw directly onto the joists before any drywall is installed. They're rock-solid, but you can only use them during a major remodel or a new build.
Remodel housings, on the other hand, are designed for the rest of us working in a finished home. They are engineered to slip right into the hole you cut in the ceiling. Once you push it through, a set of clips springs out and clamps onto the back of the drywall, holding the light firmly in place. It's a brilliant design.
For any project where you're adding lights to an existing room, the remodel housing is your go-to. It saves you from the nightmare of ripping out a perfectly good ceiling just to get to the joists.
Do I Really Need an Electrical Permit?
For this kind of work, yes. In almost every jurisdiction, including right here in Utah, adding a new circuit or even extending an old one for new lights requires a permit. It might seem like a hassle, but it's a critical safety check. The permit process ensures a qualified inspector signs off that the work is done correctly and up to code.
Now, if you're just replacing one light fixture with another in the same spot and not touching the wiring, you probably don't need one. But when in doubt, a quick call to your local building department is the smartest move you can make. Of course, if you hire a licensed electrician, they take care of all the permits and inspections for you.
Ready to tackle your next home improvement project but want an expert touch? The team at Northpoint Construction specializes in everything from basement finishing to full-scale home remodels in Orem, Provo, and surrounding areas. Let us help you turn your vision into a beautiful, functional reality. Learn more at buildnp.com.