

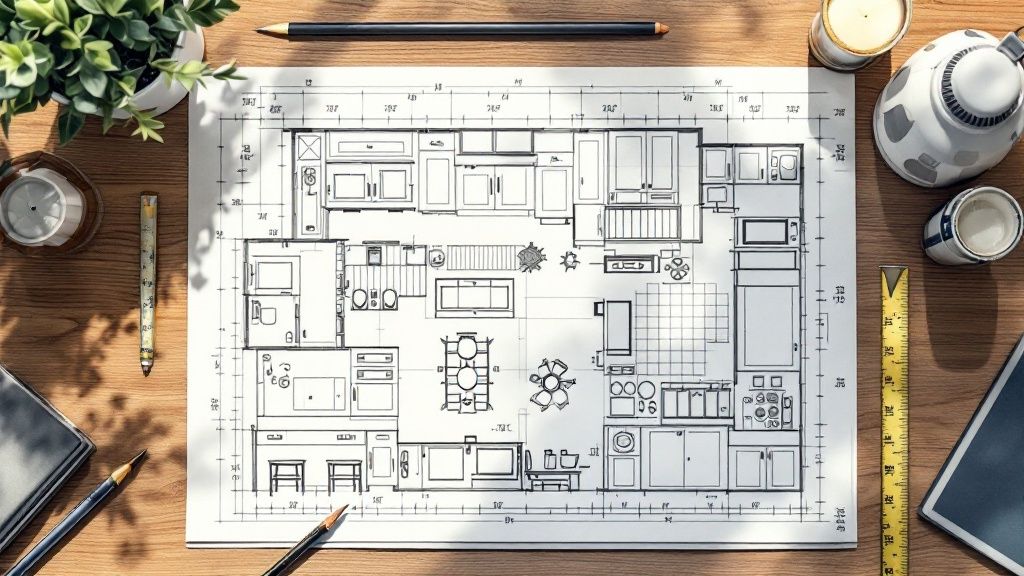
Before you pick out a single paint chip or countertop sample, the most important work of your kitchen remodel happens on paper. You need to get to the heart of why you're doing this in the first place. Is it for better family dinners, a fresh look, or boosting your home's value? Figuring this out now is the key to creating a roadmap that prevents headaches and costly changes down the road.
Defining Your Vision and Project Scope

It’s easy to get swept up in the excitement of new appliances and fancy finishes, but hold on for a second. The first real step is getting crystal clear on your goals. Your answer to "Why are we remodeling?" becomes the foundation for every single decision you'll make.
People decide to overhaul their kitchens for all sorts of reasons, but most motivations boil down to a few common themes:
- Better Functionality: The current layout just doesn't work. You're tired of a cramped cooking space, constantly searching for storage, or having a layout that makes it impossible to entertain guests.
- A Modern Style Update: Let's face it, that 90s oak has seen better days. You're ready for a new look that reflects your personal style with updated materials, colors, and lighting.
- Boosting Home Value: Maybe you're thinking of selling in the next few years. A smart kitchen remodel is one of the most reliable ways to increase your home's appeal and your return on investment.
Clarifying Your Must-Haves vs. Nice-to-Haves
With your main goal in mind, grab a pen and paper. It's time to make two lists: your non-negotiables and your "it would be nice if..." items. This simple exercise is your secret weapon against scope creep—that sneaky process where small additions blow up your budget and timeline.
For instance, if you've got young kids, a durable, stain-resistant quartz countertop might be a must-have. A big island where they can do homework while you cook could be another non-negotiable. On the flip side, that fancy panel-ready refrigerator might land on the nice-to-have list. You’d love it, but you could live without it if the numbers get tight.
A well-defined scope is the single most important tool for keeping your project on track. It transforms vague ideas into a concrete plan, empowering you to make confident, budget-conscious decisions from day one.
Getting this clarity is more important than ever. Kitchen remodels are consistently one of the most popular home improvement projects, and the data backs it up. Projections show that a whopping 38% of all renovations in 2025 will be kitchens.
What’s really interesting is the shift away from do-it-yourself projects. With 86% of homeowners now hiring pros, the trend is clear. In fact, professional-led kitchen remodels are expected to grow by 2.9% in 2025, leaving DIY jobs in the dust. You can discover more insights about home improvement trends from recent industry reports.
Alright, you've got your vision board overflowing with beautiful kitchens. Now it's time for the reality check: figuring out the money and the schedule. Nailing down your budget and timeline from the get-go is the single best way to save yourself a world of stress down the road.
A huge mistake I see homeowners make is just adding up the costs of the "big ticket" items like cabinets and appliances. A real-world budget goes way deeper than that. You have to account for materials, fixtures, and the one thing people always underestimate: skilled labor. Depending on your project, labor alone can eat up 20-35% of your total budget.
The key to a remodel that doesn't make you tear your hair out isn't a perfect plan—it's a realistic plan with a little wiggle room.
How to Build a Budget That Actually Works
First, do some initial legwork to get a feel for costs. The price difference between stock cabinets from a big-box store and fully custom inset cabinetry is staggering. The same goes for countertops—laminate is a world away from a slab of high-end quartzite. Add up these major items to create a baseline number.
But don't you dare stop there. Now, it's time to factor in all the "hidden" costs that can sneak up on you:
- Permits and Fees: Your city or county wants its cut. This can be a few hundred dollars or, for major structural work, a few thousand.
- Design Services: If you're bringing in a pro kitchen designer, their fees need a line item in the budget.
- Delivery & Shipping: Getting those heavy appliances and crates of flooring to your door isn't always free. These charges can add up.
- Life Disruption Costs: Let's be honest, you'll be eating a lot more takeout for a while. Factor that extra cost into your regular household expenses.
This image gives you a great visual breakdown of where the money typically goes in a standard mid-range remodel. It really highlights how much of the pie is dedicated to labor and services, not just the pretty stuff you see at the end.
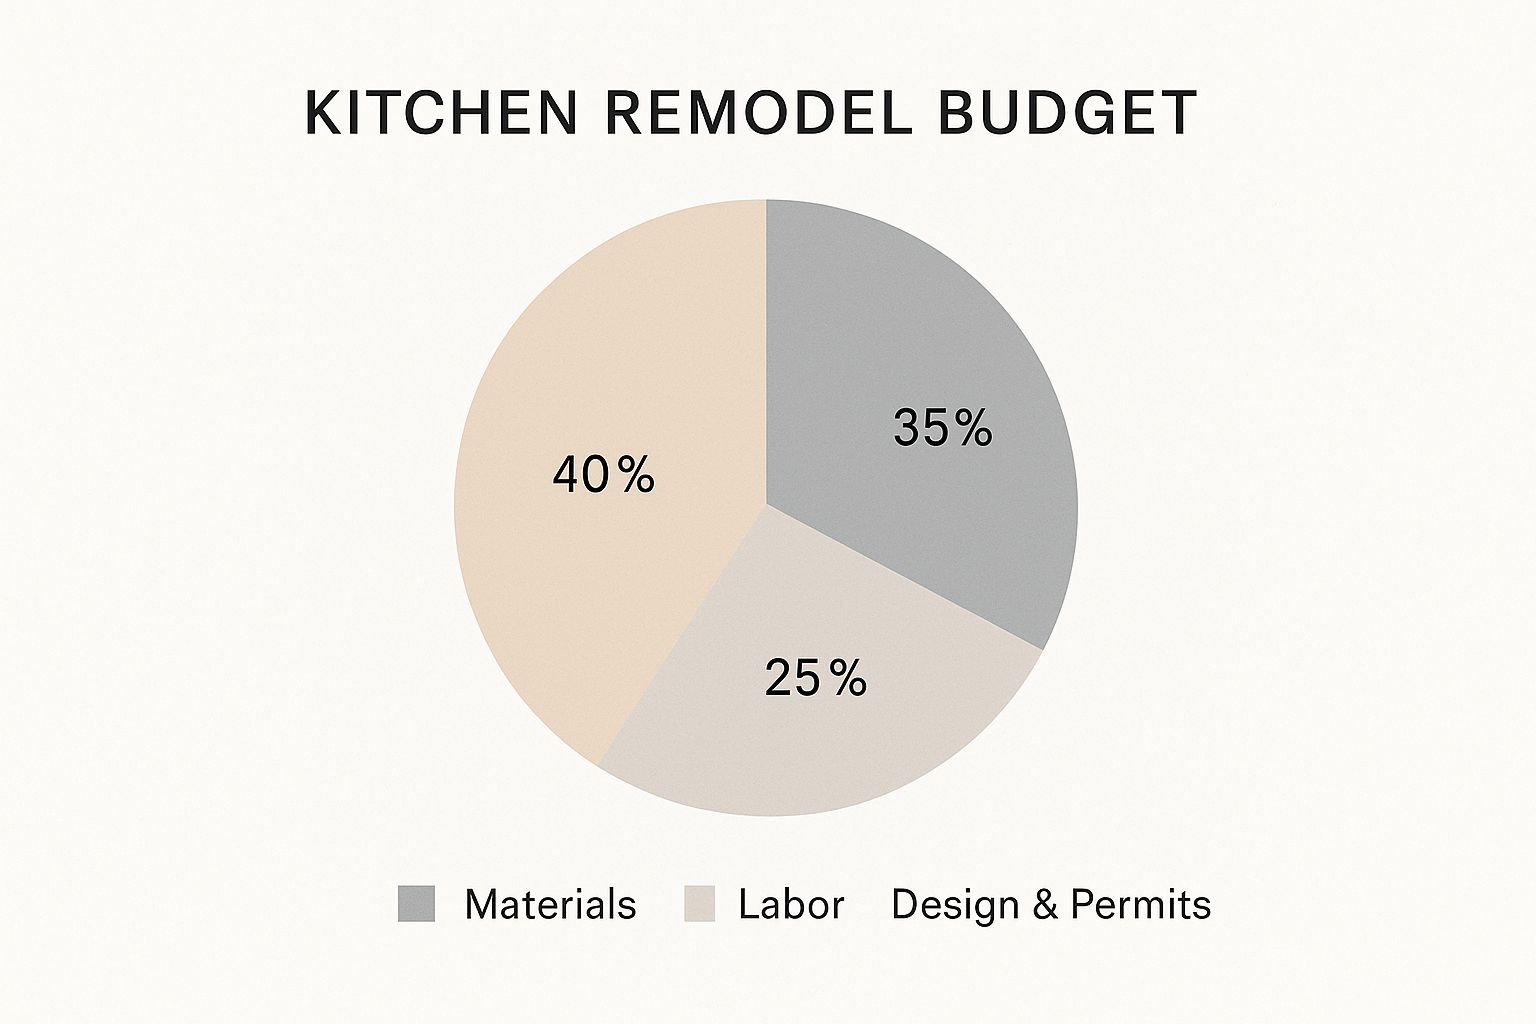
As you can see, budgeting for the people doing the work is just as important as budgeting for the materials they're installing.
To give you a clearer idea, here's a sample budget allocation. Think of this as a starting point—your own percentages will shift based on your priorities, but this is a solid framework.
Sample Kitchen Remodel Budget Allocation
| Cabinetry & Hardware | 30% | The single largest expense. Custom vs. stock will dramatically affect this number. |
| Labor & Installation | 20% | Includes demo, plumbing, electrical, installation, etc. Don't skimp here. |
| Appliances & Ventilation | 15% | High-end, pro-style appliances can easily push this percentage higher. |
| Countertops | 10% | Material choice (laminate vs. stone) is the biggest cost driver. |
| Flooring | 7% | Includes the material and the cost of installation or refinishing. |
| Lighting & Electrical | 5% | Includes new fixtures, under-cabinet lighting, and any necessary wiring updates. |
| Plumbing & Fixtures | 5% | Faucet, sink, garbage disposal, and any plumbing relocation costs. |
| Backsplash & Finishes | 3% | Tile, paint, and trim work. |
| Design & Permits | 5% | Fees for designers, architects, and municipal building permits. |
This table should help you start assigning real numbers to your dream kitchen, ensuring no major category gets overlooked.
The Remodeler's Golden Rule: The Contingency Fund
If you only take one piece of advice from this guide, let it be this: you must have a contingency fund. This is your project's safety net. Set aside 15-20% of your total estimated cost for the things you can't possibly plan for. Because trust me, they will happen.
Think of it like project insurance. You really hope you don't need it, but you'll thank your past self when the plumber opens a wall and finds old, corroded pipes that have to be replaced right now.
Without that cushion, one unexpected problem can force you to compromise on the finishes you've been dreaming of, or worse, bring the entire project to a screeching halt.
It's clear homeowners are continuing to invest heavily in their spaces. The U.S. kitchen and bath market is forecast to reach a staggering $235 billion in revenue by 2025, with remodel spending growth of 2.6% outpacing new construction. This trend shows a real commitment to improving the homes we already live in. You can learn more about kitchen and bath market trends to see how the industry is evolving.
Mapping Out a Timeline That Won't Break
Time is your other precious resource. A realistic schedule is more than a start and end date; it's a carefully sequenced chain of events. One delay can cause a domino effect down the line.
Here’s a general look at the phases of a kitchen remodel:
- Phase 1: Design and Planning (4-12 weeks). This is where you finalize everything—layout, materials, appliances, contractors. Do not rush this part. A good plan is your best defense against chaos later.
- Phase 2: Ordering and Waiting (4-16 weeks). This often overlaps with the end of the planning phase. Custom cabinets can take 8-16 weeks to be built and delivered. Appliances and special-order tiles can also have surprisingly long lead times.
- Phase 3: Demolition and Construction (4-8 weeks). Now the dust flies. This is the heavy lifting: tearing out the old kitchen, handling rough-in for new plumbing and electrical, putting up drywall, painting, and installing the new floor.
- Phase 4: Installation and Finishing Touches (2-4 weeks). The final stretch! This is when cabinets, countertops, backsplash, appliances, and all the final fixtures and hardware go in, and your new kitchen finally comes to life.
One of the most common hiccups? Waiting on a single, backordered item. A delayed faucet can hold up the final plumbing inspection, which means you can't use your sink. By ordering everything as early as possible and building a few buffer days into each phase, you create a schedule that can bend without breaking.
Designing a Kitchen That’s Functional and Timeless
This is the fun part—where your vision starts to feel real. We’re moving beyond just saving inspiration photos and getting into the nitty-gritty of what makes a kitchen not only beautiful but also a dream to work in. The ultimate goal is to create a space that looks fantastic and genuinely supports your daily life for years.
First things first: let's put function before form. A gorgeous kitchen that's a nightmare to cook in is a failed design. This means getting serious about how you’ll actually move around and use the space.
Mastering Your Kitchen Layout
The old-school "kitchen work triangle"—connecting the sink, stove, and fridge—is a decent starting point, but it doesn't tell the whole story for modern kitchens. Today, it’s much more practical to think in terms of dedicated work zones for prepping, cooking, cleaning, and storage.
Every layout has its pros and cons:
- L-Shape: Perfect for open-concept homes. It uses two connected walls, which creates a really efficient workspace while leaving plenty of room for an island or a dining table.
- U-Shape: This design wraps around you on three sides, giving you an incredible amount of counter space and storage. It’s a favorite for serious cooks but can feel a bit closed off if the room is small.
- Galley Kitchen: With two parallel counters, this is a lean, mean, efficient machine often found in smaller homes. It keeps everything within a few steps but can get crowded if more than one person is cooking.
Think honestly about how your family uses the kitchen. Do you and your partner often cook together? A galley might lead to some bumped elbows. If you love to entertain, an L-shaped layout with a big island is perfect for letting guests gather around.
Creating a Cohesive and Timeless Style
Once the functional layout is locked in, it’s time to nail down the aesthetic. The secret to a kitchen you'll love for decades is to aim for a cohesive style, not just a collection of the latest trends. Whether your vibe is modern farmhouse, sleek minimalism, or classic traditional, consistency is what gives a kitchen that polished, high-end feel.
A timeless kitchen isn’t about being boring or avoiding trends. It’s about creating a classic foundation with things that are hard to change. You can always bring in trendy touches with things that are easy to swap out, like bar stools, light fixtures, or even cabinet hardware.
Instead of getting pulled in a million different directions, try to stick to a core palette of three to four main materials and colors. For instance, a beautiful design might pair pewter green cabinets with white quartz countertops, warm brass hardware, and light oak floors. This simple, focused palette guarantees that everything will feel harmonious.
Getting these big-picture design decisions right is a fundamental part of the planning process. For projects involving major structural work or a completely new build, solid design principles are just as critical as the construction itself, which is a key component of our comprehensive home building services.
The Power of Layered Lighting
Lighting is one of those things that people often forget about until it's too late, but it can make or break a kitchen. A single light in the middle of the ceiling just won't cut it. A truly great lighting plan uses multiple layers to make the space functional, flexible, and inviting.
Think of it in three layers:
Ambient Lighting: This is your general, all-over light. It's the foundation, usually coming from recessed can lights or a central fixture that brightens the entire room.
Task Lighting: This is non-negotiable. It’s the focused light you need to actually see what you’re doing. Under-cabinet LED strips are the MVP here, lighting up your countertops so you don't chop your fingers in the shadows.
Accent Lighting: This is the jewelry of the kitchen—the lights that add personality and style. Think of a beautiful set of pendant lights hanging over your island or a pair of sconces on either side of the sink.
When you combine all three, you get a dynamic kitchen that can be bright and energetic when you’re cooking up a storm, or soft and moody when you’re winding down with a glass of wine. This thoughtful approach ensures your finished space is every bit as usable as it is beautiful.
Getting Materials and Appliances Right
Alright, your layout is locked in. Now comes the fun part—choosing the materials and appliances that bring your vision to life. This is where you juggle aesthetics, durability, and cost to make choices you’ll love using every single day.
These selections are the heart and soul of your kitchen. The countertops, cabinets, flooring, and appliances you pick will define the space for years, impacting both your daily life and your home's long-term value.
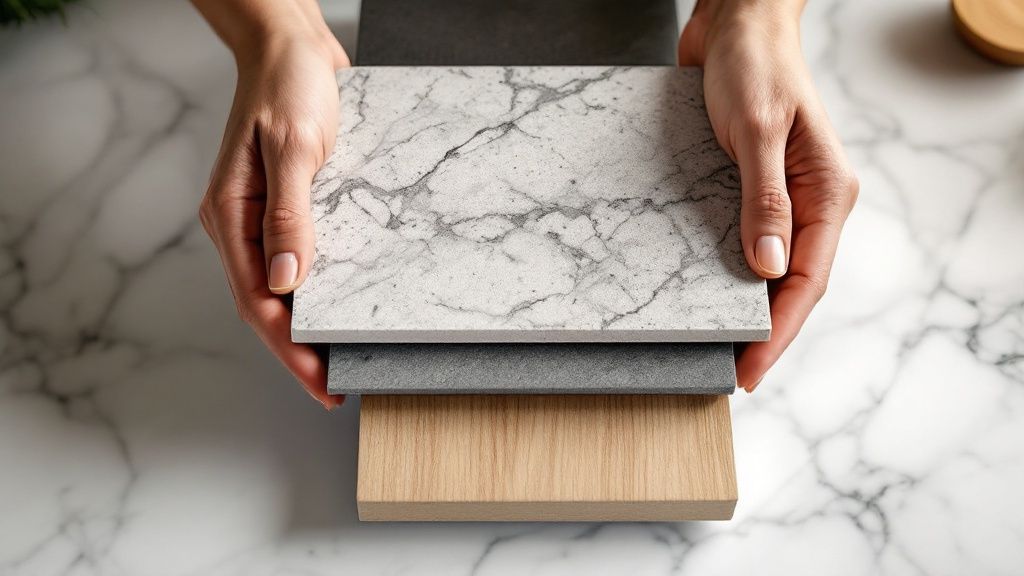
Selecting Your Perfect Countertop
The countertop isn't just a design statement; it's one of the hardest-working surfaces in your entire home. Let your real-life habits guide this decision.
- Quartz: This stuff is an absolute workhorse. As an engineered stone, it's non-porous, which means spills from wine, coffee, or oil won't stain, and you never have to seal it. If you have a busy family or just want something that’s practically bulletproof, quartz is a fantastic choice.
- Granite: For those who love the unique, one-of-a-kind beauty of natural stone, granite is a timeless classic. No two slabs are identical. It's incredibly heat-resistant (go ahead, put that hot pan down!), but it does need to be sealed periodically to keep it from absorbing stains.
- Butcher Block: Looking to add some warmth and character? Wood countertops are a beautiful option. They're naturally antibacterial and great for food prep, but they do demand a bit of TLC, like regular oiling to keep them from drying out or staining.
Think honestly about how you live. Are you the type to wipe up a spill immediately, or does it sometimes sit for a while? If so, quartz might be your best friend.
Understanding Your Cabinetry Options
Cabinets are almost always the biggest line item in a kitchen remodel budget. Knowing the difference between your options is crucial for keeping costs in check while getting the look you want.
| Stock | Low | 1-2 weeks | Quick, budget-friendly projects with standard kitchen dimensions. |
| Semi-Custom | Medium | 4-8 weeks | Homeowners who want some flexibility in sizing and finishes without the full custom price tag. |
| Fully Custom | High | 8-16 weeks | Unique layouts, specific design needs, or anyone wanting that truly high-end, built-in look. |
Speaking of a high-end look, inset cabinetry—where the doors sit perfectly flush inside the cabinet frame—is a gorgeous choice. It delivers a timeless, furniture-like appearance but requires incredible precision to build, which is why it often costs around 20% more than standard overlay doors.
Making a Smart Flooring Choice
Your kitchen floor needs to be tough. It has to handle spills, constant foot traffic, and the inevitable dropped pot or dish. For good reason, a couple of options really stand out.
Luxury Vinyl Plank (LVP) has become wildly popular because it's completely waterproof, scratch-resistant, and much more comfortable to stand on than tile. It does a fantastic job of mimicking the look of real hardwood without any of the maintenance headaches, making it a go-to for homes with kids or pets.
Porcelain or Ceramic Tile is another classic, durable choice. It’s also waterproof, a breeze to clean, and available in a seemingly endless array of styles. The main downsides? It’s hard and cold underfoot, and you'll have to clean the grout lines every so often to keep them looking fresh.
A Quick Design Tip: Think about how all your materials play together. If you choose a simple, solid-color cabinet, you can get away with a countertop that has more movement and character, like a veined granite. But if you're planning a bold, patterned backsplash, a quieter countertop will keep the space from feeling too busy. It's all about balance.
Choosing Appliances That Fit Your Life
Finally, it's time to pick your appliances. The key here is to match the technology to your actual cooking and living habits—don't get dazzled by features you'll never touch.
A passionate baker might prioritize a double wall oven. Someone who entertains a lot might want an oversized refrigerator or a whisper-quiet dishwasher. Be realistic about what you need.
This is also a great opportunity to make a positive environmental impact. The home improvement world is shifting, with 14% of all projects now including eco-friendly upgrades like energy-efficient appliances. Opting for models with a high energy rating doesn't just cut down on your utility bills; it also brings your home up to modern standards. For a deeper dive, you can read the full research on kitchen market trends and see where the industry is heading.
Assembling Your Professional Remodel Team
Let’s be honest: the success of your remodel hinges less on the gorgeous quartz you picked out and more on the hands that install it. Putting together the right professional team is easily the most critical investment you'll make in your project. This isn't just about hiring help; it's about finding partners who get your vision, respect your budget, and have the skills to make it all happen without the drama.
A kitchen remodel isn’t a solo act. It's a carefully orchestrated performance with a few key players, and understanding who does what is the first step. You won’t always need everyone on this list, so knowing the roles helps you hire exactly who you need for your specific job.
Who You Need on Your Team
The scale of your project really dictates the pros you'll need to bring on board. A simple refresh might just call for a good handyman, but a full gut renovation requires a much more robust crew.
- General Contractor (GC): Think of the GC as your project's quarterback. They manage the entire show—from hiring and scheduling all the subcontractors (plumbers, electricians, painters) to making sure the project stays on track and meets building codes. If you're moving walls or touching plumbing or electrical, a GC is non-negotiable.
- Kitchen Designer: This is your functional artist. A great kitchen designer specializes in creating layouts that are not only beautiful but also incredibly efficient. They are wizards of space planning, material selection, and squeezing out every inch of storage, ensuring your new kitchen works as wonderfully as it looks.
- Architect: Your structural visionary. If the remodel involves major structural changes—like taking out a load-bearing wall, building an addition, or altering your home's exterior—you absolutely need an architect. They create the official drawings and ensure everything is structurally sound.
People often think a General Contractor and a designer are redundant, but they're really two sides of the same coin. The designer figures out the 'what' and 'why' of your vision, while the GC executes the 'how' and 'when' of the actual construction. The best projects have them working together seamlessly.
For a big remodel, having a skilled team is everything. You can get a better sense of how these roles fit together by seeing a full-service construction team in action and understanding their individual contributions.
Vetting Your Contractors Like a Pro
Finding a great contractor takes more than a quick online search. You need to do your homework to protect yourself and your investment. Once you have a shortlist of about three candidates, it’s time to really dig in.
When you meet with them, ask pointed questions. Don't just ask if they're licensed and insured; ask to see the physical documents. A reputable pro will have their license number and proof of liability and worker's comp insurance ready to show you. Take a few minutes to verify their license with your state’s licensing board—it's a quick check that can save you a world of headaches.
Next, get references... and actually call them. Don't just ask if they were happy. Get specific:
Did the project stay on budget? If it went over, why?
How did the contractor handle unexpected problems or curveballs?
Was communication clear and consistent?
How was the job site? Was it kept clean and organized?
Bottom line: Would you hire them again without a second thought?
The answers you get here will paint a much clearer picture than any online review ever could.
Deconstructing the Contract
A handshake is nice, but a rock-solid contract is essential. Never, ever start work without a detailed, written agreement signed by both of you. This document is your roadmap and your safety net.
Your contract should spell out everything, including:
- A Clear Scope of Work: It needs to list every single task, from demolition to the final coat of paint. It should even specify the exact models of appliances and types of materials being used.
- A Detailed Payment Schedule: Payments should be tied to project milestones (e.g., after demolition is complete, after cabinets are installed), not just random dates. A big red flag is a contractor asking for a huge deposit; avoid paying more than 10% upfront.
- Process for Change Orders: Surprises happen. The contract must outline exactly how changes to the original plan will be proposed, approved, and billed.
- Estimated Start and Completion Dates: While things can shift, having these dates in writing establishes a clear timeline and manages everyone's expectations.
Keeping the Relationship Strong
Clear communication is the lifeblood of a smooth remodel. Set the ground rules from the start. Decide on a preferred method and frequency for updates, whether that's a quick daily text or a more formal weekly site meeting.
When disagreements pop up—and they might—address them calmly and immediately. Go back to your contract to clarify the scope and expectations. Most issues come from simple misunderstandings, not bad intentions. A true professional will want to resolve problems quickly to keep things moving forward.
Finally, the project isn't truly over when the last tool is packed up. Do a final walkthrough with your contractor, armed with a "punch list" of any small items that need fixing—a paint touch-up, a sticky drawer, or a piece of trim that isn't quite right. Only make that final payment when every single item on that list is crossed off to your satisfaction.
Surviving the Remodel and Finalizing Your Project
Okay, the plans are done, and the real work is about to begin. This is where your careful planning pays off, but it's also the part that will test your patience. Getting through the construction phase with your sanity intact is all about having a game plan for the disruption.
First things first, let's talk permits. I get asked all the time if they're really necessary. For almost any kitchen remodel that touches plumbing, electrical, or walls, the answer is a resounding yes. Think of a permit less as red tape and more as an insurance policy. It ensures a third-party inspector verifies the work is done safely and to code, which is critical for your family's safety and your home's value. Your contractor should handle the paperwork, but it’s smart to confirm it's been filed and approved before a single hammer swings.
Setting Up a Temporary Kitchen
Once the sledgehammers come out, your kitchen will be a no-go zone for a while. This is where a temporary kitchen becomes your absolute lifeline.
You don't need a huge area; a corner of the dining room or even the garage will do. The goal here is simple: create a small, functional space to handle basic meals so you aren't bleeding money on takeout for six weeks.
Here’s a look at a bare-bones but effective setup:
- Appliance All-Stars: A microwave is non-negotiable. Add a coffee maker (a must for early mornings with contractors) and an electric kettle or hot plate for simple things like soup or pasta.
- A Mini-Fridge: Essential for keeping milk, butter, drinks, and leftovers from going bad.
- Dish-Free Living: This is the time to embrace paper plates and disposable cutlery. Trust me, washing dishes in a tiny bathroom sink gets old fast.
- Water Station: A large, refillable water dispenser is a game-changer for drinking, making coffee, or even rinsing a piece of fruit.
The Final Walkthrough and Punch List
As the finish line appears, there's one crucial step before you write that final check: the punch list. This is your chance to walk through the finished space with your contractor and meticulously point out anything that needs fixing.
Take your time with this. Open and close every single cabinet and drawer. Turn on every faucet and light. Look for paint drips, scuffs, or tile grout that isn’t quite right. A good contractor expects this and wants you to be happy.
Don't be shy. A slightly crooked drawer pull, a switch plate that's not flush with the wall, or a tiny scratch on an appliance are all fair game for the punch list. This is your last opportunity to get every detail just right.
Once you’re satisfied and every item on the list has been addressed, you can sign off and make that final payment. With the project complete, the focus shifts to keeping your new kitchen looking its best. A little knowledge about proactive maintenance solutions goes a long way in protecting your investment for years to come.
Answering Your Top Kitchen Remodel Questions
Even the most organized homeowner runs into questions during the planning phase. It’s completely normal. Getting solid answers to these common queries will give you the confidence you need to move forward without second-guessing every decision.
How Long Should I Spend Planning?
Honestly, give yourself plenty of time here. A thorough planning process for a kitchen remodel typically takes anywhere from 3 to 6 months. This isn't just about picking out pretty tile; this is the time to nail down your goals, finalize your budget, hire your team, lock in the design, choose every single material, and get your permits approved.
I can't stress this enough: rushing the planning stage is the number one reason projects go over budget and off schedule. A few extra months of careful preparation will save you so much stress down the line.
Is There a "Best" Time of Year to Start?
While you can technically remodel any time, most people aim for late spring or summer. The good weather makes life easier for things like ventilation (think drywall dust and paint fumes) and any necessary outdoor work. The trade-off is that this is peak season for contractors, so they're often booked solid.
If you're looking for potentially lower costs and quicker availability, consider kicking things off in the off-season, from late fall to winter. Just be ready to roll with potential weather delays, especially if you live in a colder climate.
A well-done kitchen remodel almost always delivers one of the best returns on investment (ROI) for any home improvement project. What's interesting is that a smart, mid-range remodel often recoups a higher percentage of its cost than a full-blown luxury overhaul. It pays to know your neighborhood's home values.
Will This Actually Increase My Home's Value?
Without a doubt. A thoughtfully updated, functional kitchen is a massive draw for potential buyers and a proven way to increase your home's market value. It's one of the few renovations where you can confidently expect to see a significant chunk of your investment back when it's time to sell.
Feeling ready to take the next step in your remodel? The expert team at Northpoint Construction can help turn your plans into a beautiful, functional reality. Contact us today for a consultation.