
How to Put a Bathroom in a Basement: A Complete Guide
Adding a bathroom to your basement is more than just a weekend project. It’s a puzzle of plumbing, moisture control, and smart design. The key to getting it right—and not ending up with a damp, dysfunctional space—is a solid plan that tackles the unique challenges of building below ground. Think of it as your project's blueprint, the one thing that will save you from major headaches and budget overruns down the line.
Your Blueprint for a Basement Bathroom
Putting a bathroom in the basement is hands-down one of the best ways to boost your home's value and usability. It can turn a storage area into a guest suite, a family room, or even a rental space. But here’s the thing about basements: they play by different rules than the rest of your house. Gravity isn't always on your side, and moisture is a constant battle.
That's why your initial planning is so critical. This isn't just about picking out a cool vanity or the perfect tile. It's about figuring out the nitty-gritty of plumbing, ventilation, and construction before you ever swing a sledgehammer. A well-thought-out plan is the difference between a successful project and a costly do-over.
Selecting the Ideal Location
First things first: where is this bathroom going to live? This decision alone will have the biggest impact on your budget and timeline. The golden rule is to get as close as you can to your existing plumbing.
Look for the main soil stack—that's the large vertical pipe that carries all the wastewater out of your house. The closer your new bathroom is to that stack, the better. A shorter run means less concrete to break up, less pipe to lay, and ultimately, less money out of your pocket. Placing it directly below an upstairs bathroom is often the most straightforward and cost-effective strategy.
As you scout out the perfect spot, keep these points in mind:
- Proximity to Plumbing: How easily can you tap into the main drain and the hot/cold water supply lines? Every foot of distance adds complexity and cost.
- Ceiling Height: Basements are notorious for low-hanging ductwork, pipes, and beams. You need to make sure your chosen location has enough headroom to meet local building codes, which is usually a minimum of 7 feet. For a deeper dive, check out our guide to basement ceiling height requirements.
- Future Use: Think about how the bathroom fits into your overall basement plan. If it's for a guest bedroom, it should be an ensuite or right next door. If it's for a general rec room, a more central location makes sense.
Navigating Local Codes and Permits
I can't stress this enough: do not skip the permit office. Building codes exist for a reason—they ensure the work is done safely and correctly. Getting caught without the right permits can result in hefty fines, failed inspections, or even being forced to tear out all your hard work.
Here in Orem and the rest of Utah County, you’ll need to check with your local building authority. They have very specific rules for everything from electrical wiring and plumbing connections to how the space must be ventilated. You'll almost certainly need separate permits for the plumbing, electrical, and the overall construction.
Key Takeaway: Make your first call to the local building department. They'll give you a roadmap of what's required, when inspections need to happen, and which permits to pull. It feels like a hassle upfront, but it's the single best way to protect your investment and avoid major problems later.
Before diving into the technical details, let's summarize these crucial first steps with a quick checklist.
Initial Planning Checklist for Your Basement Bathroom
This table breaks down the essentials you need to nail down before you even think about buying materials.
| Site Selection | Proximity to existing plumbing (soil stack, water lines), ceiling height, obstacles like ductwork or support posts. | The path of least resistance is usually the cheapest. Try to align the new bathroom directly under an existing one on the floor above. |
| Code & Permit Research | Contact your Orem/Utah County building department. Identify requirements for plumbing, electrical, framing, and ventilation. | Get a printed checklist from the building office. This document will become your project bible and help you pass inspections the first time. |
| Layout & Functionality | Finalize the floor plan, fixture placement (toilet, sink, shower), and how it connects to the rest of the basement. | Use painter's tape to mark the layout on the floor. This helps you visualize the space and ensure you have enough clearance for doors and fixtures. |
| Plumbing Strategy | Decide between a gravity-fed system (if possible) or an up-flush/ejector pump system. Consider backflow prevention. | If your main drain is above the basement floor, you will need a pump system. Don't try to fight gravity—it will always win. |
Getting these four pillars sorted out will set a strong foundation for the entire project, ensuring a smoother process from start to finish.
The demand for these projects is huge. In fact, bathroom additions are a major driver in the home improvement market, accounting for roughly 37% of all major renovations. It’s a popular and valuable upgrade.
For a bird's-eye view of how a basement bathroom fits into the bigger picture of home design, this comprehensive guide to house plans with basements offers some great foundational insights that are perfect for this planning phase.
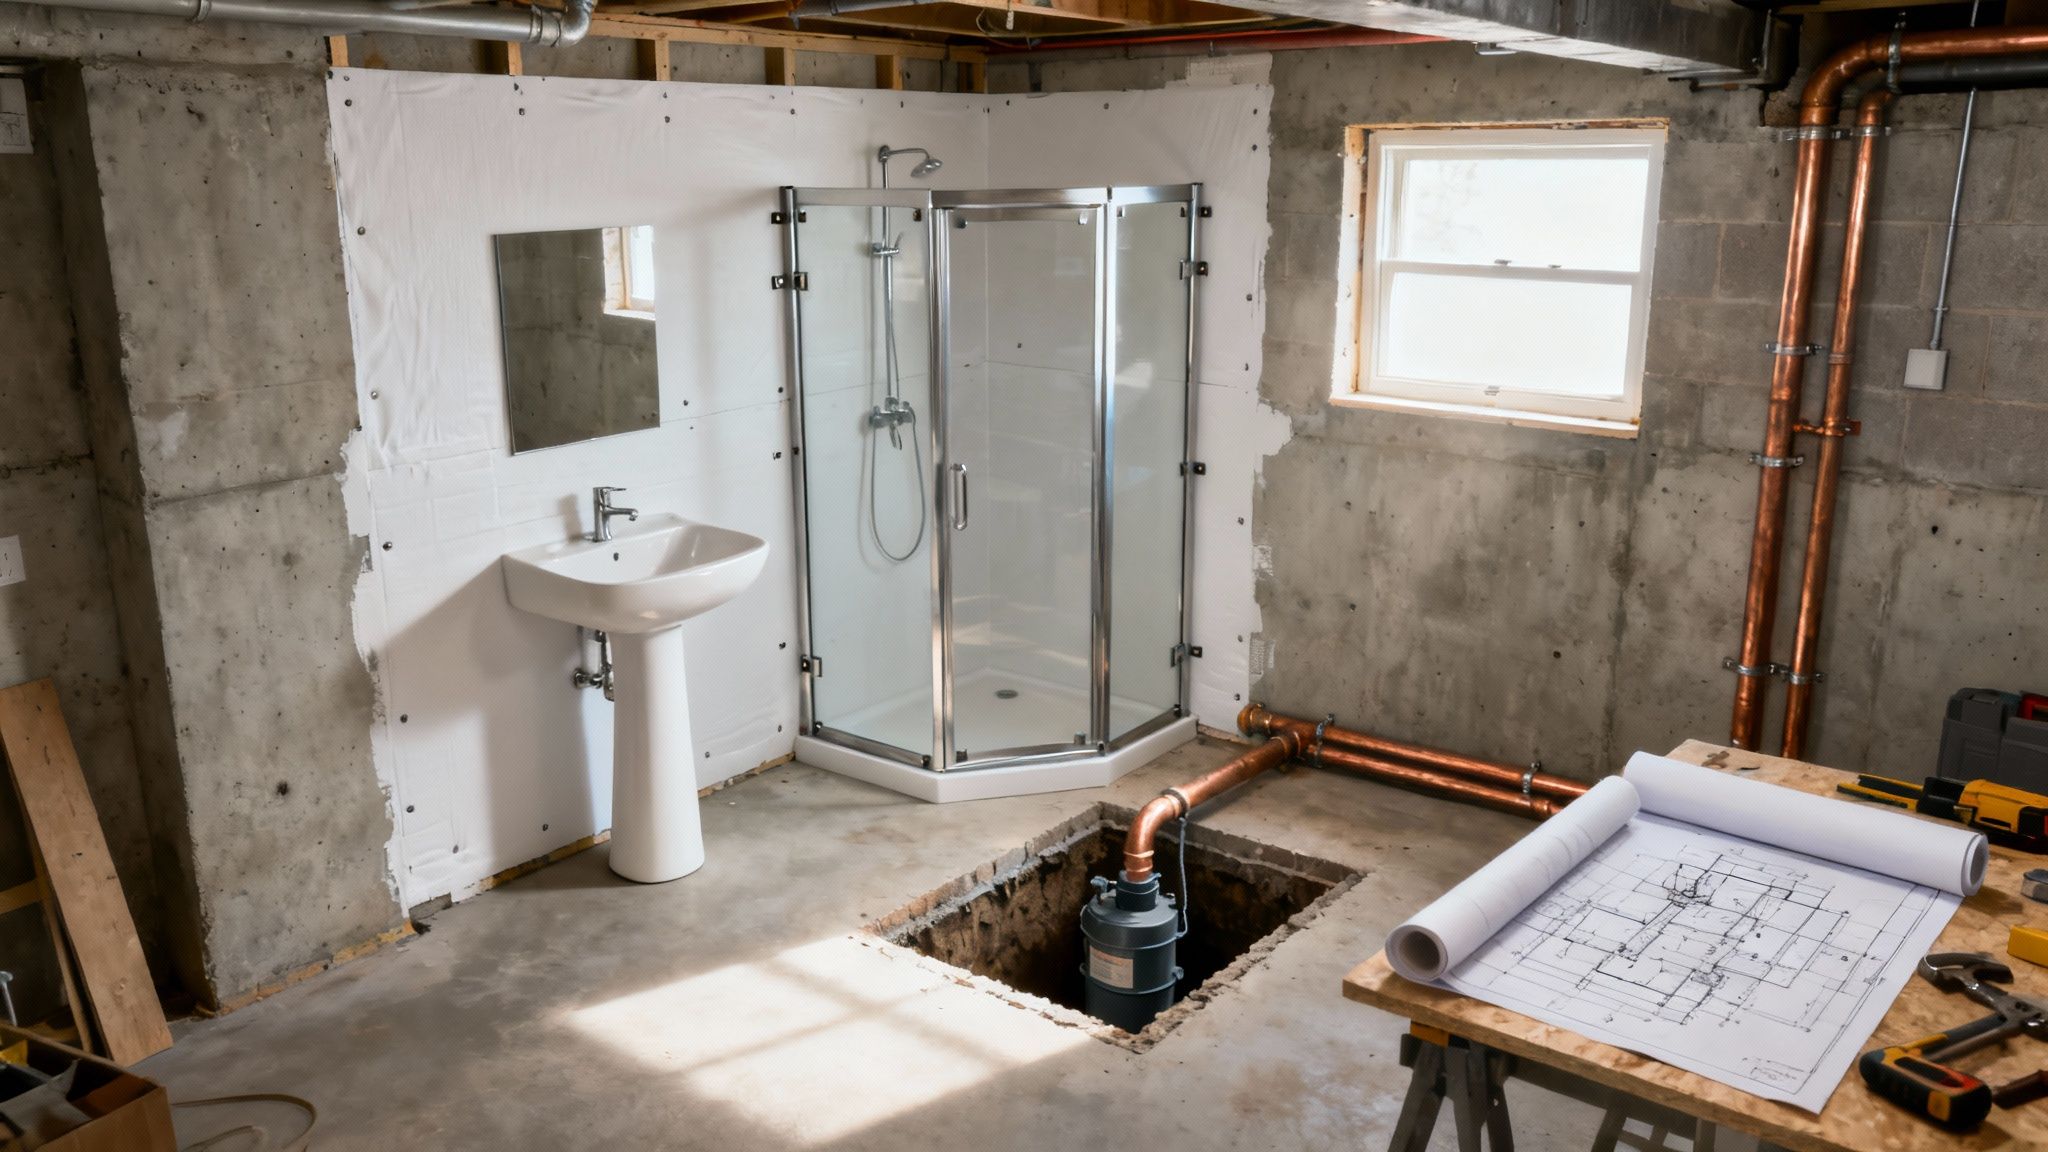
Solving the Basement Plumbing Puzzle
Let's talk about the biggest hurdle you'll face when adding a bathroom to your basement: the plumbing. Upstairs, gravity does all the heavy lifting, pulling waste down and away without a second thought. But when you’re downstairs, you’re often below your home's main sewer line, meaning you have to work against gravity.
Figuring this out really boils down to two paths: a traditional gravity-fed system or a pump-assisted system. The right call for your project hinges entirely on how deep your existing plumbing lines are buried.
This decision tree gives you a great visual starting point for checking your plumbing, codes, and available space to see if your basement is ready for a bathroom.
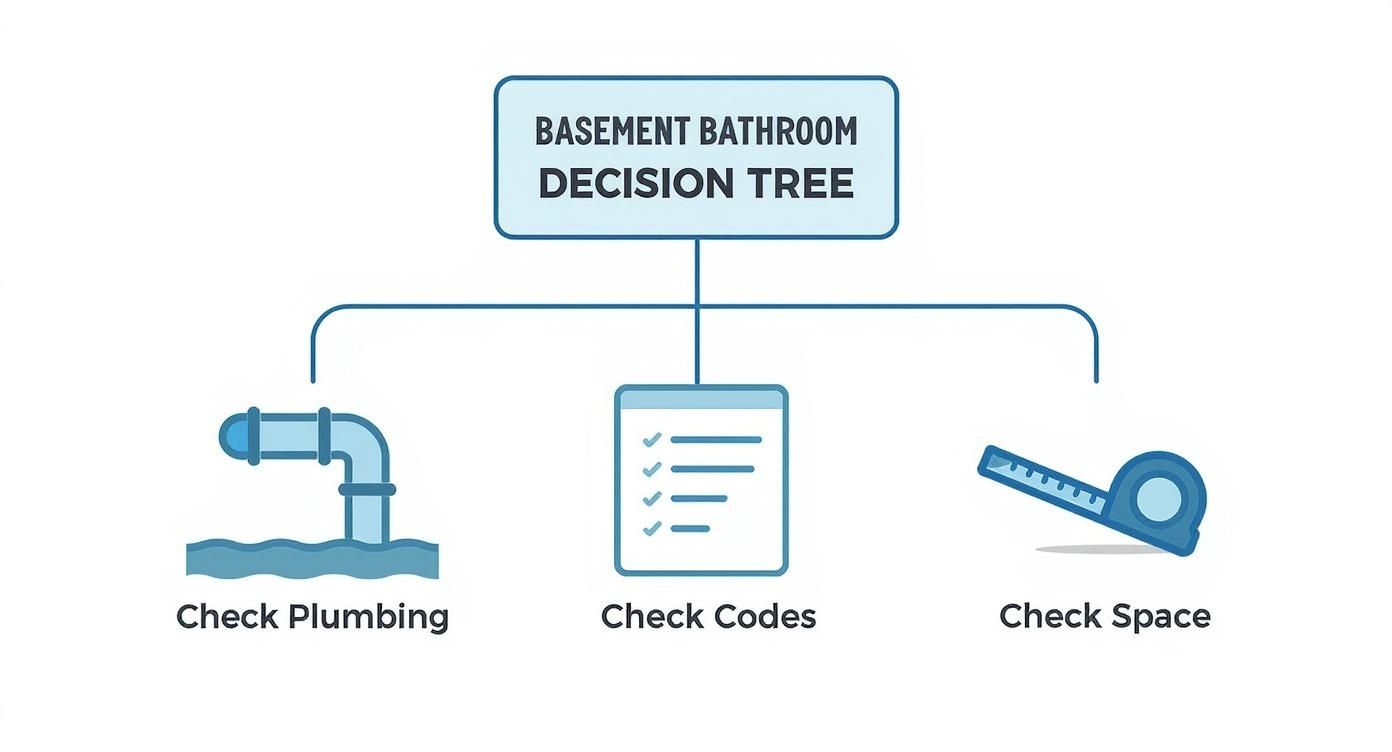
As the graphic shows, getting a handle on your home's existing infrastructure is the absolute first step—long before you even think about picking out a vanity.
The Gravity-Fed Dream Scenario
In a perfect world, your home’s main sewer line would sit low enough for a new basement drain to tie right in, maintaining a proper downward slope. For this to work, the new drain needs to drop at least ¼ inch for every foot it runs horizontally.
A plumber can figure this out pretty quickly by finding your main cleanout and measuring its depth relative to your basement floor. If you have enough "fall," you're in luck. The work itself involves breaking up the concrete floor, digging a trench for the new pipes, tying into the main line, and then pouring new concrete. It’s definitely a messy, labor-intensive job, but it’s also the most reliable and maintenance-free option because it just works with physics.
When Gravity Fails: Pump-Assisted Solutions
For most basement bathroom projects, a gravity-fed system just isn't in the cards. This is where modern plumbing tech really shines. You'll need a system that can actively pump waste up to the main sewer line.
You’ve got two main choices here: a sewage ejector pump or an upflush toilet system.
- Sewage Ejector Pump: This is the workhorse solution and the one we see most often. It involves cutting a hole in your basement floor to install a sealed basin (often called a "pit"). Inside the pit, a pump collects all the waste from the toilet, sink, and shower. When the basin fills up, a float switch kicks the pump on, which grinds the waste and sends it up a pipe to your main sewer line.
- Upflush Toilet System: You might hear this called a macerating toilet. It's a slick, self-contained unit where the grinder and pump are built right into the toilet or a small box that sits behind it. It pulverizes waste into a fine slurry and pumps it out through a much smaller pipe. The huge advantage here? You don't have to break up any concrete.
Pro Tip: While upflush systems like Saniflo are fantastic for avoiding major concrete work, I usually recommend them for guest bathrooms or spaces that won't see constant use. If this is going to be a primary, heavily used bathroom, the sheer durability and capacity of a traditional sewage ejector pump system is the way to go.
Comparing Your Pumping Options
Picking between these two systems means weighing the installation hassle, cost, and what you can expect from it long-term.
| Installation | Requires breaking concrete to install a pit. It's more invasive and labor-intensive upfront. | No concrete work needed. The unit sits right on the finished floor, making the install much faster and cleaner. |
| Cost | Higher initial cost because of the concrete work and plumbing, typically $2,500 - $5,000. | Lower upfront installation cost, but the toilet unit itself is pricey. Total costs often land between $1,500 - $3,000. |
| Performance | Easily handles a full bathroom (toilet, sink, shower). Extremely reliable and built to last. | Best for handling a toilet and sink. Some models can take a shower, but they can be more prone to clogs if anything non-flushable goes down. |
| Maintenance | The pump is accessible through a sealed lid for service but is generally very low-maintenance. | The macerating unit is more complex. Repairs can be more frequent and might require a pro who knows the specific brand. |
Don't Forget to Vent
No matter which plumbing setup you land on, proper venting is non-negotiable. A drain vent pipe lets air into the system, which is critical for two reasons: it stops a vacuum from forming that can kill your drainage, and it gives sewer gases a safe path out through your roof.
Without a good vent, you'll get gurgling drains, slow performance, and nasty smells. In most cases, the new vent pipe will run up inside a wall and tie into an existing vent stack elsewhere in your home. This is one part of the job where knowing the local plumbing codes is absolutely essential, as the rules for pipe sizing and routing are very strict.
Preventing a Sewer Nightmare
Finally, anytime you're adding plumbing below street level, you have to protect your beautiful new bathroom from potential sewer backups. A backwater valve is a must-have. This device gets installed on your main sewer line and acts like a one-way gate—it lets sewage flow out but slams shut if anything tries to flow back in from the city line. It’s a small component that can save you from a catastrophic mess.
On a related note, make sure your new bathroom will have enough hot water. It's a good idea to check out a professional water heater sizing guide to see if your current unit can handle the extra demand.
Building a Dry and Solid Foundation
With your plumbing strategy figured out, it's time to build the actual space. Here’s a hard truth about basement bathrooms: you have to win the battle against moisture before you even start. Basements are naturally prone to dampness, so creating a dry, solid shell is non-negotiable. It’s the single most important thing you can do to protect your investment and make sure the room is comfortable and healthy for years to come.
This all starts with serious waterproofing. You're essentially creating a sealed envelope to keep ground moisture from ever getting in. I always recommend a multi-layered approach for the best results.
- Interior Sealants: A high-quality waterproof paint or a dedicated concrete sealant, like KILZ Mold & Mildew Primer, is your first line of defense. Think of it as creating a barrier right on the surface that stops moisture from seeping through the porous concrete.
- Exterior Membranes: If you live in an area with a high water table or just want bulletproof protection, an exterior waterproof membrane is the way to go. It’s applied to the foundation from the outside, stopping water before it even touches the concrete. Yes, it’s a much bigger job and costs more, but it’s hands-down the most effective method.
Managing any water that does get in is just as critical. This is where your sump pump becomes your best friend. Make sure it’s working perfectly and, ideally, has a battery backup. That backup is your lifeline if the power goes out during a heavy storm. For a deeper dive, our guide on how to waterproof basement walls walks you through the entire process.
Framing Your New Bathroom Walls
Once you’re confident the space is dry, you can start framing the walls. This is the exciting part where the room finally begins to take shape. But choosing the right materials from the very beginning is crucial.
The concrete floor will always have some level of moisture, which can wick up into wood. That’s why the bottom plate—the piece of lumber that sits directly on the concrete—must be pressure-treated. This special wood is chemically treated to resist rot and decay, saving you from a catastrophic structural failure down the road. Never, ever use standard lumber for this.

From there, you’ll build out the rest of the walls with standard wood or metal studs, usually spaced 16 inches on center. As you're putting up the frame, think ahead about everything the room will need:
- Frame out the rough opening for your door.
- Build any shower niches for shampoo and soap.
- Add extra wood blocking between the studs where you plan to hang a heavy vanity, a big mirror, or grab bars. This gives you a solid anchor point later on.
Expert Tip: Before you bolt down that bottom plate, roll out a sill gasket underneath it. This thin foam barrier costs next to nothing but adds an extra layer of moisture and thermal protection between the concrete and your wood frame. It's cheap insurance.
Integrating Electrical and HVAC Systems
With the room’s skeleton in place, it’s time to run your utilities. When it comes to electrical work in a bathroom, safety is everything. Any outlet you install must be Ground Fault Circuit Interrupter (GFCI) protected. This is a strict code requirement everywhere, including Orem, and it's what prevents electrical shocks in a wet environment.
Plan out your wiring carefully. You'll need circuits for an overhead light, vanity lighting, and a powerful exhaust fan to pull all that moisture out. Unless you have deep experience with electrical work, this is the point where you absolutely should call a licensed electrician. They’ll ensure everything is done safely, meets local codes, and can handle the load.
Next up is heating and ventilation. Basements get cold, period. Tying into your home’s existing HVAC system is often the most efficient route, but it's not always feasible. Luckily, standalone options work great. Radiant in-floor heating is a touch of luxury that makes a cold tile floor feel amazing on a winter morning. Alternatively, a small, efficient electric wall heater can provide plenty of on-demand warmth.
Investing in this kind of infrastructure is smart. Homeowners are putting more and more value on updated bathrooms—the global market for this kind of work is projected to hit an incredible USD 593.7 billion by 2035. It's a clear sign that projects like these are a solid way to boost your home's value and livability.
Choosing Smart Fixtures and Finishes
Now for the fun part—giving your new bathroom its personality. After all the heavy lifting of plumbing, framing, and waterproofing, picking out the fixtures and finishes can feel like a victory lap. But remember, in a basement, these choices go beyond just style. You need to select materials that can stand up to the unique challenges of a below-grade space.
Making smart selections here is what ensures your bathroom not only looks fantastic but also resists moisture, makes the most of the space, and feels bright and inviting, even though it's underground.
Building a Flood-Proof Floor
Let's start from the ground up. Your flooring is your first line of defense against moisture, so it absolutely has to be 100% waterproof. Anything with a wood or fiber core is just asking for trouble in a basement. The good news is, you have some great-looking, completely waterproof options.
- Luxury Vinyl Plank (LVP): There's a reason LVP is a top contender. It's completely impervious to water, feels warmer on your feet than tile, and is incredibly tough. It gives you the look of real wood or stone without any of the high-maintenance headaches.
- Porcelain or Ceramic Tile: A classic for a reason. Tile is waterproof, durable, and comes in an endless variety of designs. When you install it correctly over a waterproof membrane, you're creating a fortress against water.
- Sealed Concrete: For a more industrial or modern look, you can simply finish and seal the existing concrete slab. It doesn't get more durable than that, and a proper seal makes it completely waterproof.
Walls and Wet Areas
When it comes to the walls, standard drywall just isn't going to work. You need to use moisture-resistant drywall, often called "green board," for the entire bathroom. This stuff has a specially treated core and paper that fight off moisture and prevent mold and mildew from getting a foothold.
Inside the shower or tub surround, you have to take it a step further. This is your high-risk zone, and it needs a serious waterproofing system before a single tile goes up. You can use a liquid-applied membrane (like RedGard) or a sheet membrane system (like Schluter-KERDI) to create a seamless, waterproof barrier over your backer board.
Key Insight: A common mistake is thinking moisture-resistant drywall is the same as waterproof backer board. It’s not. Green board is for the general bathroom walls. Inside the shower, you must use a dedicated cement board or fiber-cement backer board underneath your waterproofing membrane. That combination is what will actually protect your wall framing from water damage.
Space-Saving Fixtures
Basement bathrooms often get tucked into tight corners, so every inch really does count. The right fixtures can make a small room feel surprisingly open.
Think about these space-saving tricks:
Wall-Mounted Toilets and Vanities: Getting fixtures up off the floor is a game-changer. It creates an unbroken sightline that makes the room feel much bigger and airier. Plus, cleaning the floor underneath is a breeze.
Corner Sinks or Showers: These are designed specifically to fit snugly into a corner, which frees up precious floor space right in the middle of the room.
Prefab Shower Stalls: A custom-tiled shower is beautiful, no doubt. But a one-piece prefabricated stall is often quicker to install, is guaranteed to be leak-proof, and can fit into some really small footprints. They're a super practical choice for many basement projects.
These kinds of smart upgrades are becoming more popular everywhere. Homeowners are increasingly investing in durable, water-saving, and innovative fixtures, driving significant growth in the bathroom renovation industry. If you want to dive deeper into market trends, you can explore the full research on the bathroom installation market.
Layering Your Lighting
Good lighting is the secret weapon for making a basement bathroom feel like it isn't in a basement. Since you probably have little to no natural light, you need a layered lighting plan to chase away the shadows and create a bright, welcoming vibe.
It helps to think in three distinct layers:
| Ambient | Your main source of light, providing overall illumination. | Recessed ceiling lights (can lights) or a central flush-mount fixture. |
| Task | Focused light for specific jobs like shaving or applying makeup. | Sconces on both sides of the mirror or a bright vanity light bar above it. |
| Accent | Adds a touch of style and visual interest. | LED strip lighting tucked under a floating vanity or inside a shower niche. |
By combining these different types of light, you'll create a space that’s not just functional but genuinely inviting—a room that feels just as bright and comfortable as any other bathroom in your home. This is the final touch that pulls the whole project together.
Budgeting Your Project and Timeline
Let's talk money and time. Before you even think about picking out tile, you need a solid handle on your budget and a realistic schedule. This is the single most important step to keeping a big project like a basement bathroom from becoming a massive headache.
The final price tag can swing wildly, from a manageable DIY job to a full-blown professional renovation. It all comes down to the choices you make along the way.
The biggest variable, hands down, is your plumbing situation. If you’re lucky enough to have your main drain line below the basement floor, gravity is your friend, and your costs will be significantly lower. But for most of us, that's not the case. You'll likely be looking at an ejector pump or an upflush toilet system, which adds a whole other layer of complexity and cost right off the bat.
After plumbing, the next major factor is the level of finishes you choose. A simple, clean bathroom with a fiberglass shower insert and a basic vanity from a big-box store is one thing. A spa-like retreat with custom tile work, a frameless glass shower, and high-end fixtures is a completely different financial ballpark.
Breaking Down the Costs
So, what does it actually cost? The difference between doing it yourself and hiring professionals is massive, mostly because of labor. Here’s a general idea of how the costs break down for a typical basement bathroom.
Cost Comparison: DIY vs. Professional Installation
This table gives you a starting point for what to expect. Remember, these are estimates and can change based on your location, the complexity of your project, and the materials you choose.
| Plumbing & Ejector Pump | $1,500 - $3,000 | $4,000 - $7,000 |
| Framing & Drywall | $800 - $1,500 | $2,000 - $4,000 |
| Electrical (GFCI, Fan, Lights) | $500 - $1,200 | $1,500 - $3,000 |
| Fixtures (Toilet, Sink, Shower) | $1,000 - $4,000+ | $1,500 - $6,000+ |
| Flooring, Paint & Finishes | $700 - $2,000 | $1,500 - $3,500 |
| Permits & Fees | $200 - $500 | $200 - $500 |
| TOTAL ESTIMATE | $4,700 - $12,200 | $10,700 - $24,000+ |
As you can see, tackling parts of the job yourself can lead to big savings, but it's a trade-off for your time and effort. For a more detailed look at what goes into these numbers, our guide on the cost to install a bathroom in the basement dives much deeper.
Crucial Tip: I tell every homeowner this: add a 15-20% contingency fund to your final budget. Basements are notorious for surprises. You might break ground and find a drainpipe exactly where you wanted your toilet, or discover a crack in the foundation once you pull down old paneling. That buffer is your safety net, preventing a small problem from derailing the whole project.
Mapping a Realistic Timeline
One of the easiest mistakes to make is underestimating how long this will all take. It's not just about the construction; it's about the planning, inspections, and coordinating different workers if you hire pros.
Here’s what a typical timeline looks like when managed by a contractor:
- Phase 1: Planning & Permits (2-4 weeks): This is all the upfront work. You'll be finalizing the layout, getting bids from contractors, and submitting your permit application to your local office, whether that's in Orem or elsewhere in Utah County. Rushing this stage is a recipe for disaster.
- Phase 2: Demolition & Rough-Ins (1-3 weeks): Time to get dusty. This means breaking up concrete for the new plumbing lines, framing the walls, and running all the electrical wiring and plumbing pipes. This phase usually ends with your first city inspections.
- Phase 3: Drywall & Finishes (2-4 weeks): Once the rough-in work passes inspection, the walls go up. Drywall is hung, taped, and mudded. Then comes the fun part: installing the floor, tiling the shower, setting the vanity, and putting in the fixtures.
- Phase 4: Final Touches (1 week): This is the home stretch. It involves painting, installing baseboards and trim, hanging the mirror and light fixtures, and making the final plumbing and electrical connections before the final inspection.
If you're a DIYer working weekends, be honest with yourself. This project could easily take 3-6 months to complete. A professional crew working every day can often wrap up the entire construction process in 4-8 weeks once they get started.
Common Questions We Get About Basement Bathrooms
Even the most detailed plan can't cover every little question that pops up. After finishing hundreds of basements here in Utah, we've heard them all. Here are the answers to the three questions that come up on nearly every single project.
Do I Really Need an Ejector Pump?
Probably. But not always. It all comes down to gravity.
Your home's main sewer line exits the house at a certain height. If the new drains for your basement toilet and shower sit below that line, the wastewater has no way to get out on its own. An ejector pump is what solves this problem by actively pumping the waste up and out to the main stack.
A licensed plumber can tell you for sure by measuring the depth of your lines. The main alternative is an upflush toilet. These units have a macerator and pump built right in, so you don't have to break up your concrete floor to install a separate pit for a traditional ejector pump system. It's a solid, less invasive option for certain layouts.
What's the Best Flooring for a Basement Bathroom?
Stick with something that is 100% waterproof. No exceptions. Basements are naturally damp, and a bathroom adds even more moisture to the equation. Anything with a wood or fiber core is just asking for trouble down the road.
Here are the two options we recommend most often:
- Luxury Vinyl Plank (LVP): This is the go-to choice for a reason. It's totally waterproof, it’s tough as nails, and it feels a lot warmer on your feet than tile on a cold morning.
- Porcelain or Ceramic Tile: The classic choice. Tile is bulletproof when it comes to water and durability. As long as it's installed correctly over a good waterproofing membrane, you've got a floor that will last a lifetime.
Expert Tip: Steer clear of laminate flooring or engineered hardwood in any below-grade bathroom. We've seen them swell and warp from even minor moisture exposure, forcing homeowners into a full-blown (and expensive) replacement.
How Do I Make It Not Feel Like a Basement Bathroom?
This is where good design makes all the difference. Since you probably don't have windows, you have to create your own light. Layering your lighting is the secret.
Start with plenty of bright, recessed can lights for overall illumination. Then, add dedicated vanity lights so you're not trying to get ready in your own shadow. For a little extra pop, you could even add accent lighting, like an LED strip tucked under a floating vanity.
Lighter paint colors and a large mirror will also do wonders to make the space feel bigger and brighter. Finally, don't skimp on the exhaust fan. A powerful, high-quality fan will pull all the humidity out of the air, keeping the room fresh and preventing that classic damp, basement-y feeling. It's a small detail that has a huge impact on how comfortable the room feels.
Ready to turn that unused basement space into something special? The team at Northpoint Construction has been finishing basements and remodeling homes in Orem, Utah, and the surrounding communities for years. We know how to handle the unique challenges of a basement bathroom project from start to finish. Start your project with us today!