
How to Put In a Basement Bathroom A Practical Guide
Putting a bathroom in a basement comes with its own set of hurdles, but it's one of the best ways to boost your home’s value and make the space more livable. Getting it right really boils down to three things: smart plumbing solutions, rock-solid moisture control, and knowing the local building codes. Think of this guide as your game plan for turning that underused space into a seriously valuable part of your home.
Your Blueprint for a Basement Bathroom Project
Let’s treat this project like a strategic upgrade, not just a construction manual. We'll get into the real-world choices you’ll have to make—like deciding between a sewage ejector pump and an upflush toilet—and make sure the finished room is dry, bright, and has proper airflow.
Adding a basement bathroom isn't just a convenience; it's a savvy financial move. Basement remodels can deliver a 70% return on investment, which often beats out what you’d get back from a standard bathroom update, a major kitchen overhaul, or even adding a new room.
Key Project Pillars
Before you even think about swinging a hammer, let’s nail down the big-picture items. Your entire project rests on these three pillars.
- Plumbing Strategy: This is where things get tricky. Since you're below the main sewer line, you have to figure out how to get waste up. That usually means choosing between a sewage ejector pump system or a macerating (upflush) toilet.
- Moisture and Waterproofing: Basements are naturally prone to dampness. You can't skip this step. A bulletproof plan for waterproofing the walls and floors, paired with a good ventilation fan, is absolutely essential to stop mold and mildew before they start.
- Layout and Functionality: How will this new bathroom fit into the rest of your basement? It's important to think about the flow of the entire space. The whole https://buildnp.com/blogs/basement-finishing-step-by-step/ needs to feel intentional and connected.
Whether you're a seasoned DIYer or hiring a crew, knowing how to steer the ship is key. This guide to project managing a build is a great resource for keeping your project on track and on budget.
By hashing out a detailed plan that covers these fundamentals from the get-go, you're paving the way for a much smoother project. A well-executed basement bathroom is more than just another room; it's a lasting improvement that makes your home work better for you.
Navigating Permits and Local Building Codes
Before you even think about breaking up that concrete slab, we need to talk about the less glamorous—but absolutely critical—side of the project: permits and building codes. Adding a bathroom isn't like slapping on a new coat of paint; it's a serious construction project that has to meet legal and safety standards.
Tempted to skip the permit process to save a few bucks or some time? Don't do it. I’ve seen it lead to massive headaches down the road, including hefty fines, tear-out orders, and major problems when it's time to sell your house.
Think of a permit as your project’s blueprint for success and safety. It ensures all the plumbing, electrical, and structural work is done right and signed off on by a professional inspector. This protects your family and preserves your home's value. For anyone in the Orem and Provo area, your first call should be to your local building department to get the specific rundown for your project.
Understanding Permit Types
Putting in a basement bathroom isn't a one-and-done permit situation. You’re actually juggling several different approvals, each for a specific part of the job.
You’ll almost certainly need to pull a few different permits:
- Building Permit: This is the big one. It covers the overall construction, like framing walls, putting in a new door, or making any changes to the existing structure.
- Plumbing Permit: Absolutely essential. This one is for all the drainage, waste, and vent (DWV) systems, plus the hot and cold water supply lines. An inspector will need to verify every connection.
- Electrical Permit: Any new wiring, outlets, lights, or switches will require this. The inspector's job is to ensure everything is safely grounded and up to code, especially with GFCI protection near water sources.
Pro Tip: Keep your approved permits posted in a visible spot right at the job site. Inspectors look for this first thing. Having everything ready and accessible makes their visit quick and painless.
Key Code Requirements to Know
Building codes aren't there just to make your life difficult—they’re designed for your safety. They can seem a bit dense, but they address real hazards, especially in a below-grade space like a basement. Before you finalize your plans, it’s worth spending some time understanding local zoning regulations as well.
Here are a few of the big-ticket items an inspector will be looking at in your new bathroom.
Ceiling Height
Most codes have a strict minimum for ceiling height in finished living spaces. For a bathroom, you'll typically need at least 6 feet 8 inches of clearance from the finished floor to the finished ceiling. If you’re cutting it close, you can find more on the specifics of https://buildnp.com/blogs/basement-ceiling-height-requirements/ to make sure you're compliant.
Ventilation
A basement bathroom without good ventilation is a recipe for mold and mildew. You absolutely must have an exhaust fan, and it needs to be vented directly outside your home. Venting into the attic or another part of the basement is a major code violation. The fan’s power, measured in cubic feet per minute (CFM), also needs to be correctly sized for the room.
GFCI Protection
This is non-negotiable. Ground Fault Circuit Interrupter (GFCI) outlets are required for all receptacles near a sink, tub, or shower. These smart outlets can detect a fault in the current and shut off the power in a millisecond, preventing a potentially fatal electric shock in a wet environment.
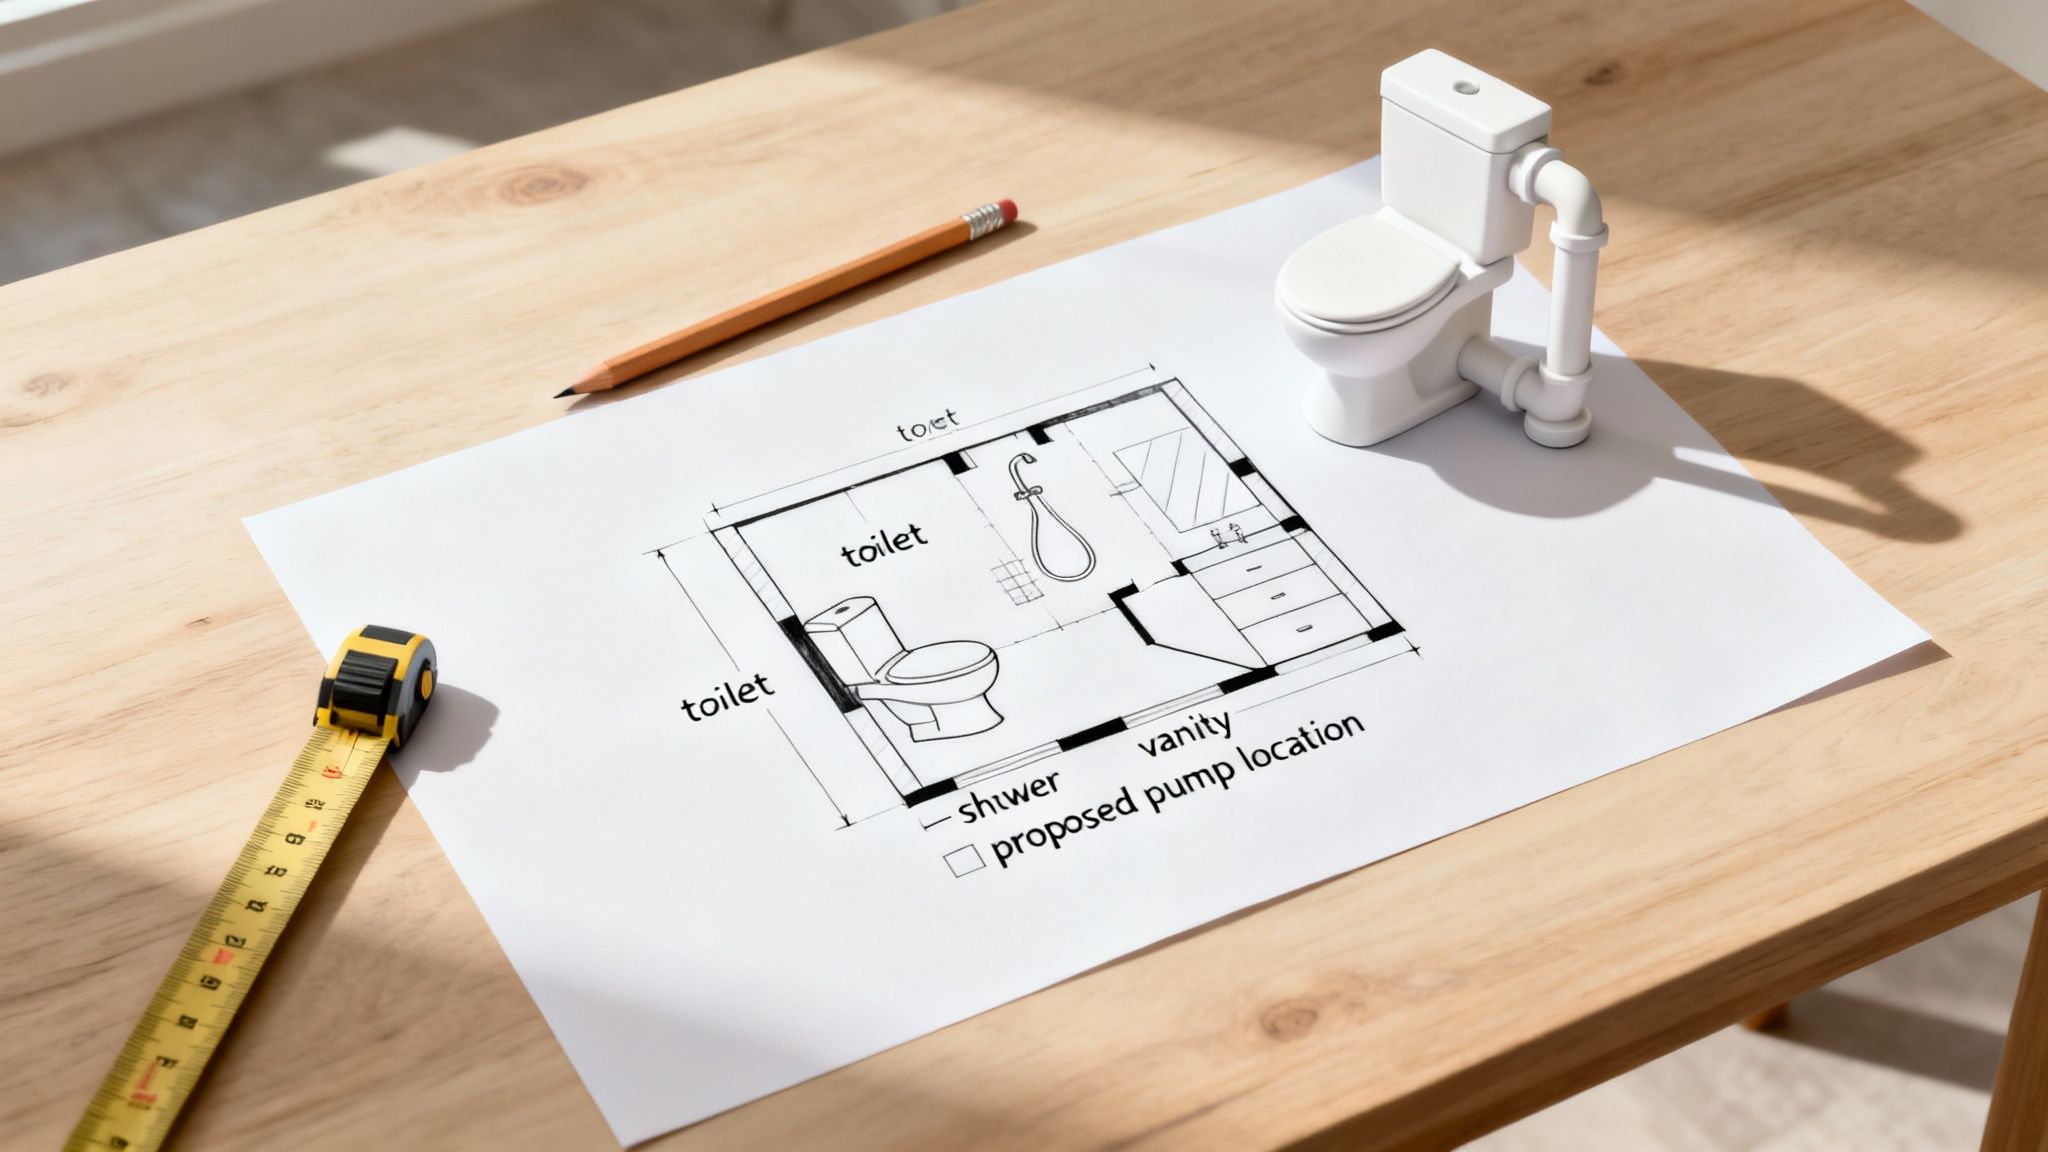
Solving the Basement Plumbing Puzzle
Let's start with the biggest hurdle in any basement bathroom project: gravity. Your home’s main drain line is almost always higher than the basement floor. This simple fact means you can't just let waste flow downhill like you would on the main floor. You have to actively pump it up and out.
Getting this right is everything. It’s the single biggest challenge that dictates the entire plumbing approach for your project. Honestly, this is where I see most DIY projects go wrong. Working against gravity requires specific know-how, which is why bringing in a licensed plumber—especially one who knows the ins and outs of local codes in Orem or Provo—is one of the smartest moves you can make.
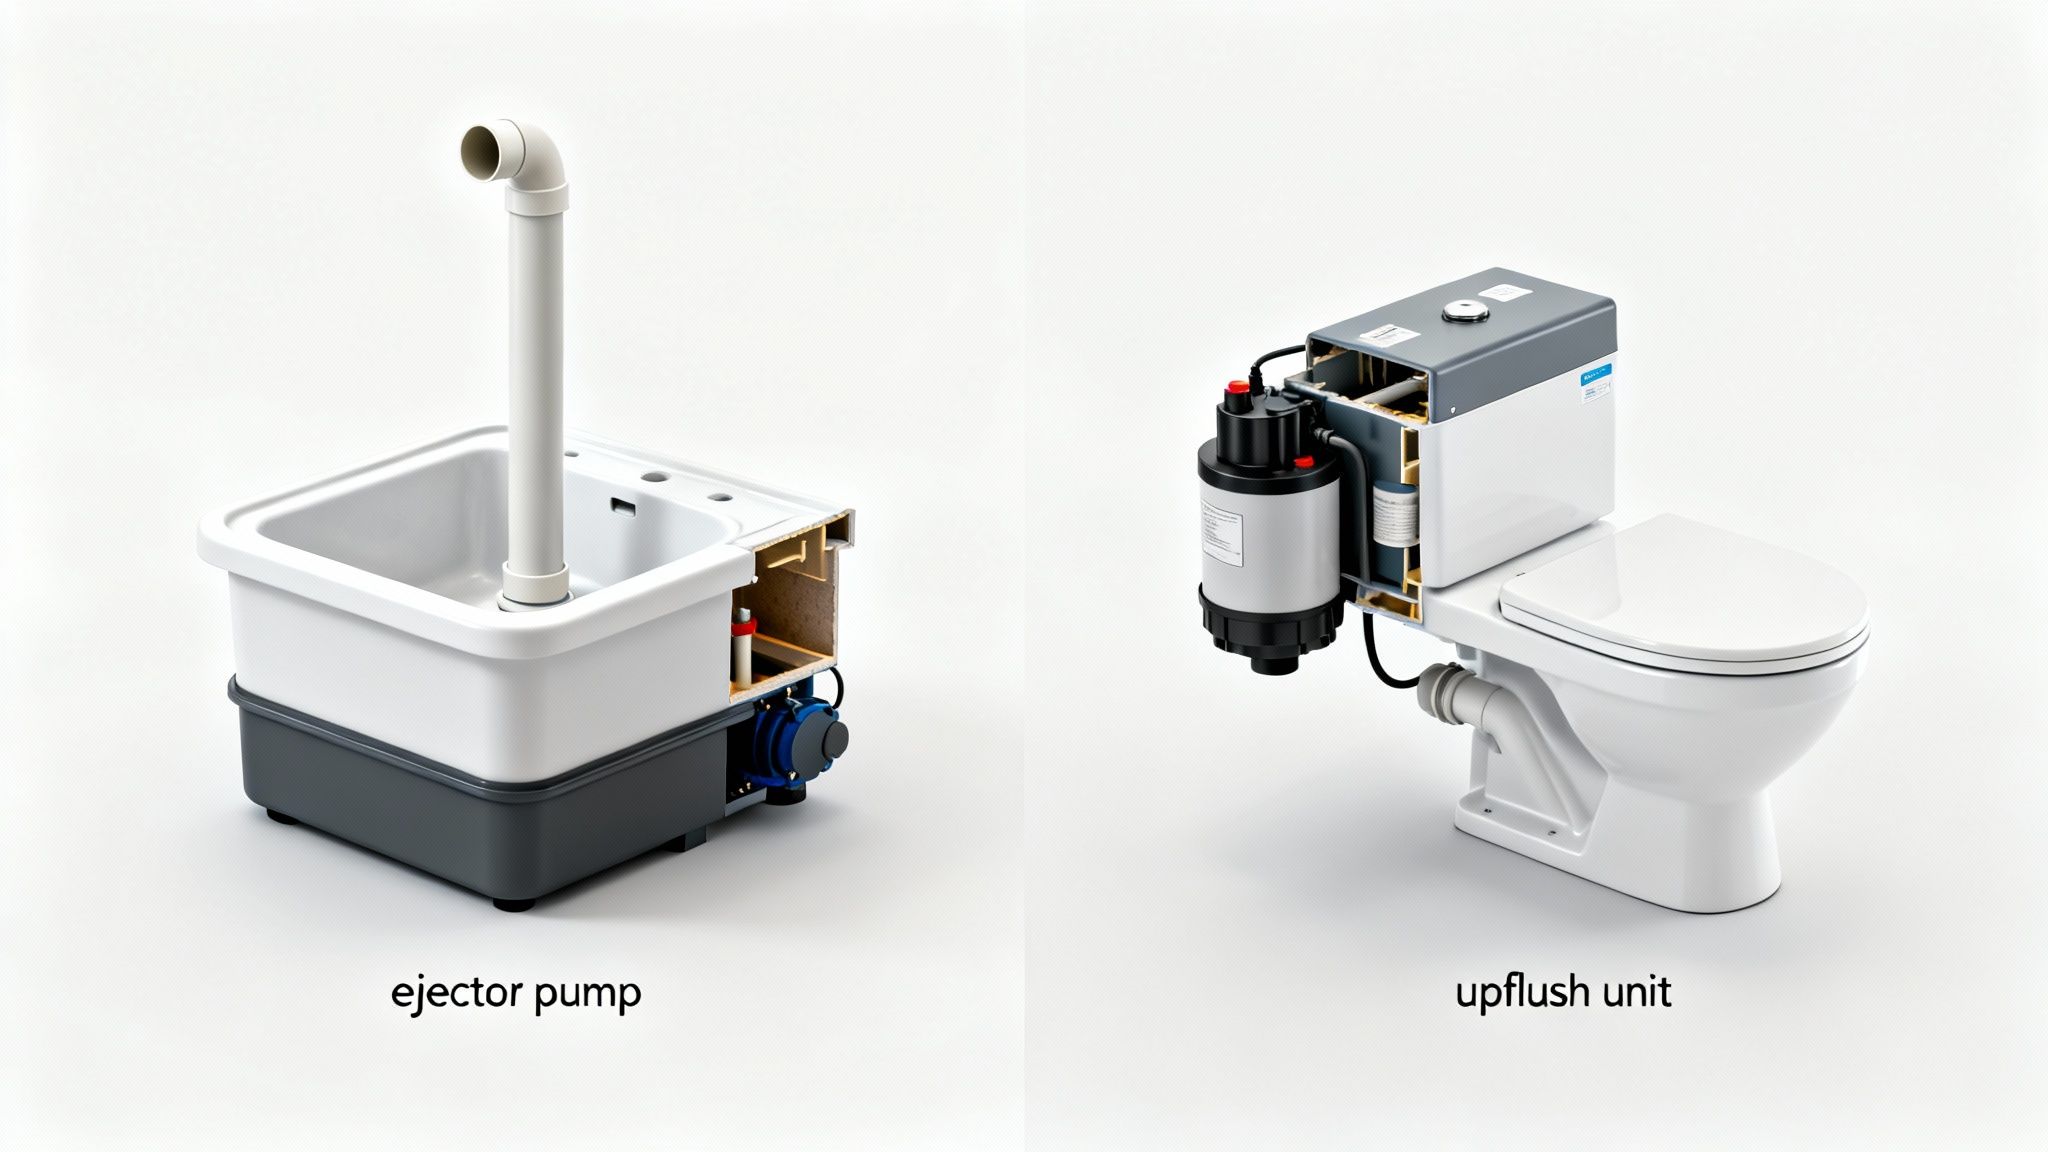
Luckily, plumbers have a couple of clever solutions to beat gravity. The two main players are the traditional sewage ejector pump and the more modern upflush toilet. Your choice between them will dramatically affect your project's cost, timeline, and how much concrete you end up breaking.
The Two Powerhouse Plumbing Solutions
So, how do you choose? One path involves a jackhammer and digging a pit in your foundation, while the other is a much less invasive, surface-level installation.
- Sewage Ejector Pump: This is the old-school, heavy-duty workhorse. It requires cutting a hole in your concrete floor to install a sealed pit. All your new fixtures—the toilet, sink, and even a shower—drain directly into this pit. Once the waste hits a certain level, a float switch kicks on a grinder pump that pulverizes everything and shoots it up to the main sewer line. It’s a permanent, robust solution.
- Upflush (Macerating) Toilet: If the idea of jackhammering your floor gives you a headache, this is your answer. The toilet sits right on your existing floor. When you flush, waste goes into a macerating unit (a box with a grinder and pump) tucked behind the toilet. The blades turn waste into a fine slurry and pump it out through a small pipe that can easily be tied into the main stack above. No major surgery required.
Making this call comes down to weighing the pros and cons of installation hassle versus long-term performance. This flowchart can also help clarify when permits come into play based on the work you're planning.
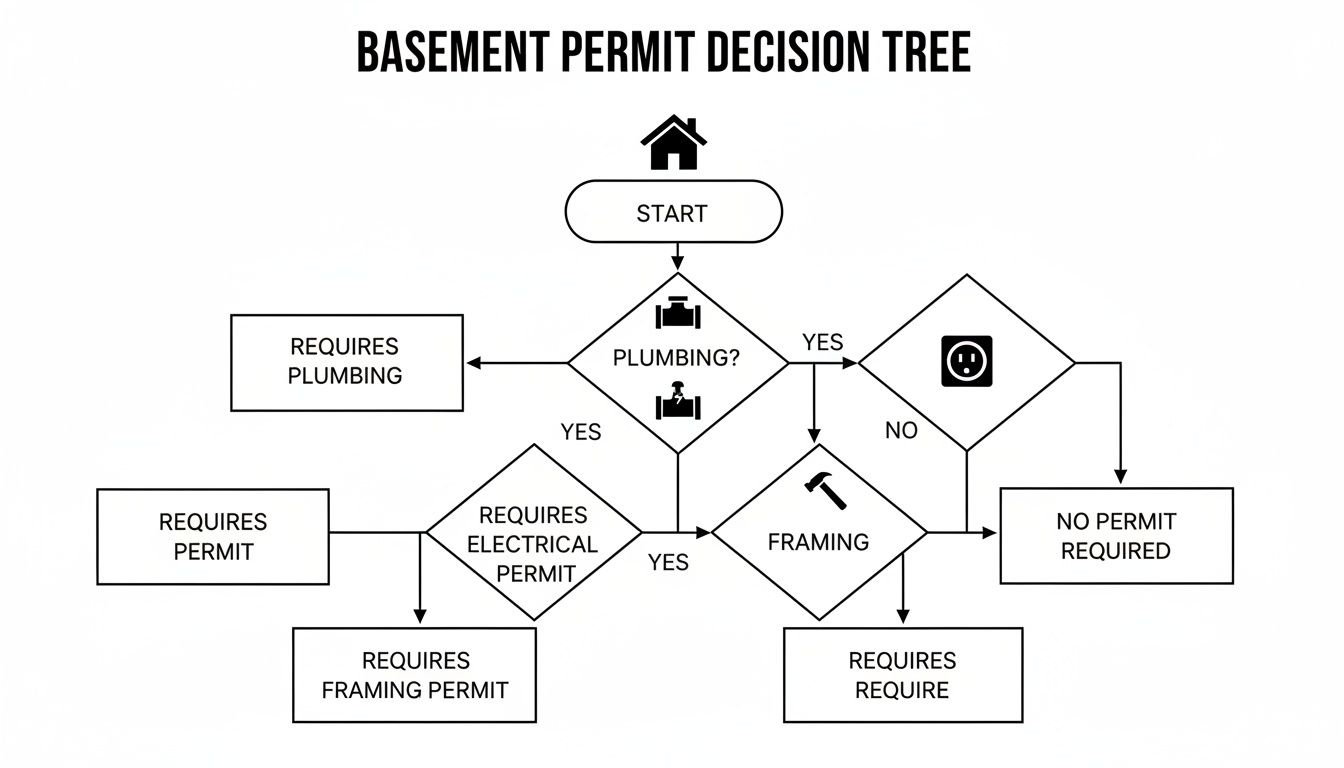
As you can see, once you start talking about new drain lines or electrical connections for a pump, you're squarely in permit territory. Factoring this in from day one will save you a world of trouble later.
Drainage System Showdown: Ejector Pump vs. Upflush Toilet
To make the decision even clearer, here's a head-to-head comparison to help you pick the best drainage system for your basement, budget, and stomach for demolition.
| Installation | Highly invasive; requires breaking concrete to dig a pit. | Minimally invasive; sits on top of the existing floor. |
| Fixtures | Easily handles waste from a toilet, sink, and shower all at once. | Base models handle the toilet only; others have inputs for a sink/shower. |
| Cost | Higher upfront cost due to major labor for excavation and concrete work. | Lower initial cost since you skip the demolition. |
| Maintenance | Accessing the pump for repairs is harder since it’s sealed in the pit. | The macerating unit is right there, making service or replacement simple. |
| Noise Level | Generally quieter because the pump is buried below the floor. | Can be noticeably louder when the grinder kicks in. |
Ultimately, the best choice really depends on your situation.
If you’re already planning a full basement finish where the concrete floor is getting opened up anyway, an ejector pump is the more integrated, permanent solution. But if you're adding a bathroom to an already finished or partially finished space, an upflush system is a much more practical and cost-effective route.
Tapping Into Water Supply and Venting
Getting waste out is the main event, but don't forget the supporting cast: getting clean water in and dangerous sewer gas out.
A plumber will tap into the nearest existing hot and cold water lines, which are often running through the ceiling joists above. They’ll use modern PEX or traditional copper pipes to bring water down to your new sink, toilet, and shower, making sure every connection is solid.
Now for the part that’s absolutely critical but often misunderstood: venting. Every single drain needs a vent pipe. This pipe does two crucial things: it gives sewer gas a safe escape route through your roof and it keeps the air pressure in your drain lines balanced.
Without a proper vent, you’re in for a world of hurt:
- Drains will gurgle and drain at a snail's pace because of negative air pressure.
- Worse, water can get siphoned out of the P-traps, letting smelly and hazardous sewer gas seep directly into your home.
This isn't just about avoiding bad smells; it's a major health and safety requirement in every building code. A pro will know exactly how to tie your new bathroom's vent into your home's main vent stack correctly.
This commitment to professional standards is part of a larger trend. The bathroom installation services market is on track to hit USD 6,067.1 million by 2025. With basements accounting for 30% of all remodeling projects in North America, adding a bathroom is a smart move, often bringing a 70% return on investment. These additions are dominated by new toilets (40% market share), showers (30%), and sinks (20%). You can dig into these market dynamics to see just how valuable your project can be.
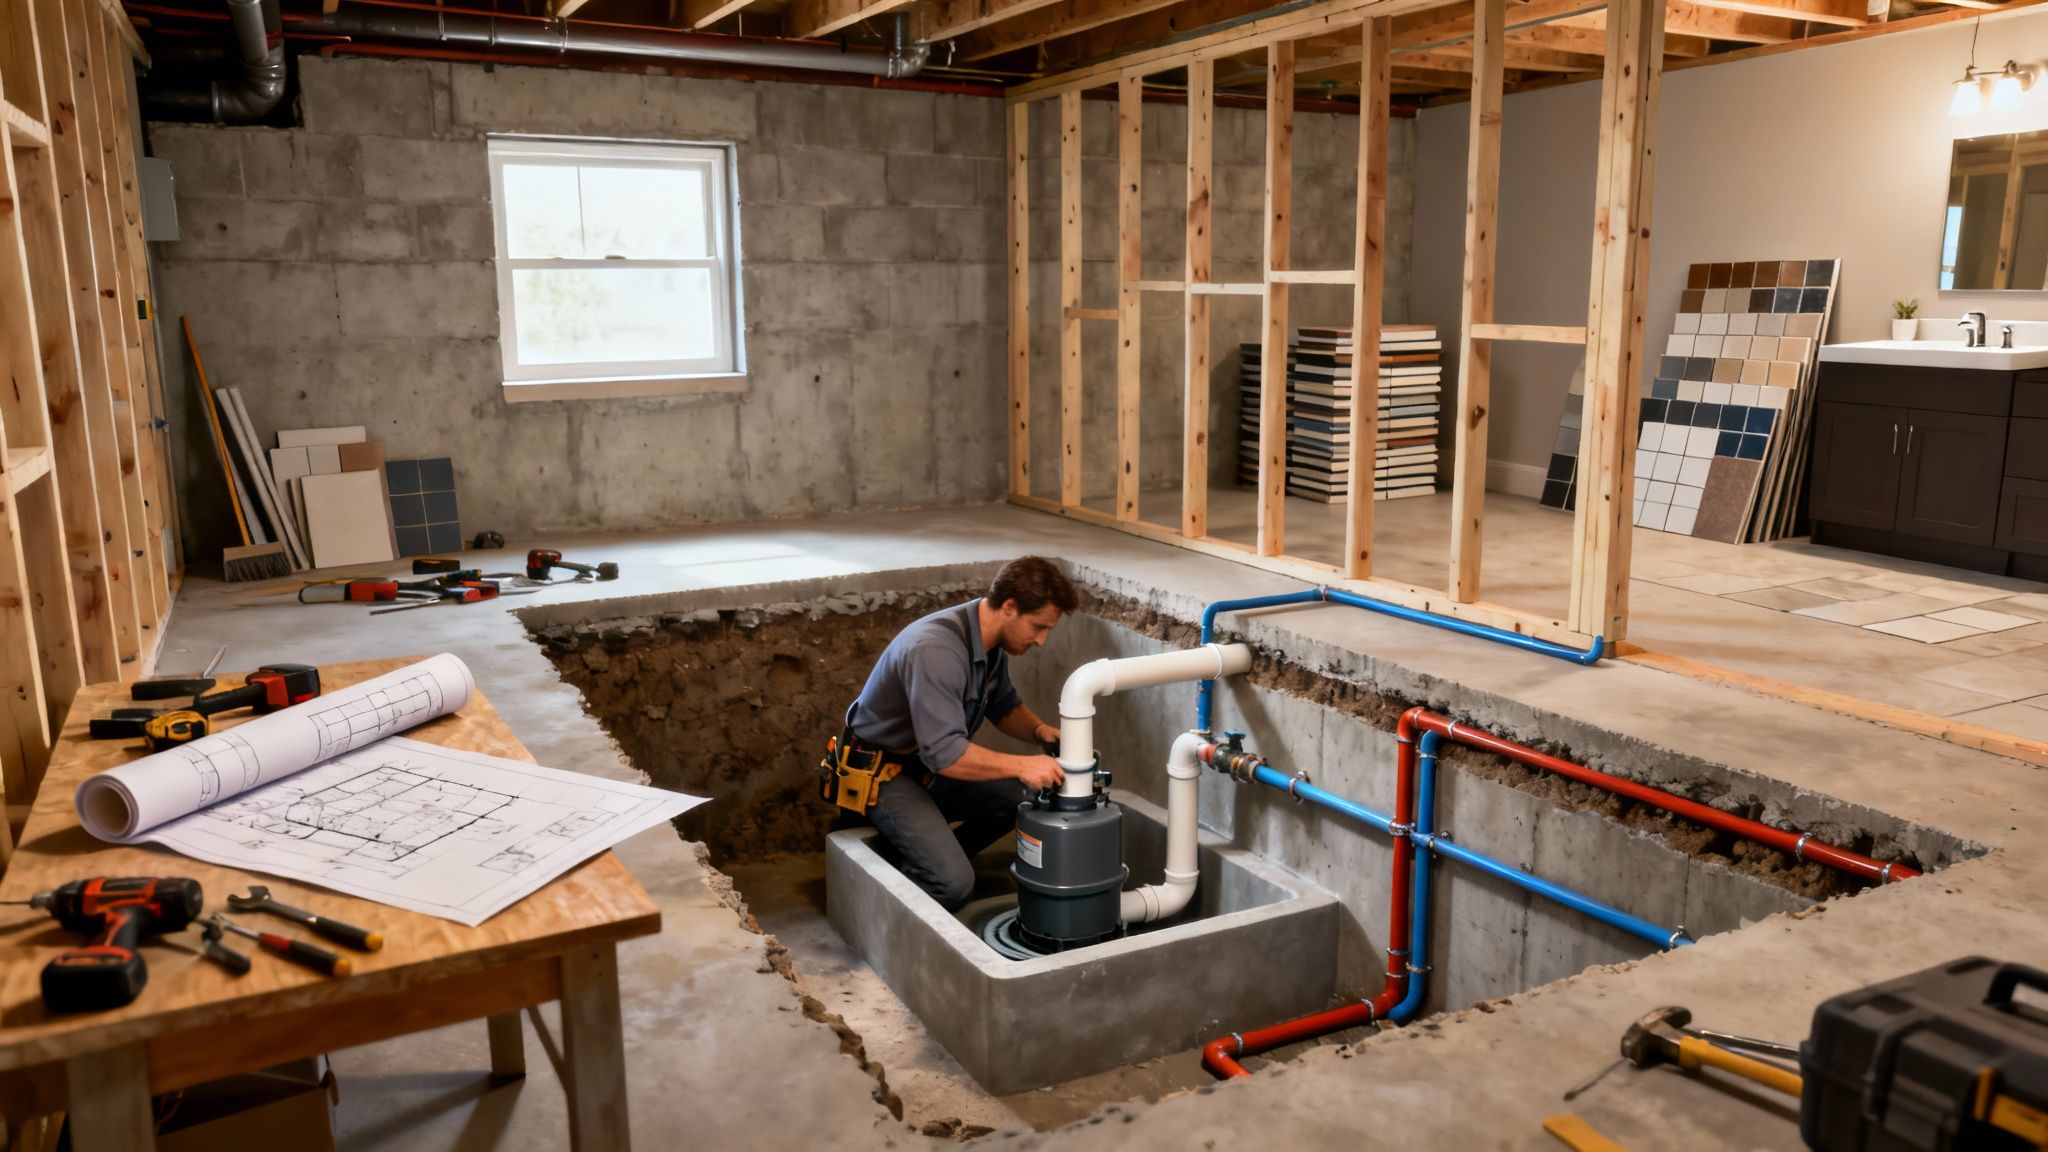
With the tough plumbing work out of the way, it's time for the fun part: turning that mess of pipes into an actual room. This is where your basement bathroom really starts to take shape, moving from a rough-in sketch to a space you can actually use. First up is framing the walls that will define the bathroom's footprint.
When you're framing in a basement, one thing is non-negotiable: the bottom plate. That's the piece of wood that sits directly on the concrete floor, and it absolutely must be pressure-treated lumber. Concrete is like a sponge; it wicks moisture up from the ground. Standard lumber will soak that moisture right up, leading to rot and mold before you know it. Think of that pressure-treated plate as the foundation of your wall's defense system.
Mastering Moisture Control
Your biggest enemy in any basement project is moisture. If you get this step wrong, you're setting yourself up for musty smells, peeling paint, and serious mold problems that are a nightmare to fix later on. A dry, comfortable basement bathroom isn't an accident—it's the result of a smart, multi-layered defense.
Here's how to think about your battle plan against dampness:
- Seal the Concrete Walls: Before a single stud goes up, get a quality waterproof sealant or membrane and apply it directly to the foundation walls. This is your first and most important line of defense against moisture trying to seep in from outside.
- Build a Proper Subfloor: Never, ever lay flooring directly on the concrete slab. A good subfloor system, like a dimpled plastic membrane topped with plywood, creates a small air gap. This simple gap is a game-changer; it lets any moisture vapor from the slab dissipate harmlessly and acts as a thermal break, so your floors won't feel so icy cold.
- Don't Forget the Vapor Barrier: Once you've got insulation between the wall studs, you'll want to staple a plastic vapor barrier over the framing before any drywall goes on. This crucial layer stops the warm, humid air from inside the bathroom from hitting the cold concrete walls and turning into condensation.
Think of moisture control like dressing for a rainy day. The sealant on the concrete is your waterproof jacket, the subfloor is your rubber boots, and the vapor barrier is your umbrella. Each piece does a different job, but together, they keep you completely dry.
I can't stress enough how critical a solid waterproofing system is. The stats are pretty stark: untreated basements have a shocking 22% failure rate each year due to water issues. But with proper systems in place? That number plummets to just 2%. This mindset of smart planning should carry over to your fixtures, too. Modern efficient toilets can cut your water usage by 20%, and smart showers can trim energy consumption by 15%. It's no wonder a 2024 report found that 26% of homeowners are planning bathroom updates, with many turning to basements for extra living space. You can get a sense of the bigger picture from these trends in bathroom remodeling.
Bringing Light to the Basement
Basements are naturally dark, which makes lighting one of your most powerful design tools. A single lonely bulb in the ceiling just won't cut it. To make the space feel bright, open, and inviting, you need to think in layers. A good lighting plan combines different fixtures to handle different jobs, making sure the room works for everything from your morning routine to late-night cleaning.
Your Layered Lighting Plan
Ambient Light: This is the overall illumination for the room. Recessed "can" lights are a basement's best friend because they're flush with the ceiling and don't eat up precious headroom. Spacing four to six of them evenly across the ceiling will give you great, shadow-free light.
Task Light: This is focused light where you need it most. In a bathroom, that means the vanity. Flanking your mirror with a pair of sconces or mounting a bright fixture directly above it is the best way to get even light on your face without casting weird shadows.
Accent Light: This is the "nice to have" layer. It’s not strictly necessary, but a small touch like a waterproof recessed light inside the shower stall can add a real touch of class and make showering feel a bit safer.
One last critical note on lighting: any fixture you install inside a shower or tub enclosure must be rated for wet locations. This isn't a suggestion; it's a major safety requirement to prevent electrical shock.
Choosing Floors and Fixtures
Alright, we're on the home stretch. Now it's time to choose the materials that bring your bathroom's style to life. For a basement, your choices need to be as durable and water-resistant as they are beautiful.
When it comes to flooring, Luxury Vinyl Tile (LVT) or planks are a fantastic option. They are 100% waterproof, tough as nails, and come in countless styles that do a surprisingly good job of mimicking real wood or stone. Plus, LVT feels much warmer and softer underfoot than chilly ceramic tile.
As for fixtures like the vanity, toilet, and shower, always consider the scale of the room. It’s easy to fall in love with a massive double vanity at the store, but it will completely overwhelm a compact basement bathroom. Instead, look for pieces that fit the space. A pedestal sink or a floating vanity can be a great trick for making a small room feel bigger by showing more of the floor. A toilet with a smaller footprint or a neo-angle corner shower can also be brilliant, space-saving moves.
Budgeting Your Project: DIY vs. Hiring a Pro
Let's talk numbers and know-how. This is where the rubber meets the road for most homeowners planning a basement bathroom. How much is this really going to cost, and how much can you realistically do yourself?
The truth is, the total cost can swing wildly. I've seen simple, DIY-heavy projects come in around $5,000, while a high-end, professionally built bathroom can easily top $25,000. That's a huge range, and understanding where that money goes is the first step to building a budget that doesn't fall apart halfway through.
Breaking Down the Costs
A single price tag doesn't tell you much. The real cost is a combination of several different jobs, and each has its own price tag.
By far, the biggest chunk of your budget—often 40-60% of the total—will be plumbing. This is especially true if you have to break up your concrete slab to install a sewage ejector pump, which is common in basement projects.
Here’s a pretty standard breakdown of where the money goes:
- Plumbing: This is the big one. It covers the ejector pump or an upflush system, all the drain and supply lines, and the skilled labor to put it all together. It's complex, and it’s where you don't want to cut corners.
- Framing and Drywall: The materials themselves aren't too pricey, but the labor can add up. This includes the essential pressure-treated lumber for the bottom plates and moisture-resistant drywall for the walls.
- Electrical: You'll need new circuits, GFCI outlets (a must-have near water), lighting, and wiring for an exhaust fan. For safety and code reasons, this is almost never a DIY job.
- Finishes: This is where you have the most control over the final cost. We're talking about flooring (like Luxury Vinyl Tile), the vanity, toilet, shower fixtures, paint, and lights.
A classic mistake I see all the time is underestimating the cost of finishes. That beautiful vanity or custom tile you saw online can add thousands to the final bill. Price these items out early so you're not caught by surprise later.
The DIY vs. Pro Decision
The big question is always, "What can I tackle myself?" Be brutally honest about your skills, the time you can commit, and the tools you actually own. Biting off more than you can chew is the fastest way to turn a dream project into a costly, frustrating nightmare.
For a lot of people, a hybrid approach works best. You handle the jobs that are comfortably within your skillset and bring in licensed pros for the critical stuff. And when it comes to finding the right people for the job, it pays to do your homework. Our guide on how to choose a general contractor is a great resource for navigating that process.
Tasks a Skilled Homeowner Can Often Handle
- Painting: This is a straightforward way to save a ton on labor costs. A weekend of your time can save you hundreds of dollars.
- Installing LVT Flooring: Modern click-lock vinyl flooring is practically designed for DIYers. It's forgiving and doesn't require a lot of specialized tools.
- Assembling and Installing a Vanity: If the plumbing stubs are already in place, setting a vanity and hooking up the faucet is a very manageable task for most.
- Installing Trim and Baseboards: With a miter saw and a little patience, you can get a professional-looking finish and save on carpentry costs.
Jobs Best Left to Licensed Professionals
- All Major Plumbing: Tying into existing drain stacks, installing pumps, and running new water lines need to be done perfectly and to code. A leak behind a freshly drywalled wall is a catastrophe you don't want to deal with.
- All Electrical Work: This is non-negotiable. It's a major safety issue, and in places like Orem and Provo, you need a licensed electrician to pull permits and pass inspection.
- Breaking and Pouring Concrete: This is back-breaking, messy, and specialized work. Outsource it. You'll be glad you did.
- Drywall Finishing: Sure, hanging the boards is one thing, but getting that perfectly smooth, seamless finish is a true art form. A pro finisher is worth their weight in gold.
At the end of the day, it's a balancing act between your budget, your timeline, and your skills. Paying a professional ensures the job is done right, it meets all local codes, and it gets finished much faster. Remember, your labor might be free, but your time isn't. The peace of mind that comes with professional work is often worth every single penny.
Got Questions About Your Basement Bathroom? Let's Clear Things Up.
Even the most well-thought-out basement bathroom plan comes with a few head-scratchers. This isn't your average weekend project; there are a lot of moving parts, and it’s smart to get your questions answered before you bring in a single tool. Here are some of the most common things homeowners ask us before they get started.
Do I Really Need a Special Pump for a Basement Toilet?
In almost every single case, yes. It boils down to one simple, unavoidable force of nature: gravity.
Your home's main sewer line is almost always higher than your basement floor. That means a standard toilet just won't cut it. There's simply no way for waste to flow uphill on its own.
To get around this, you need a system that actively pumps the waste up to that main drain line. You've got two solid options:
- A Sewage Ejector Pump: Think of this as the heavy-duty, permanent solution. It means breaking up a small section of your concrete floor to install a sealed basin that collects waste from the toilet, sink, and shower. When it fills up, a powerful pump inside kicks on, grinds everything up, and shoots it up to the sewer line.
- An Upflush Toilet (also called a Macerating Toilet): This is a fantastic, less-invasive option if the idea of jackhammering your floor makes you nervous. The toilet itself is connected to a small, powerful grinding unit that sits right behind it. This unit liquefies the waste and pumps it away through a much smaller pipe.
You should always have a plumber verify the exact depth of your main drain line, but it's a very safe bet to plan on needing one of these systems right from the start.
What's the Biggest Mistake People Make with Basement Bathrooms?
Hands down, the most common and expensive mistake we see is underestimating moisture. People get so focused on the layout and the pretty finishes that they forget they’re building in an inherently damp, below-grade environment.
Simply putting up studs and drywall directly against bare concrete is asking for trouble. You're essentially building a five-star hotel for mold, mildew, and rot.
The long-term success of your basement bathroom isn't about the fancy tile or the modern fixtures. It's built on the unseen layers of protection you put in place first. Waterproofing isn't a feature; it's the foundation of the entire project.
Getting moisture control right is a multi-step game. It starts with properly sealing the concrete walls and floor with a quality waterproof membrane. It also means using the right materials, like cement board instead of regular drywall in the shower. And critically, it requires installing a powerful exhaust fan that’s vented directly outside—not just into the ceiling joists—to physically pull that humid air out of the room. Don't treat these steps as optional; they are absolutely essential for a healthy, long-lasting bathroom.
How Much Value Does a Basement Bathroom Really Add?
A new bathroom in the basement consistently ranks as one of the best home improvement projects for return on investment. The exact numbers can change based on your local market, but homeowners can generally expect to recoup around 70% of the project's cost when they sell.
But the real value isn't just about the money. A basement bathroom fundamentally transforms how you can use that entire level of your home. It turns a storage space into a true living space.
Suddenly you have a private guest suite, a home gym with a shower, or a comfortable rec room where no one has to run upstairs. That kind of functionality is a huge draw for buyers and makes your home far more livable right now. You're effectively adding valuable square footage without the massive cost of building a full addition.
Can I Just Tie the New Bathroom Fan Into My Dryer Vent?
Absolutely not. Please don't do this. It’s a shortcut that people sometimes ask about, but it’s incredibly dangerous and a clear violation of building codes.
Every appliance that vents air outside needs its own dedicated duct, and for very good reasons.
Fire Hazard: Dryer vents are full of lint, which is extremely flammable. Pumping moist bathroom air into a tube packed with lint creates a serious fire risk.
It Won't Work Properly: Sharing a vent line is a recipe for backdrafts. You could end up with lint from your dryer blowing back into your brand-new bathroom or moist air being pushed into your laundry area.
For your bathroom fan to do its job safely and effectively, it needs its own clean, smooth-walled duct running directly to an exterior vent cap. Never, ever share vent lines.
Ready to transform your basement into a beautiful and functional space? The expert team at Northpoint Construction has the experience to handle every aspect of your basement bathroom project, from plumbing and framing to the final finishes. We proudly serve homeowners in Orem, Provo, and the surrounding Utah communities. Visit us at buildnp.com to schedule your consultation and get a detailed quote for your project.