
How to Waterproof Basement Walls: Expert Tips & Methods
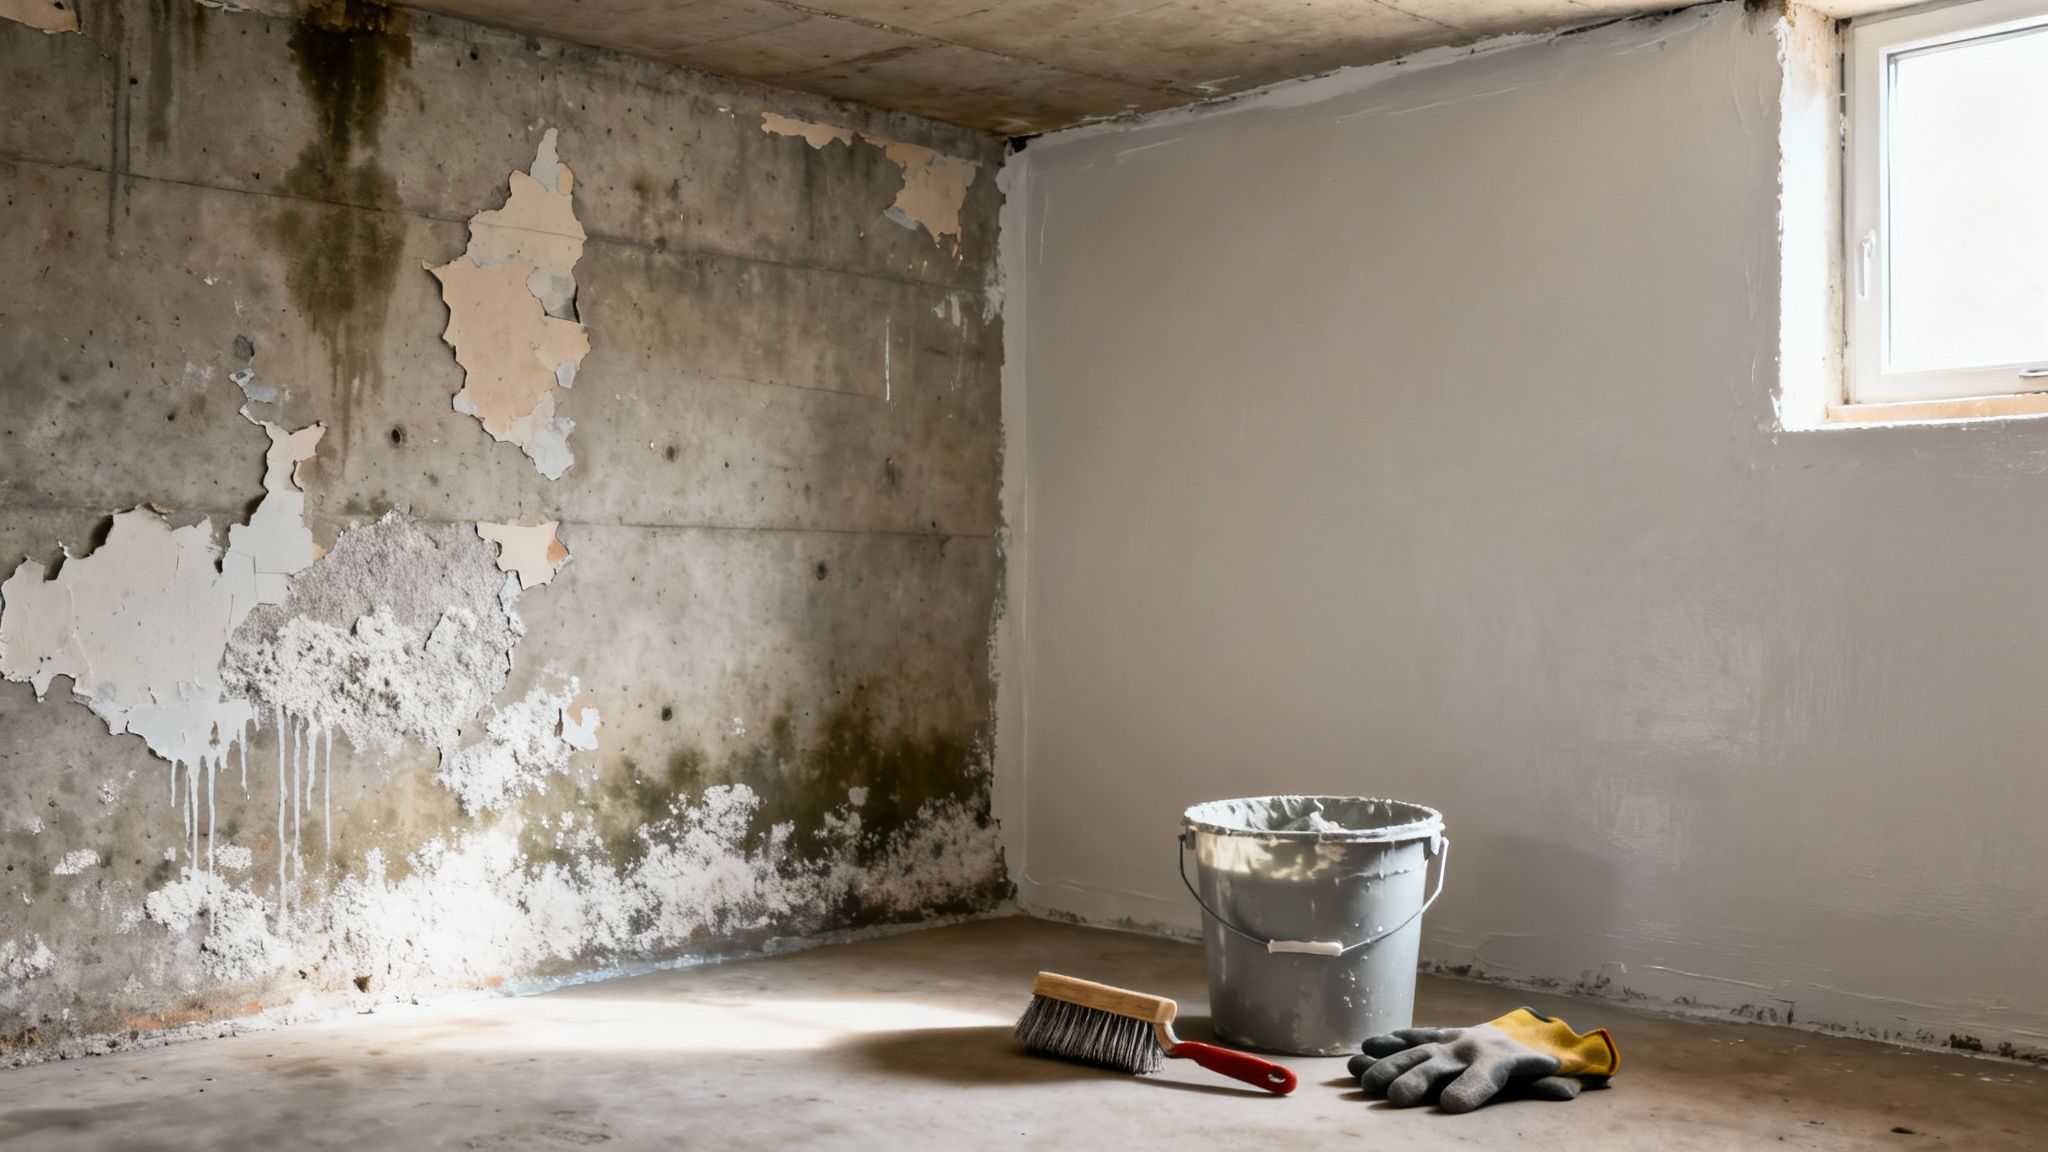
If you've ever walked down into your basement and been hit with that telltale musty smell or noticed paint flaking off the walls, you’re not just dealing with a cosmetic issue. Those are red flags signaling that water is finding its way inside. The first, and most important, step in truly waterproofing your basement is figuring out how and why that water is getting in. It could be pressure from the soil outside, tiny cracks in the foundation, or even poor drainage around your house.
Understanding Why Basements Leak
A damp basement is one of the most common complaints I hear from homeowners, and it almost always points to bigger issues with how a house handles water. The problem usually starts on the outside, where soil, rain, and gravity team up against your foundation. Before you even think about slapping on a coat of sealant, it's worth taking a step back and thinking about the bigger picture of ensuring your home is leak-proof.
The main force we're fighting is something called hydrostatic pressure. Picture this: after a heavy rainstorm, the ground around your foundation gets completely saturated. All that water-logged soil creates immense pressure that pushes against your basement walls from every direction. If there’s even a hairline crack or a weak spot, that pressure will force water right through the concrete. It’s why you’ll often notice things feel damper after a big storm.
Common Signs of Water Intrusion
Catching the problem early can save you a world of headaches and money. Keep an eye out for these classic signs that you've got a moisture issue brewing:
- Flaking Paint or Bubbling Wallpaper: When moisture seeps through concrete, it pushes off whatever is on the surface. This is often the first thing people notice.
- A Persistent Musty Smell: That "damp basement" odor is the signature scent of mold and mildew, which need moisture to grow.
- Visible Mold or Mildew: You might see splotchy black, green, or white stains, especially in corners, along the base of the walls, or behind stored items.
- Efflorescence: This is a chalky, white, powdery residue left behind on concrete or masonry walls as water evaporates, leaving mineral deposits.
This picture shows exactly what I'm talking about—efflorescence blooming around a small crack.
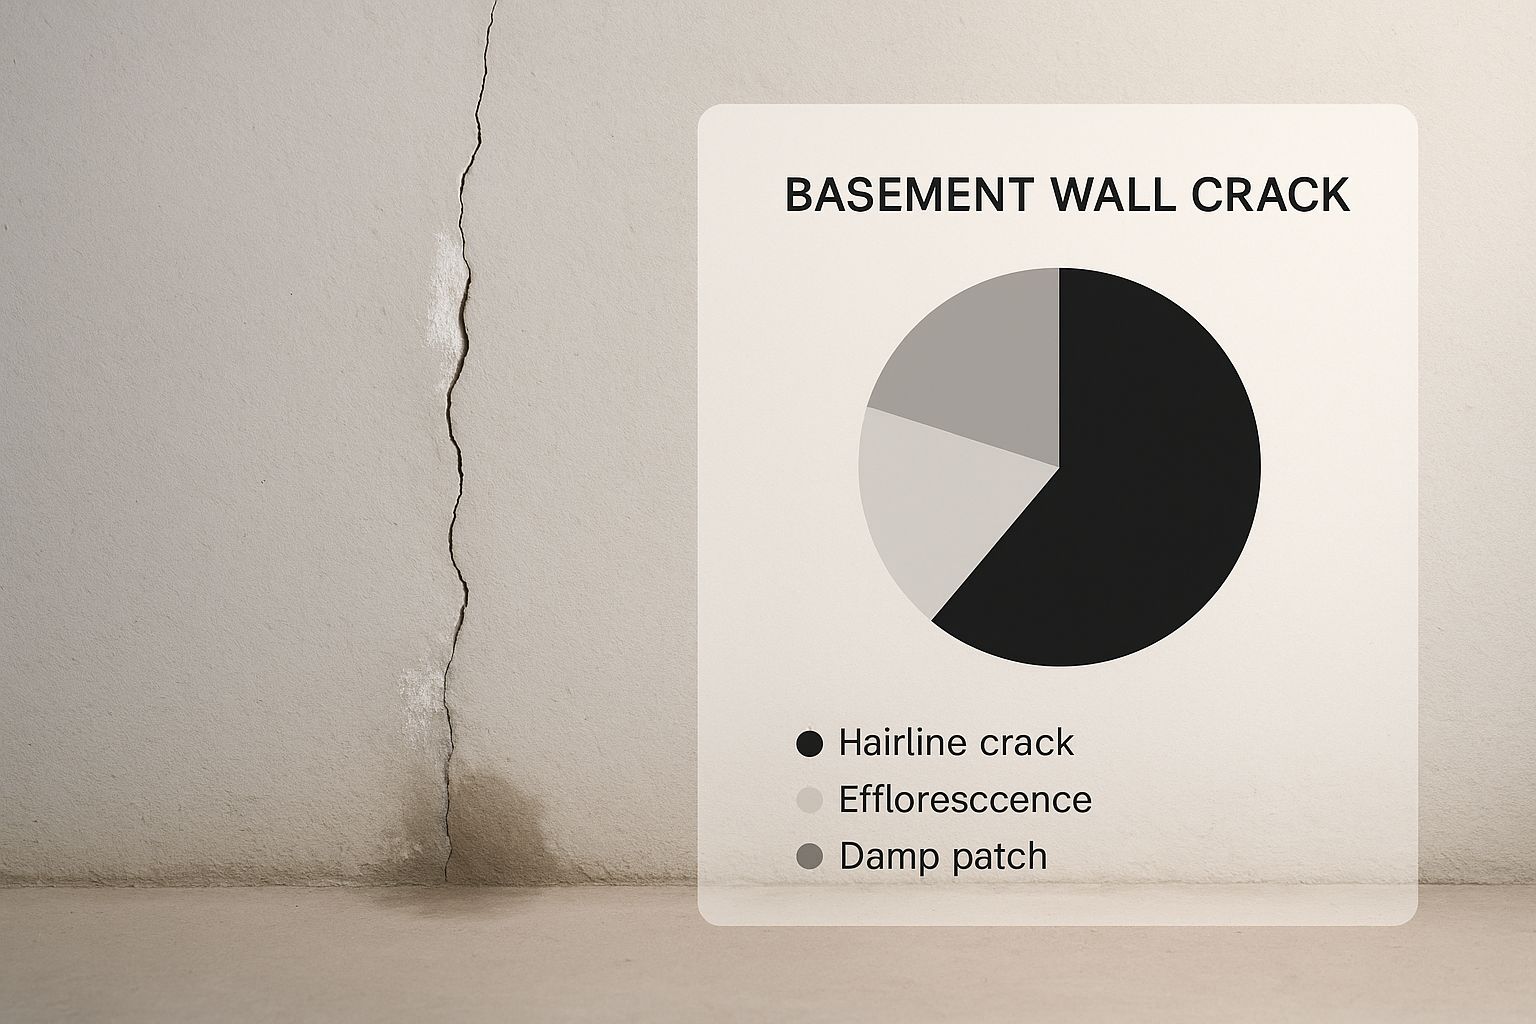
It’s a perfect example of how even a tiny imperfection can become a major highway for water intrusion.
The Root Causes of Basement Leaks
Hydrostatic pressure is the muscle, but there are other factors that give water an easy way in. Foundation cracks are the most obvious culprit. They can appear as a house settles naturally or from the constant expansion and contraction of soil, especially in areas with a lot of clay.
Another classic weak spot is the cove joint—that little seam where the basement walls meet the concrete floor. It's a notoriously tricky area to seal perfectly during construction. Compounding all of this is poor exterior drainage. If your gutters are clogged or your downspouts are dumping water right next to the foundation, you're basically creating a moat around your house and inviting trouble.
It’s no surprise that the market for solutions is booming. The global basement waterproofing coatings market was valued at $3.93 billion and is expected to hit $6.74 billion by 2033. This isn't just a niche industry; it shows that homeowners and builders are recognizing that proactive waterproofing is a critical investment. This is a vital thing to keep in mind when planning any project, something we touch on in our guide about the key differences between a finished vs. unfinished basement: https://buildnp.com/blogs/finished-vs-unfinished-basement/
Key Takeaway: Remember, a wet basement is almost always a symptom of an external water problem. Sealing the inside walls is a necessary line of defense, but the real, long-term solution starts with managing water outside your home.
Choosing the Right Waterproofing Products
Walking down the waterproofing aisle at the hardware store can be dizzying. You’re faced with a wall of tubs, buckets, and sprays, all promising a dry basement. So, how do you pick the one that will actually work?
The secret isn't finding the single "best" product on the shelf. It's about finding the best product for your basement—your specific walls, the type of moisture you're dealing with, and the root cause of the problem. Getting this right is the difference between a permanent fix and a patch job you'll be redoing after the next big rain.
Decoding The Labels: What’s Inside The Bucket?
Most of the interior products you'll see fall into three main categories. They all work differently, so let's break down what they do and when you'd use them.
- Cementitious Coatings: Think of this stuff as super-charged, waterproof concrete in a bag. You mix the powder with water to create a thick, cement-based slurry that you trowel or brush onto the walls. It creates an incredibly hard, durable barrier that physically stops water in its tracks. It’s fantastic for concrete block walls because it fills all those tiny pores.
- Silicate-Based Sealers (Densifiers): These are a different breed entirely. Instead of sitting on top of the wall, these thin liquids soak deep into the concrete or masonry. They then react chemically with the lime and minerals already in your wall, growing a crystalline structure inside the concrete’s pores. This process doesn't create a film; it makes the concrete itself far less permeable to water.
- Elastomeric Membranes: These are basically thick, rubberized paints. When they dry, they form a flexible, stretchy membrane over the wall's surface. The real advantage here is their ability to bridge small, non-structural cracks. If your foundation has tiny hairline fractures that shift with the seasons, an elastomeric coating can expand and contract right along with it.
A Quick Word of Caution: You'll see plenty of cans labeled "waterproof paint." Be skeptical. A true waterproofing compound is much thicker and more robust than your average can of acrylic paint. A thin paint film will almost always blister and peel when faced with real water pressure from behind the wall.
Comparing Interior Waterproofing Sealants
To make the choice a little easier, here's a side-by-side look at how these products stack up for the typical DIYer.
| Cementitious | Porous concrete block walls; moderate dampness. | Extremely durable; becomes part of the wall; breathable. | Labor-intensive to mix and apply; can be messy. | Yes |
| Silicate-Based | Poured or block concrete; preventing efflorescence. | Penetrates deeply; won't peel or blister; invisible finish. | Won't bridge cracks; less effective on painted surfaces. | Yes |
| Elastomeric | Poured concrete with hairline cracks; covering imperfections. | Very flexible; bridges small, non-structural cracks. | Not breathable; can trap moisture if applied incorrectly. | Yes |
Ultimately, the best choice is the one that directly addresses the type of wall and moisture issue you have. Don't be sold on marketing alone—match the product's function to your problem.
Matching The Product To The Problem
So, let's put this into practice. You wouldn't use a bandage for a broken arm, and the same logic applies to your basement walls.
If your walls just feel generally damp or you see that classic chalky white powder (efflorescence), a silicate-based sealer is a great first line of defense. It hardens the wall from the inside out and helps stop that slow, steady moisture vapor from passing through.
For those classic, porous concrete block walls with more significant dampness, a cementitious coating is often the heavy-hitter you need. Its thick consistency gets worked into every little void, creating a solid, tough barrier that essentially becomes a new, waterproof face for the wall.
Got a poured concrete foundation with some stable, hairline cracks? This is the perfect job for an elastomeric membrane. Its rubber-like flexibility lets it stretch over those tiny imperfections and move with the wall, keeping water from seeping through.
The need for these solutions is only growing. The global waterproofing membranes market, once valued at USD 24.54 billion, is expected to hit USD 40.15 billion by 2030. This boom in the industry means more innovation and better products are constantly hitting the shelves for homeowners just like you.
Gear Up: The Tools You'll Actually Need
Choosing the right product is step one, but having the right tools to apply it is just as crucial. A lot of waterproofing failures come down to bad prep or shoddy application, not a bad product.
Here’s a quick list of what you should have on hand before you start:
- Wire Brush: This is non-negotiable. You have to scrape off every bit of loose material, old paint, and efflorescence. The new coating needs a clean, bare surface to grab onto.
- Hydraulic Cement: This is a special type of cement that sets incredibly fast and actually expands as it cures. It's the go-to for patching any holes, larger cracks, or actively leaking spots before you apply the main coating.
- Masonry Brush or Heavy-Nap Roller: Leave your standard paintbrushes in the garage. These thick coatings need a brush with stiff, rugged bristles or a roller with a very thick nap (3/4" or more) to properly work the material into the wall's texture.
- Drill with a Mixing Paddle: Trust me on this one. If you're using a cementitious product, mixing it by hand is a recipe for a sore arm and a lumpy, inconsistent mess. A paddle mixer makes it smooth and easy.
Getting your tools ready from the start makes the whole project go smoother. Once your walls are properly sealed, you can start thinking about the finishing touches. A well-prepped and waterproofed basement opens up a world of possibilities, and you can start exploring ideas in our guide on the best basement flooring options for your newly dry space.
How to Prep Your Walls for the Perfect Waterproof Seal
I can't stress this enough: a successful waterproofing job is 90% preparation. You can buy the most expensive, high-tech sealant on the market, but if you slap it onto a dirty, damp, or crumbling wall, you're just wasting your time and money.
Think of it like painting a car. You wouldn't spray a fresh coat of paint over rust and dirt, right? The same logic applies here. The prep work is what makes or breaks the entire project.

Time and again, I see DIY jobs fail because this stage was rushed. The sealant bubbles, peels, or just lets water right through because it never got a chance to properly bond with the wall. Let’s do it right.
Start with a Blank Canvas
First things first, you need to get those walls back to their bare, original state. Anything sitting on the surface—paint, dirt, mystery grime—has to go. It’s all just a barrier between the concrete and your new waterproof coating.
Grab a stiff wire brush and a good paint scraper and get to work on any loose or peeling paint. You'll likely run into a chalky, white powder as you go. That's efflorescence, and it's a dead giveaway that water has been seeping through the concrete. It’s essentially salt deposits left behind as moisture evaporates, and you need to scrub it all off.
Patch Every Crack and Hole
Once the walls are clean, you'll have a much clearer view of every crack, hole, and imperfection. These are the little highways that water uses to get into your basement. You have to shut them down before you even think about opening a can of sealant.
For this job, your best friend is hydraulic cement. This stuff is amazing. It's not like regular mortar; it actually expands as it cures and can set in just a few minutes, creating an incredibly tight seal that can stop active leaks on the spot.
Here’s the professional way to patch a crack:
- Undercut It: Take a hammer and chisel and chip away at the crack to make it wider at the bottom than at the surface—like an inverted "V." This creates a mechanical lock that the cement can grab onto.
- Clean It Out: Use a shop vac or a stiff brush to get every last bit of dust and debris out of the void.
- Mix and Pack: Hydraulic cement sets fast, so only mix a small batch you can use in a few minutes. Pack it tightly into the crack with a putty knife, making sure it fills the entire space.
Your goal is a smooth, seamless surface. Any crack left unpatched is a guaranteed point of failure. Don't rush this part—it’s the most critical repair you’ll make.
Make Sure the Surface is Bone-Dry
This final prep step requires some patience: the walls have to be completely dry. If you apply a sealant over a damp wall, you're just trapping moisture. That trapped moisture creates vapor pressure, which will literally push your new coating right off the wall.
You can speed things up. I always bring a couple of high-powered fans and a good dehumidifier to a job. The fans help the surface moisture evaporate, while the dehumidifier pulls gallons of water out of the air, which in turn helps draw moisture out of the concrete itself.
So, how do you know when it’s dry enough? Here's an old-school trick that works every time. Tape a one-foot square of plastic sheeting to the wall, sealing all four edges. Check it after 24 hours. If the plastic has condensation on the inside or the wall beneath it looks dark and damp, you need more time. Wait another day and test again.
Once your walls are clean, patched, and totally dry, you’ve laid the groundwork for a successful project. You're finally ready to apply a sealant that will form an unbreakable bond. Getting this right means your basement won't just be dry storage; it can become a real extension of your home. If you're looking for ideas, check out our guide on creating a basement home office to see what's possible when you start with a solid, dry foundation.
Getting the Sealant on the Walls
Now for the part where you see real progress. After all that prep work—the scraping, cleaning, and patching—your basement walls are finally ready for their protective layer. This is where you build the tough, watertight barrier that will keep your basement dry for years to come.
Applying a waterproofing sealant isn't like rolling on a coat of regular paint. It’s a deliberate process. You need to get the consistency of the product just right and use the right technique to force it into every little pore and crevice of the concrete. This is what creates that final, impenetrable shield.
Nail the Mix for a Flawless Finish
Before a drop of sealant hits the wall, you have to get the mix right, especially if you're working with a cement-based product that comes in powder form. Don't eyeball it; the consistency here is absolutely critical.
You’re aiming for a smooth, creamy texture, kind of like a thick pancake batter. If it's lumpy, it won't spread evenly, and you'll end up with weak spots. My go-to tool for this is a drill with a paddle mixer attachment. It's a game-changer and ensures a perfect, lump-free blend in just a minute or two, something you just can't achieve by hand.
A Word of Caution: Always stick to the manufacturer’s instructions for the water-to-powder ratio. Too much water will thin out the product and weaken its waterproofing power. Too little, and it becomes a thick, unworkable paste that won’t properly penetrate the concrete.
Applying the First Coat: Push, Don't Paint
With your sealant mixed to perfection, it's time to lay down that all-important first coat. The goal isn't just to cover the wall; it's to work the material deep into the concrete's texture. This first layer is what creates the initial bond and fills every tiny void.
Forget a standard paintbrush. You need a heavy-duty masonry brush or a roller with a thick nap—think at least a 3/4-inch nap. These tools are built to hold the thick sealant and have the stiffness required to push it into the wall's surface.
Here's how I tackle the first coat for the best results:
- Start High: Begin in an upper corner and work your way down and across the wall.
- Work in Grids: Focus on one manageable 4x4 foot section at a time. This keeps you from fighting against a product that’s starting to dry.
- Apply Liberally: Don't be stingy. You need a thick, generous layer. If you can still see the color of the concrete block through the sealant, you haven't applied enough.
- Scrub It In: This is the most important part. Use firm, strong strokes to really scrub the sealant into the surface. It feels less like painting and more like you're troweling on a thick paste. This is what creates a truly waterproof bond.
Why a Second Coat is Non-Negotiable
One coat is almost never enough for a truly waterproof seal. Think of the second coat as your insurance policy. It covers any pinholes, thin spots, or slight imperfections you missed the first time around, building up the thickness needed to stand up to water pressure.
But first, you have to let that initial coat cure. And I mean really cure, not just feel dry to the touch. Curing is a chemical reaction, and if you rush it, you'll compromise the entire job. Check the product's data sheet, but plan on waiting at least 12 to 24 hours.
When applying the second coat, I always use a cross-hatch pattern. If my first coat was applied with mostly vertical strokes, the second coat goes on horizontally. This simple trick ensures you cover every microscopic ridge and gap left behind, creating a strong, interlocking membrane.
Curing Time: The Final, Crucial Wait
The job isn't done when the second coat is on the wall. The temperature and humidity in your basement play a huge role in how effectively the sealant cures and bonds.
Most of these products have an ideal application temperature range, typically between 50°F and 90°F (10°C to 32°C). Working in a cold, damp basement will dramatically slow down curing time. If it’s too hot, the product can dry too fast and crack. A simple thermometer can help you keep an eye on the conditions.
Patience is your best friend here. Once that final coat is on, give it plenty of time to fully cure before you even think about moving furniture back or painting over it. Most sealants need a solid 5-7 days to reach their maximum strength and waterproofing capability. Giving it this time is the final step in getting the job done right.
Exterior Solutions for Long-Term Prevention
While interior sealants are a solid last line of defense, winning the war against a wet basement means stopping water before it ever gets to your foundation. The most effective, long-term strategies focus on the exterior of your home, where you can tackle the problem at its source. This approach is all about managing water and relieving the intense hydrostatic pressure that forces its way through concrete.
It really comes down to creating a layered defense system around your house. You'd be surprised how many of the most powerful fixes are also the simplest. Most basement leaks start with rainwater being dumped right next to the foundation, so controlling where that water goes is half the battle.
Simple Changes With a Big Impact
Before you start thinking about major excavation projects, let's cover the basics. These small adjustments can divert hundreds of gallons of water during a single storm and are perfect weekend DIY projects.
- Clean Your Gutters: This is non-negotiable. When gutters get clogged with leaves and debris, they overflow, creating a waterfall right next to your foundation. Make it a habit to clean them out every spring and fall.
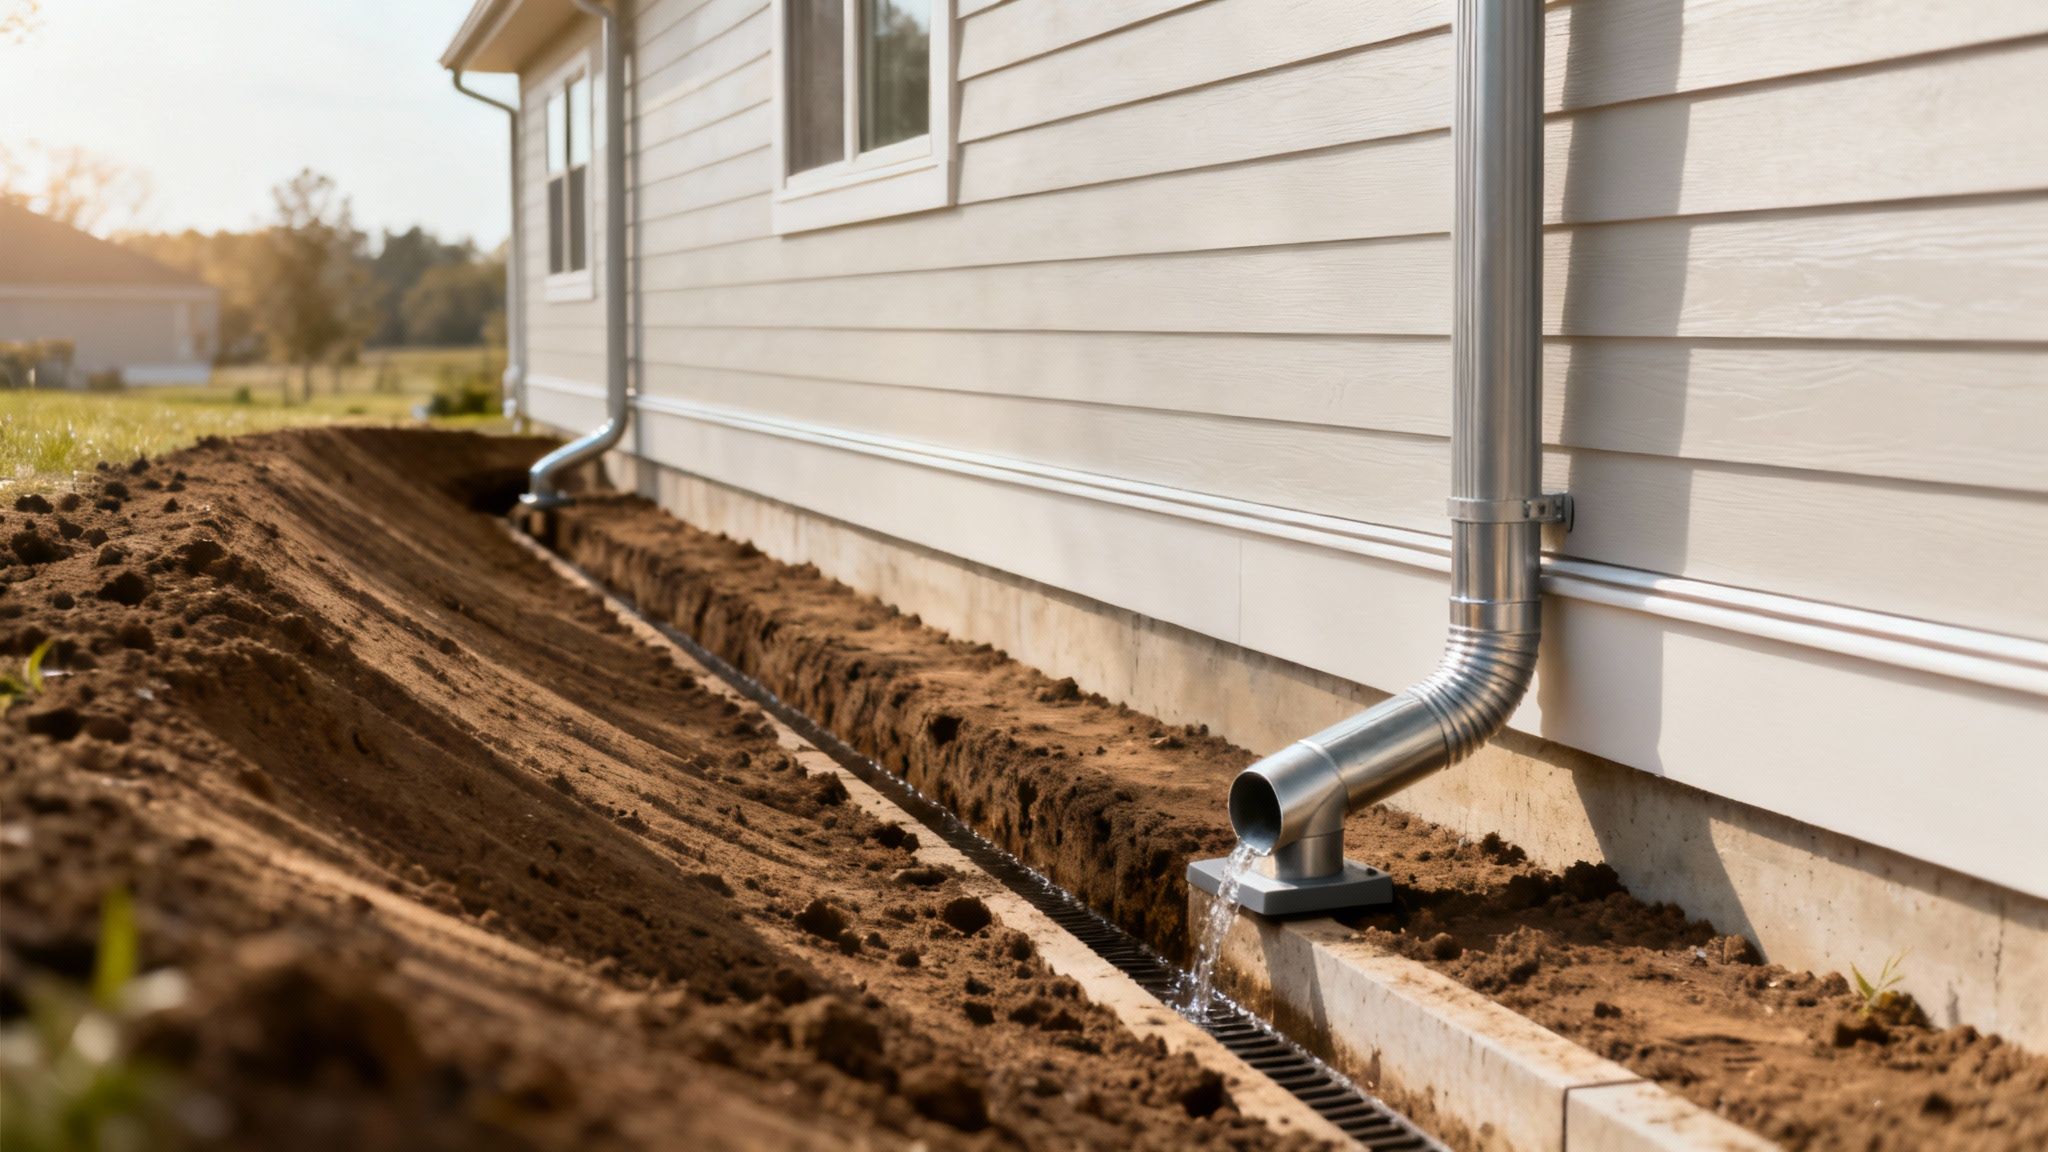
- Install Downspout Extenders: Take a look at where your downspouts end. If they're dumping water at the base of your home, you're just asking for trouble. They need to discharge that water at least six to ten feet away. Simple plastic or metal extenders from the hardware store are cheap and incredibly effective.
- Correct Your Soil Grade: The ground around your foundation should actively slope away from the house. A negative grade, where it slopes inward, funnels water directly toward your basement walls. You're aiming for a drop of about one inch for every foot, extending out for at least five feet. This can often be fixed with a shovel, some elbow grease, and a few bags of topsoil.
Getting a handle on these surface water issues is a massive piece of the puzzle and often solves the problem entirely.
When You Need a More Robust Solution
If you've tackled the surface water and you're still finding damp spots, it's time to consider solutions that manage groundwater. These systems are designed to intercept and redirect the water that collects deep in the soil around your foundation.
A French drain is one of the most common and effective tools for this. It's a simple concept: a trench is dug around the perimeter of your foundation, filled with gravel, and fitted with a perforated pipe. This system captures subsurface water and channels it to a safe discharge point, dramatically reducing the hydrostatic pressure pushing against your basement walls.
Often, the best defense combines exterior and interior systems. A good next step is understanding what a sump pump is and its role in basement waterproofing, as it works perfectly with drainage systems to actively pump collected water away.
Exterior Waterproofing Membranes
For the most stubborn water problems, the ultimate solution is applying a waterproof membrane directly to the exterior foundation walls. This is a job for the pros, as it involves excavating all the soil down to the foundation footing.
Once the wall is exposed and cleaned, a thick, rubberized asphalt coating is applied. This creates a seamless, impenetrable barrier that physically stops moisture from ever touching the concrete.
This method is the gold standard for a reason—it addresses the problem from the outside in. It’s a significant project, but for persistent water issues, it’s a permanent fix.
The importance of these robust systems is reflected in market trends. The global basement waterproofing system market was valued at around USD 9.8 billion in 2024 and is expected to keep growing as building codes get stricter and homeowners look for more durable solutions. This shows a clear industry shift toward proactive, heavy-duty waterproofing.
Got Questions? Let's Talk Basement Waterproofing
Finishing a project like this feels great, but it's normal to wonder what comes next. Knowing how long your hard work will last and when a problem is actually too big to handle on your own is what separates a good DIY job from a great one. Let’s clear up a few of the most common questions I hear from homeowners.
We'll cover how long you can realistically expect a DIY seal to hold up, cut through the marketing hype on so-called "waterproof" paints, and identify the red flags that mean it's time to pick up the phone and call a pro.
How Long Does Interior Waterproofing Really Last?
This is the million-dollar question, isn't it? The honest answer is that it truly depends. The lifespan of your interior waterproofing job comes down to three things: the quality of the product you used, how meticulously you prepped the walls, and the sheer force of the water you're trying to hold back.
If you've done everything right—using a top-notch cementitious or elastomeric coating on a perfectly clean and patched wall—you can reasonably expect it to last 10 years or more. But you have to remember what this coating is: a secondary line of defense. If you never fix the root cause of the water, like poor grading outside or relentless hydrostatic pressure, that constant force will eventually find a way through.
Is "Waterproof" Paint Good Enough?
I see this all the time. You walk into the hardware store, and there are cans of acrylic paint promising a fully waterproof basement. It’s critical to understand the massive difference between a dedicated waterproofing sealant and what is, in reality, just a moisture-resistant paint.
Most of these paints are only built to handle a little dampness or high humidity. They create a thin film on the surface that simply has no chance against active water pressure pushing its way through the concrete. Once real hydrostatic force gets behind it, that paint will bubble, blister, and peel away. I've seen it happen in less than a year.
My Two Cents: If your basement walls are actively leaking or have that chalky efflorescence, you need to bring out the big guns. A cementitious coating that actually becomes part of the concrete or a silicate-based sealer that soaks deep into the pores is what it takes to create a real barrier. Save the "waterproof" paint for minor dampness issues or for a decorative top coat after you've applied a real sealant.
When Should I Call a Professional?
Look, sealing interior walls is a fantastic DIY project for handling common moisture problems. But some situations are clear signs that you're in over your head. Trying to patch over a major structural issue isn't just a waste of time; it's dangerous.
You need to put down the roller and call a professional immediately if you see any of these:
- Big Cracks: We're talking anything wider than 1/8 of an inch. Pay special attention to horizontal cracks or stair-step patterns in block walls—those are serious red flags for foundation stress.
- Bowing or Bulging Walls: If you can see your walls curving inward, that's a sign of immense pressure from the outside soil. This is a potential collapse situation.
- Water Gushing In: A trickle is one thing, but if water is actively streaming into your basement, especially from the cove joint (where the wall meets the floor), an interior coating won't stop it. That signals a major hydrostatic problem that needs a professional-grade solution.
A good contractor can diagnose these severe issues and recommend the right fix, which might involve exterior excavation and sealing, foundation underpinning, or installing an interior drain tile system. These are massive jobs that go far beyond a weekend paint project.
At Northpoint Construction, we turn your basement from a liability into a valuable part of your home. Whether you need a robust waterproofing solution or are ready to transform your dry space with a full basement finish, our team has the expertise to get it done right. Let's make your basement a beautiful, functional, and permanently dry space.
Discover how we can help at https://buildnp.com.