
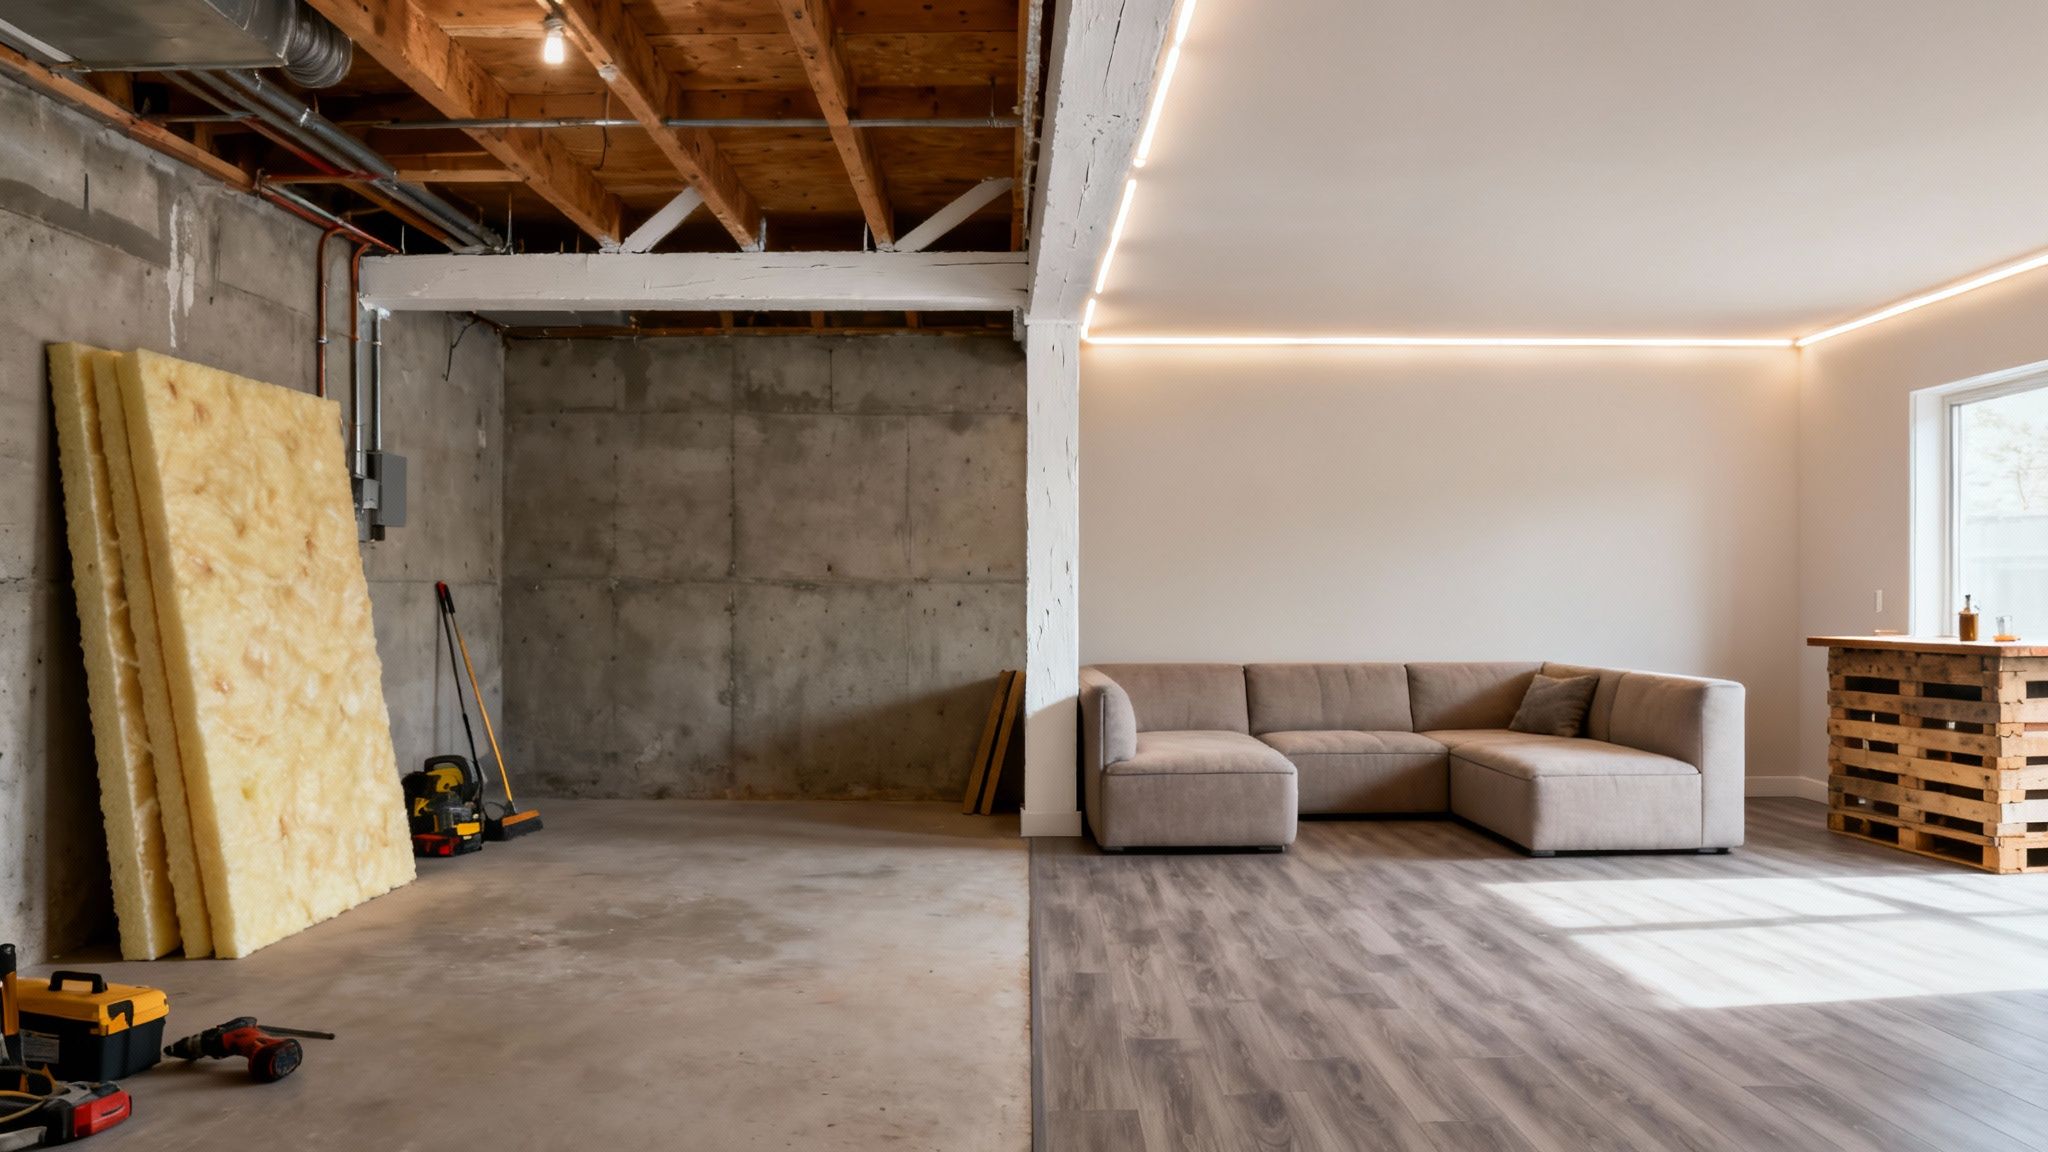
10 Smart IDEAS FOR FINISHING A BASEMENT ON A BUDGET in 2025
That unused square footage beneath your home represents a goldmine of potential living space, but the high cost of a full-scale renovation often puts the project on hold indefinitely. A finished basement can serve as a home theater, a guest suite, a playroom, or a much-needed home office, significantly increasing your property's value and functionality. The key to unlocking this potential without draining your savings lies in strategic, cost-conscious planning. Finding affordable yet effective ideas for finishing a basement on a budget is the critical first step.
This comprehensive guide moves beyond generic advice to provide a curated roundup of ten actionable, budget-friendly strategies. We will break down specific, low-cost materials and DIY-friendly techniques that deliver a polished look for a fraction of the typical cost. You will learn how to approach everything from walls and floors to ceilings and moisture control with a focus on maximizing impact while minimizing expense.
Forget the misconception that "budget" means "cheap" or "compromised." A smart basement finish is about making intelligent choices, like using a high-quality paint-and-primer combo to transform concrete walls, or installing a practical drop ceiling that provides easy access to utilities. We will explore how to seal and stain concrete floors for a modern industrial aesthetic, utilize versatile peel-and-stick products, and incorporate salvaged materials for a unique, cost-effective touch. Whether you're planning a phased, multi-year project or a quick transformation, these ideas will provide a clear roadmap to creating a comfortable, stylish, and functional lower level without breaking the bank.
1. Paint and Primer Combo
One of the most impactful and budget-friendly ideas for finishing a basement on a budget is leveraging a high-quality paint and primer combo. This all-in-one product streamlines the painting process, allowing you to transform bare concrete or drywall into a clean, finished surface with minimal investment. It’s a foundational step that instantly makes the space feel more livable and bright.
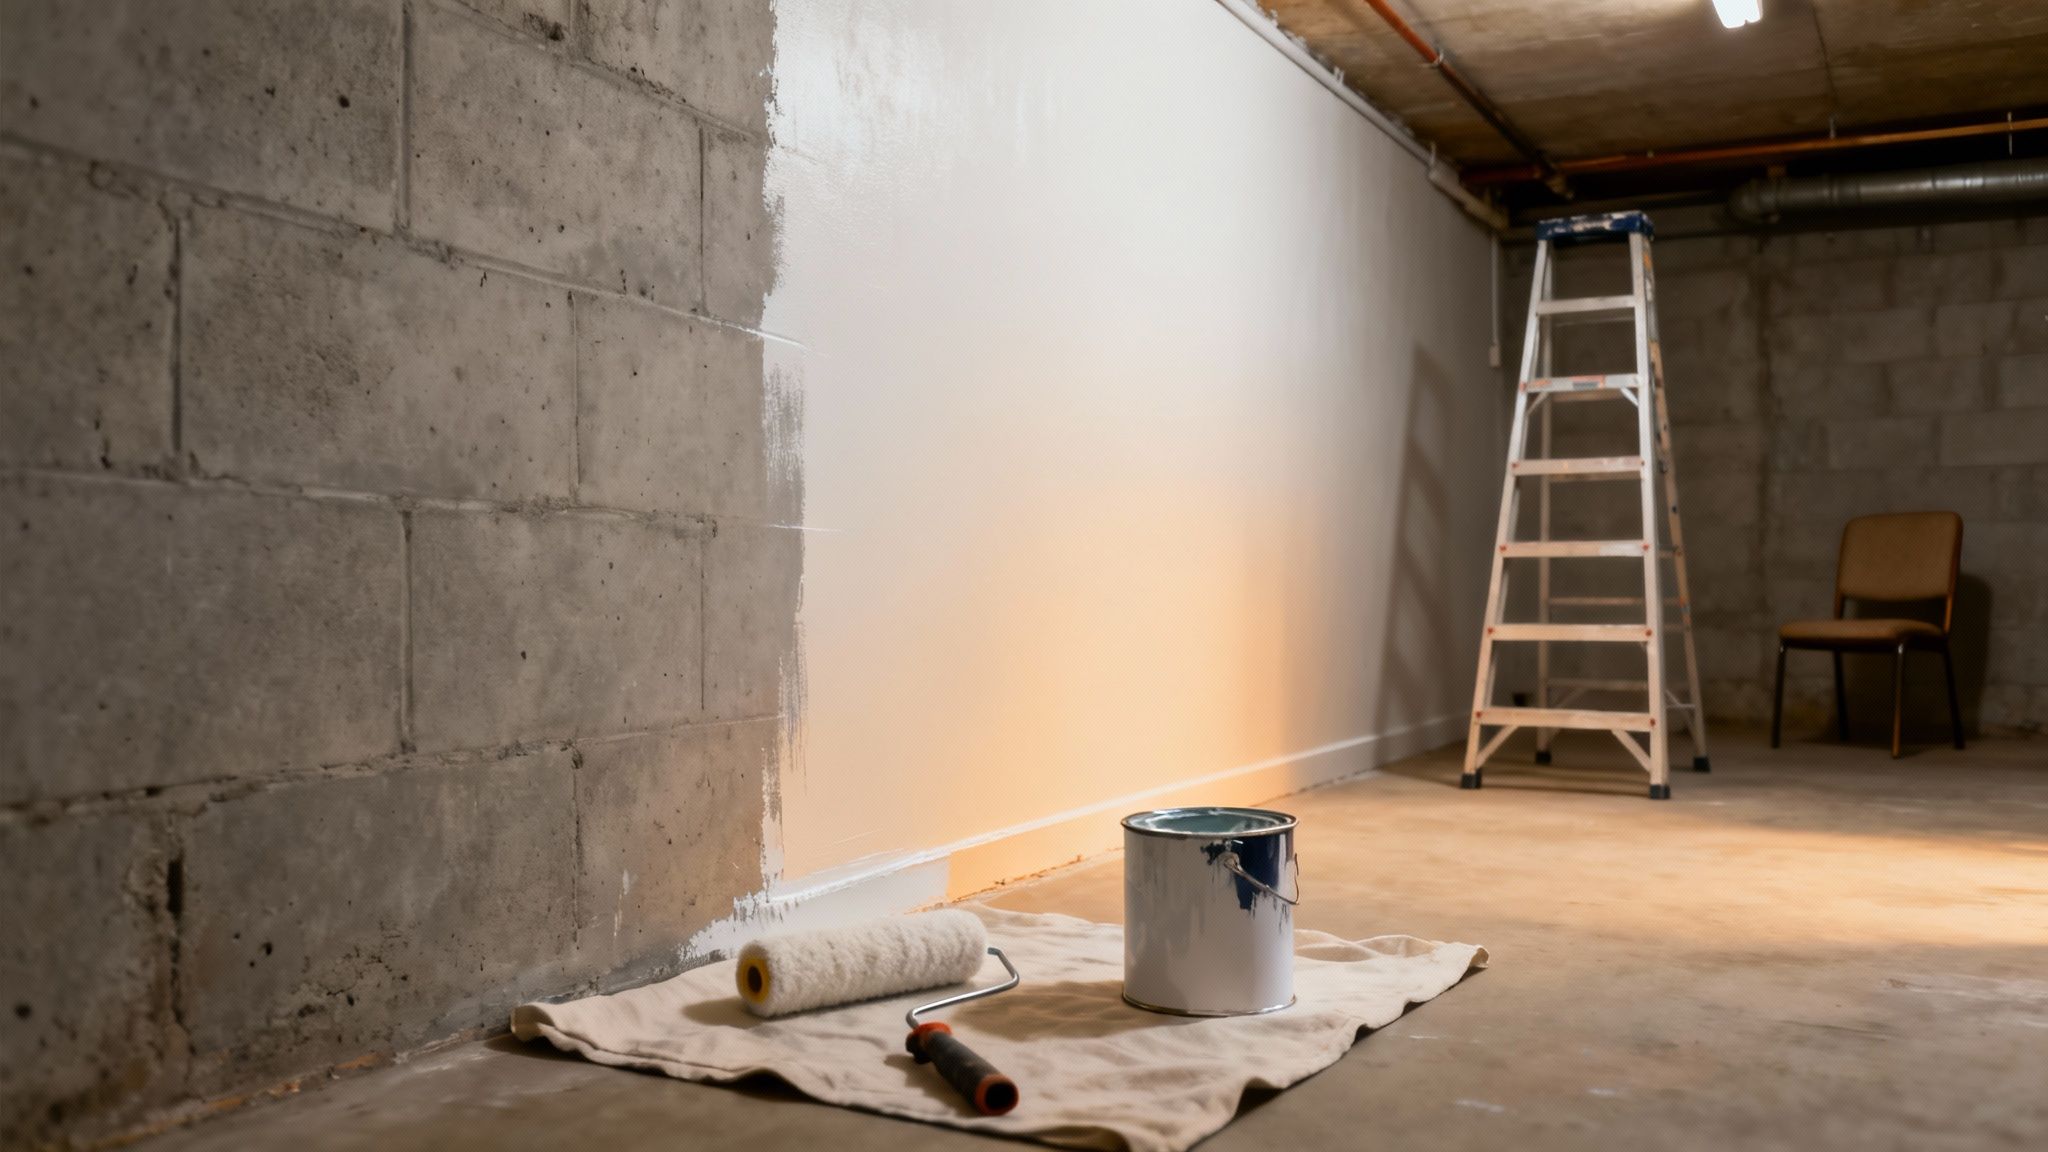
Why It Works for Basements
Basements often have porous concrete walls or unpainted drywall that would typically require a separate priming step to ensure even color and proper adhesion. A paint and primer combination product consolidates these steps, saving you both time and the cost of buying separate materials. This approach provides a durable, uniform finish that can dramatically improve the ambiance of an otherwise utilitarian space. For tough stains or challenging surfaces, applying a dedicated high-performance primer sealer beforehand can guarantee superior coverage and block potential moisture bleed-through.
Implementation Tips for a Professional Finish
To get the best results from your paint and primer combo, proper preparation is key. Follow these actionable steps for a smooth, lasting finish:
- Thorough Cleaning: Before you begin, scrub the walls with a stiff brush and a cleaning solution (like trisodium phosphate or a heavy-duty degreaser) to remove dirt, efflorescence, and any lingering grime. Let the walls dry completely.
- Strategic Color Choice: Opt for light, neutral colors like off-white, light gray, or beige. These shades reflect light, making the often dark and enclosed basement feel larger, brighter, and more inviting.
- Efficient Application: Use a long-napped roller designed for rough surfaces like concrete or a standard roller for drywall. This will speed up the application process significantly compared to using a brush for the entire area. Cut in the edges with a brush first, then fill in the large sections with the roller.
- Smart Shopping: Keep an eye out for sales at major home improvement stores like Home Depot or Lowe's. You can often find quality store brands or even premium lines from Sherwin-Williams and Benjamin Moore at a discount during holiday promotions.
2. Unfinished Drywall Installation
For homeowners looking for functional separation without the high cost of full finishing, an unfinished drywall installation is a brilliant budget-savvy solution. This approach involves hanging drywall sheets to frame out rooms and cover exposed studs, but deliberately skipping the labor-intensive steps of taping, mudding, sanding, and painting. It’s one of the most practical ideas for finishing a basement on a budget when the primary goal is creating distinct, usable zones like a workshop or storage area.
Why It Works for Basements
The most significant cost in drywalling isn't the material itself but the skilled labor required for a perfectly smooth, seamless finish. By stopping after the hanging phase, you create a structurally sound, enclosed space that provides basic fire resistance and a clean, uniform look. This method is perfect for utility rooms, home gyms, or storage closets where aesthetics are secondary to function. It gives the basement a more complete feel than bare studs while keeping costs down.
Implementation Tips for a Professional Finish
Even without mud and tape, a clean installation is crucial. Proper execution ensures the space is functional and ready for future finishing if your budget allows.
- Plan for Phased Finishing: Treat this as the first step in a longer-term project. When your budget allows, you can easily hire a professional to tape, mud, and finish the walls without needing to start from scratch.
- Seal Gaps for Cleanliness: Use a simple, paintable caulk to seal the gaps between the drywall sheets. This quick step prevents dust and debris from accumulating in the seams and gives the installation a tidier appearance.
- Prioritize Safety: Always wear protective gear, including safety glasses and a dust mask, when cutting and hanging drywall. The dust can be a significant irritant.
- Understand the Costs: While this is a budget-friendly DIY project, it's wise to understand the full scope of potential expenses. To get a better idea of material and labor costs, you can learn more about the cost of drywalling a basement to plan your project effectively.
3. Concrete Floor Sealing and Staining
Instead of covering the concrete slab with expensive flooring like carpet or tile, one of the best ideas for finishing a basement on a budget is to embrace the industrial-chic look of the existing floor. By sealing and staining the concrete, you can create a durable, attractive, and low-maintenance surface for a fraction of the cost of traditional flooring options. This approach transforms a functional element into a stylish design feature.

Why It Works for Basements
Basement concrete is often prone to moisture, making materials like carpet or hardwood a risky choice. A high-quality epoxy sealer or concrete stain creates a non-porous barrier that protects against spills, dampness, and wear and tear. This method is incredibly versatile, allowing you to achieve various looks, from a simple clear gloss to rich, semi-translucent colors that mimic natural stone. It's an ideal solution for creating a modern loft-style basement, a functional home gym, or a durable workshop space.
Implementation Tips for a Professional Finish
Achieving a high-end look with concrete stain and sealer requires careful prep work. Follow these steps to ensure your floor is both beautiful and long-lasting:
- Prep the Surface: Thoroughly clean and degrease the entire concrete floor to remove any dirt, oil, or previous sealants. You may need to use an etching product to open the pores of the concrete so it can absorb the stain evenly.
- Moisture Testing: Before applying any product, test for moisture. Tape a small plastic square to the floor and leave it for 24 hours. If condensation forms underneath, you may need a vapor barrier product first to prevent the sealer from peeling.
- Apply Thin, Even Coats: Use a roller with an extension handle to apply the stain or epoxy. Work in small sections and apply thin, consistent coats to avoid puddles and roller marks. Follow the manufacturer's drying time recommendations between coats.
- Add Anti-Slip Grit: For areas that might get wet, such as a basement laundry room or bar, consider adding an anti-slip additive to your final topcoat. This fine grit provides essential traction without significantly altering the floor's appearance.
- Ensure Proper Ventilation: Concrete sealers and stains release strong fumes. Open windows and use fans to ensure adequate ventilation during and after application to keep the area safe.
4. Peel-and-Stick Wall Panels
For a dramatic visual upgrade without the cost and complexity of traditional materials, peel-and-stick wall panels are one of the most innovative ideas for finishing a basement on a budget. These adhesive-backed panels simulate high-end textures like wood, stone, brick, or shiplap, offering a transformative effect with minimal effort. They provide an affordable, DIY-friendly way to create a stunning accent wall or cover imperfections on existing surfaces.
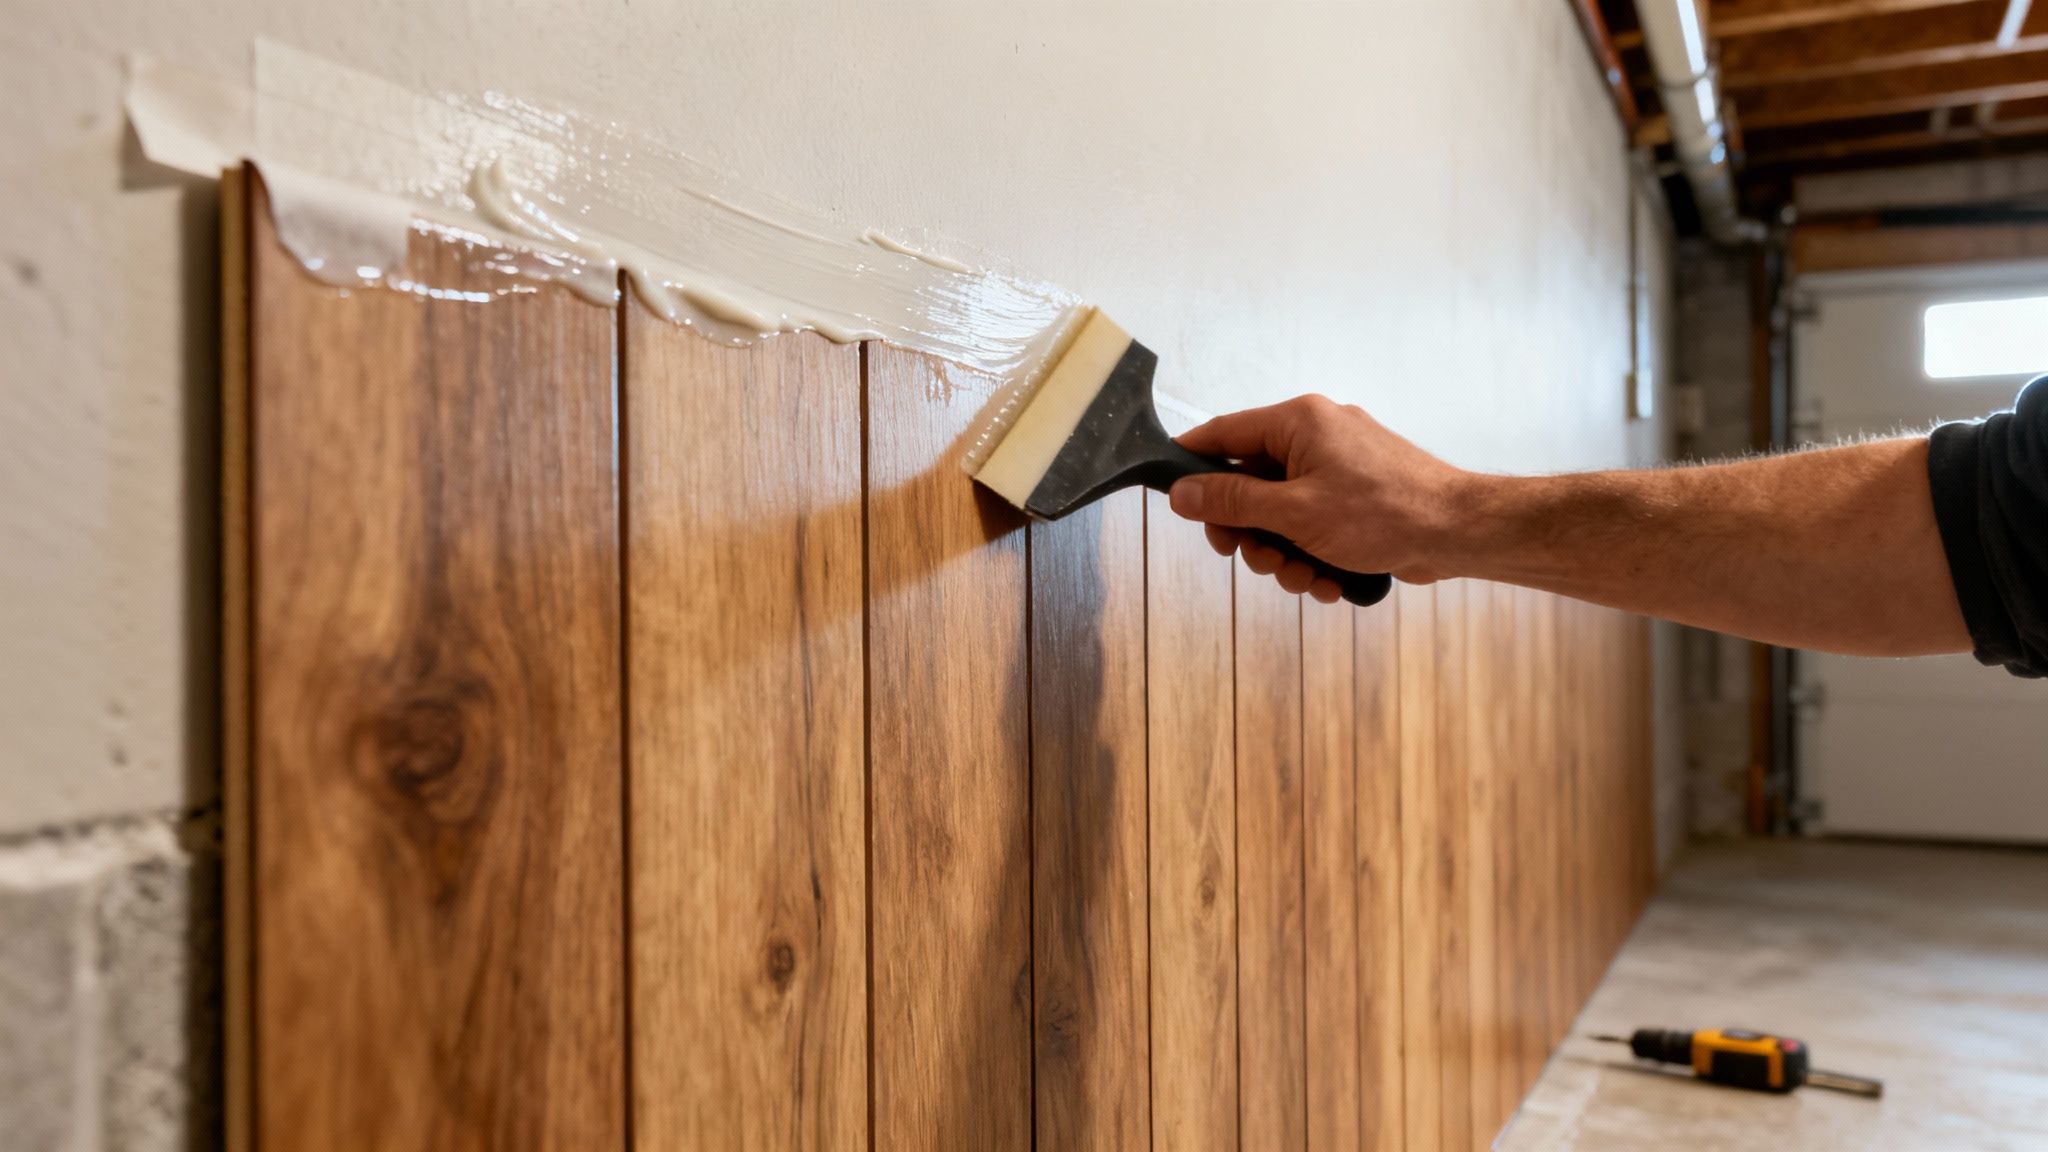
Why It Works for Basements
Peel-and-stick panels are an excellent solution for basements because they bypass the need for messy adhesives, grout, or specialized tools. Unlike real wood or stone, these lightweight panels don't require structural reinforcement and can be applied directly over primed drywall or even smooth, painted concrete. This makes them perfect for creating a feature wall behind a TV, adding texture to a home office nook, or updating the look of a basement bar area. Their removability also makes them an ideal choice for renters or homeowners who may want to change their decor in the future.
Implementation Tips for a Professional Finish
Achieving a seamless, professional look with peel-and-stick panels depends on careful preparation and application. Follow these steps for the best outcome:
- Prepare the Surface: The wall must be clean, dry, and perfectly smooth. Fill any holes or cracks, sand them down, and apply a coat of primer to ensure the panels adhere properly.
- Measure and Plan: Before peeling any backing, lay out your panels on the floor to plan the design. Measure your wall and mark a level starting line, often in the center, to ensure the pattern remains straight.
- Apply with Precision: Start from your guideline and work outward. Peel only a small portion of the backing at a time, pressing the panel firmly onto the wall. Use a plastic squeegee or roller to smooth out any air bubbles as you go.
- Create Accent Walls: To maximize your budget, consider using these panels on a single accent wall rather than the entire room. This creates a powerful focal point without the expense of covering every surface. Brands like RoomMates and Brewster Home Fashions offer a wide variety of styles.
5. Reclaimed or Salvaged Materials
One of the most creative and sustainable ideas for finishing a basement on a budget is to incorporate reclaimed or salvaged materials. This approach involves using repurposed items like old barn wood, salvaged doors, or vintage fixtures to add unique character and history to your space. It's a fantastic way to achieve a high-end, custom look for a fraction of the cost of new materials.
Why It Works for Basements
Using salvaged materials introduces textures, patinas, and stories that brand-new items simply can't replicate. A reclaimed wood accent wall can bring warmth and rustic charm to an otherwise sterile concrete space, while an antique door can become a unique sliding entrance to a utility room or home office. By sourcing materials from places like Habitat for Humanity's ReStore, you not only save money but also contribute to a circular economy, diverting usable items from landfills. This method is perfect for homeowners looking to create a one-of-a-kind design that reflects personal style and environmental consciousness.
Implementation Tips for a Professional Finish
To successfully integrate salvaged materials, a bit of planning and inspection is crucial. Follow these actionable steps for a beautiful and safe installation:
- Inspect Thoroughly: Before purchasing, carefully examine all materials. Check for signs of rot, pests, or structural damage. For older painted items, be mindful of potential lead paint or asbestos and test them if necessary.
- Be Flexible with Design: The beauty of salvaged materials lies in their unpredictability. Instead of a rigid plan, have a flexible design concept that can adapt to the unique pieces you find. This approach turns your material hunt into a creative adventure.
- Factor in Refinishing: Many salvaged items require some T.L.C. to look their best. Account for the time and cost of cleaning, sanding, stripping, or sealing materials. This "sweat equity" is where you'll realize the biggest savings.
- Build Local Connections: Get to know the staff at local salvage yards, architectural antique stores, and demolition companies. They can often alert you when specific items you're looking for become available.
6. Suspended or Drop Ceiling Installation
One of the most practical and cost-effective ideas for finishing a basement on a budget is installing a suspended or drop ceiling. This system uses a lightweight metal grid to hold acoustic tiles, effectively hiding exposed joists, ductwork, plumbing, and electrical wiring. It provides a clean, finished look while ensuring crucial access to these systems for future maintenance.
Why It Works for Basements
Basements are the nerve center of a home, filled with pipes and wires that you may need to access later. Unlike drywall, which must be cut and repaired, a drop ceiling allows you to simply lift a tile to make repairs or upgrades. This accessibility makes it a superior choice for a functional basement, saving you significant hassle and expense down the line. Leading brands like Armstrong and USG offer a variety of tile styles, from basic functional designs to more decorative options that mimic traditional ceiling textures.
Implementation Tips for a Professional Finish
A well-installed drop ceiling can look seamless and professional. Proper planning and execution are essential for a high-quality result.
- Plan the Grid Layout: Before you start, map out your grid on paper. Aim to maximize full tiles and minimize the number of cut tiles, especially in highly visible areas. Centering the layout often creates the most balanced and aesthetically pleasing look.
- Choose the Right Tile Size: While standard 2x4 foot tiles are common and often cheaper, 2x2 foot tiles provide a more modern, less commercial appearance. They can make the ceiling feel less vast and more refined in a residential setting.
- Incorporate Lighting: A drop ceiling is perfect for integrating recessed can lights or flat panel LED lights. Plan your lighting placement during the grid layout phase to ensure lights are positioned exactly where you need them for optimal illumination.
- Measure Headroom: Ensure you have adequate ceiling height before committing. A drop ceiling will lower the headroom by at least 3-4 inches, so it’s crucial to confirm it will still meet local building codes and feel comfortable.
7. Laminate Flooring
For homeowners seeking the classic look of hardwood without the high cost and moisture vulnerability, laminate flooring is an excellent budget-friendly solution for a basement remodel. This engineered product offers the aesthetic of wood, stone, or tile at a fraction of the price, providing a durable and attractive surface that can dramatically elevate a subterranean space. Its ease of installation makes it a top choice for DIY enthusiasts looking for impactful ideas for finishing a basement on a budget.
Why It Works for Basements
Basements are prone to moisture and temperature fluctuations, making traditional hardwood a risky investment. Modern laminate flooring, especially options with a waterproof core, is specifically engineered to handle these conditions. It features a layered construction with a tough wear layer that resists scratches, stains, and fading, making it ideal for high-traffic areas like a family room or home gym. Brands like Pergo and Mannington offer extensive waterproof collections designed for below-grade applications.
Implementation Tips for a Professional Finish
Proper installation is critical to ensure the longevity and performance of your laminate floor. Follow these key steps for a flawless, moisture-resistant result:
- Prioritize a Moisture Barrier: Before laying a single plank, install a quality vapor barrier underlayment. This thin plastic sheeting is essential for blocking moisture that can seep up through the concrete slab, protecting your flooring from warping and mold growth.
- Acclimate the Planks: Let the unopened boxes of laminate flooring sit in the basement for at least 48-72 hours before installation. This allows the material to adjust to the room's specific temperature and humidity, preventing future buckling or gapping.
- Choose Waterproof-Core Laminate: When shopping at stores like Home Depot or Lowe's, specifically look for products labeled "waterproof" or "water-resistant," not just those with a water-resistant top layer. A waterproof core provides much greater protection against potential spills or moisture issues.
- Seal the Perimeter: After installation, apply a flexible, waterproof silicone sealant in the expansion gaps around the perimeter of the room and at all transitions before installing baseboards. This creates a final line of defense against moisture intrusion.
8. Open Shelving and Industrial Racking
For homeowners looking for practical and stylish ideas for finishing a basement on a budget, open shelving and industrial racking offer a fantastic solution. Instead of costly custom built-ins or traditional cabinetry, these systems provide ample storage while contributing to a modern, industrial-chic aesthetic. They are perfect for organizing everything from seasonal decor to workshop tools, turning storage into a design feature.
Why It Works for Basements
Basements often serve multiple functions, requiring versatile and adaptable storage. Industrial racking systems from brands like Gladiator or Husky are incredibly durable, easy to assemble, and far more affordable than constructing walls and closets. Their open design prevents the space from feeling closed-in and allows for easy access to stored items. This approach is ideal for creating designated zones for a home gym, workshop, or general storage without the expense of traditional construction.
Implementation Tips for a Professional Finish
To elevate the look of open shelving from purely utilitarian to intentionally stylish, focus on strategic organization and thoughtful details. Follow these steps for a polished and functional result:
- Curate and Organize: Don't just place items randomly. Use matching bins, baskets, or clear containers to group similar items. This creates a clean, cohesive look and reduces visual clutter.
- Secure for Safety: Always anchor tall or heavy-duty shelving units directly to the wall studs. Basements can have uneven floors, and securing the racks prevents tipping, which is a critical safety measure, especially in households with children.
- Create Visual Interest: Combine different materials, like wood planks on metal frames, to add warmth. You can also paint the shelving units to match your basement's color scheme, integrating them seamlessly into the overall design.
- Strategic Placement: Use shelving units as room dividers to define different areas in an open-concept basement. Place a unit between a play area and a media zone to create separation without building a wall.
9. Moisture Control and Waterproofing
Before any aesthetic improvements are made, one of the most critical ideas for finishing a basement on a budget is to establish robust moisture control. This foundational step involves using cost-effective solutions like sealers, dehumidifiers, and proper drainage to create a dry, healthy environment. Addressing water issues first prevents costly damage to new flooring, drywall, and furniture, safeguarding your entire investment.
Why It Works for Basements
Basements are naturally prone to dampness due to their below-grade location. Ignoring this reality can lead to mold, mildew, musty odors, and the eventual ruin of your finished space. By proactively waterproofing, you protect the structural integrity of your home and the health of its occupants. This non-negotiable step ensures the longevity of all subsequent finishing work, making it a smart, preventative investment.
Implementation Tips for a Professional Finish
Properly managing moisture is a multi-faceted task. Follow these essential steps to keep your basement dry and ready for finishing:
- Seal Concrete Surfaces: Thoroughly clean and dry concrete walls and floors, then apply a quality waterproof sealer like Drylok or RadonSeal. Fill any visible cracks with hydraulic cement or an appropriate epoxy filler before sealing to create an impermeable barrier.
- Invest in a Dehumidifier: A high-efficiency basement dehumidifier from a brand like Ivation or Santa Fe is essential, especially during humid seasons. It actively removes moisture from the air, preventing the damp conditions that allow mold to thrive.
- Manage Exterior Drainage: Ensure the ground around your foundation slopes away from the house. Clean gutters regularly and use downspout extenders to direct rainwater at least 5-10 feet away from the foundation.
- Conduct a Mold Check: During preparation, if you find any signs of mold, it's vital to address it immediately. Consult effective tips for removing mold from your basement to ensure the space is safe before you continue. For an in-depth guide on sealing walls, you can explore detailed steps on how to waterproof basement walls.
10. DIY Finishing and Staged Approach
One of the most effective strategies for finishing a basement on a budget involves tackling the project yourself and breaking it down into manageable phases. This DIY and staged approach allows you to spread costs over time, build skills progressively, and make adjustments as you see how you use the space. Instead of a single, massive upfront investment, you can methodically upgrade your basement as your budget and schedule permit.
Why It Works for Basements
Basements are ideal candidates for a phased, do-it-yourself renovation because the work can often be isolated from the main living areas, minimizing disruption. This approach transforms a daunting project into a series of achievable goals. You can start with foundational tasks like waterproofing and framing, then move on to flooring, and finish with cosmetic details months or even years later. By doing the labor yourself, you can reallocate funds that would have gone to a contractor toward higher-quality materials or tools that you can use for future projects.
Implementation Tips for a Professional Finish
Successfully managing a DIY basement project requires planning and patience. Follow these steps to ensure a smooth, cost-effective process:
- Start Small to Build Confidence: Begin with simpler tasks like painting concrete walls or installing peel-and-stick flooring. Completing these smaller projects will provide valuable experience and the motivation to tackle more complex jobs.
- Prioritize Functionality: Focus on projects that add immediate usability first. This might mean framing and insulating one room to create a usable home office or gym before finishing the entire space.
- Invest in Quality Tools: While it seems counterintuitive for a budget project, investing in good tools pays off. A quality miter saw or power drill will deliver better results and can be used for countless other home projects, saving you rental or labor costs in the long run.
- Know When to Call a Pro: For specialized tasks like complex electrical wiring or major plumbing work, hiring a licensed professional is essential for safety and code compliance. Budget for this from the start. For more guidance on what you can handle, explore our resources on DIY basement renovations.
10 Budget Basement Finishes Compared
| Paint and Primer Combo | Low — basic prep and roll/brush | Minimal tools (rollers, brushes), product cost $50–150 | Quick visual refresh; moderate coverage; won’t hide major defects | Budget refreshes, DIY basement updates, rentals | Most economical; fast application; wide color selection |
| Unfinished Drywall Installation | Low — simple fastening, no finishing | Drywall sheets, screws/nails, basic tools; $1–2/ft² (materials) | Functional enclosed space with raw appearance; adds fire/sound resistance | Storage, utility rooms, phased finishing plans | Low labor cost; quick enclosure; allows future finishing |
| Concrete Floor Sealing and Staining | Low–Moderate — surface prep critical | Sealers/stains, prep supplies, ventilation; $100–300 | Durable, easy-clean floor with modern aesthetic; 5–10 year life | Garage conversions, modern/industrial basements, DIY floors | Budget-friendly; preserves existing slab; long-lasting finish |
| Peel-and-Stick Wall Panels | Low — peel, align, and apply | Panels, squeegee, measuring tools; $50–200 | Decorative, removable finish; visible seams; limited moisture resistance | Rentals, accent walls, temporary makeovers | Fast install; renter-friendly; wide style options |
| Reclaimed or Salvaged Materials | Moderate–High — sourcing and restoration | Sourcing time, restoration tools, variable cost ($0.50–3/board ft) | Unique, vintage character; sustainable; quality varies | Rustic or industrial designs, eco-focused projects | Low material cost; unique aesthetics; environmentally responsible |
| Suspended / Drop Ceiling Installation | Moderate — grid and tile installation | Grid, tiles, basic tools; $1–3/ft² | Conceals utilities; accessible plenum; modest finished look | Basements needing utility access, offices, standard finishes | Hides systems, replaceable tiles, improves acoustics |
| Laminate Flooring | Low–Moderate — click-lock or glue-down | Planks, underlayment/moisture barrier, tools; $1–3/ft² | Hardwood-like appearance; durable; moisture-resistant options | Budget living spaces, DIY basement floors | Affordable, easy DIY install, wide style selection |
| Open Shelving & Industrial Racking | Low — assemble and place | Modular metal units, anchors, $200–500 for typical setup | Functional, exposed storage; industrial aesthetic | Workshops, storage-focused basements, industrial decor | Very affordable vs cabinetry; flexible; heavy-duty |
| Moisture Control & Waterproofing | Moderate–High — assessment and solutions | Sealers, dehumidifier, sump pump/French drain; $200–1,000+ | Reduces water damage and mold; protects finishes and air quality | Any basement prior to finishing; high-moisture sites | Essential foundation for finishes; prevents costly damage |
| DIY Finishing & Staged Approach | Variable — depends on scope and skill | Time, tools, phased materials; potential 30–50% labor savings | Gradual, customizable finish; quality varies with skill | Budget-conscious homeowners, phased renovations | Spreads cost over time; customizable; significant labor savings |
Bring Your Budget to Life
Finishing your basement doesn't have to be a financially daunting project that drains your savings. As we've explored, a wealth of creative and cost-effective strategies can transform that underutilized space into a vibrant, functional, and valuable part of your home. The key to success lies not in having an unlimited budget, but in making smart, strategic choices that maximize every dollar. This journey is about prioritizing function, embracing savvy material selections, and understanding where your DIY efforts can truly shine.
By focusing on high-impact, low-cost solutions, you can achieve a remarkable transformation. Remember, a finished basement is more than just extra square footage; it's a new opportunity for your home to grow with your family’s needs, whether that means creating a cozy family room, a productive home office, or a dedicated play area for the kids. The ideas for finishing a basement on a budget we've detailed are designed to be your blueprint, guiding you from a concrete shell to a comfortable living area.
Your Blueprint for a Budget-Friendly Basement
Let’s recap the core principles that will make your project a resounding success. These takeaways are the foundation of a smart and affordable basement renovation:
- Foundation First: Never skip the fundamentals. Proper moisture control and waterproofing are non-negotiable first steps. Addressing potential water issues before you install a single wall or floor will save you thousands in future repairs and protect your investment.
- Embrace Smart Surfaces: Your choices for walls and floors have the biggest impact on your budget. High-value options like a paint and primer combo on concrete walls, sealing and staining concrete floors, or installing durable laminate flooring provide a finished look without the high price tag of traditional materials.
- DIY Where It Counts: Taking on tasks like painting, installing peel-and-stick panels, or assembling open shelving can drastically cut labor costs. However, it's equally important to recognize when to call in professionals, especially for complex electrical, plumbing, or structural work. A staged, hybrid approach often yields the best results.
Actionable Next Steps to Get Started
Feeling inspired? It’s time to move from planning to action. The most crucial step you can take right now is to create a realistic plan tailored to your specific space and financial situation.
Assess and Prioritize: Walk through your basement with a critical eye. Identify any moisture problems, map out your desired layout, and decide which functions are most important to you and your family.
Build Your Budget: Create a detailed spreadsheet. Research the costs for your chosen materials, get quotes for any professional labor you might need, and always add a 10-15% contingency fund for unexpected expenses.
Create a Phased Timeline: You don't have to finish everything at once. Break the project down into manageable stages. Perhaps you start with waterproofing and framing this year, and tackle the flooring and finishing touches next year.
Ultimately, mastering these budget-friendly basement finishing ideas empowers you to unlock your home's hidden potential. It’s an investment not just in your property value, but in your quality of life. By being resourceful, planning meticulously, and combining your own hard work with expert help where needed, you can create a beautiful, functional space that you and your family will enjoy for years to come, all without breaking the bank.
Ready to turn your vision into a reality with professional guidance? The team at Northpoint Construction specializes in transforming basements across Orem, Provo, Lehi, American Fork, and Saratoga Springs, blending quality craftsmanship with budget-conscious solutions. Contact us today to discuss your project and discover how we can help you build the basement of your dreams.