

10 Inexpensive Ways to Finish Basement Spaces in 2026
That unfinished basement represents a world of opportunity: a future home theater, a spacious playroom, a home gym, or a valuable guest suite. But the thought of high renovation costs can be daunting, often stopping homeowners from capitalizing on this valuable square footage. The good news is that creating a functional and inviting lower level doesn't have to drain your savings. This guide is designed to explore 10 practical and inexpensive ways to finish basement spaces, focusing on smart material choices, strategic DIY projects, and clever design hacks that deliver maximum impact for a minimal investment.
Whether you're a homeowner in Orem, Provo, or Lehi looking to expand your living area, these actionable ideas will help you transform your concrete cavern into a cherished part of your home without breaking the bank. We will cover everything from foundational work like moisture control and framing to the final aesthetic touches with flooring and lighting. For additional strategies on undertaking home improvements without breaking the bank, a realtor's playbook offers insights into how to renovate a house on a budget, focusing on high-impact, low-cost cosmetic improvements.
Our goal is to provide a comprehensive roadmap, helping you decide where you can save with a hands-on approach and when it might be wise to call in a professional like Northpoint Construction to ensure the job is done right, meeting all local codes and safety standards. Let's unlock the hidden potential beneath your feet.
1. DIY Framing and Drywall Installation
Tackling the framing and drywall installation yourself is one of the most impactful, inexpensive ways to finish your basement. Labor typically represents 40-60% of a professional finishing project's total cost. By taking on this phase, you convert your own time and effort directly into significant savings, freeing up your budget for other essential finishes like flooring or lighting. This approach involves building the wooden or metal stud framework that defines your new rooms and then hanging, taping, and mudding the drywall panels to create smooth, paint-ready walls.
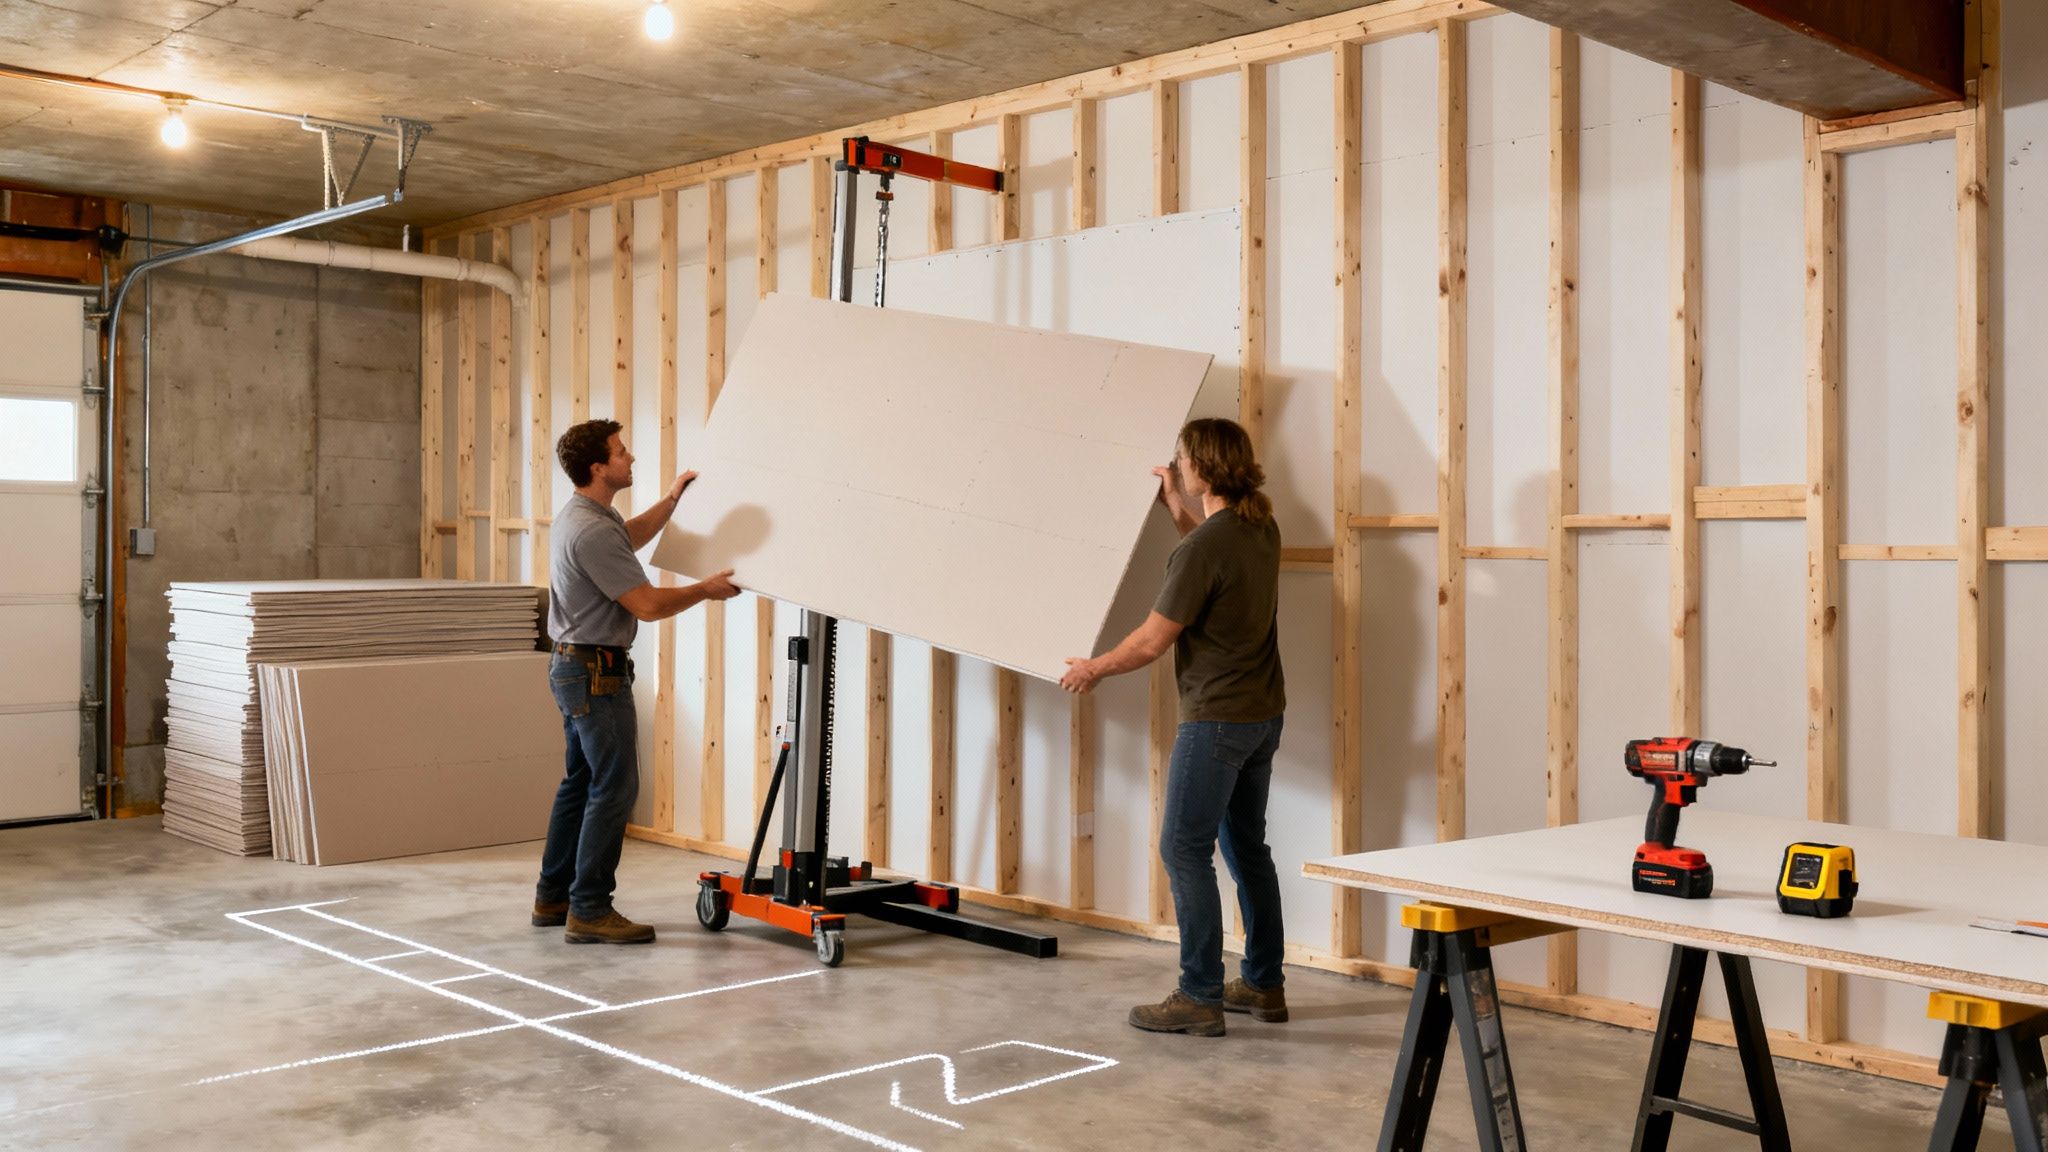
While it demands physical effort and a willingness to learn, this task is well within the reach of a determined DIYer. We've seen homeowners in Orem and Lehi successfully create beautiful, functional playrooms and home offices by framing and drywalling the space themselves over a few weekends. It's a foundational step that makes the project feel real and provides immense satisfaction.
How to Get Started
Proper planning and the right tools are crucial for a professional-looking result. Before you buy any materials, create a detailed floor plan. Mark out where your walls will go, accounting for doorways, electrical outlets, and any plumbing.
Actionable Tips for Success:
- Rent a Drywall Lift: This tool is a game-changer, especially for ceilings. It holds heavy panels in place securely, making the job safer and manageable for just one or two people.
- Invest in Good Tools: A quality screw gun, a sharp utility knife, and a reliable stud finder are non-negotiable. Using chalk lines will ensure your wall layouts are perfectly straight.
- Study the Pros: Watch several high-quality video tutorials on framing and drywall finishing. Pay close attention to techniques for taping and applying joint compound (mud) to achieve seamless joints.
- Be Patient with Mudding: The key to invisible seams is applying multiple thin coats of joint compound, not one thick one. Allow each coat to dry completely before sanding and applying the next. This step cannot be rushed.
By handling this critical stage, you not only save a substantial amount of money but also gain complete control over the layout and quality of your basement's foundation.
2. Unfinished Concrete Floors with Epoxy Coating
Instead of installing costly traditional flooring, embracing the existing concrete and enhancing it with an epoxy coating is a brilliant and inexpensive way to finish your basement floor. Epoxy creates a durable, seamless, and often high-gloss surface that is remarkably resilient to moisture, stains, and heavy use. This approach transforms a cold, utilitarian slab into a polished, modern-looking floor, saving you a significant portion of the finishing budget that would otherwise go toward materials like tile, carpet, or vinyl plank.
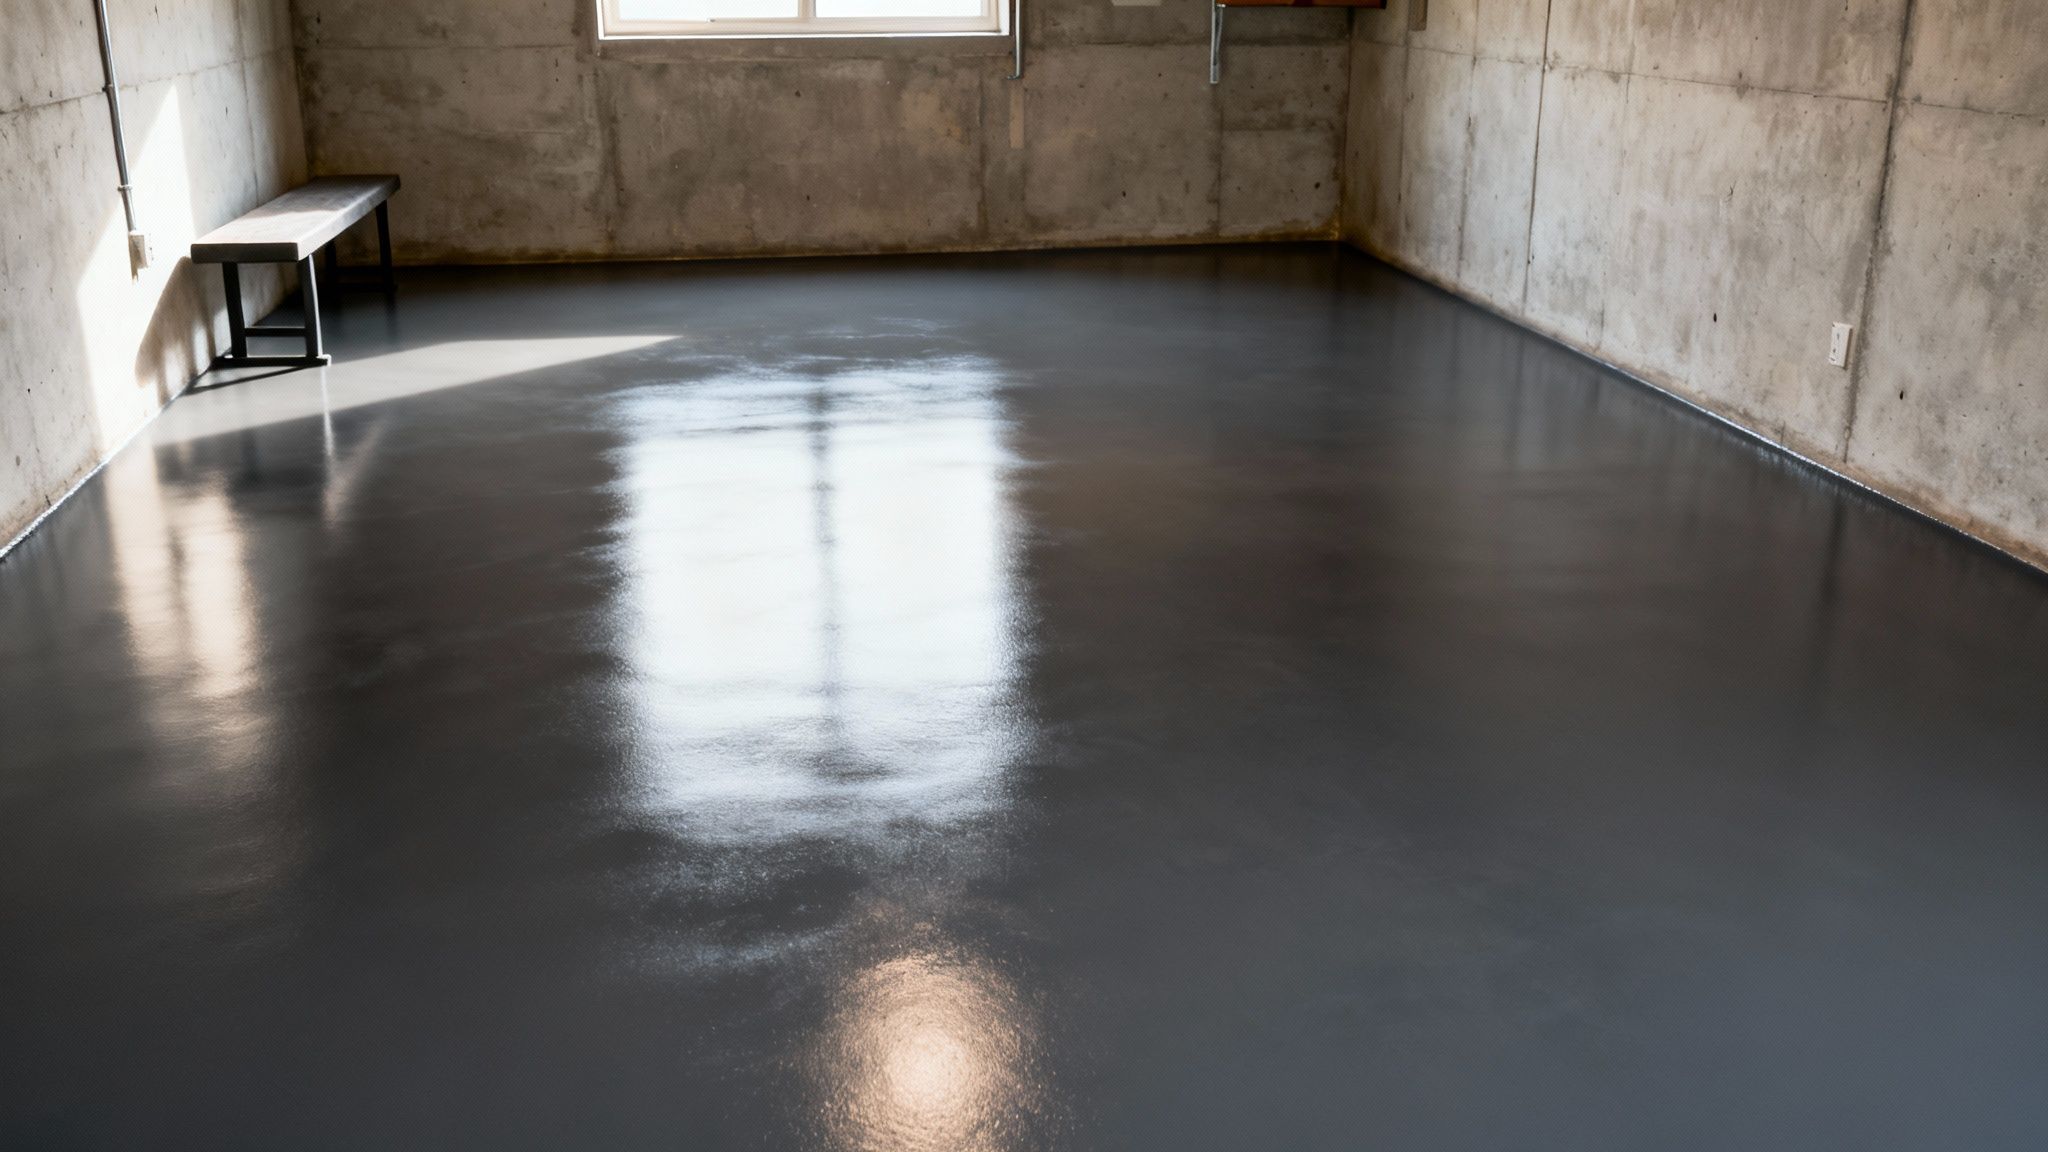
This flooring solution is particularly effective in Utah basements where mitigating moisture is a priority. We have seen homeowners in the Provo area use metallic epoxy to create stunning, durable floors for home gyms and workshops that are easy to clean and maintain. It's a practical yet stylish choice that provides a high-end look without the associated cost, making it perfect for utility spaces, playrooms, or modern living areas. Explore our detailed guide to discover more floor finishes for basements.
How to Get Started
Success with epoxy flooring hinges on meticulous preparation of the concrete surface. The concrete must be completely clean, dry, and porous for the epoxy to bond permanently. Any existing cracks or pits should be repaired before you begin the coating process.
Actionable Tips for Success:
- Prepare the Concrete Properly: The most critical step is cleaning and etching the concrete. Use a concrete degreaser and then an etching solution (like muriatic acid or a safer alternative) to open up the pores of the concrete for a strong bond.
- Test for Moisture: Before applying, tape a small plastic square to the floor for 24 hours. If condensation forms underneath, you may need to apply a moisture-vapor barrier primer first.
- Choose the Right Epoxy: For areas that might get wet, such as a basement laundry room, select an epoxy with an anti-slip additive for safety.
- Apply Thin, Even Coats: Use a roller with a proper nap to apply multiple thin coats rather than one thick one. This prevents bubbles and ensures a smooth, uniform finish. Always allow adequate drying time between coats as specified by the manufacturer.
By leveraging your existing concrete slab, this method provides a tough, attractive floor that stands up to the unique challenges of a basement environment while saving you a fortune.
3. Suspended Ceiling Installation
Opting for a suspended ceiling, also known as a drop ceiling, is a classic and highly practical, inexpensive way to finish your basement. Instead of attaching drywall directly to the joists, this method involves installing a lightweight metal grid that hangs below the structural ceiling. Acoustic or vinyl tiles are then simply dropped into place. This approach is significantly cheaper and faster than traditional drywall ceilings, saving you money on both materials and intensive labor like mudding and sanding.
The primary benefit is unparalleled access to your home's infrastructure. Need to run a new wire or fix a leaky pipe? Just lift a tile. This is why we often see commercial property managers in Provo and American Fork use this system for tenant improvements. For homeowners, it means future repairs or upgrades won't require costly and messy demolition of a finished ceiling, providing long-term savings and convenience.
How to Get Started
A successful suspended ceiling installation begins with meticulous layout planning. You'll need to establish a level line around the perimeter of the room to guide your grid placement. Carefully measure the space to ensure a symmetrical layout for the tiles, which prevents awkward, thin tile cuts along visible edges.
Actionable Tips for Success:
- Choose the Right Tiles: Basements can be prone to moisture. Select moisture- and mold-resistant tiles to prevent sagging, staining, and potential health issues down the road.
- Plan for Fixtures: Before installing the grid, map out locations for lights, vents, and speakers. When considering options for your ceiling, especially with limited vertical space, it's worth exploring specialized fixtures like hugger ceiling fans that mount flush.
- Use a Laser Level: A laser level is invaluable for establishing a perfectly level line for the perimeter wall angle. This ensures your entire grid system is straight and professional-looking.
- Check Local Codes: Ensure you leave adequate clearance around mechanical elements like HVAC ducts and furnace flues as required by local building codes.
With a wide variety of modern tile styles available, a suspended ceiling can be both a smart financial choice and a sleek design element for your finished basement. You can learn more about the different basement ceiling options to find the perfect fit for your project.
4. Reclaimed and Recycled Materials
Using reclaimed wood, salvaged fixtures, and recycled materials is a fantastic, inexpensive way to finish your basement that also injects unique character and history into the space. Instead of buying everything new, this approach involves sourcing materials from demolition projects, salvage yards, and online marketplaces. This sustainable choice not only slashes material costs but also adds a distinctive charm that brand-new items often lack, making your basement truly one-of-a-kind.
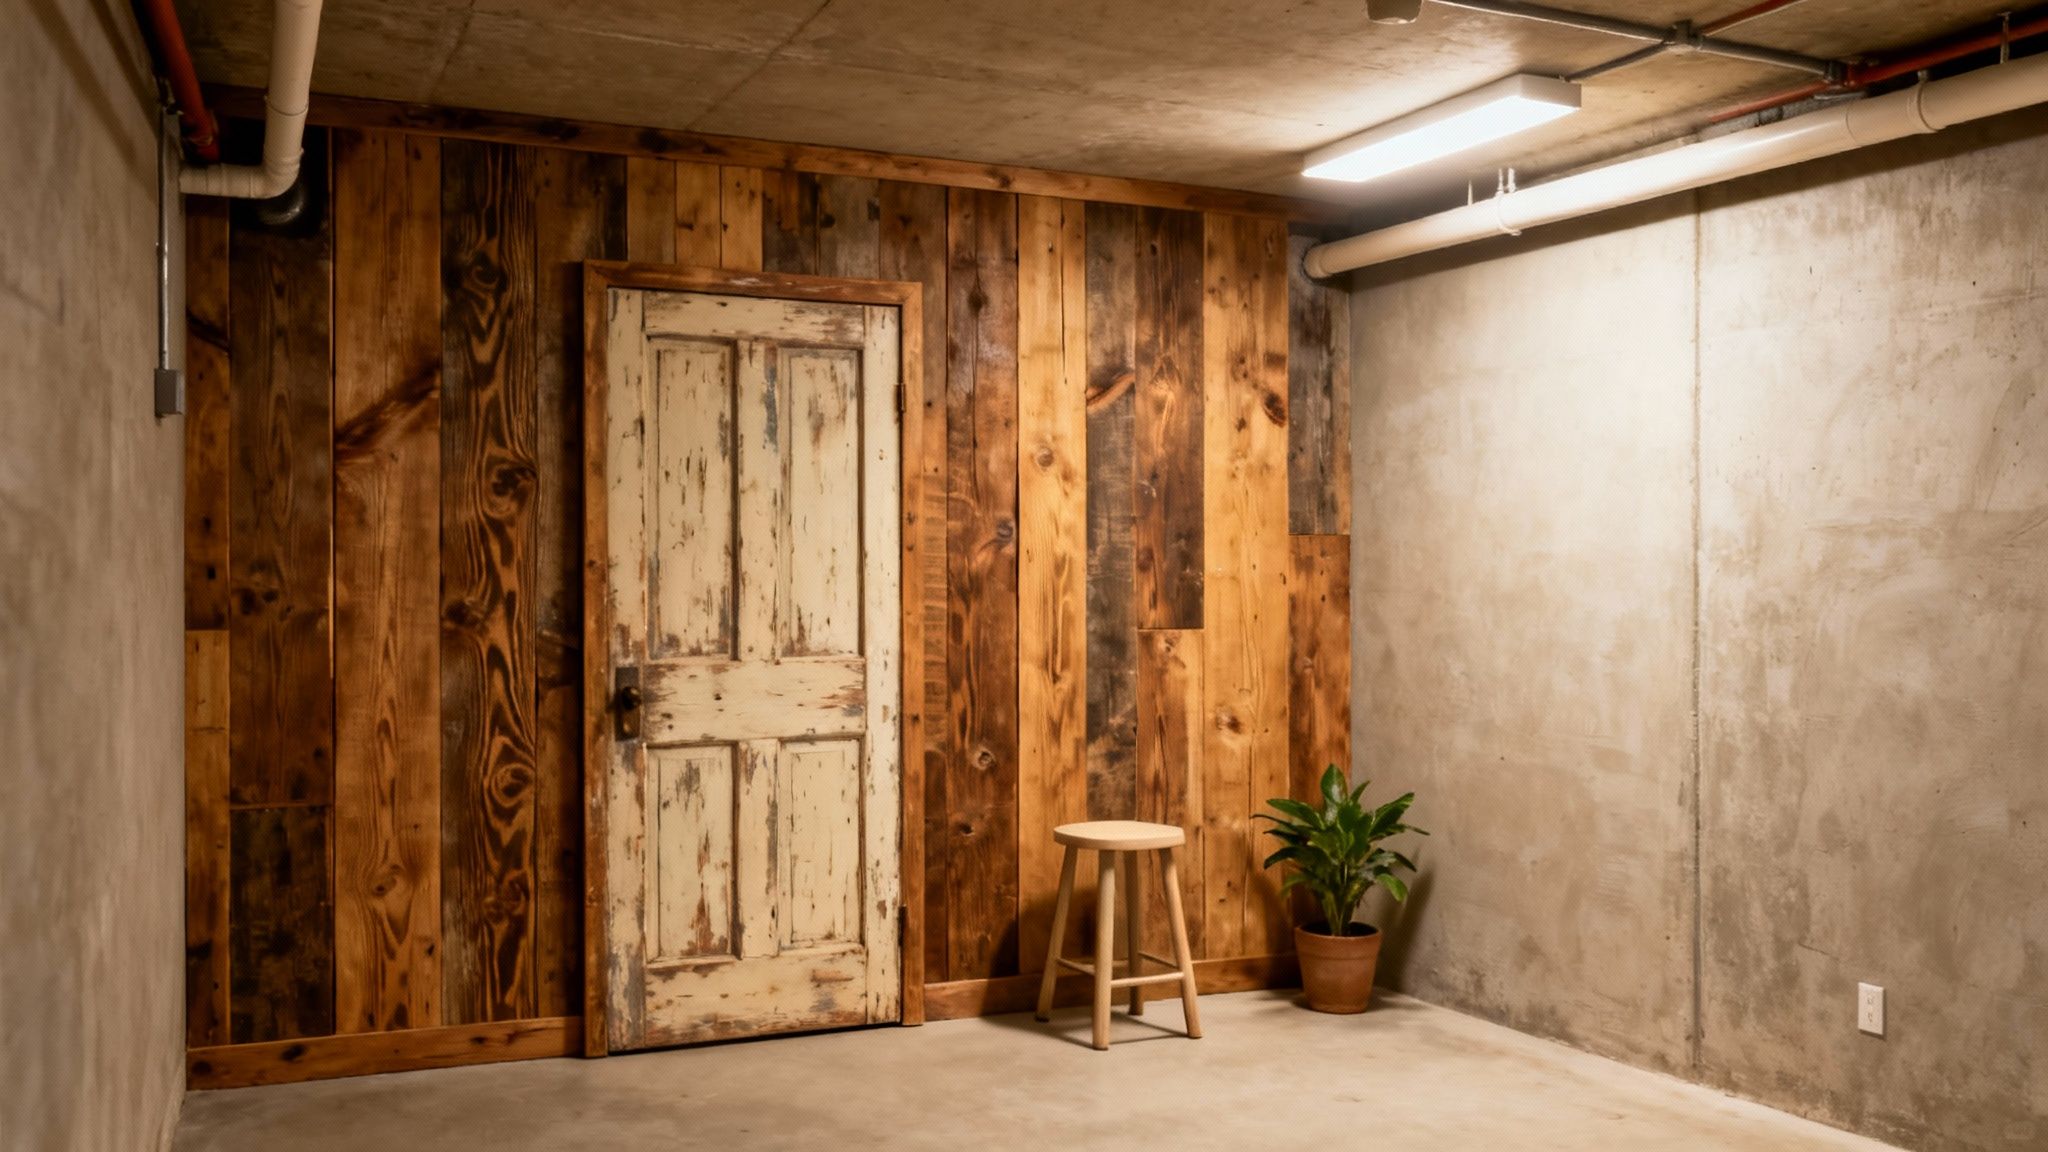
This method is perfect for homeowners who appreciate rustic, industrial, or eclectic aesthetics. We've seen resourceful Orem homeowners create stunning basement bars with reclaimed barn wood, and Provo landlords use salvaged brick to build captivating accent walls. The active Utah real estate market means there is a steady supply of these materials, turning your budget-conscious project into an eco-friendly and stylish statement.
How to Get Started
Begin by defining your basement's style, which will guide your hunt for materials. Are you looking for rustic wood beams, vintage light fixtures, or unique doors? With a clear vision, you can start exploring local resources to find the perfect pieces for your project.
Actionable Tips for Success:
- Scour Local Sources: Regularly check local salvage yards, Facebook Marketplace, and Craigslist. Building relationships with demolition companies can also give you early access to high-quality materials.
- Inspect Everything Thoroughly: Before purchasing, carefully examine materials for structural integrity, water damage, pests, and potential hazards like lead paint or old nails.
- Plan for Restoration: Salvaged items often require cleaning, sanding, or refinishing. Factor this extra time and the cost of supplies like sandpaper or sealant into your overall project plan.
- Buy Extra Material: Unlike products from a big-box store, you can't just go back for more of the same reclaimed item. Always purchase more than you think you’ll need to account for mistakes or unusable sections.
Embracing reclaimed materials is a creative strategy to save money and infuse your basement with personality and sustainable design.
5. Partition Walls and Open Floor Plans
Embracing an open floor plan or using strategic partition walls is a brilliant, inexpensive way to finish your basement. Instead of building a complex layout with numerous rooms, this approach minimizes material and labor costs associated with extensive framing and drywall. It creates a flexible, multi-functional space that feels larger and can be adapted over time, allowing you to finish the basement in affordable stages rather than all at once.
This method focuses on finishing the perimeter walls, ceiling, and floor, leaving the central area open or divided by simple, non-load-bearing partitions. We’ve seen homeowners in Saratoga Springs and American Fork create incredible entertainment zones and flexible guest suites using this philosophy. The modular approach allows them to enjoy a finished area now while leaving room to add a bedroom or office later without a major demolition project.
How to Get Started
Begin by visualizing how you will use the space and identifying distinct zones for different activities. The key is to create separation without building full walls everywhere. Think about how furniture placement, area rugs, and lighting can delineate a home theater area from a children's play space or a home gym.
Actionable Tips for Success:
- Define Zones without Walls: Use large area rugs to anchor a seating area, arrange a sofa as a visual divider, or install distinct lighting fixtures over each "zone" to create separation in an open-concept layout.
- Consider Flexible Partitions: Sliding barn doors or even heavy curtains on a ceiling track can close off a space when needed for privacy but open up to maintain a spacious feel.
- Plan Utilities for the Future: Even if you opt for an open plan now, map out where future walls, electrical outlets, and plumbing might go. Running the necessary wiring or rough-in plumbing during the initial phase is far cheaper than opening up walls later.
- Manage Acoustics: Open spaces can be noisy. Incorporate soft materials like rugs, upholstered furniture, and acoustic wall panels to absorb sound and prevent echoes, making the space more comfortable.
By minimizing interior walls, you not only reduce upfront costs significantly but also gain a versatile basement that can evolve with your family’s changing needs, making it one of the smartest and most inexpensive ways to finish your basement.
6. Budget Lighting and Electrical Planning
Strategic electrical and lighting planning is a massively overlooked but highly effective method for an inexpensive basement finish. Instead of treating wiring and fixtures as an afterthought, integrating this planning into the earliest stages of your project can dramatically reduce material and labor costs. This approach involves thoughtfully mapping out outlet and switch locations to minimize complex wiring runs, choosing energy-efficient fixtures, and leveraging existing circuits where safely possible, all before a single stud is put in place.
This foresight prevents costly rework, like cutting into freshly installed drywall to add a forgotten outlet. We've seen homeowners in Orem and Provo significantly cut their electrical budget by planning layouts that group outlets logically and using cost-effective LED lighting. Proper planning not only saves money upfront but also lowers long-term energy bills, making it one of the smartest inexpensive ways to finish your basement.
How to Get Started
Begin by drawing your electrical plan directly onto your basement floor plan. Walk through the space and visualize how you'll use each area. Think about where furniture will go, where you’ll need task lighting for a desk or workshop, and where you’ll want ambient light. This map becomes the blueprint for your electrician or your own DIY wiring work.
Actionable Tips for Success:
- Map Everything Before Framing: Finalize the location of every single switch, outlet, and light fixture before the first 2x4 is installed. This is the single most important step for avoiding expensive changes later.
- Embrace Recessed LEDs: Canless, "puck" style LED lights are affordable, incredibly energy-efficient, and easy to install. They provide a clean, modern look and excellent light distribution without the bulk of traditional fixtures.
- Plan for the Future: It costs very little to add an extra outlet or two during the initial wiring phase. Consider adding outlets in closets or unfinished storage areas for future flexibility.
- Install Dimmer Switches: Dimmers are a low-cost upgrade that provides significant value. They allow you to control the ambiance of a room and reduce energy consumption, extending the life of your LED bulbs.
Careful electrical planning is the secret to creating a well-lit, functional, and safe basement without blowing your budget on electrician fees and last-minute changes.
7. Painted Concrete Walls and Masonry Sealing
Forgoing traditional framing and drywall in favor of treating the existing concrete is one of the most direct and inexpensive ways to finish a basement. This approach involves thoroughly cleaning, sealing, and painting your foundation walls, transforming them from a raw, industrial surface into a clean, finished, and intentionally styled backdrop. Sealing the concrete first with a quality masonry sealer provides a critical moisture barrier, which is essential in Utah's climate, while a durable concrete paint adds color and personality.
This method is not just a budget-saver; it’s a design choice that embraces a modern, industrial-chic aesthetic. We've seen homeowners in Lehi and Saratoga Springs use this technique to create stylish home gyms, workshops, and utility areas where durability and moisture resistance are key. It’s an incredibly efficient way to make a space feel complete without the cost and labor of building out new walls.
How to Get Started
Proper surface preparation is the most critical factor for a lasting, professional-quality finish. Before you even think about paint, you must address any moisture issues and create a pristine surface for the sealer and paint to adhere to. Any cracks or leaks must be repaired first.
Actionable Tips for Success:
- Clean and Etch: Thoroughly clean the concrete walls with a stiff brush and a concrete cleaner to remove dirt, grime, and any efflorescence (white, salty deposits). Etching the concrete with an appropriate solution can improve paint adhesion.
- Seal First, Then Prime: Apply a high-quality interior masonry waterproofer or sealer. This is your primary defense against moisture wicking through the concrete. Once cured, use a primer specifically formulated for concrete or masonry.
- Use the Right Paint: Don't use standard interior wall paint. Invest in a durable epoxy-based or acrylic latex paint designed for concrete floors and walls. It will stand up to the unique conditions of a basement environment.
- Ventilate Properly: Sealers, primers, and concrete paints can have strong fumes. Ensure the area is well-ventilated during and after application by using fans and opening any available windows.
By properly sealing and painting your concrete walls, you create a bright, clean, and moisture-resistant space for a fraction of the cost of drywall, making it a brilliant choice for a budget-conscious basement project.
8. Minimal or No Insulation Strategy with Climate Control Planning
For a truly budget-focused project, strategically reducing or forgoing extensive insulation is a powerful way to lower upfront costs. While conventional wisdom suggests insulating all basement walls, this isn't always necessary, especially depending on the intended use of the space. In Utah's unique climate, the earth provides a significant amount of natural insulation. By focusing on critical air sealing and smart HVAC planning, you can maintain a comfortable environment without the major expense of fully insulating every wall, a key consideration for those seeking inexpensive ways to finish a basement.
This approach trades the material and labor costs of full insulation for a more thoughtful plan. It involves identifying and sealing major sources of heat loss, like rim joists, and using your existing climate control system more effectively. We've seen homeowners in Provo and American Fork create comfortable workshops, storage areas, or seasonal-use rooms by adopting this minimal strategy, reserving their budget for finishes that have a greater day-to-day impact. It’s about working smarter, not just harder, to achieve a functional finished space.
How to Get Started
The key is to prioritize sealing air leaks and managing moisture, which have a bigger impact on comfort than temperature transfer through concrete walls. Begin by meticulously inspecting your basement's perimeter, especially where the wood framing of the house meets the concrete foundation.
Actionable Tips for Success:
- Seal the Rim Joists: This is the most critical step. The rim joist area is a major source of air infiltration. Use rigid foam board cut to size and sealed with spray foam or caulk to completely stop drafts.
- Install a Moisture Barrier: Even without full insulation, a plastic vapor barrier against the concrete walls is essential to prevent moisture from entering your finished space and damaging drywall or framing.
- Plan HVAC Strategically: Work with an HVAC professional to ensure your ductwork includes supply and return vents in the basement. Good air circulation is vital for maintaining a consistent temperature and managing humidity.
- Consider the Intended Use: A home gym or workshop doesn't require the same thermal comfort as a bedroom. Tailor your insulation strategy to how the space will actually be used to avoid unnecessary spending.
- Insulate Exposed Pipes: If you have water pipes running along exterior walls, make sure to insulate them to prevent freezing in the winter, regardless of your overall wall insulation plan.
By focusing on these high-impact, low-cost steps, you can create a comfortable, usable basement without the significant expense of a full insulation package.
9. Laminate or Vinyl Plank Flooring Over Concrete
Choosing the right flooring is a critical step, and opting for waterproof laminate or luxury vinyl plank (LVP) is a fantastic, inexpensive way to finish your basement. These modern materials offer the warm, high-end look of hardwood or tile at a fraction of the cost and are specifically engineered to handle the unique challenges of a below-grade environment. Unlike traditional hardwood, which can warp with moisture, LVP and waterproof laminate are stable, durable, and easy to clean, making them a practical and stylish choice.
The primary cost saving comes from both the material price and the simplified installation. These flooring systems are designed to be "floated" directly over a properly prepared concrete slab, which dramatically reduces subfloor preparation costs. We've seen homeowners in Saratoga Springs and Provo transform damp, cold concrete into inviting living spaces using LVP, creating durable, family-friendly surfaces perfect for playrooms or entertainment areas.
How to Get Started
Proper preparation of your concrete slab is the most important step for a successful and long-lasting installation. The floor must be clean, dry, and level before you begin laying any planks. Address any cracks or significant low spots with a concrete patch or self-leveling compound first.
Actionable Tips for Success:
- Prioritize a Moisture Barrier: Before installation, ensure your concrete is sealed. Then, use an underlayment that includes an integrated moisture barrier for an extra layer of protection against dampness.
- Choose Click-Lock Systems: Opt for flooring with a click-lock or tongue-and-groove system. This makes the installation a straightforward DIY project that doesn't require messy adhesives or specialized tools.
- Acclimate the Product: Let the unopened boxes of flooring sit in your basement for at least 48 hours. This allows the planks to adjust to the room's specific temperature and humidity, preventing future buckling or gapping.
- Leave an Expansion Gap: You must leave a small gap (typically 1/4 inch) between the flooring and all walls and permanent fixtures. This allows the floor to expand and contract naturally with temperature changes. Baseboards will cover this gap for a clean finish.
By selecting LVP or waterproof laminate, you get a beautiful, resilient floor that is well-suited for basement life without straining your budget.
10. Phased Finishing Approach Over Multiple Seasons
One of the most practical and inexpensive ways to finish your basement is to break the project into manageable phases over several seasons or even years. Instead of needing a large, upfront investment, this strategy allows you to fund the project as your budget allows. You can complete one section at a time, paying with cash and avoiding interest from large loans. This method transforms a daunting, costly endeavor into a series of achievable, budget-friendly mini-projects.
Spreading out the work reduces financial stress and minimizes disruption to your daily life. We've seen Orem families finish a much-needed playroom in the first year and then tackle a guest bedroom and bathroom the following year. This incremental progress makes the project feel less overwhelming and allows you to enjoy the benefits of each completed space much sooner.
How to Get Started
A successful phased approach hinges on a comprehensive master plan created at the very beginning. Before any construction starts, design the layout for the entire basement. This ensures that electrical, plumbing, and HVAC systems installed in phase one are sufficient to support all future phases, preventing costly rework down the line.
Actionable Tips for Success:
- Plan Utilities for the Future: During phase one, rough-in the plumbing and electrical for the entire basement, even for areas you won't finish for years. Capping off pipes and wires is far cheaper than opening up finished walls later.
- Prioritize High-Impact Areas: Start with the room that will provide the most value to your family, like a home office or a recreation room. This immediate payoff provides motivation to continue with subsequent phases.
- Protect Finished Spaces: As you begin a new phase, carefully seal off completed areas with plastic sheeting to protect them from construction dust and damage.
- Budget for Price Changes: Be aware that material and labor costs may increase over time. Factor in a small contingency for inflation in your budget for later phases. A well-planned, phased approach to basement finishing is a smart financial strategy.
This method gives you ultimate control over your budget and timeline, making a finished basement an attainable goal without the financial strain of a single, massive project.
10 Budget Basement Finishes Compared
| DIY Framing and Drywall Installation | Moderate–high skill; time-intensive | Lumber, drywall, finishing tools, possible rentals | Fully finished walls with personalized layout | Homeowners wanting to cut labor costs and customize space | Large labor savings; customizable; learn-as-you-go |
| Unfinished Concrete Floors with Epoxy Coating | Low–moderate; surface prep critical | Epoxy kit, grinder/etch tools, safety gear | Seamless, durable, moisture-resistant floor | Home gyms, utility rooms, rental basements | Cost-effective, low maintenance, professional look |
| Suspended Ceiling Installation | Low; straightforward modular install | Grid system, ceiling tiles, basic tools | Accessible, concealed utilities with replaceable tiles | Basements needing utility access or sound control | Affordable, easy access, quick installation |
| Reclaimed and Recycled Materials | Moderate; sourcing and restoration needed | Salvaged wood/fixtures, restoration supplies | Unique, characterful finishes with variable consistency | Eco-minded homeowners, vintage or rustic designs | Cost savings, sustainability, one-of-a-kind aesthetics |
| Partition Walls and Open Floor Plans | Low–moderate; non-load-bearing framing | Lightweight framing, minimal finishes | Flexible zones; staged finishing possible | Large basements, phased projects, rental flexibility | Lower upfront cost, adaptable layout, easy future changes |
| Budget Lighting and Electrical Planning | Moderate; requires planning or electrician | LED fixtures, wiring, panels, planning time | Efficient lighting, lower long-term utility costs | Any finishing project where costs and energy matter | Reduced energy bills, fewer reworks, code compliance |
| Painted Concrete Walls and Masonry Sealing | Low; simple prep and application | Masonry sealer, concrete paint, repair materials | Moisture-protected, finished industrial look | Utility spaces, industrial-style basements, rentals | Fast, very budget-friendly, DIY-friendly |
| Minimal or No Insulation Strategy with Climate Control Planning | Moderate; needs analysis and sealing | Rim-joist seals, selective insulation, HVAC planning | Reasonable comfort with reduced insulation costs | Seasonal spaces, storage, some commercial uses | Big material/labor savings; faster completion |
| Laminate or Vinyl Plank Flooring Over Concrete | Low; DIY-friendly with prep | LVP/laminate, underlayment with moisture barrier | Warm, water-resistant flooring with varied looks | Family rooms, rentals, budget-conscious finishes | Affordable, quick install, wide style options |
| Phased Finishing Approach Over Multiple Seasons | Low complexity per phase; long timeline | Standard finishing materials staged over time | Gradual completion with managed budget impact | Homeowners with limited capital or time | Spreads cost, allows learning and adjustments |
Bringing Your Vision to Life: Your Next Steps
Transforming a cold, concrete basement into a warm, functional living area doesn't have to drain your savings. As we've explored, the journey to a finished lower level is paved with smart choices, creative solutions, and a healthy dose of strategic planning. The key is to shift your perspective from simply "finishing" the space to "finishing it smartly." This approach, focusing on inexpensive ways to finish basement spaces, is not about cutting corners but about making intelligent investments of both time and money.
By embracing a blend of DIY spirit and professional expertise, you can achieve a result that adds immense value, comfort, and utility to your home. Whether it's the industrial-chic appeal of an epoxy-coated concrete floor or the practical flexibility of a suspended ceiling, each method we've discussed offers a pathway to a beautiful and budget-conscious renovation.
Recapping Your Budget-Friendly Toolkit
Let’s quickly revisit the core strategies that form the foundation of an affordable basement transformation:
- Embrace the Unfinished Aesthetic: Techniques like painting concrete walls and sealing concrete floors with epoxy prove that you don't need to cover every surface to create a stylish, complete look. This minimalist approach saves significantly on materials and labor.
- Prioritize Function Over Form (Initially): An open-concept layout or simple partition walls provide immediate utility without the high cost of framing out multiple individual rooms. You can always add more complex divisions later as your needs and budget evolve.
- Leverage DIY for High-Impact, Low-Risk Tasks: Projects like installing laminate plank flooring, painting, or assembling reclaimed wood features are well within the reach of a determined homeowner. Taking on these tasks yourself directly slashes labor costs, which often constitute the largest part of a renovation budget.
- Plan in Phases: The "Phased Finishing Approach" is perhaps the most powerful tool for managing costs. By breaking the project into manageable stages (e.g., waterproofing first, then framing, then electrical), you can fund your renovation over time without taking on debt or overwhelming your finances.
The Most Crucial Takeaway: A Dry Foundation is Non-Negotiable
If there is one piece of advice to highlight above all others, it's this: ensure your basement is completely dry before you begin. All the budget-friendly flooring, drywall, and paint in the world will be wasted if moisture intrusion leads to mold, mildew, and rot. Investing in proper sealing, a quality dehumidifier, and addressing any exterior grading issues is the most important first step. For homeowners in the Orem, Provo, and Lehi areas, where seasonal moisture can be a factor, this is especially critical.
Key Insight: The cheapest renovation is the one you only have to do once. Prioritizing moisture control from the outset protects your investment and ensures the long-term health and stability of your new living space.
Your Actionable Path Forward
Feeling inspired? Here’s how to channel that energy into action:
Assess and Plan: Walk through your basement with a critical eye. Identify any moisture issues first. Sketch a simple floor plan and decide on the primary function of the space: a family room, a home office, a gym?
Create a Phased Budget: Based on your plan, break the project into logical steps. Assign a realistic budget to each phase, researching material costs for options like vinyl plank flooring versus polished concrete.
Identify Your DIY Line: Honestly evaluate your skills. Are you comfortable with framing? Maybe you'd rather hire out the drywall finishing but handle the painting yourself. Knowing your limits is key to avoiding costly mistakes.
Consult the Experts: Before you buy a single 2x4, understand your local building codes. A consultation can also help identify potential challenges you haven't considered, from egress window requirements to the placement of electrical outlets.
Finishing your basement is more than a construction project; it's an opportunity to unlock the hidden potential within your home. By applying these inexpensive strategies, you can create a space that serves your family’s needs, enhances your lifestyle, and significantly boosts your property value, all without breaking the bank. The journey from a concrete box to a cozy retreat is within your reach.
When your DIY plans meet the need for professional precision, or you want to ensure the foundational work is done perfectly, Northpoint Construction is your trusted local partner. We specialize in helping homeowners navigate the complexities of basement finishing, from ensuring Utah code compliance to executing flawless structural and electrical work. Let us handle the tough stuff so you can focus on bringing your vision to life.
Ready to start your basement transformation with confidence? Contact Northpoint Construction today for a consultation.