
A Homeowner's Guide to Soundproof a Basement
Before you can really tackle a noisy basement, you have to figure out exactly what kind of noise you're dealing with. Is it the drone of a TV, or is it the constant thud of footsteps from upstairs? The solution for one won't necessarily fix the other. A truly quiet basement comes from a smart combination of adding mass, damping vibrations, decoupling structures, and absorbing sound—not just throwing up a single layer of insulation and hoping for the best.
Understanding Your Basement's Noise Problem

Before you even think about buying materials, you need to play detective. What are you hearing, and where is it coming from? The muffled chatter from the living room is a completely different acoustic beast than the jarring sound of someone dropping a pan in the kitchen above. Pinpointing the source and, more importantly, the type of noise is the absolute first step.
This diagnostic phase is non-negotiable. Why? Because you can waste a lot of time and money installing materials designed for airborne sound when your real problem is impact noise. I've seen it happen. Effective soundproofing is about applying the right acoustic science where it counts.
The Two Main Noise Culprits
Pretty much every sound complaint in a basement boils down to one of two categories. Sometimes it's a mix of both. Knowing which you're up against will shape your entire project.
Here’s a quick way to think about it:
Identifying Your Basement Noise Problem
| Airborne | Sound traveling through the air that causes surfaces (like drywall) to vibrate and transmit the noise. | Voices, TV/music from another room, a dog barking, phone conversations. |
| Impact | Sound created when an object hits a surface, sending vibrations directly through the building's structure. | Footsteps on the floor above, a chair scraping, dropped items, a washing machine's vibrations. |
Getting this right from the start is half the battle. If you can clearly identify your primary issue as airborne, impact, or a combination, you're already on the right track.
The biggest mistake I see homeowners make is thinking one layer of insulation will be a silver bullet. True soundproofing requires a strategy that addresses every path sound can take—vibrations through joists, airborne noise through gaps, and impact thuds from above.
The 4 Core Principles of Soundproofing
Once you know your enemy, you can choose your weapons. Any good soundproofing project relies on four fundamental principles, and the best results almost always come from using a few of them together.
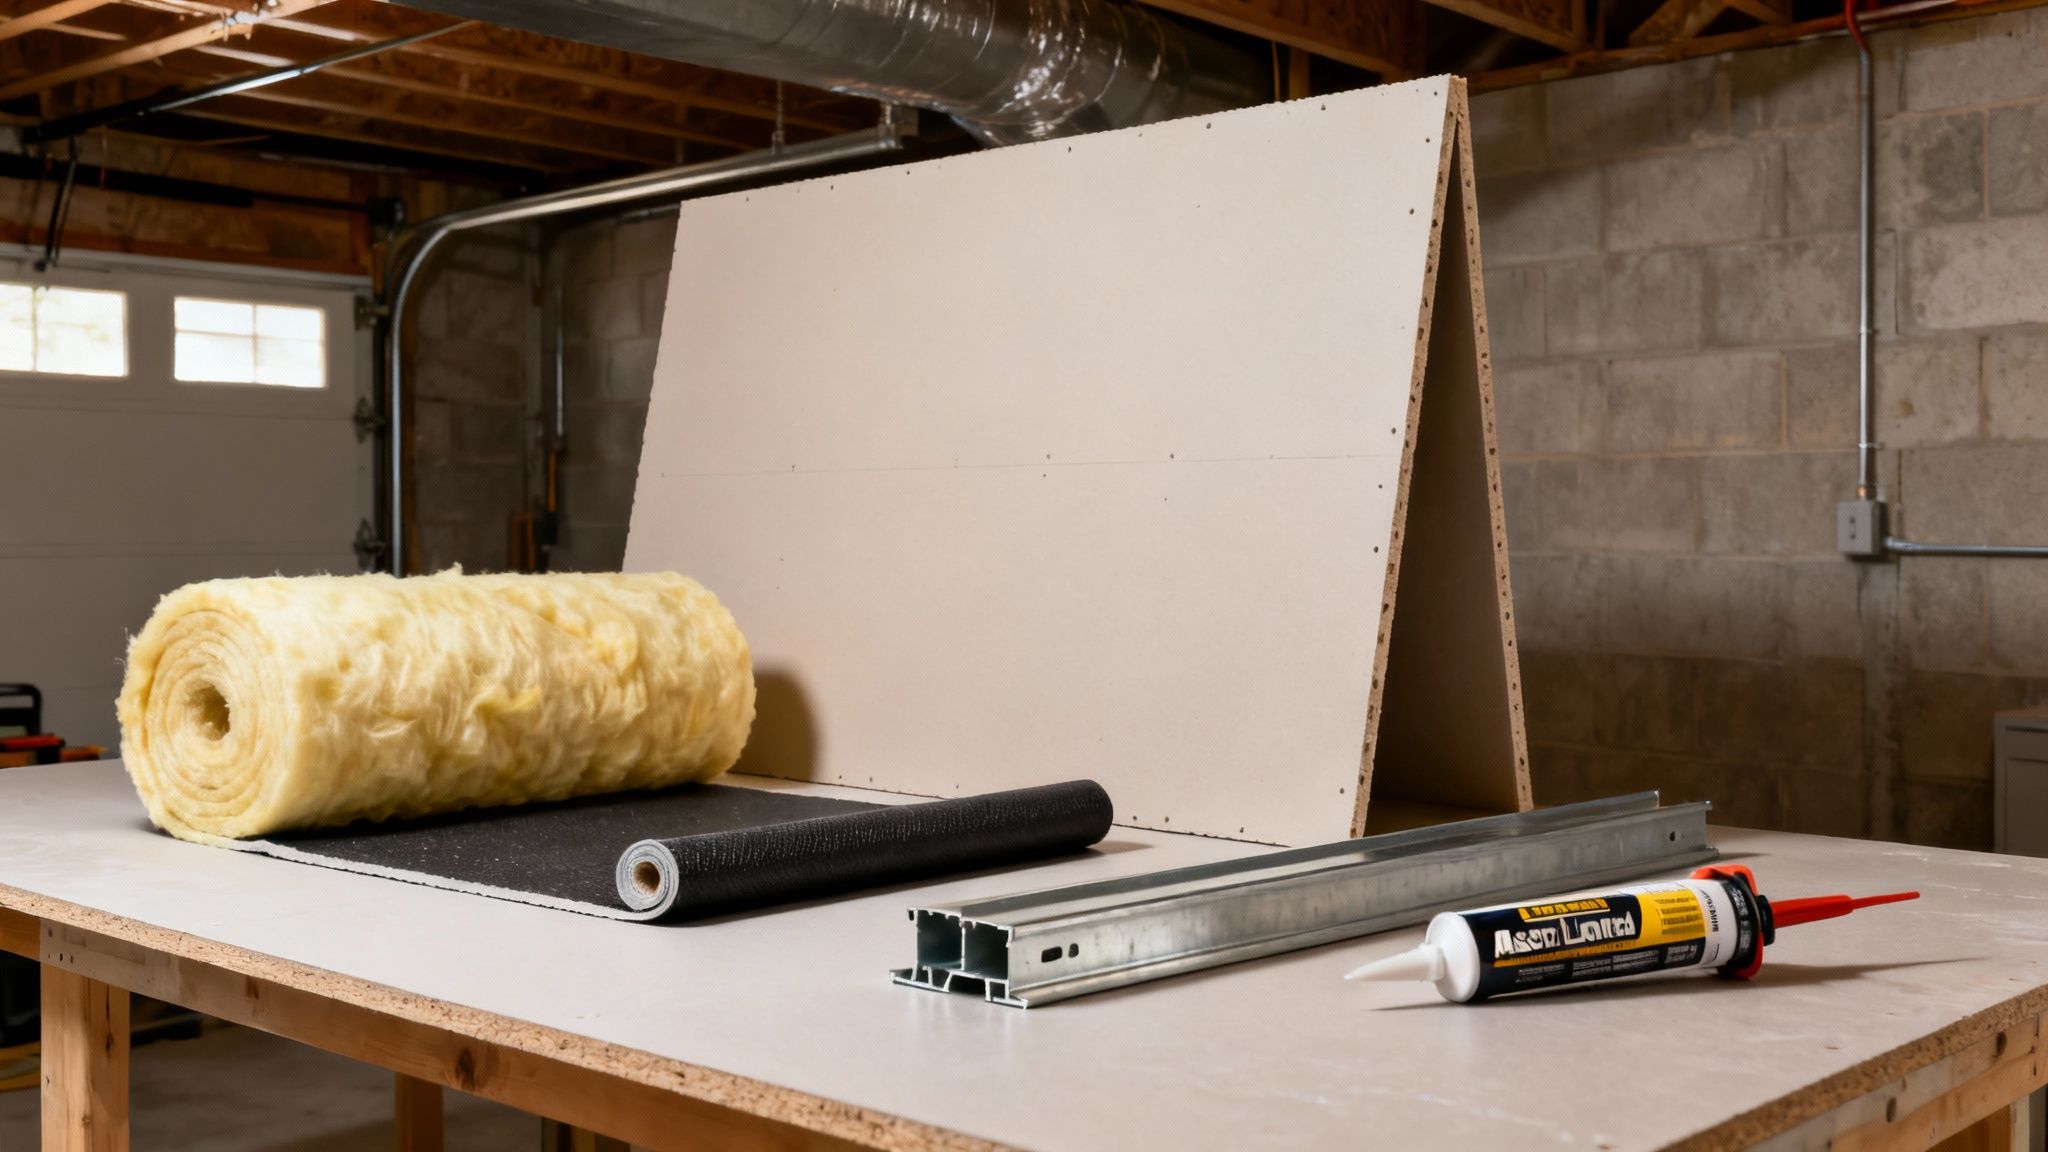
Adding Mass: Simply put, heavy, dense materials are hard for sound waves to move. This is the most straightforward concept. Adding layers of 5/8" drywall or installing a heavy membrane like Mass-Loaded Vinyl (MLV) makes it much tougher for sound to punch through a wall or ceiling.
Damping: This is all about killing vibrations. Damping converts sound energy into a minuscule amount of heat. A product like Green Glue is a perfect example—you apply this gooey compound between two layers of drywall. When sound hits the wall, the compound shears and dissipates the vibration before it can get to the other side.
Decoupling: Think of this as creating a break in the path for sound. You're mechanically separating the two sides of a structure so vibrations can't travel across. This is a game-changer for impact noise. Using resilient channels or building a staggered-stud wall creates an air gap that effectively isolates one side from the other.
Absorption: This is what most people think of as "soundproofing." Soft, porous materials are fantastic at trapping airborne sound waves and stopping them from bouncing around. Filling your ceiling joists or wall cavities with mineral wool or fiberglass insulation is a classic and effective way to soak up sound.
The desire for quieter homes isn't just a trend; it's a booming market. The global acoustic insulation industry was valued at USD 16.55 billion in 2025 and is on track to hit USD 22.92 billion by 2033. If you're curious about the industry's growth, you can explore the full market research on acoustic insulation to see how things are evolving.
Picking the Right Tools for the Job: Your Soundproofing Materials
When you first start looking at soundproofing materials, it can feel like you've stumbled into a science class. You’ll hear terms like mass, damping, decoupling, and absorption thrown around, and it's easy to feel overwhelmed. But here’s the secret: you don’t just pick one.
The best way to soundproof a basement is to layer different types of materials that work together as a system. Think of it like dressing for a Utah winter—one thick coat is good, but a base layer, a fleece, and a shell jacket are far better. It's all about creating multiple barriers that sound has to fight through.
Add Mass and Density to Block Sound
The simplest principle in soundproofing is that heavy, dense things block sound. Sound is just energy, and it takes a lot of that energy to make a heavy wall vibrate. This is your first line of defense.
Mass-Loaded Vinyl (MLV): This stuff is a popular choice for a reason. It's a thin, flexible, but incredibly heavy vinyl sheet that you can roll out. A standard roll weighs about one pound per square foot. MLV is fantastic for wrapping noisy pipes or for tacking onto studs before you hang the drywall. The downside? It can get expensive, and you have to be meticulous about sealing every seam.
Soundproof Drywall: Think of products like QuietRock as a pre-made soundproofing sandwich. They bond a layer of damping compound between two sheets of gypsum, saving you a messy step. It’s a great time-saver on the job, but be prepared for a higher price tag compared to standard drywall.
My two cents: For most homeowners, the most bang for your buck comes from using two layers of standard 5/8" fire-rated drywall. It’s cheap, available everywhere, and the sheer mass it adds is a massive upgrade over a single sheet of half-inch board.
Use Absorption to Soak Up Echo
Mass is great for blocking sound from getting through, but absorption deals with the sound that gets trapped inside your walls and ceiling. It stops sound waves from bouncing around and amplifying. This is where insulation becomes critical.
- Mineral Wool (Rock Wool): This is the industry standard for acoustic insulation. It's much denser than the pink fiberglass you’re probably used to, and its tangled fiber structure is brilliant at trapping sound waves and converting them into heat.
- Fiberglass Insulation: Don't count fiberglass out—it’s a solid budget-friendly alternative that still provides decent acoustic benefits. If you go this route, look for batts specifically labeled for "acoustic" use, as they are typically denser.
There’s a reason pros lean on mineral wool. The acoustic insulation market shows that stone wool (another name for it) had a market value of $5.1 billion back in 2023. Its dual thermal and acoustic properties make it a workhorse for projects like basement finishing.
Decouple and Dampen for the Final Touch
This is where we get into the more advanced, and frankly, more effective techniques, especially for killing impact noise like footsteps from above. Decoupling creates a physical break between your drywall and the house’s frame, while damping materials absorb vibration.
- Resilient Channels: These are springy metal strips that you fasten to your joists or studs. The drywall then screws into the channel, not directly into the wood framing. This "floats" the drywall, making it much harder for vibrations to pass through. A word of caution: A single misplaced screw that's too long and touches the joist will create a bridge for sound and ruin the entire effect. Installation has to be perfect.
- Damping Compounds (Green Glue): This is a game-changer. Green Glue is a gooey, non-hardening compound you squeeze between two layers of drywall. When sound vibrations hit the wall, the Green Glue shears and turns that energy into a tiny, unnoticeable amount of heat. It’s especially brilliant at killing low-frequency sounds like the bass from a home theater.
Of course, your choice of wall finish plays a part, too. If you're looking beyond traditional gypsum board, we have a whole guide on drywall alternatives for basement walls that might give you some ideas. Ultimately, a truly quiet basement comes from combining these different strategies—mass, absorption, and decoupling—into one cohesive plan.
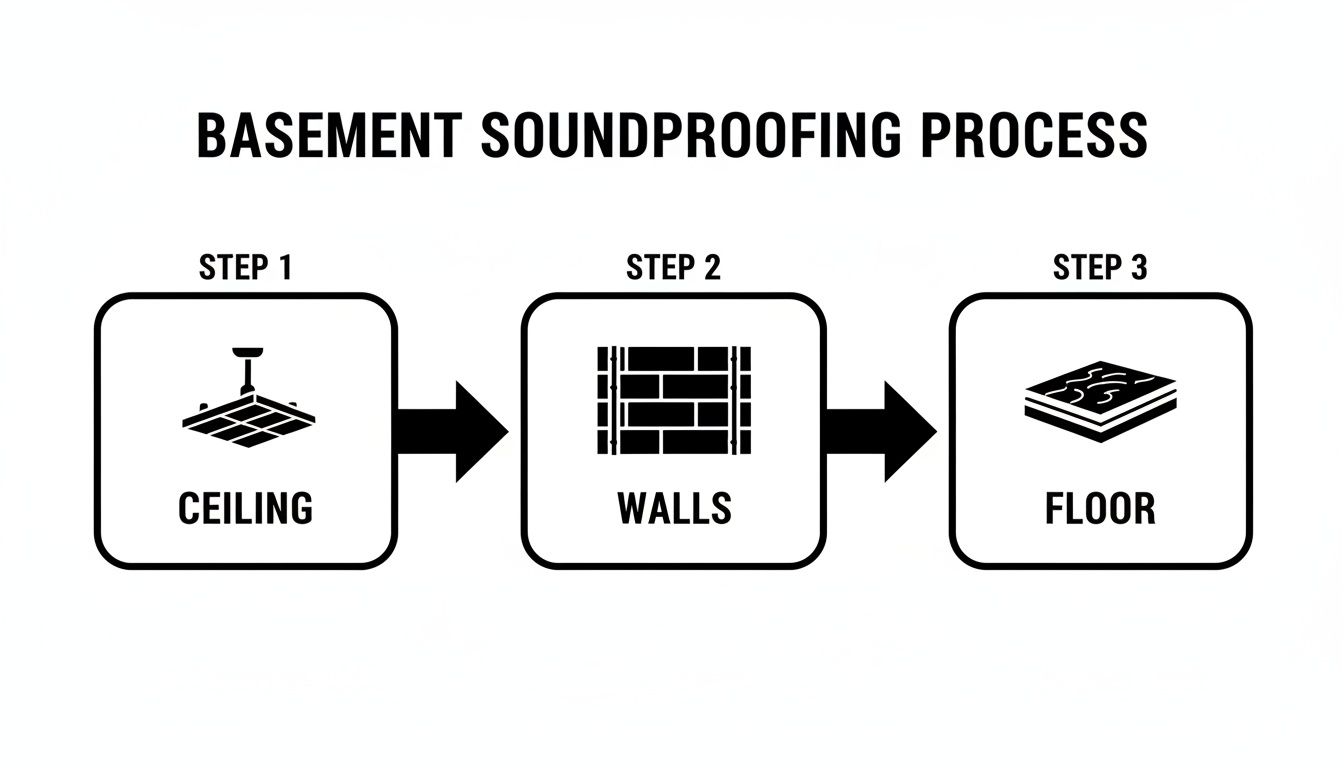
A Practical Soundproofing Strategy for Your Basement
Alright, let's get into the nuts and bolts of it—how to turn acoustic theory into a genuinely quiet basement. You have to be methodical. Sound is like water; it will find and exploit any weakness in your defenses. The best approach is a layered one, tackling every surface where sound can get in or out.
Let's start with the biggest offender in most homes.
Taming the Ceiling: The Primary Noise Source
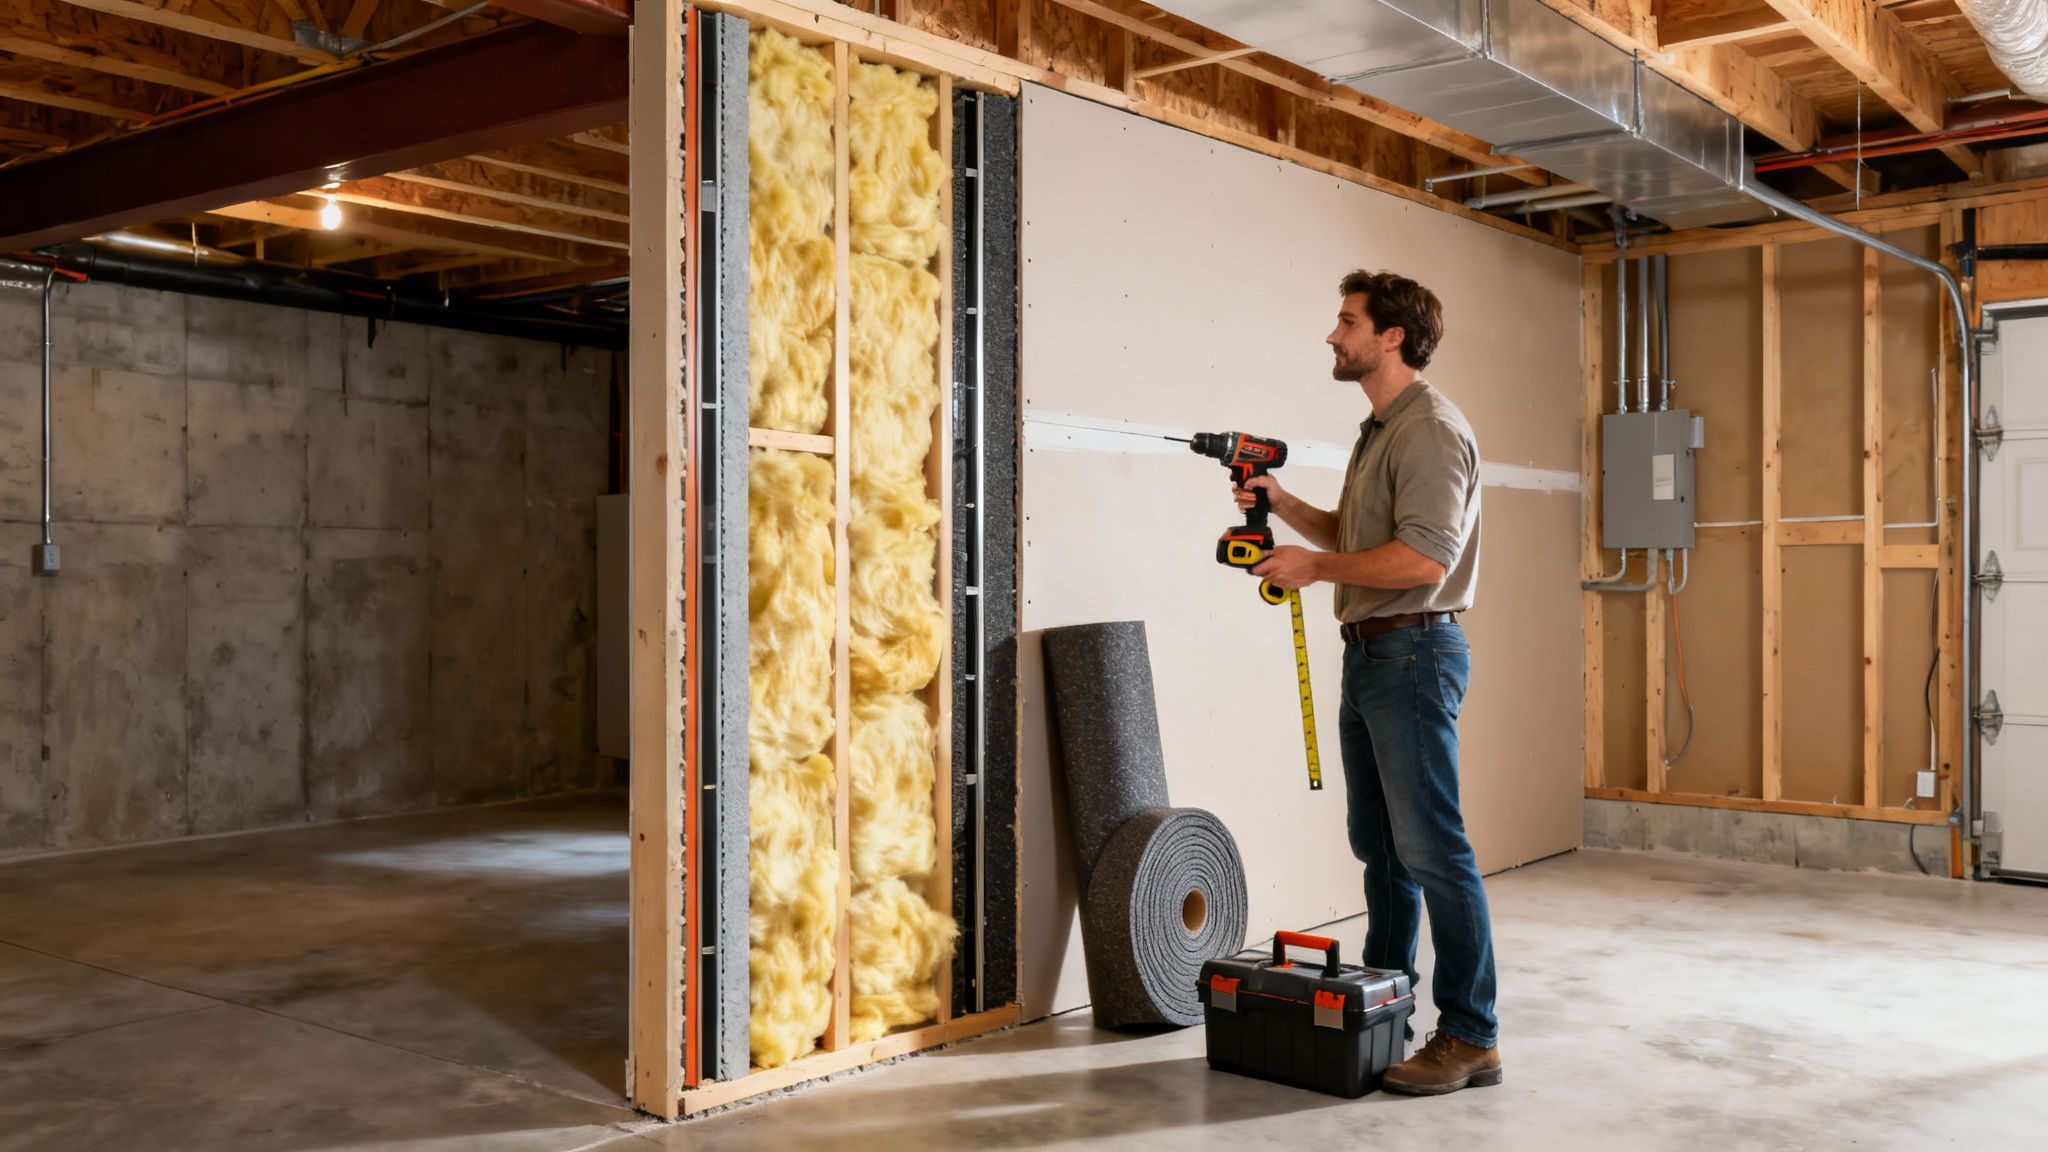
For most of us, the basement ceiling is the main battleground. It's the direct line for impact noise from footsteps and airborne sounds like conversations and the TV from the floor above. Your mission is to create a robust barrier that stops both.
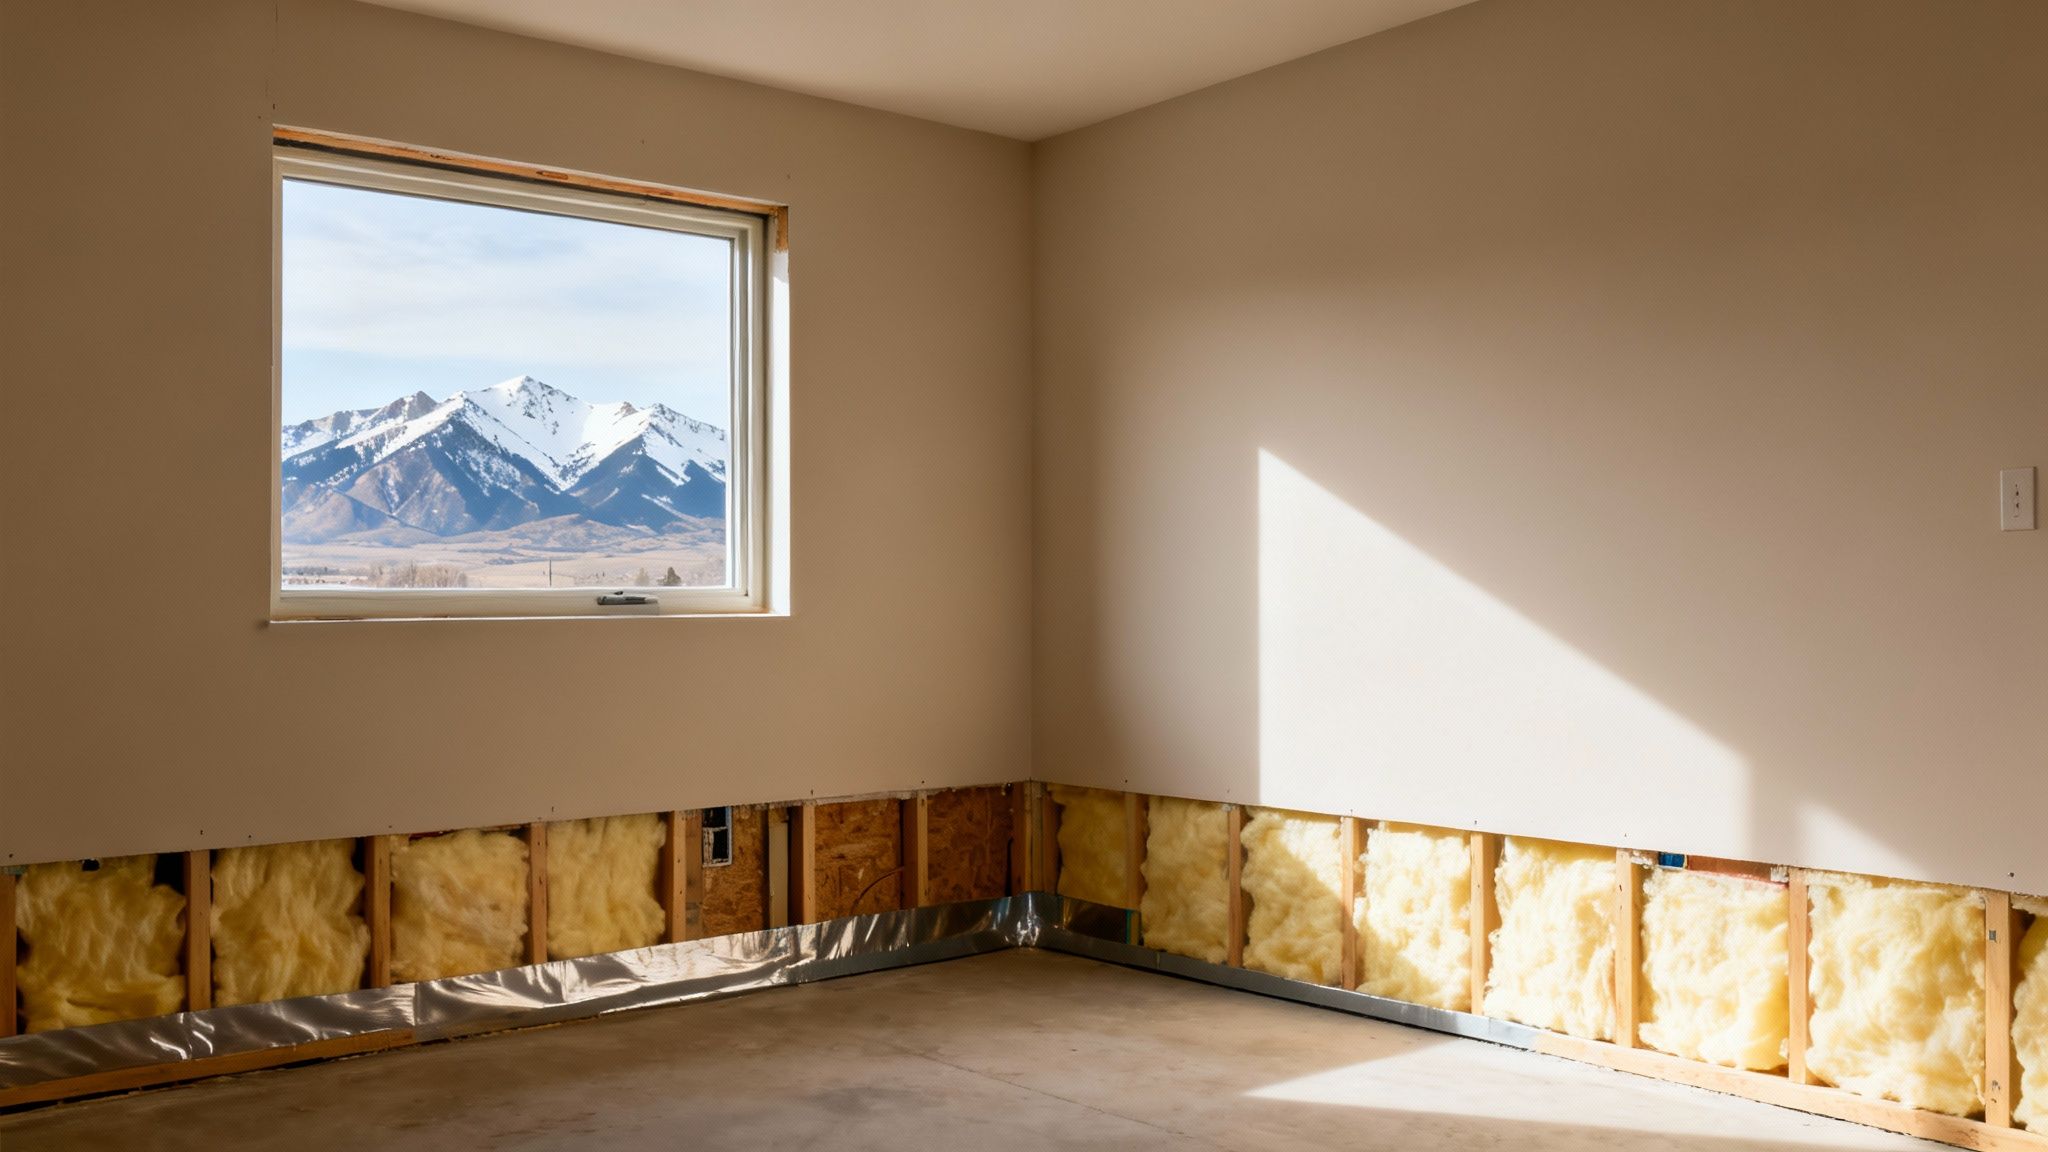
If you’re starting with an unfinished ceiling and exposed joists, you’re in luck—the job is much easier. The first thing you'll want to do is fill the cavities between the joists with dense mineral wool insulation. Don't just cram it in there; take the time to cut the batts so they fit snugly without any gaps. This step alone absorbs a surprising amount of airborne sound.
The next, and arguably most important, step is creating separation. We call this decoupling, and it's where resilient channels shine. These thin metal strips get attached to the joists before you hang any drywall. The drywall then screws into these channels, not the joists, effectively "floating" the ceiling. This physical break is a game-changer for impact noise, as it stops vibrations from traveling directly through the wood structure into your room.
A Critical Installation Tip: Be incredibly careful with your screw length when attaching drywall to resilient channels. If your screws are long enough to touch the wood joist behind the channel, you’ve just created an "acoustic bridge" that completely undermines the decoupling. The whole system's effectiveness depends on getting this right.
Finally, you need to add mass. The go-to method here is a double layer of 5/8" fire-rated drywall. To take it to the next level, you'll spread a damping compound like Green Glue between these two layers. This stuff is fantastic—it never fully hardens, instead converting sound energy into a tiny, harmless amount of heat. Just make sure to stagger the seams of the second drywall layer so they don't line up with the first. For those building a home theater, considering advanced in-ceiling loudspeaker installation strategies is also crucial to ensure the speaker cutouts don't become new sound leaks.
Soundproofing Basement Walls
Basement walls are the next priority, especially if they’re shared with a noisy utility room or separate a quiet home office from a kids' playroom. The strategy is similar to the ceiling: a combination of mass, absorption, and, for the best results, decoupling.
If you're building new walls or doing a gut renovation, a staggered-stud wall is a fantastic decoupling technique. Instead of one row of studs shared by both sides of the wall, you use a wider bottom plate and stagger the studs. This way, the drywall on one side never touches the studs supporting the other side, creating an air gap that sound struggles to cross.
Working with existing walls? You can still get excellent results.
- Insulation: First, make sure the stud cavities are filled with mineral wool to absorb sound.
- Mass and Damping: Before hanging new drywall, you can add a layer of Mass-Loaded Vinyl (MLV) directly to the studs. For peak performance, though, the double drywall and Green Glue method is the way to go.
There's a reason we focus so much on walls. Industry data shows that wall and partition assemblies made up 39.48% of the entire acoustic insulation market in 2025. That’s a huge number, driven by the demand for real sound isolation in homes and offices.
To help you decide which approach is right for your project, here’s a quick comparison of the common methods for each surface.
Soundproofing Method Comparison for Basement Surfaces
This table breaks down the different levels of soundproofing you can implement, from simple DIY projects to more complex, professional-grade solutions.
| Ceiling | Mineral wool insulation between joists. | Insulation + resilient channels + single layer 5/8" drywall. | Insulation + resilient channels + double 5/8" drywall with Green Glue. |
| Walls | Mineral wool in stud cavities + 5/8" drywall. | Insulation + Mass-Loaded Vinyl (MLV) + 5/8" drywall. | Staggered-stud wall or double drywall with Green Glue on existing studs. |
| Floors | Thick carpet and quality padding over the concrete slab. | Acoustic underlayment beneath LVP or engineered hardwood. | A "floating floor" system built on resilient mounts. |
Choosing the right combination depends on your budget, your goals, and how much noise you're truly trying to block. Often, a "Good" or "Better" approach is more than enough for most residential needs.
Don't Forget the Floor
When it comes to the basement floor, you’re usually trying to solve one of two problems: stopping sound from escaping your basement up into the house, or preventing impact noise from footsteps inside the basement.
For airborne sound trying to get out, a thick carpet with a quality pad is a surprisingly effective and simple fix. The soft materials do a great job of absorbing sound waves.
If you're installing a hard surface floor like LVP or tile, you absolutely need to think about decoupling. A specialized acoustic underlayment is a must. These rubber or foam mats are installed before your finished flooring, creating a cushion that absorbs footstep impacts and stops that sharp, clicking sound from echoing.
Addressing the Sound Leaks: Doors and Windows
You could build a fortress of a room, but if you have a cheap, flimsy door, it’s like leaving a giant hole in the wall. Sound will pour right through.
Swap out any hollow-core doors for a solid-core wood door. The sheer weight and density make a huge difference. Then, seal the perimeter. Add a door sweep to the bottom and use high-quality weatherstripping around the top and sides to create an airtight seal when the door is closed.
Windows are another weak point. For a truly quiet space like a home studio, replacing a standard window with a dedicated acoustic-grade window is the ultimate solution. For a less extreme fix, a heavy, insulated blackout curtain can do a decent job of absorbing sound and taming echo within the room. These finishing touches really matter, which is something we cover in our guide on the different options for finishing basement ceilings.
Quieting Noisy HVAC Systems
Finally, don't overlook your HVAC system. Metal ductwork is a perfect conductor for sound, acting like an old-fashioned telephone line that carries conversations and TV noise directly into your quiet basement.
An effective fix is to wrap the ducts in your basement with MLV or a specialized duct insulation wrap. This adds mass to the thin metal and dampens the vibrations that carry sound. For a more advanced solution, you can have an HVAC pro install baffled silencers inside the ducts themselves. Think of them as mufflers for your vents—air flows through, but sound waves get trapped.
By systematically working through each of these areas—ceiling, walls, floor, and all the little leaks—you create a layered defense that will make it incredibly difficult for noise to spoil your new space.
Budgeting Your Project and When to Call a Pro
Alright, let's talk about the big question: what’s this actually going to cost? The honest answer is, "it depends," but we can definitely break down the variables to give you a realistic idea of what to expect. The final price for soundproofing your basement can swing from a small weekend project budget to a major investment, all depending on your goals, the size of the space, and how much of the work you do yourself.
For a basic DIY job where you're just adding insulation and sealing up gaps, you might only spend a few hundred dollars. But if you're dreaming of a professional-grade home theater with fully decoupled walls and ceilings, multiple layers of drywall, and damping compounds, you'll be looking at a project that easily runs into the thousands.
Factors That Shape Your Budget
A few key things will determine your total investment. Thinking about these upfront will help you plan your budget and avoid any nasty surprises later on.
- Room Size: This one's pretty straightforward. A bigger basement means more ceiling and wall space, which translates directly to more materials and more labor.
- Material Choices: As we've discussed, not all materials are created equal, and neither are their price tags. Standard fiberglass insulation is a lot cheaper than high-density mineral wool. Likewise, a second layer of standard 5/8" drywall is much more wallet-friendly than specialized products like QuietRock.
- Level of Soundproofing: What's the goal here? Are you just trying to muffle the sound of the TV upstairs by about 50%, or do you need near-perfect silence for a recording space? The higher you aim for in terms of sound reduction (measured by STC ratings), the more complex and expensive the whole assembly becomes.
For most comprehensive projects, you'll want to follow a specific order of operations, starting with the biggest noise culprit.
This top-down approach makes the most sense because, in almost every basement I've worked on, the ceiling is the main highway for noise traveling from the rest of the house.
DIY vs. Hiring a Professional
Deciding whether to tackle this yourself or call in a pro isn't just about saving money. It's a question of skill, time, and the real risk of getting it wrong.
Simple jobs like adding insulation or running a bead of acoustic caulk are perfect for a weekend warrior. These are low-risk tasks that can make a surprisingly big difference without a huge learning curve.
But when you start getting into more advanced techniques—like installing resilient channels, hanging double layers of heavy drywall, or applying damping compounds—the stakes get much higher.
The most expensive soundproofing project is the one you have to do twice. Improper installation, like using the wrong screw and creating an acoustic short circuit, can make hundreds of dollars of materials completely worthless.
This is where a professional’s experience pays off. They know the science of how sound moves and have the precision to install these complex systems flawlessly. If your project is more ambitious, finding a qualified remodeling contractor is the key to getting professional results. They ensure every component works together as a system, not just a pile of expensive materials.
It's no surprise that more people are turning to experts for this kind of work. The market for soundproofing services is expected to grow at an impressive 13.9% annually between 2025 and 2032. This trend shows a real demand for expert installation to get the job done right the first time.
Ultimately, you have to be honest about the complexity of the job versus your own skills. A pro will cost more upfront, but they deliver peace of mind and a result that actually works.
Soundproofing a Basement in Utah: What You Need to Know
When you're looking to soundproof a basement here along the Wasatch Front, the project involves a lot more than just blocking noise. The unique climate, local building codes, and even the way we live in places like Orem and Provo add some extra layers to consider.
Finishing a basement in Utah is rarely just about sound. It’s a bigger puzzle where acoustics have to fit perfectly with the demands of our environment and regulations.
Utah’s Climate: More Than Just Sound
Our climate throws a lot at us—from freezing cold winters to scorching dry summers. This means your soundproofing plan has to go hand-in-hand with excellent thermal insulation and moisture control. If you only focus on the sound, you're missing the bigger picture.
Think about it this way: when you pack ceiling joists with dense mineral wool to stop noise, you’re also creating a powerful thermal barrier. That one move helps keep your main floor warmer in the winter and cooler in the summer. It's a smart, dual-purpose approach that makes for a comfortable and efficient home.
I often see people treat soundproofing and thermal insulation as two separate jobs. Here in Utah, they are two sides of the same coin. A properly insulated basement is naturally quieter, and it will save you a bundle on energy bills all year long.
Moisture control is another absolute must. Before you even think about putting up soundproofing layers like drywall and Green Glue, your foundation has to be completely waterproofed. Sealing moisture behind your new walls is a recipe for mold and serious structural damage. It can turn your dream basement into a nightmare. For a deep dive on this, check out our guide to the best waterproofing for basements.
Local Building Codes and the Rise of ADUs
Utah's building regulations also play a big role. Every finished basement needs an egress window for safety, but these can be major weak points for sound. You have to plan ahead for high-performance windows or acoustic inserts to make sure you don't compromise your sound barrier.
Another big factor right now is the boom in Accessory Dwelling Units (ADUs). If you’re turning your basement into a rental unit, top-tier sound isolation isn't just a nice-to-have; it's essential for a peaceful living arrangement. This means going beyond the basics and using serious decoupling techniques, like resilient channels or building a staggered-stud wall, to tackle both airborne noise and footsteps from above.
Staying on top of these trends is key. In 2023, the United States held about 76% of the regional acoustic insulation market, but the technology and building standards are always changing. Keeping an eye on global shifts in the acoustic insulation market helps us bring the most effective and modern solutions to homeowners right here in Utah.
Answering Your Top Basement Soundproofing Questions
Alright, even with a solid plan in hand, you've probably still got some questions bouncing around. That’s completely normal. When you're putting your hard-earned money and time into a project like soundproofing your basement, you want to be certain you're making the right moves.
Over the years, we've heard just about every question from homeowners here in the Orem and Provo area. Let's dig into the most common ones we get—getting these cleared up can give you the confidence to finally get started.
So, What's This Actually Going to Cost Me?
This is always the first question, and the honest answer is: it really depends. The price can swing wildly based on your goals.
For a basic DIY job in a smaller basement, you might focus on the essentials like stuffing joist bays with mineral wool insulation and meticulously sealing every gap with acoustic caulk. That kind of targeted approach could cost you somewhere in the $500 to $1,000 range.
But if you're building something that demands serious quiet—like a home theater, a recording space, or a legal rental suite—you'll need to invest more. A high-performance solution using things like resilient channels, two layers of 5/8" drywall, and a damping compound like Green Glue will run you between $5 to $10 per square foot for both materials and professional installation.
To put that in perspective, for a typical 500-square-foot basement ceiling, you're looking at a budget of $2,500 to $5,000 to get a result that truly works.
How Do I Stop Hearing Every Single Footstep from Upstairs?
Ah, the dreaded footfall noise. That thumping is impact noise, and it travels right through the structure of your home, making it a real challenge to stop. The absolute best way to silence it is to physically separate, or decouple, your basement ceiling from the floor joists above.
- Resilient Channels: Think of these as little metal springs for your ceiling. They fasten to the joists, and then the drywall attaches to the channels, not directly to the wood. This creates a gap that absorbs the vibrations from footsteps before they can turn into noise in your basement.
- Double Drywall with Green Glue: This is a classic one-two punch. The extra layer of drywall adds sheer mass, and the Green Glue sandwiched in between is a viscoelastic compound that converts vibration energy into a tiny amount of heat.
The gold standard is doing both. A decoupled ceiling using resilient channels that's holding up two layers of damped drywall is an incredibly effective barrier. Very little impact noise is getting through that system.
Can I Get Decent Results Without Ripping Out My Existing Ceiling?
Yes, you can! It's a common scenario—the ceiling is already finished, and the last thing you want is a full-blown demolition project.
One of the best "over-the-top" solutions is to add a second layer of 5/8" drywall right over the existing one. The key is to apply a damping compound like Green Glue to the back of the new sheets before screwing them up. This method adds critical mass and damping without the mess and expense of a teardown. It won't be quite as bulletproof as a fully decoupled ceiling, but it can make a significant reduction in noise with a lot less headache.
What's This "STC Rating" I Keep Hearing About?
STC stands for Sound Transmission Class. It’s simply a number that grades how well a structure—like a wall or a ceiling—blocks airborne sound. The higher the STC number, the quieter the room will be.
- A standard interior wall is usually around STC 35. You can easily hear loud conversation through it.
- For a basement space where you need real privacy, like a home office or a guest suite, you should aim for STC 50 or higher. At this level, loud speech becomes mostly inaudible.
- For a dedicated space like a home theater where you don't want to disturb the rest of the house, you'll want to push for STC 60+.
At Northpoint Construction, we've spent years perfecting the art of building quiet, comfortable basements. If you're ready to stop hearing every little sound and turn your basement into a peaceful oasis, we're here to help.
Contact us today to discuss your basement finishing project and let's make a plan.