
Your Complete Guide to Soundproofing a Basement
Effective soundproofing isn't just about stuffing some insulation in the walls. It’s a strategic combination of adding mass, absorbing sound, and, most importantly, separating structures to break the path noise takes to travel. To truly quiet a basement, you have to think beyond a single solution and create a system that seals air gaps, uses dense materials, and decouples walls and ceilings from the house's main frame.
Why Soundproofing Your Basement Is a Game-Changer
Turning an underused basement into a genuinely livable space is one of the smartest investments a homeowner can make. Soundproofing is what takes that transformation from good to great, converting a potentially noisy, echoey lower level into a peaceful retreat. It's not just about chasing silence; it’s about unlocking the full potential of your home's square footage.
Maybe you're dreaming of a dedicated space and have a list of basement home theater ideas, or you need a quiet home office that's free from distractions. Without proper sound control, these rooms just don't work as intended. The rumble from the washing machine can ruin the best part of a movie, and the sound of footsteps from the kitchen above can derail an important work call.
Understanding Your Enemy: Airborne vs. Impact Noise
To win the battle against noise, you first need to identify what you're up against. Noise in a basement typically comes in two flavors:
- Airborne Noise: This is sound that travels through the air. Think of conversations, music, or the TV. It sneaks through any gap or crack it can find and easily passes through thin materials.
- Impact Noise: This is the big one for basements. Also called structure-borne noise, it's the vibration that travels through the physical frame of your house. The classic example is footsteps from the floor above, but it also includes things like a dropped object or a rumbling appliance.
Each type of noise requires a completely different strategy. While thick, dense insulation is great for soaking up airborne sound, stopping impact noise is all about creating a physical separation—a technique we call decoupling—between the basement ceiling and the floor joists above it.
To help you pinpoint the issues in your own basement, here's a quick breakdown of common noise sources and how to think about tackling them.
Noise Sources and Soundproofing Priorities in a Basement
| Footsteps from above | Impact | Decoupling the ceiling from the floor joists. |
| Voices, TV from upstairs | Airborne | Adding mass and absorption in the ceiling. |
| Plumbing/HVAC systems | Impact & Airborne | Isolating pipes, wrapping ducts, and insulating cavities. |
| Home theater or music room | Airborne | Absorption within the room and mass on walls/ceiling. |
| Workshop or gym equipment | Impact | Isolating the floor with specialized underlayment. |
This table should give you a starting point for diagnosing your specific noise problems and focusing your efforts where they'll make the most difference.
More Than Just Quiet: An Investment in Comfort
Here’s a great bonus that comes with soundproofing: many of the best acoustic materials are also fantastic thermal insulators. Materials like mineral wool, which is a powerhouse for absorbing sound waves, is also incredibly effective at preventing heat loss.
This means a well-soundproofed basement is often warmer in the winter and cooler in the summer, which can lead to real savings on your energy bills.
This isn't just a niche upgrade anymore. The demand for quieter, more comfortable homes is on the rise. In fact, the global acoustic insulation market is projected to hit USD 22.92 billion by 2033. With the United States alone making up about 76% of the North American market, it's clear that homeowners see sound control not as a luxury, but as a must-have for a modern, valuable home.
Understanding the Four Pillars of Sound Control
If you want to get serious about soundproofing your basement, you have to move beyond just stuffing some insulation in the ceiling and calling it a day. Real sound control isn’t about a single magic bullet product; it's a strategy built on four core principles. Once you get how these work together, you'll be able to build a truly quiet space.
Think of it like building a fortress against noise. Each of these pillars is a different layer of defense, and when you combine them, you create a seriously effective barrier.
Decoupling: Breaking the Path of Vibration
Decoupling is hands-down the most powerful trick in the book for stopping impact noise—those thudding footsteps from the family room right above your head. The entire goal here is to physically separate the drywall of your basement ceiling from the floor joists above it.
Think about a drum. When you strike the top, the vibration shoots right through the drum's body. But what if you could float a second layer just underneath the first, without them touching? The vibration can't easily jump across that air gap. That's decoupling in a nutshell.
In the real world of construction, we achieve this with a couple of key products:
- Resilient Channels: These are simple, thin metal strips that get attached to the joists. Your drywall then gets screwed into these channels instead of directly into the wood. This creates a small but mighty air gap that breaks the physical path for vibrations.
- Sound Isolation Clips: This is the heavy-duty option. These beefy rubber-and-steel clips attach to the joists and hold furring channels. The drywall then fastens to the channels, creating what is essentially a "floating" ceiling that’s almost completely isolated from the main house structure.
Absorption: Soaking Up the Sound
While decoupling is your champion against thumps and bumps, absorption is your go-to for tackling airborne noise—think voices, the TV, or music traveling through the air. The idea is to fill empty spaces with soft, porous materials that trap sound waves and convert their energy into a tiny, unnoticeable amount of heat.
Picture an empty room with bare walls versus one with plush carpets, heavy drapes, and comfy furniture. The empty room is an echo chamber because sound waves just bounce off all the hard surfaces. The furnished room feels quieter because all those soft materials are literally soaking up the sound.
When you're soundproofing a basement, filling the empty joist cavities in your ceiling and the stud bays in your walls with dense insulation is absolutely non-negotiable. This one step will drastically cut down on echo and stop airborne sound from amplifying inside the structure itself.
The best tool for this job is mineral wool insulation, often known by the brand name Rockwool. Its dense, fibrous makeup is just far better at trapping a wide range of sound frequencies than standard pink fiberglass insulation.
Mass: Making it Harder for Sound to Get Through
The principle of mass is beautifully simple: the heavier and denser a wall or ceiling is, the harder it is for sound energy to physically move it and pass through to the other side. A hollow, flimsy interior door does almost nothing to block noise, but a heavy, solid-core door can make a huge difference.
Adding mass is a crucial part of the strategy, especially if you're trying to contain the low-frequency rumble of a home theater or muffle conversations from upstairs.
You can easily add mass to your basement walls and ceiling by:
- Using 5/8" Type X drywall, which is noticeably heavier and denser than standard 1/2" drywall.
- Installing a second layer of drywall right over the first.
- Applying a layer of Mass Loaded Vinyl (MLV). This stuff is a thin, flexible sheet that's incredibly heavy and dense. You can tack it directly to the studs or sandwich it between two layers of drywall for great results.
Damping: The Secret Ingredient
Damping is what separates a good soundproofing job from a great one. This involves using a special viscoelastic compound that's engineered to convert the vibrational energy of sound into negligible heat.
Imagine two panes of glass. If a sound wave hits them, they'll both vibrate and pass the noise right through. Now, what if you put a layer of thick honey between them? As the panes try to vibrate, the sticky honey will shear and stretch, dissipating that energy.
That's precisely how damping compounds like Green Glue work. You squeeze it between two layers of drywall, and it never fully hardens. It stays flexible and effectively deadens vibrations, stopping them in their tracks. It's an incredibly effective way to boost the performance of the mass you've added. For anyone looking to turn their basement into a more professional creative space, these same principles apply, and checking out acoustic tips for home podcasting studios can offer even more specialized advice.
Picking the Right Soundproofing Materials
Walking into a building supply store and looking at soundproofing options can be a bit much. There's a ton of technical jargon, and it's hard to know what actually works and what's just marketing fluff.
The secret isn't one magic product. It’s about using a combination of materials that work together to address the four key principles of sound control: mass, absorption, decoupling, and damping.
Think of it like building a championship team—you need a solid defense, a versatile offense, and smart players who know their roles. Let's break down the essential materials and show you where you'll get the most bang for your buck.
The Heavy Hitters: Adding Mass
When you're trying to stop airborne noise—like conversations, a blaring TV, or music from upstairs—mass is your number one ally. Simply put, heavier, denser materials are much harder for sound waves to move.
- Acoustic Drywall (5/8" Type X): This is not your average sheetrock. It’s significantly heavier and denser, creating a powerful first line of defense. A single layer of 5/8" drywall outperforms a standard 1/2" sheet every time, and a double layer is a go-to strategy for pros.
- Mass Loaded Vinyl (MLV): This stuff is a sound-blocking beast. MLV is a thin, flexible roll of vinyl loaded with high-mass particles. You can staple it right onto the ceiling joists before the drywall goes up, or better yet, sandwich a layer between two sheets of drywall for a truly formidable barrier.
Here’s a pro tip: Layering different types of mass is far more effective than just using a thicker version of the same material. A combo of MLV and acoustic drywall forces sound waves to deal with two different densities, which stops them dead in their tracks.
Soaking It Up: Absorption and Insulation
You absolutely cannot skip filling the empty spaces between your ceiling joists and wall studs. This step is all about absorption—using insulation to trap and soak up sound waves before they can bounce around and get louder.
Mineral Wool vs. Fiberglass
While the pink fiberglass insulation you see everywhere does provide some acoustic benefit, mineral wool (often sold under the brand name Rockwool) is hands-down the better choice for soundproofing.
The dense, random fiber structure of mineral wool is what makes it a sound-trapping machine. It’s an upgrade that pays for itself with both acoustic and thermal performance. This is particularly crucial in a basement, where moisture management is always a concern. If you're dealing with dampness before you even start, take a look at our guide on how to waterproof basement walls.
The Unsung Heroes: Decoupling and Damping
Mass and absorption do the heavy lifting, but decoupling and damping are what will take your project from "pretty good" to "wow, it's quiet." These materials are specifically designed to stop structure-borne noise—the thud of footsteps, a dropped object, or a chair sliding across the floor.
- Resilient Channels: These are simple but effective metal strips that create a tiny air gap between the ceiling joists and the drywall. That small separation breaks the direct connection, making it incredibly hard for vibrations to pass through the structure.
- Sound Isolation Clips: For the absolute best performance, sound isolation clips are the way to go. These clips, made of rubber and steel, attach to the joists and hold metal furring channels. The drywall then attaches to the channels, creating a "floating ceiling" that is almost completely disconnected from the floor above.
- Acoustic Sealant: Don't overlook this final, crucial step. Regular caulk gets hard and cracks, creating new gaps for sound to leak through. A good acoustic sealant stays flexible forever, creating a permanent, airtight seal around outlets, light fixtures, and the entire perimeter of your room. Remember, sound acts like water—it will find any tiny crack.
- Damping Compound: A product like Green Glue is a true game-changer. You apply this gooey compound between two layers of drywall. As sound waves try to vibrate the wall, the compound shears and converts that vibrational energy into a tiny, harmless amount of heat. This damping effect is amazingly effective at deadening all kinds of noise.
The demand for a quieter home is driving major growth in this industry. The global soundproofing and insulation market was valued at USD 45.2 billion in 2024 and is expected to hit USD 72.3 billion by 2032. This means more innovation and better, more user-friendly products are becoming available all the time.
To help you decide where to invest your budget, here’s a quick comparison of the most common materials.
Soundproofing Material Comparison Cost vs. Performance
This table breaks down the most common soundproofing materials to help you decide what makes sense for your project and your budget.
| Mineral Wool | Absorption (in cavities) | $$ | High | Overall acoustic & thermal performance |
| 5/8" Drywall (x2) | Adding Mass | $$ | High | Blocking airborne noise (voices, TV) |
| Mass Loaded Vinyl | Adding Mass | $$$ | Medium | High-level airborne noise blocking |
| Green Glue | Damping (between drywall) | $$ | High | Reducing vibration and impact noise |
| Resilient Channel | Decoupling | $ | Medium | Good impact noise reduction on a budget |
| Isolation Clips | Decoupling | $$$$ | Low-Medium | Maximum impact noise reduction |
| Acoustic Sealant | Sealing Gaps | $ | High | Essential finishing for any project |
Choosing the right combination depends on your specific noise problem. For blocking voices from a living room above, focusing on mass and absorption is key. But to silence footsteps, decoupling is non-negotiable.
Building Your Soundproof Walls and Ceiling
Alright, you've got your plan and your materials. Now for the fun part: putting it all together. This is where we take the science of soundproofing and turn it into a quiet, comfortable space. We're going to tackle this just like we would on a professional job, focusing on the steps that actually make a difference.
The biggest rookie mistake I see is people rushing to hang drywall. Before a single sheet goes up, there's a crucial first step that can make or break the entire project.
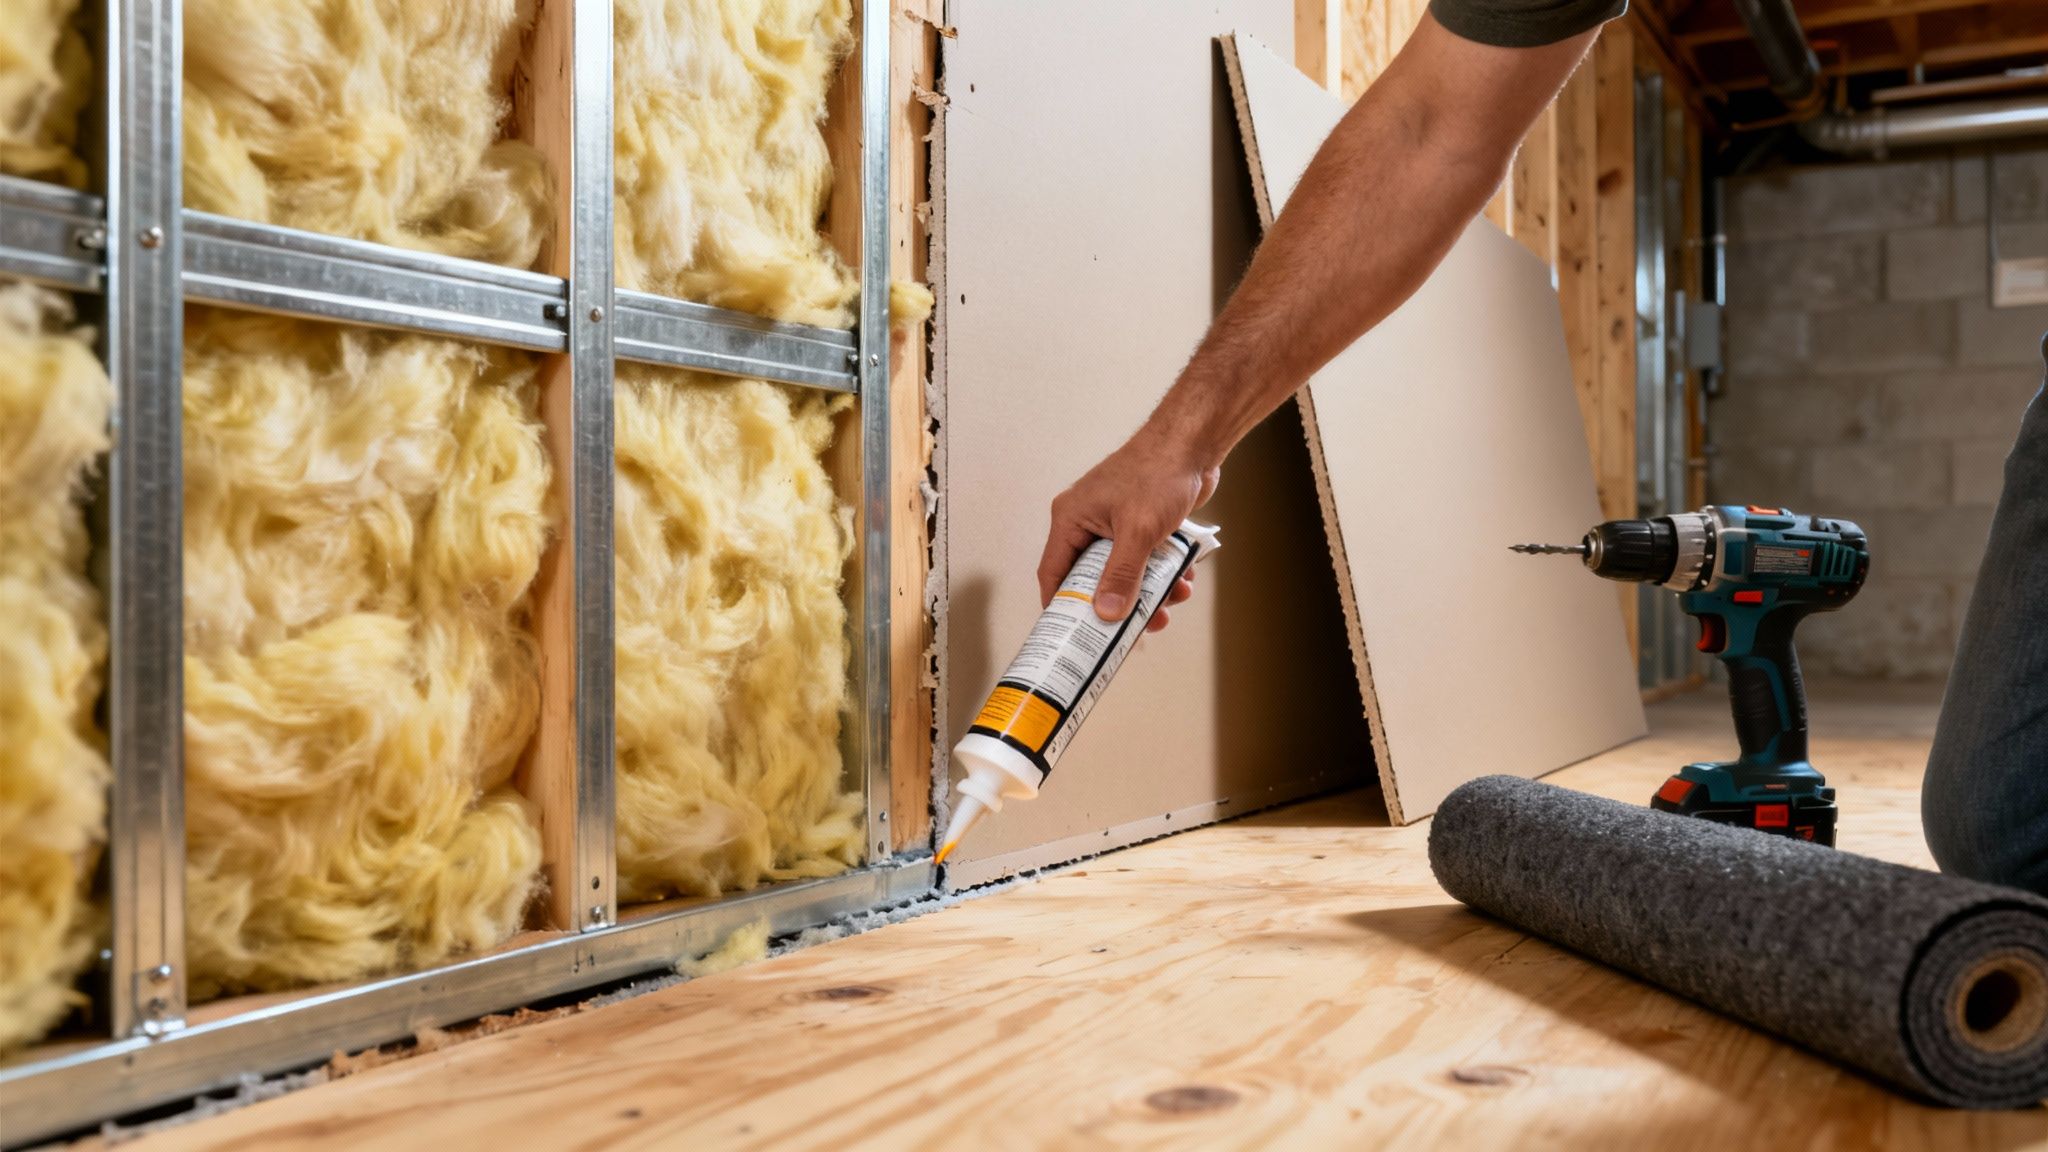
Start with an Airtight Seal
Think of sound like water—it will find any crack or gap to leak through. A tiny 1% gap in your soundproofing barrier can tank its overall effectiveness by as much as 50%. Seriously.
That’s why the very first thing you need to do is meticulously seal every single opening with acoustic sealant. This isn't your standard caulk from the hardware store, which gets hard and cracks. Acoustic sealant is engineered to stay flexible for good, moving with your house as it settles without ever breaking the seal.
- Seal the Perimeter: Run a solid bead where the top and bottom plates of your new walls meet the subfloor and ceiling joists.
- Seal Every Penetration: Go around every electrical box, pipe, and vent. Don't let any gap, no matter how small, get a pass.
- Seal the Framing: I also like to run a bead along the seams between joists and studs. It might feel like overkill, but it’s worth it.
This is tedious work, I won't lie. But skipping it guarantees you're wasting all the time and money you're about to spend on the next steps.
Fill Every Cavity with Dense Insulation
With your frame sealed up tight, it's time to fill the empty space between the wall studs and ceiling joists with high-density insulation. This is your frontline defense against airborne noise, working to absorb and muffle sound waves trying to travel through the structure.
While any insulation is better than none, mineral wool (often called stone wool) is the hands-down winner for soundproofing. Its dense, tangled fiber structure is incredible at trapping a huge range of sound frequencies. The commercial building industry knows this well—wall and partition assemblies make up nearly 40% of the acoustic insulation market. In fact, the stone wool market hit USD 5.1 billion in 2023 for this very reason.
When you're installing it, cut the batts just a bit larger than the cavity so they fit snugly without any gaps. And a word to the wise: wear gloves, a mask, and long sleeves. The fibers can be itchy.
A common mistake is jamming the insulation in too tight. You want a snug, friction-fit, but over-compressing it actually makes it less effective at absorbing sound. Let it fill the space naturally.
This simple diagram is a great reminder of the three core principles we're using.

It all comes down to that trifecta: adding heavy materials for mass, using insulation for absorption, and sealing every last gap.
Decouple the Structure to Stop Vibrations
Now we get to the powerhouse technique for killing impact noise: decoupling. This is all about physically separating your new drywall from the house’s frame. By creating a break, you stop vibrations from footsteps and thumps from traveling right through the ceiling.
You've got two main ways to do this:
Resilient Channels: These are simple, Z-shaped metal strips that you screw to the joists. The drywall then screws only to the channel, not the wood behind it. This creates a small air gap that effectively isolates the drywall. They're a great, cost-effective option.
Sound Isolation Clips: This is the high-performance, premium solution. You fasten these special rubber-and-steel clips to the framing, then snap metal furring channels into them. The drywall attaches to the channels, creating a "floating" ceiling that is almost completely disconnected from the structure above.
For most basements, the ceiling is where you'll get the most bang for your buck with decoupling. We dive deeper into the pros and cons of different methods in our guide to basement ceiling finish options. Just remember, installation has to be perfect. One misplaced screw that goes through the drywall and into a joist will ruin the whole effect.
Hang the Drywall Like a Pro
Finally, it's time for drywall. But we’re not just throwing up a single layer. To get serious mass and damping, you're going to install a double layer of 5/8" drywall.
First, hang your initial layer of 5/8" drywall, screwing it into your resilient channels or furring channels. Make sure to stagger the seams so they don't line up from one sheet to the next. Once that layer is up, go back with your acoustic sealant and caulk the entire perimeter and all the seams between the sheets.
Next comes the magic ingredient: a damping compound like Green Glue. You'll apply this directly to the back of your second layer of drywall. Use a caulking gun and spread it in a random, messy pattern all over the sheet. This gooey compound is a viscoelastic polymer that converts the vibration energy from sound waves into a tiny amount of heat.
With the compound applied, hang that second layer of drywall right on top of the first, again making sure to offset the seams. This combination—a double layer of mass, separated by a damping compound, and all of it decoupled from the framing—creates an incredibly effective sound barrier that will make a world of difference in your basement.
Finishing Touches That Make a Real Difference
You’ve done the heavy lifting, building out a ceiling and walls with layers of mass and clever decoupling. But don't pop the champagne just yet. The final details are what truly elevate a room from just "quiet" to a peaceful, private sanctuary. If you skip these, you risk undermining all that hard work.
Sound is like water; it will find and exploit any crack or weak point. A flimsy door, a humming vent, or the wrong kind of flooring can act like a noise superhighway, making your impressive wall assembly far less effective. Let's lock in these final elements to bring your basement soundproofing project over the finish line.
Tame Your HVAC System
Your heating and cooling system is a must-have for comfort, but the ductwork can work like an old-fashioned tin can telephone, carrying conversations and furnace rumbles all over the house. That constant low hum or whoosh of air can become a major source of background noise.
Luckily, you don't have to sacrifice comfort for quiet. Here's how to tackle it:
- Flexible Duct Connectors: Have an HVAC pro install short, insulated, flexible duct sections where the main ducts meet your basement vents. This creates a break in the rigid metal, stopping vibrations in their tracks. It’s a relatively simple fix with a big impact.
- Acoustic Duct Liners: For a more comprehensive solution, line the inside of the ducts heading to the basement with a specialized acoustic liner. This material literally absorbs sound as it passes through, hushing the entire system.
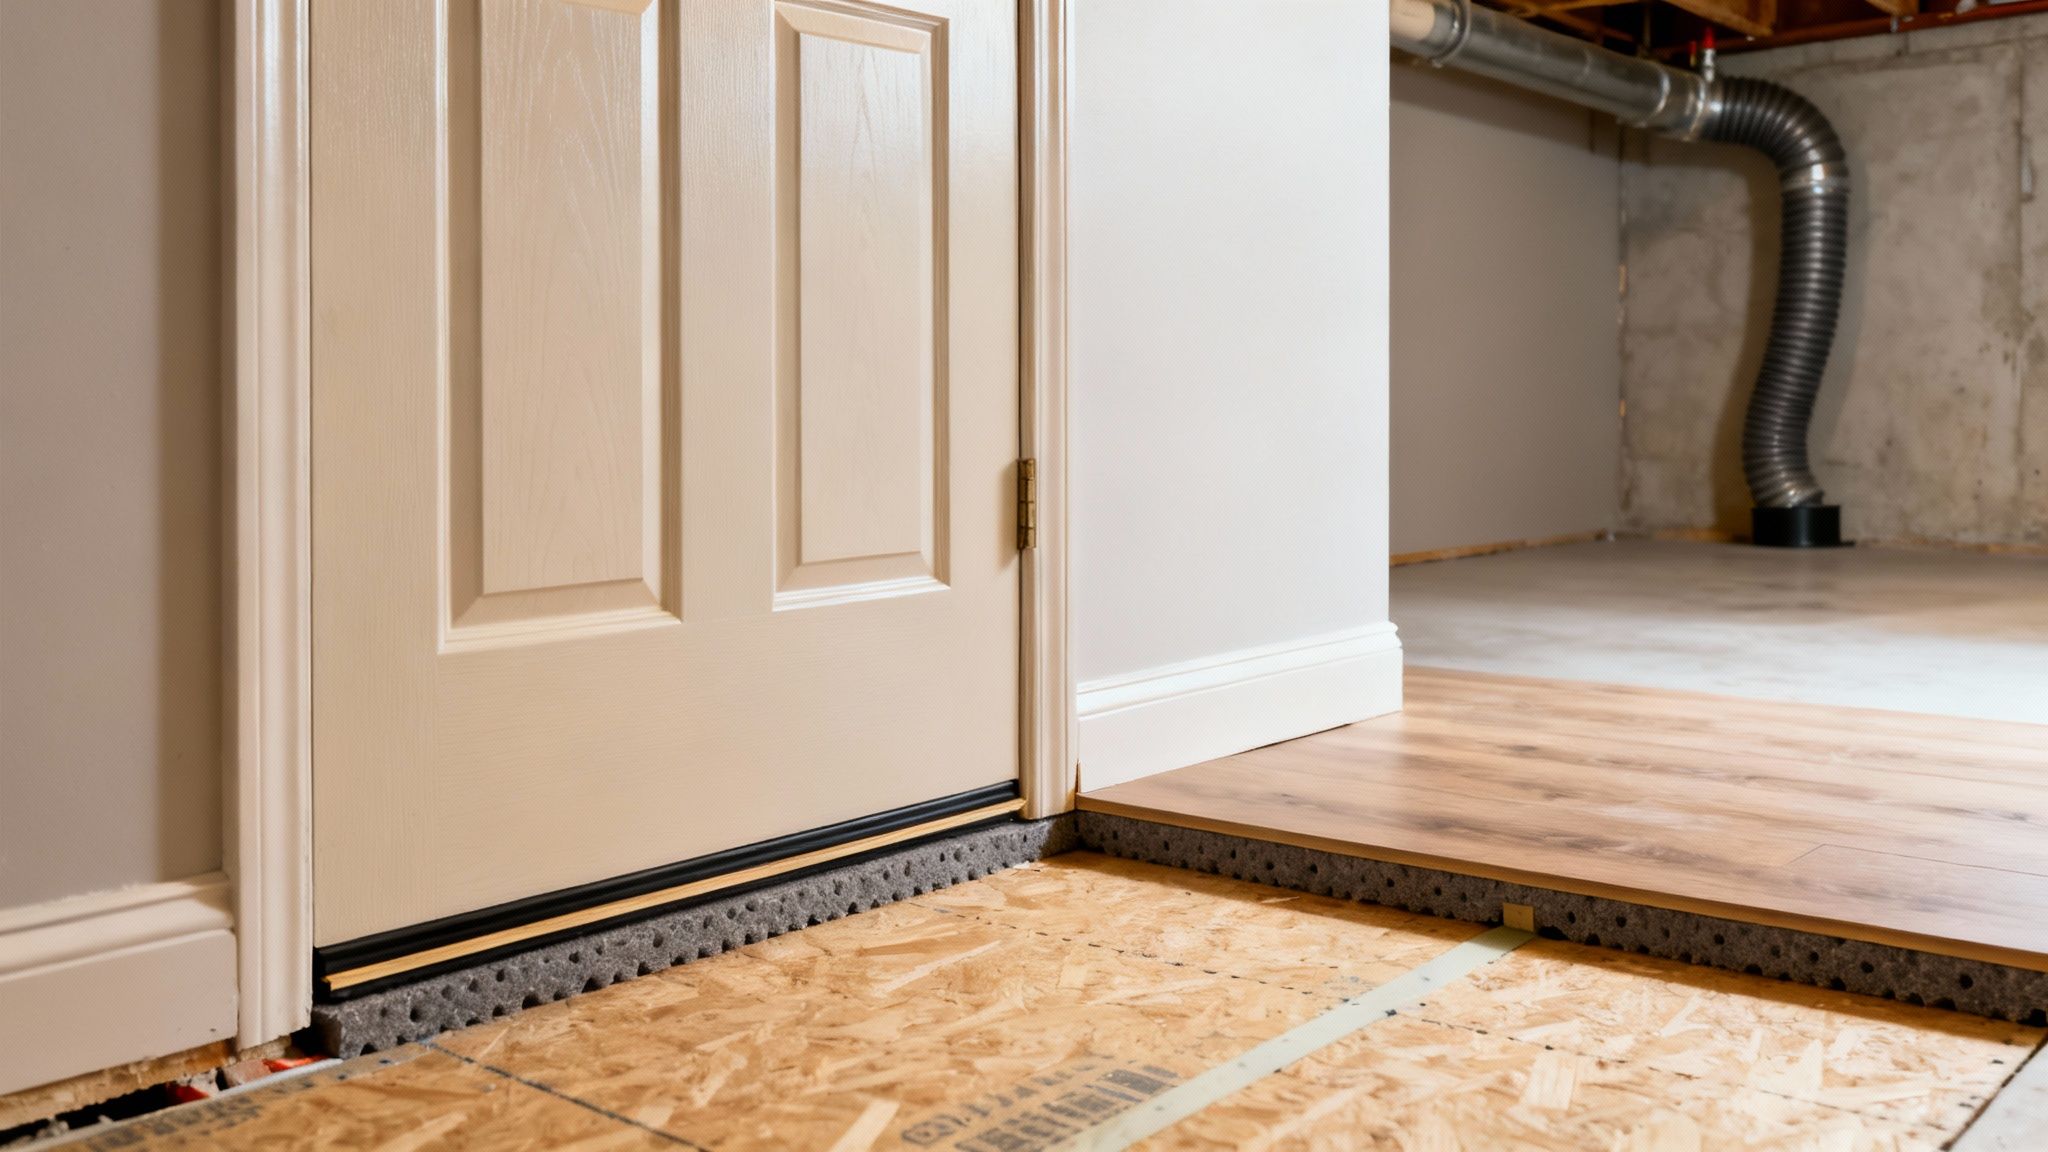
Don't Overlook Your Doors
A standard hollow-core door is one of the biggest offenders in a soundproofing project. Think of it as a thin wooden drumhead—it offers almost zero resistance to sound. All the time and money you spent on the walls will be wasted if you cap it off with a cheap, lightweight door.
Upgrading to a solid-core wood or composite door is non-negotiable. The sheer mass makes it dramatically harder for airborne sound to push through.
Of course, a heavy door means nothing if sound just zips around the edges. You have to seal the perimeter completely:
- Install high-quality weatherstripping on the top and sides of the door jamb. You want a durable compression seal that makes firm contact when the door is latched.
- Add an automatic door bottom. This is a clever device that drops a seal down to the floor only when the door is closed, creating a tight barrier against the biggest gap. A heavy-duty sweep can also work.
A crucial takeaway: Sealing the doorway is just as critical as the door itself. A poorly sealed solid-core door can actually perform worse than a hollow-core door that's been perfectly sealed. The whole system has to work together.
Address the Floor Above
Even with a top-tier decoupled and insulated ceiling, you can still be driven crazy by impact noise—footsteps, dropped items, scraping chairs—from the floor above. The key here is to treat the problem at the source, which is the floor finish in the room directly over your basement.
Adding a soft, sound-dampening layer upstairs will absorb that impact energy before it ever gets a chance to travel through the structure.
- For hard surfaces like LVP or laminate, a high-quality acoustic underlayment is essential. These specialized rubber or foam mats create a resilient cushion that deadens the shock of footsteps.
- Carpet with a thick pad is a natural champion at absorbing impact noise. If the room above is a bedroom or family room, this combination is often the simplest and most effective solution.
While you're dialing in the floors and ceiling, remember that the walls play a role, too. For more ideas on wall finishes that can help with sound control, check out our article on drywall alternatives for basement walls.
Got Questions About Basement Soundproofing? We've Got Answers.
When you're knee-deep in a project like this, questions are inevitable. It's one thing to read a guide, but it's another to apply it to your own space. Let's tackle some of the most common questions we get from homeowners right here in Utah.
Think of this as the conversation we'd have if you called us up. We'll get straight to the point on costs, what to do with an already-finished basement, and which materials give you the most bang for your buck.
So, What's This Going to Cost Me?
This is always the first question, and for good reason. The honest answer is... it depends. The final price tag is tied directly to how quiet you need the space to be. Are you just trying to dull the sound of kids running upstairs, or are you building a recording studio?
Let's break it down into a few common scenarios:
- Good (Noticeable Improvement): If you're mainly adding mineral wool insulation between the joists and hanging a single layer of thick 5/8" drywall, you're in the ballpark of $2-$4 per square foot for materials. This takes the edge off airborne noise pretty well.
- Better (Serious Reduction): Now we're getting more serious. This approach adds things like resilient channels and acoustic sealant to the mix, which starts tackling impact noise. Plan on $4-$7 per square foot in materials.
- Best (Maximum Sound Isolation): This is the home theater or private office level. We're talking sound isolation clips, two layers of drywall sandwiched with a damping compound, maybe even Mass Loaded Vinyl (MLV). This is a high-performance system, and material costs can run from $8-$20+ per square foot.
Pro Tip: These numbers are just for materials. If you’re not a seasoned DIYer, labor will be a significant part of your budget. Always get a few quotes from local contractors before you commit.
Can I Soundproof My Basement if It's Already Finished?
You absolutely can, but it's a different ballgame. Your options become a bit more limited, and you have to decide between demolition or addition.
Retrofitting a finished basement usually means one of two things: tearing out the existing ceiling to do it right, or adding new soundproofing layers on top of what's already there.
Adding new layers is often the path of least resistance. For instance, you could install a fresh layer of drywall over your existing ceiling, using a damping compound like Green Glue between the two layers. It won't be as effective as a fully decoupled ceiling built from the studs, but it can make a surprising difference for airborne noise like conversations and TV sounds.
For those thumping footsteps, though, your best bet is to work on the floor above the basement.
What's the Single Best Thing I Can Buy for Soundproofing?
Everyone wants that one magic bullet, but soundproofing is really a team sport where different materials tackle different problems. That said, if I had to pick one MVP, it would depend entirely on the type of noise that's driving you crazy.
- For Impact Noise (Footsteps, Dropped Items): Sound isolation clips are the undisputed champion here. They work by decoupling the drywall from the framing, which stops vibrations in their tracks. Nothing else makes a bigger dent in structure-borne noise.
- For Airborne Noise (Voices, Music): Mass is your best weapon. A combination of two layers of 5/8" drywall with a damping compound in between is incredibly effective. This heavy, dense barrier simply stops a huge range of sound frequencies from passing through.
At the end of the day, the quietest rooms are built using a system that combines all four key elements: mass, absorption, damping, and decoupling. When they all work together, the results are truly impressive.
Ready to turn your noisy basement into the quiet, functional space you've always wanted? The team at Northpoint Construction has the expertise to design and build a soundproofing solution that meets your specific needs and budget. From home theaters to private home offices in the Orem and Provo area, we handle every detail. Contact us today to start your project.