

Your Ultimate Whole House Remodel Checklist for 2025
Embarking on a whole house remodel is a monumental yet incredibly rewarding project. This endeavor is your chance to completely tailor your living space to your functional needs and aesthetic preferences. However, the path from concept to completion is paved with hundreds of critical decisions, logistical challenges, and potential pitfalls. Without a structured approach, the excitement can quickly give way to stress, missed deadlines, and costly budget overruns.
This is precisely why a detailed whole house remodel checklist is not just helpful, it's essential. This comprehensive guide serves as your strategic roadmap, meticulously designed to navigate every stage of the renovation process with clarity and control. We've broken down this complex undertaking into ten distinct, manageable phases, providing the actionable insights needed to maintain momentum and avoid common mistakes.
From the foundational steps of creating a realistic budget and hiring vetted professionals to the critical details of securing permits, finalizing material selections, and conducting thorough inspections, this checklist covers it all. Following this blueprint will empower you to communicate effectively with your team, make informed decisions under pressure, and ensure the final result aligns perfectly with your original vision. Think of this as your project manager in print, ensuring no detail is overlooked as you transform your current house into your dream home.
1. Establish a Realistic Budget and Contingency Fund
Creating a comprehensive budget is the non-negotiable first step in any successful whole house remodel checklist. This financial roadmap dictates the project's scope, timeline, and ultimate success. It goes beyond a simple estimate; it involves a detailed breakdown of all anticipated costs, from foundational work to the final coat of paint, and includes a critical safety net for unforeseen issues.

This foundational stage prevents financial overreach and ensures you can complete the project without compromising on quality or abandoning it midway. A well-planned budget, popularized by renovation experts on shows like Fixer Upper, empowers you to make informed decisions, allocate resources effectively, and maintain control throughout the entire process.
How to Implement a Sound Financial Plan
A robust budget requires more than just a total number. It’s a line-item document that accounts for every potential expense. This is where you move from a dream to a plan.
- Cost Breakdown: Itemize all known costs, including labor, materials, permits, architectural or design fees, and equipment rentals. Allocate percentages to major areas. For instance, a common model allocates 40% to kitchens and baths, 25% to structural and systems (HVAC, plumbing, electrical), and 20% to finishes.
- Contingency Fund: Set aside an additional 15-20% of your total budget in a separate account. This is not "extra" money; it is an essential part of the budget reserved for surprises like discovering asbestos, outdated wiring, or termite damage. A historic home renovation, for example, might require a 25% contingency due to the higher likelihood of hidden issues.
- Tracking System: Use a spreadsheet or a dedicated app like Houzz or Buildertrend to meticulously track every expense against your budget. This real-time oversight helps you spot potential overages early.
Pro-Tip: Front-load your budget on non-negotiable items. Prioritize spending on structural integrity, roofing, and mechanical systems before allocating funds for high-end cosmetic finishes. This ensures the home is safe and functional, even if you need to scale back on decorative elements later.
2. Hire Qualified Professionals and Verify Credentials
Selecting the right team is the most critical decision you'll make in your whole house remodel checklist, directly influencing the project's quality, timeline, and final cost. This goes beyond finding a general contractor; it involves assembling a crew of vetted architects, designers, and specialized tradespeople. The expertise of your team ensures that your vision is executed safely, legally, and to the highest standard.
This meticulous vetting process, championed by consumer advocates like Angi and renovation experts such as Mike Holmes, prevents costly mistakes and protects you from potential liabilities. A well-chosen team, like a Chicago crew that finished a renovation six weeks early through efficient coordination, becomes your greatest asset. Conversely, a failed DIY attempt in Phoenix ultimately cost 40% more than the initial professional quote to fix.
How to Assemble and Vet Your Remodeling Team
A strong project team is built on a foundation of trust, verified credentials, and clear communication. This requires a systematic approach to due diligence before signing any contracts.
- Verify Credentials: Check your state’s licensing board to confirm a contractor's license is active and in good standing. Request certificates of insurance for both general liability and workers' compensation to protect yourself from accidents on-site. Don't forget to check Better Business Bureau ratings for recent complaints.
- Check References and Portfolios: Ask for at least 3-5 recent references from projects similar in scope to yours and actually call them. Review their portfolios to ensure their work quality and aesthetic style align with your vision. A Seattle homeowner, for example, avoided a $30,000 disaster by hiring a structural engineer to assess load-bearing walls before demolition.
- Formalize the Agreement: Insist on a detailed written contract that outlines the project scope, payment schedule, timeline, and process for handling change orders. Never pay more than a 10% deposit upfront, as larger demands can be a red flag. For more tips on this process, you can find a guide to hiring a home remodel contractor near you.
Pro-Tip: Establish a communication protocol from the start. Agree on weekly check-in meetings (in-person or virtual) and a preferred method for daily updates (text, email, or a project management app). This ensures everyone stays aligned and issues are addressed promptly.
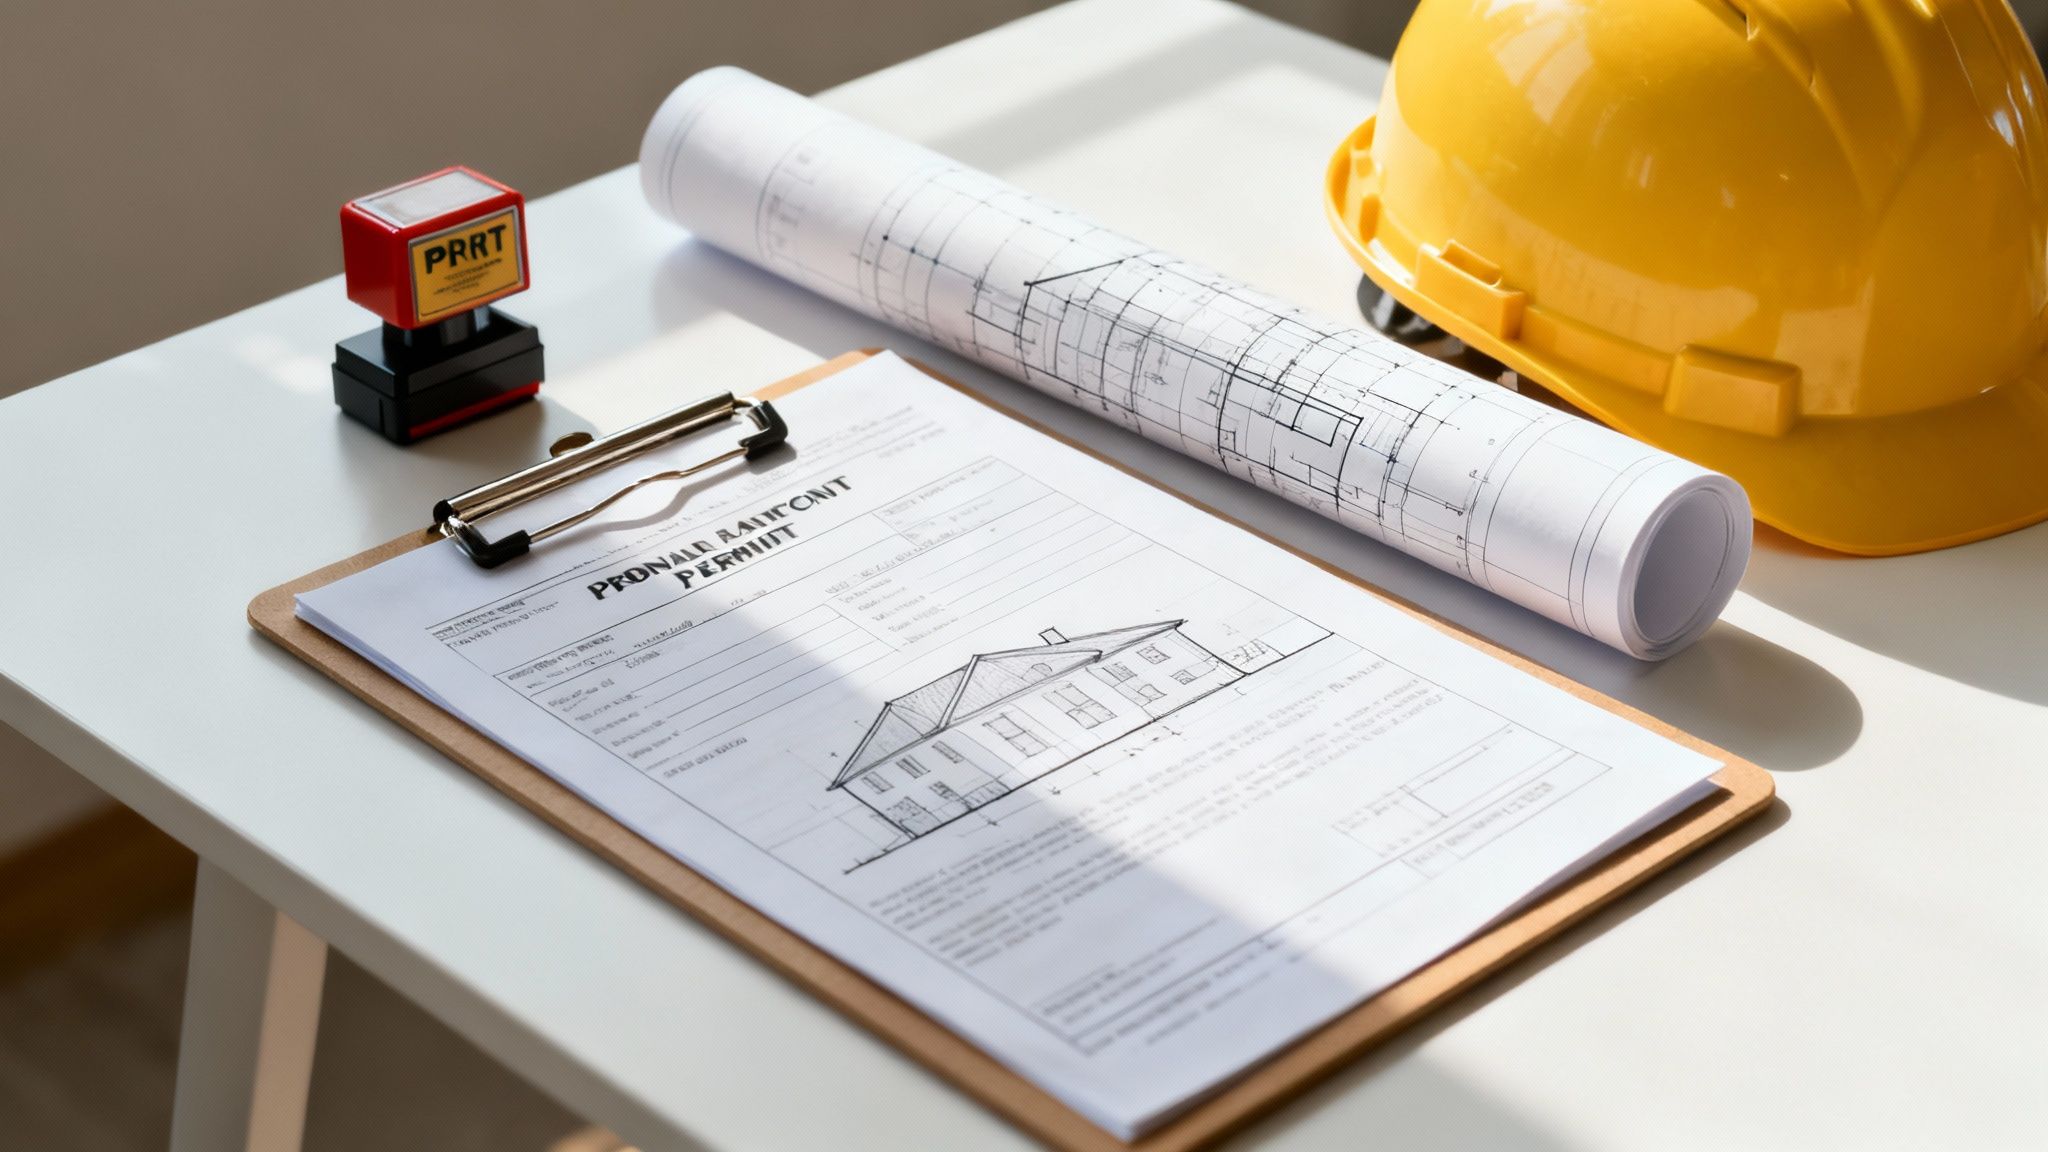
3. Obtain Required Permits and Ensure Code Compliance
Securing the proper building permits is a non-negotiable legal requirement on any whole house remodel checklist. This crucial step ensures that all work complies with local building codes, protecting your safety, investment, and the structural integrity of your home. It’s the official system of checks and balances that prevents unsafe construction and guarantees that electrical, plumbing, and structural modifications are performed correctly.
Skipping this process can lead to severe consequences, including hefty fines, work-stop orders, and the potential need to tear out completed renovations. Home renovation experts like Bryan Baeumler constantly emphasize that permits are not optional red tape; they are a critical component for a safe and legally sound project. A home sale can be delayed for months if unpermitted work is discovered, as seen with a Portland kitchen remodel that required retroactive permits.
How to Navigate the Permitting Process
Properly managing permits and inspections keeps your project on track and ensures it meets established safety standards set by organizations like the International Code Council (ICC). This process involves proactive communication with your local building authority.
- Identify Requirements: Contact your local building department before starting any work to understand which aspects of your remodel require a permit. Typically, this includes structural changes, additions, and any modifications to electrical, plumbing, or HVAC systems.
- Assign Responsibility: Ensure your contractor is responsible for pulling all necessary permits. Be wary of any contractor who suggests permits aren't needed for significant work; this is a major red flag.
- Schedule Inspections: Work with your contractor to schedule required inspections at key milestones, such as after framing or rough-in plumbing and electrical. Proactive scheduling prevents costly delays.
- Maintain Documentation: Keep all permit documents, inspection reports, and the final certificate of occupancy with your permanent home records. This paperwork is vital for insurance purposes and future home sales.
Pro-Tip: Factor permit fees and potential inspection-related delays into your initial budget and timeline. A typical permit application can take several weeks to be approved, and fees can range from hundreds to thousands of dollars depending on your project's scope.
4. Create a Detailed Design Plan and Material Selections
Developing a comprehensive design plan is a critical step in any whole house remodel checklist, transforming your vision into a precise, executable blueprint. This stage involves creating detailed architectural drawings, selecting all materials, and finalizing finishes before a single wall is touched. It acts as the definitive guide for your entire project, ensuring every stakeholder, from the architect to the subcontractor, is aligned.
This meticulous pre-planning prevents costly mid-project changes and frustrating delays. By locking in decisions early, you can order materials with long lead times and get accurate quotes from contractors. This approach, championed by design software like AutoCAD and SketchUp and popularized by designers like Nate Berkus and Jeremiah Brent, turns abstract ideas into a tangible plan, preventing miscommunication and ensuring the final result matches your expectations. For example, a Minneapolis homeowner saved over $12,000 by identifying and resolving plumbing conflicts during the design phase rather than discovering them during construction.
How to Implement a Cohesive Design and Selection Process
A successful design plan goes beyond aesthetics; it’s a technical document that dictates every action on the job site. This is where you finalize every choice to create a clear roadmap.
- Develop a Visual Guide: Use platforms like Pinterest or Houzz to create inspiration boards before meeting with your designer. This visual communication helps articulate your style and preferences for everything from color palettes to fixture styles.
- Finalize Selections Early: Create a master list of all material and finish selections, including model numbers, colors, and dimensions. For instance, instead of just "white subway tile," specify the exact brand, size (e.g., 3x6), and grout color. This prevents ambiguity and ensures you get precisely what you envisioned.
- Account for Lead Times: Order materials with long lead times, such as custom cabinetry, windows, or specialty tile, as soon as selections are finalized. Some custom items can require 12-16 weeks for delivery, and failing to account for this can bring the entire project to a standstill.
Pro-Tip: Order samples of all key materials like flooring, countertops, and paint. View them in your home at different times of the day to see how they look in your actual lighting conditions. What appears perfect in a showroom can look entirely different on-site.
5. Develop a Realistic Timeline with Milestones
A well-structured timeline is the operational counterpart to your budget, transforming your whole house remodel checklist from a list of desires into an actionable plan. This detailed project schedule outlines each phase of work, sets realistic completion dates, and identifies dependencies between tasks. A comprehensive timeline, often visualized using project management tools like Gantt charts, is essential for coordinating multiple trades, material deliveries, and inspections, ultimately managing expectations and keeping the project on track.
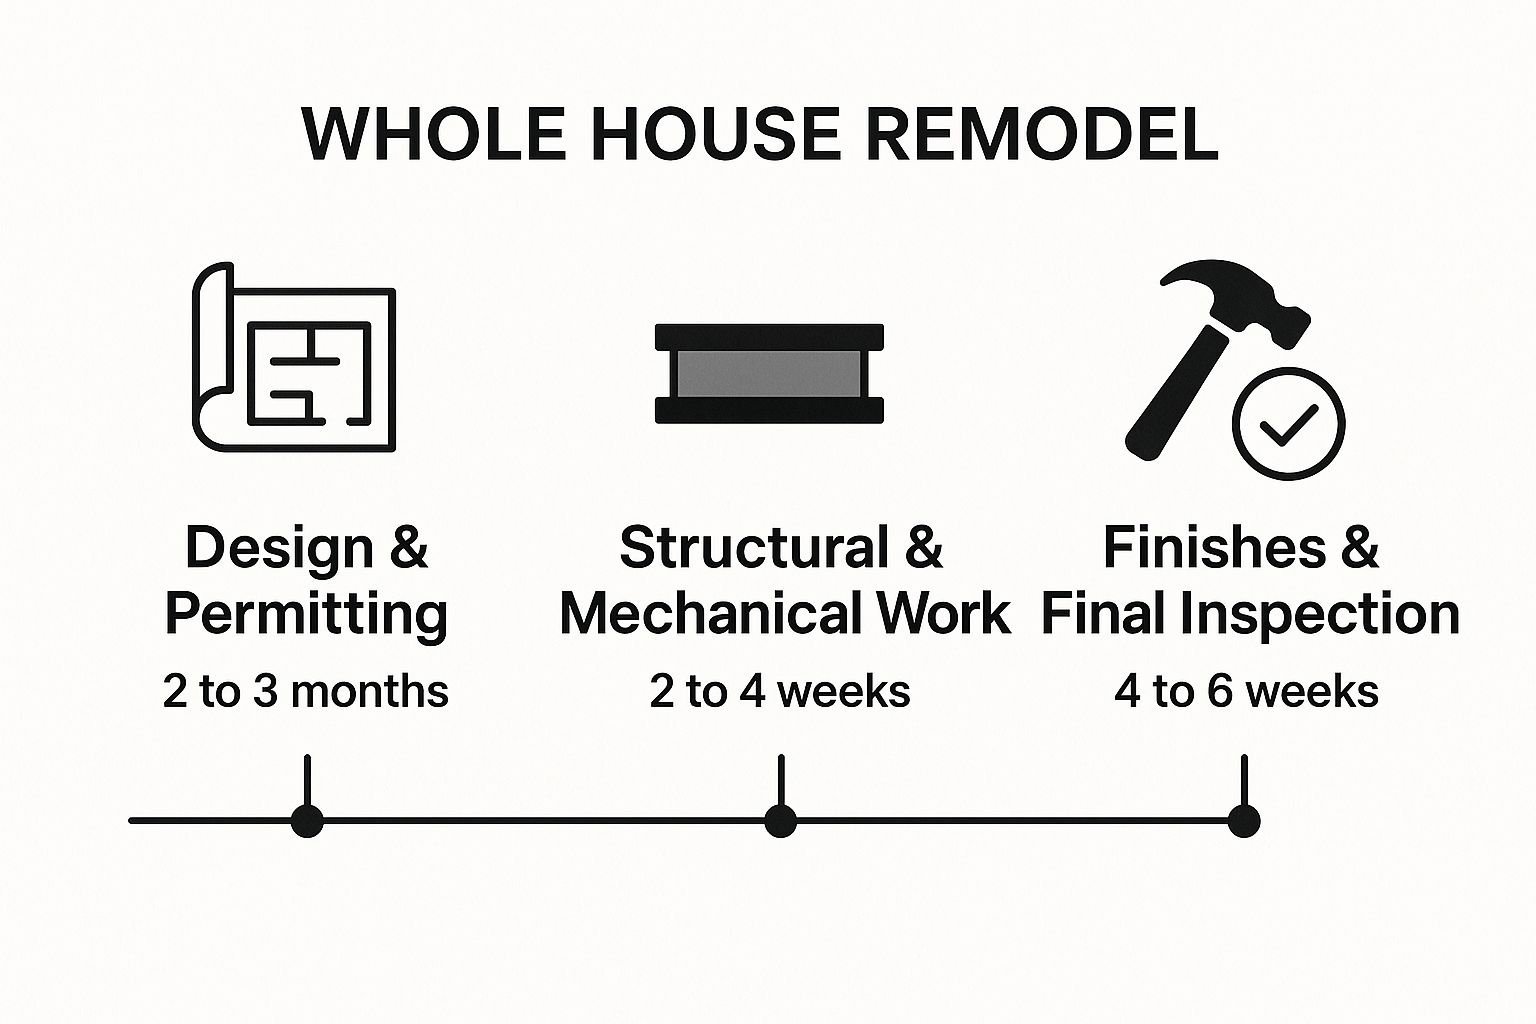
The infographic above illustrates a simplified timeline for a whole house remodel, breaking it down into three primary phases: Design & Permitting, Structural & Mechanical Work, and Finishes & Final Inspection. This visualization highlights that foundational planning and structural stages consume a significant portion of the project's duration before cosmetic work even begins. Understanding this sequence is crucial for setting realistic expectations, as it clarifies why you can't install cabinets before the new electrical and plumbing systems are fully inspected.
How to Create a Strategic Project Schedule
Building a functional timeline involves more than just setting an end date; it requires mapping out the entire process and anticipating potential roadblocks. This prevents costly delays and ensures a smooth workflow.
- Order Long-Lead Items Early: Identify and order materials with long delivery times, such as custom windows, cabinets, or specialty tile, during the design phase. A California bungalow renovation, for instance, was delayed by four months due to supply chain issues with custom windows that were ordered too late.
- Build in Buffer Time: Experienced contractors know that delays are inevitable. Add a 20-30% buffer to your total project timeline to account for weather, unexpected discoveries like foundation issues, or material backorders.
- Establish a Critical Path: Create a flowchart showing which tasks must be completed before others can begin. For example, framing cannot start until the foundation is cured, and drywall cannot be installed until electrical and plumbing rough-ins pass inspection.
- Schedule Regular Meetings: Hold weekly progress meetings with your contractor to review what was accomplished, what's next, and to identify any potential delays early.
Pro-Tip: Plan for seasonal impacts on your timeline. Attempting exterior painting in the rainy season or pouring a foundation in freezing winter temperatures will inevitably lead to delays. Align your project start date with favorable weather conditions for critical outdoor tasks to maintain momentum.
6. Plan for Alternative Living Arrangements
A crucial, often overlooked, step in any whole house remodel checklist is deciding whether you will live in the home during construction or relocate. This choice significantly impacts your budget, timeline, and daily stress levels. A full-scale renovation disrupts essential services like plumbing and electricity, creates significant dust and noise, and can present safety hazards, making the space virtually unlivable.
Planning for temporary accommodations protects your family’s health and sanity while giving contractors the unimpeded access they need to work efficiently. The rise of flexible housing options like Airbnb and VRBO has made it easier than ever to find comfortable short-term solutions, turning a potentially chaotic experience into a manageable, structured process.
How to Implement Your Accommodation Plan
A thoughtful approach to your living situation can prevent major headaches and may even accelerate your project's completion. The key is to assess the renovation's scope and your family’s tolerance for disruption.
- Assess the Need to Relocate: If your project involves gutting the kitchen or sole bathroom, major structural changes, or extensive work on the HVAC and electrical systems, moving out is almost always the best option. For example, a Maryland family moved in with relatives for four months, saving over $15,000 in potential rental costs.
- Budget for Housing Costs: If relocating, factor this expense into your primary budget. Set aside $2,000-$5,000 per month for a temporary rental, plus costs for storage units like PODS or U-Haul. Corporate housing or extended-stay hotels offer furnished, flexible options if your timeline is uncertain.
- Create a Livable "In-Place" Zone: If staying is unavoidable, isolate the construction areas. Use heavy-duty plastic sheeting to create dust barriers and set up a temporary kitchen with a microwave, mini-fridge, and electric kettle. Some homeowners, like a Texas family, attempted this during a kitchen remodel but later regretted the decision due to pervasive dust.
Pro-Tip: Before signing a lease for a temporary home, check your homeowner's insurance policy. Some policies include "Additional Living Expense" (ALE) coverage, which may reimburse you for rent, food, and other costs incurred if your home becomes uninhabitable during a covered event or renovation.
7. Address Structural and Systems Upgrades First
Prioritizing foundational infrastructure is a non-negotiable step in any comprehensive whole house remodel checklist. This means addressing the home's "bones" and "organs" like the foundation, structural integrity, electrical, plumbing, and HVAC systems before any cosmetic work begins. These critical systems are the backbone of your home, and accessing them often requires opening up walls, floors, and ceilings.
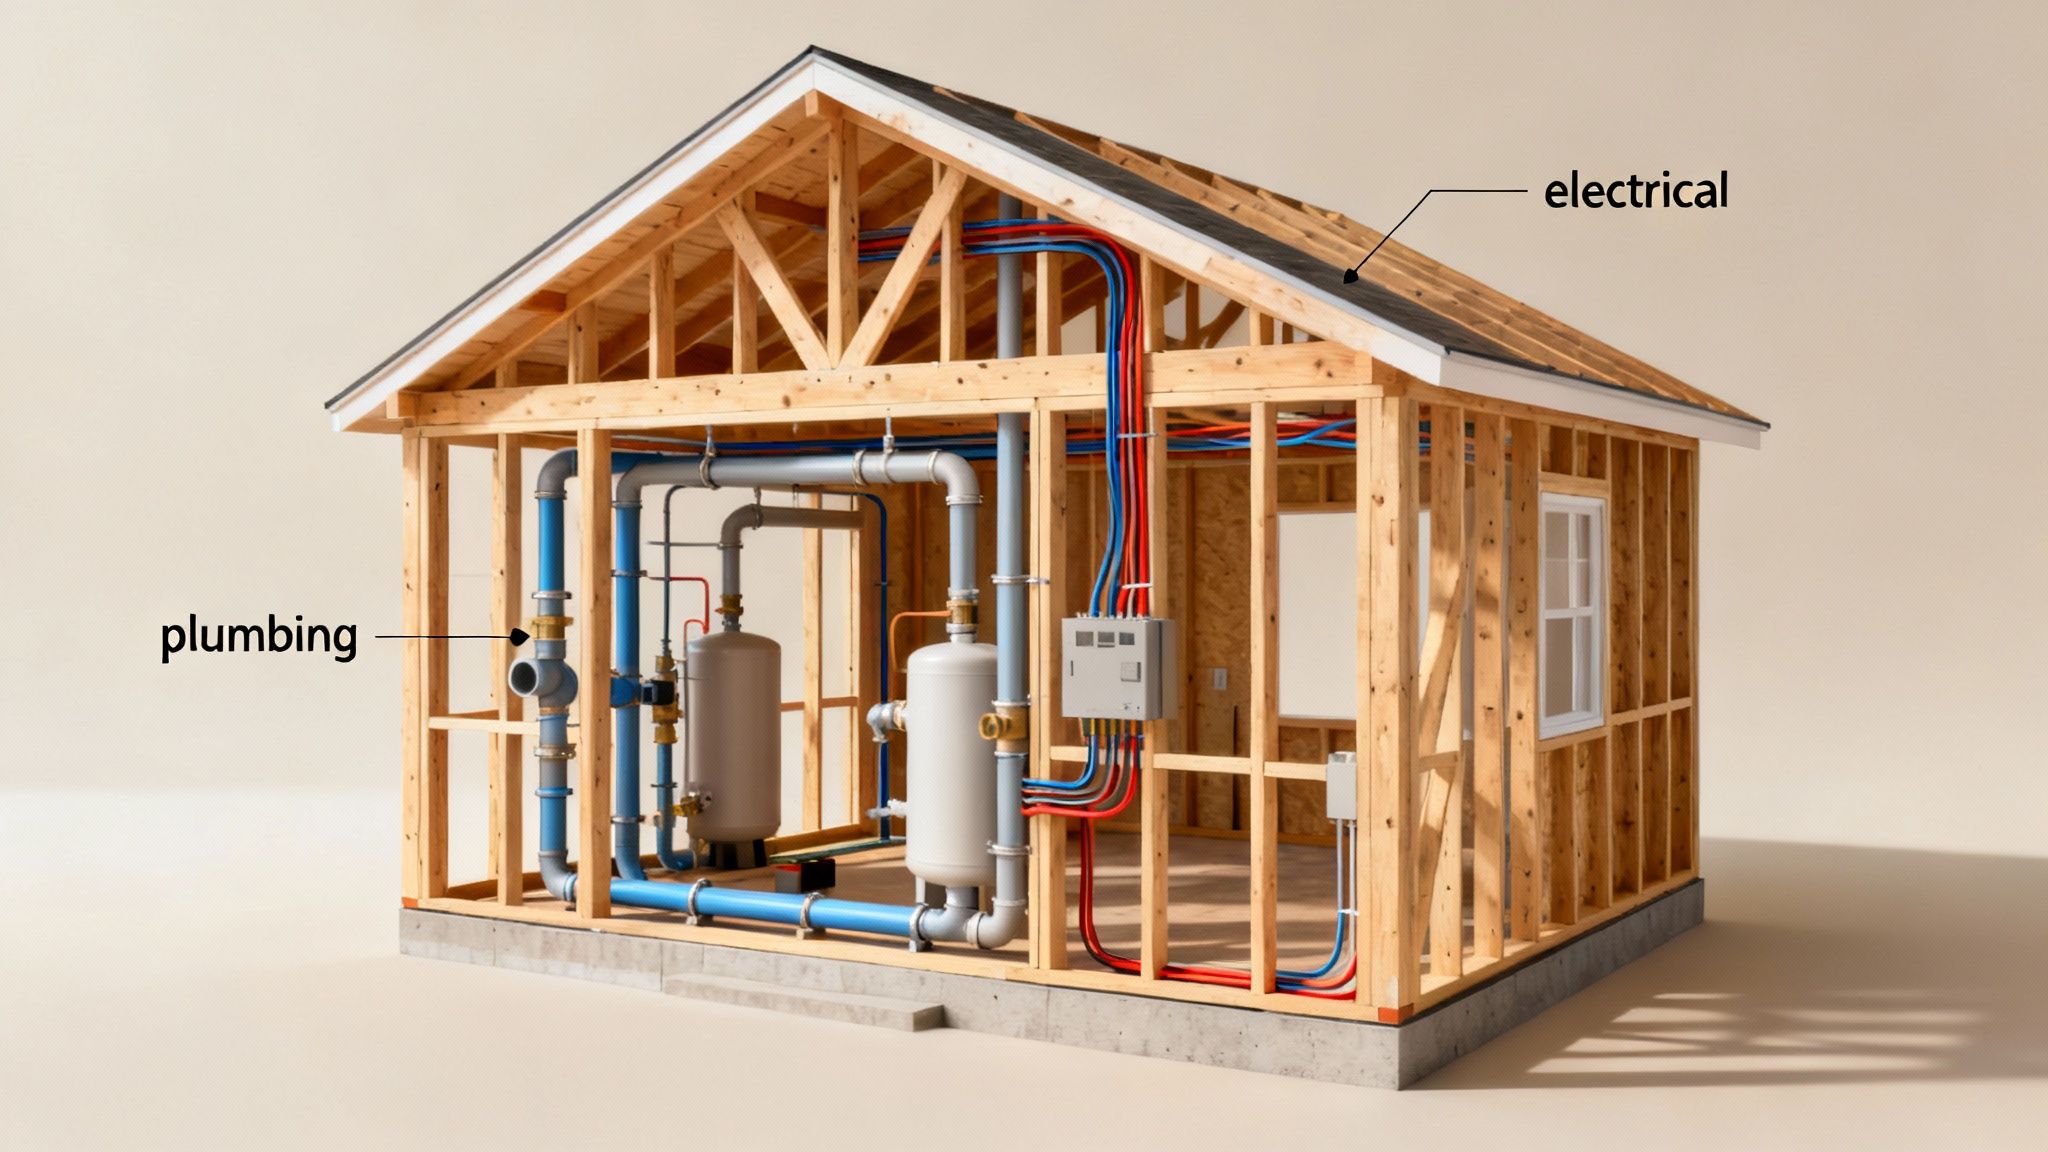
This "structure-first" philosophy, championed by building science experts like Matt Risinger and shows like This Old House, ensures the long-term safety, efficiency, and durability of your home. Deferring this work not only leads to system failures but also results in costly rework, as you would have to tear out finished walls or floors to make repairs later. Addressing these elements first protects your entire renovation investment.
How to Implement a Structure-First Approach
Tackling these hidden systems requires specialized expertise and careful planning during the earliest phases of demolition and construction. It’s about building a solid, reliable core before adding the beautiful finishes.
- Professional Assessments: Before demolition, hire a structural engineer and licensed tradespeople (electrician, plumber) to conduct thorough inspections. This identifies issues like outdated knob-and-tube wiring, which can cost upwards of $18,000 to replace, or foundation problems that must be rectified before any other work can proceed.
- System Rough-ins: All new plumbing lines, electrical wiring, and HVAC ductwork must be installed and inspected before insulation and drywall go up. This is the "rough-in" phase. For instance, an Illinois Victorian remodel required $45,000 in structural reinforcement to safely remove a load-bearing wall for an open-concept design-a cost that had to be addressed at the very beginning.
- Plan for Future Needs: Upgrade systems beyond current minimums. Increase your electrical panel's capacity to accommodate future appliances or an EV charger. While replacing subfloors, consider adding radiant floor heating for enhanced comfort and efficiency.
Pro-Tip: Document the "before" and "after" of your systems with detailed photos and videos once the walls are open. This creates an invaluable record of where every pipe, wire, and duct is located for future maintenance or repairs, saving you time and money down the road.
8. Protect and Prepare the Property
Before the first hammer swings, a crucial step in any whole house remodel checklist is to thoroughly protect your property. This involves implementing comprehensive measures to safeguard your home, belongings, and even your neighbors' property from the inevitable dust, debris, and heavy traffic of construction. Proper site preparation prevents costly accidental damage and maintains a safer, more organized worksite.
This proactive approach, championed by systems like Ram Board and BuildClean, separates the construction zone from your living space. A Chicago townhouse remodel, for instance, avoided an estimated $8,000 in hardwood floor damage by using proper floor protection, while a Boston brownstone preserved $15,000 of original molding by carefully protecting it before demolition. Failing to do this can be expensive; one Seattle project incurred a $3,000 bill to repair a neighbor's fence damaged by unprotected equipment.
How to Implement Comprehensive Site Protection
Effective preparation goes far beyond laying down a few drop cloths. It requires a systematic strategy to contain dust, protect surfaces, and manage site logistics.
- Dust and Debris Containment: Set up robust dust barriers. Use systems like ZipWall with heavy-duty plastic sheeting to seal off work areas from the rest of the house. Seal HVAC registers and return air vents with magnetic covers to prevent construction dust from circulating through your entire system.
- Surface Protection: Protect floors with durable materials like Ram Board, not just thin plastic that can tear and become a slip hazard. Cover valuable countertops, cabinetry, and fixtures that are remaining with cardboard, moving blankets, or specialty protective films.
- Establish Clear Zones: Designate a single entry and exit point for workers to minimize tracking dust throughout the home. Create specific, protected pathways for moving materials and equipment in and out. Establish a clear staging area outside for material deliveries and a waste area for the dumpster.
Pro-Tip: Before any work begins, take detailed photos of the property, including all areas to be protected, driveways, landscaping, and even your neighbors' adjacent property. This documentation provides a clear "before" record and can be invaluable in settling any potential disputes about damage later on.
9. Establish Clear Communication and Decision-Making Protocols
A successful whole house remodel checklist depends as much on clear communication as it does on skilled craftsmanship. Establishing structured communication and decision-making protocols from day one prevents costly misunderstandings, frustrating delays, and relationship breakdowns between you and your project team. This system creates a clear framework for how information is shared, approvals are given, and problems are solved.
This systematic approach, championed by project management platforms like BuilderTrend and CoConstruct, transforms potential chaos into controlled progress. Instead of relying on memory and verbal agreements which can lead to disputes, you create a documented, transparent process. An Oregon family, for instance, used a shared BuilderTrend platform to streamline decisions, reducing email clutter and ensuring all parties had access to the same information in real time.
How to Implement Strong Communication Systems
A robust communication plan is a set of agreed-upon rules for interaction. It ensures everyone is informed, accountable, and aligned throughout the renovation.
- Schedule Regular Meetings: Set a standing weekly 30-minute progress meeting for the same day and time. This creates a predictable opportunity to review progress, ask questions, and address upcoming decisions without constant interruptions.
- Document Everything in Writing: Require all change orders to be submitted in writing, detailing the cost and timeline implications, before any work proceeds. This avoids the "he said, she said" scenarios that can lead to lawsuits, like a New York renovation that soured over undocumented verbal changes.
- Define Authority and Response Times: Designate one household member as the primary point of contact to prevent conflicting directions. Agree on a 24-48 hour response window for contractor questions; prompt decisions on material selections can prevent costly delays and keep the project on schedule.
- Leverage Technology: Use project management apps like Houzz Pro, CoConstruct, or even a shared digital calendar to track deadlines for material selections and key milestones. Daily progress photos also create a visual log of the work, helping you spot issues early, like a Minnesota remodel that avoided a $7,000 error when weekly photos revealed an incorrect tile installation.
Pro-Tip: Document every significant verbal conversation with a follow-up email summary. A simple message like, "Hi [Contractor Name], just to confirm our conversation today, we agreed to..." creates a written record and ensures both parties understood the discussion the same way.
10. Plan for Quality Control and Final Inspection
Implementing systematic quality control is a critical step in your whole house remodel checklist that transforms expectations into reality. This process involves ongoing checks and a meticulous final walk-through to ensure every aspect of the work meets contractual standards, building codes, and your vision. It is the final defense against subpar workmanship, ensuring you don't pay the final invoice until the job is truly complete and correct.
This proactive approach, heavily advocated by home inspection experts like Mike Holmes, prevents small issues from becoming major, costly problems. A homeowner in Michigan, for instance, discovered improper shower waterproofing during a milestone inspection, a catch that prevented thousands in future water damage repairs. Quality control isn't about micromanagement; it's about collaborative verification to achieve the high-quality home you paid for.
How to Implement a Robust Quality Control Process
A successful quality control plan is structured and documented, moving from regular check-ins to a comprehensive final sign-off. This ensures accountability and a clear path to project completion.
- Create a Detailed Punch List: This is a running list of all items that need correction. During the final walk-through, document every flaw, no matter how minor, from paint touch-ups and scuffed floors to a misaligned cabinet door. Use your phone to take photos and make notes for clarity.
- Conduct Milestone Walk-Throughs: Don't wait until the end. Schedule formal walk-throughs with your contractor at key phases, such as 25% (post-framing), 50% (post-drywall), and 75% (pre-finishes) completion. This allows you to catch issues, like incorrect outlet placement, when they are easier and less expensive to fix.
- Verify All Systems and Finishes: Test everything. Turn on every light switch, run every faucet, test all appliances, and check HVAC systems. Verify that all materials and finishes, from the specific tile grout color to the brand of fixtures, match your signed selection sheet.
Pro-Tip: Withhold a final payment of 10-15% of the total contract price until every single item on the punch list is completed to your satisfaction. This retainage provides powerful leverage to ensure the contractor finishes the job properly and doesn't disappear before addressing the final details.
Whole House Remodel Checklist Comparison
| Establish a Realistic Budget and Contingency Fund | Moderate - Detailed cost estimation | Time, budgeting tools, multiple quotes | Prevents cost overruns; informed project scope | Any whole house remodel | Financial control; clear expectations; contingency planning |
| Hire Qualified Professionals and Verify Credentials | Moderate to High - vetting and contracts | Time for research, licensing checks | Reduced mistakes; timely and code-compliant work | Projects needing expert handling | Professional expertise; accountability; insurance coverage |
| Obtain Required Permits and Ensure Code Compliance | Moderate - paperwork and inspection coordination | Time, permit fees, inspections | Legal compliance; avoids fines; insurance valid | All remodels involving structural, electrical, plumbing changes | Safety assurance; legal protection; resale value maintained |
| Create a Detailed Design Plan and Material Selections | High - extensive planning and design work | Design professionals, software, samples | Clear project vision; fewer mid-project changes | Remodels with significant design scope | Accurate bidding; material availability; cost locking |
| Develop a Realistic Timeline with Milestones | Moderate - scheduling and coordination | Scheduling tools, communication time | Project stays on track; expectations managed | Large or complex remodels | Efficient task coordination; buffer for delays |
| Plan for Alternative Living Arrangements | Variable - depends on living situation | Temporary housing, storage, logistics | Reduced stress and health risks; uninterrupted work | Extensive or disruptive remodels | Safety; efficiency; reduced family disruption |
| Address Structural and Systems Upgrades First | High - technical and regulatory work | Specialized inspections, licensed trades | Long-term home safety and value; fewer future repairs | Homes with aging infrastructure | Code compliance; system modernization; energy efficiency |
| Protect and Prepare the Property | Low to Moderate - physical protection setup | Materials for barriers, protection gear | Minimized damage; dust and debris containment | All renovation sites | Property protection; cleaner worksite; neighbor relations |
| Establish Clear Communication and Decision-Making Protocols | Moderate - requires discipline and time | Meeting time, communication platforms | Fewer misunderstandings; timely decisions | Projects with multiple stakeholders | Smoother workflow; accountability; documented changes |
| Plan for Quality Control and Final Inspection | Moderate - thorough inspections and documentation | Inspection knowledge, time, possible independent inspector | High workmanship standards; fewer defects | All remodels with quality assurance focus | Issue detection early; compliance verification; warranty support |
Bringing Your Remodeled Home to Life
Navigating a whole-house remodel is an intricate dance of creativity, logistics, and meticulous execution. The journey from initial concept to a fully realized living space is complex, but by methodically working through a comprehensive whole house remodel checklist, you transform a potentially overwhelming process into a series of manageable, achievable steps. This checklist isn’t just a list of tasks; it’s a strategic roadmap designed to protect your investment, preserve your sanity, and ensure the final result aligns perfectly with your vision.
You began by laying a rock-solid foundation: establishing a realistic budget with a built-in contingency fund. This crucial first step provided the financial guardrails for every subsequent decision. From there, you assembled your expert team, meticulously vetting and hiring qualified professionals whose credentials and communication style inspired confidence. This early diligence in planning, permitting, and design set the stage for a smoother, more predictable project, minimizing the risk of costly surprises and delays.
The Power of Proactive Planning
The core lesson from this extensive checklist is the undeniable power of proactive planning. Success in a major renovation is rarely accidental. It’s the direct result of thoughtful preparation across several key areas:
- Logistical Preparedness: Arranging alternative living accommodations wasn't just about convenience; it was about creating a stress-free buffer zone between your daily life and the inherent chaos of a construction site.
- Structural Integrity: Prioritizing foundational, structural, and systems upgrades before any cosmetic work ensures the long-term health and safety of your home, safeguarding it from the inside out.
- Operational Clarity: Establishing clear communication protocols and a defined decision-making hierarchy with your contractor prevented misunderstandings and kept the project moving forward efficiently.
- Asset Protection: Taking the time to properly protect your property, from sealing off non-work zones to safeguarding valuable landscaping, demonstrated a commitment to detail that pays dividends in the final stages.
By internalizing these steps, you moved from a reactive mindset, where problems are addressed as they arise, to a proactive one, where potential issues are anticipated and mitigated before they can derail your timeline or budget.
From Blueprint to Reality: The Final Steps
As construction concludes, your role shifts from planner to quality control expert. The final walkthrough and punch list completion are your last, and most critical, opportunities to ensure the work meets the agreed-upon standards. This is where your detailed plans and material selection sheets become invaluable references. Don't rush this process. Walk through every room with a critical eye, testing every fixture, opening every door, and inspecting every finish.
A successful whole-house remodel is more than just an aesthetic upgrade; it’s a fundamental reimagining of your living space to better suit your lifestyle. The process, when guided by a detailed whole house remodel checklist, empowers you to be an active, informed participant in your home's transformation. You've invested time, resources, and vision into this project. Now, as the dust settles and the final touches are complete, you can step back and appreciate a home that is not only beautifully renovated but also a true reflection of your efforts and dreams.
Ready to turn your detailed checklist into a stunning reality? For homeowners in Orem, Provo, and across Utah, Northpoint Construction specializes in guiding clients through every phase of the renovation process, ensuring a seamless journey from concept to completion. Visit us at Northpoint Construction to see how our commitment to quality and transparent communication can bring your dream home to life.