
That unfinished basement is more than just a concrete box; it's a goldmine of untapped living space waiting to be discovered. The thought of finishing it often brings visions of overwhelming costs and complex construction, but it doesn't have to be that way. Transforming your lower level into a functional, inviting area is entirely achievable, even with significant financial constraints. This guide is dedicated to providing smart, stylish, and practical basement finishing ideas on a budget that prioritize high impact over high spending.
We will explore eight proven strategies designed to maximize your return on investment. From clever ceiling solutions that add height and character to flooring that stands up to moisture without draining your wallet, each idea is broken down with actionable tips and realistic cost expectations.
Forget the misconception that a beautiful basement requires a six-figure budget. These concepts are designed to help you create a useful and attractive space, whether it's a cozy family room, a productive home office, or the ultimate entertainment zone. You will learn how to make strategic choices on materials, labor, and decor to get the most value for your money. Let's get started on unlocking your home's hidden potential.
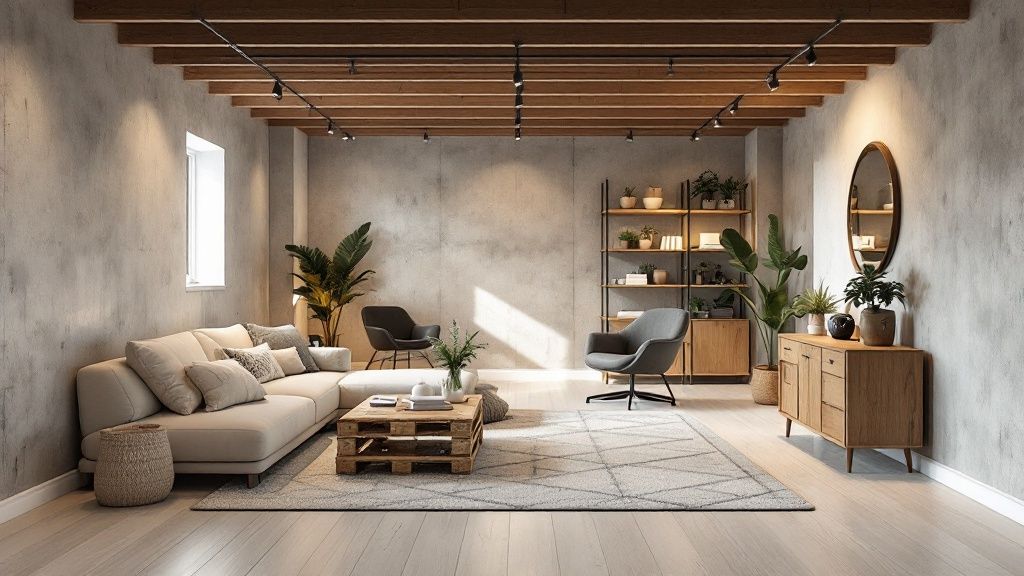
1. Painted Ceiling with Exposed Joists
One of the most impactful and budget-friendly basement finishing ideas is to skip the traditional drywall or drop ceiling entirely. Instead, embrace an industrial-chic aesthetic by painting the exposed ceiling joists, subfloor, and any visible ductwork. This approach not only saves significantly on material and labor costs but also maximizes precious ceiling height, making the space feel larger and more open.

The key to a polished finish is meticulous preparation. This method is perfect for creating a modern, urban loft feel, which is highly sought after in today's design trends.
Why Choose an Exposed Ceiling?
This solution is ideal for basements with low ceilings where every inch of vertical space matters. It's a fantastic choice for a variety of themes and uses:
- Urban Loft Home Theaters: Dark paint colors can make the ceiling recede, creating an immersive cinematic experience.
- Industrial-Themed Workshops or Man Caves: The raw, unfinished look complements utilitarian and masculine design schemes.
- Modern Home Offices: A clean, white-painted exposed ceiling can make the space feel bright, airy, and contemporary.
Practical Tips for Implementation
Achieving a professional look requires more than just a coat of paint. Follow these steps for the best results:
- Clean Thoroughly: Before you begin, use a shop vac to remove cobwebs and dust. Then, wipe down all surfaces, including joists and pipes, with a degreaser to ensure the primer and paint adhere properly.
- Prime Everything: Use a high-quality, stain-blocking primer. This step is crucial for sealing the wood to prevent stains from bleeding through and ensuring an even final color.
- Choose the Right Paint: A paint sprayer will provide the fastest and most even coverage, easily reaching into tight corners. For color, dark shades like charcoal or black are excellent for hiding imperfections and making the ceiling visually disappear. For a brighter look, opt for a crisp white.
- Select the Right Sheen: A satin or semi-gloss finish is easier to wipe clean than a flat or matte finish, which is a practical consideration for a basement environment.
For more inspiration on how to integrate this look into your overall design, you can find a wealth of basement design ideas that highlight the benefits of an exposed ceiling.
2. Luxury Vinyl Plank (LVP) Flooring
Choosing the right flooring is crucial in a basement remodel, and luxury vinyl plank (LVP) offers a perfect blend of style, durability, and affordability. This engineered flooring option convincingly mimics the look of expensive hardwood or natural stone at a fraction of the cost. More importantly, modern LVP is 100% waterproof, making it an outstanding choice for basements that may be prone to dampness or moisture issues.

The widespread availability of click-lock installation systems makes this a highly accessible DIY project, saving homeowners significant money on professional labor. This feature solidifies LVP's place as one of the best basement finishing ideas on a budget.
Why Choose Luxury Vinyl Plank?
LVP is a versatile solution that addresses the unique challenges of a below-grade environment while providing a high-end finish. It's a fantastic choice for nearly any basement function:
- Warm and Inviting Family Rooms: Wood-look LVP provides the classic warmth of hardwood without the risk of warping or water damage.
- Durable Home Gyms or Playrooms: Its tough wear layer resists scratches, dents, and spills, standing up to heavy equipment and active kids.
- Stylish Basement Bars or Kitchenettes: Stone-look or tile-look LVP offers an elegant appearance that is easy to clean and maintain in high-traffic areas.
Practical Tips for Implementation
A successful LVP installation depends on careful preparation and attention to detail. Follow these key steps for a floor that lasts:
- Prepare the Subfloor: Ensure the concrete subfloor is clean, dry, and perfectly level. Use a self-leveling compound to fill any low spots, as an uneven surface can cause planks to separate over time.
- Acclimate the Planks: Let the unopened boxes of LVP sit in the basement for at least 48 hours before installation. This allows the material to adjust to the room's temperature and humidity, preventing future buckling.
- Plan for Expansion: Leave a small expansion gap (typically 1/4 inch) around the perimeter of the room. This gap will be hidden by baseboards or quarter-round molding and allows the flooring to expand and contract naturally.
- Invest in Thickness: For a more solid feel underfoot and enhanced durability, choose a thicker plank (8mm or more) with a substantial wear layer (at least 12 mil).
For a deeper dive into flooring materials suitable for your project, you can explore some of the best basement flooring options.
3. Fabric Wall Panels and Tapestries
For a truly unique and budget-friendly approach to basement walls, consider using fabric panels, tapestries, or even stylish bedsheets. This method provides an inexpensive way to cover large areas, adding instant color, texture, and warmth to cold concrete walls. It's a fantastic alternative to paint or drywall, effectively hiding minor imperfections and improving the room's acoustics.
The key to this idea is its versatility and ease of installation. With minimal tools and effort, you can transform a drab basement into a cozy and inviting space, making it one of the most creative basement finishing ideas on a budget.
Why Choose Fabric Wall Coverings?
This solution is perfect for homeowners who want a non-permanent, easily changeable design element. It’s an excellent choice for a variety of basement themes:
- Bohemian Basement Lounges: Large, intricate tapestries can create a stunning focal point and a relaxed, eclectic vibe.
- Teen Bedrooms or Hangouts: Colorful, patterned fabric panels allow for personal expression and can be updated as tastes change.
- Music or Media Rooms: Fabric naturally dampens sound, which helps to reduce echo and improve the audio experience in the room.
Practical Tips for Implementation
To get a professional and lasting result, consider these simple but effective steps before you begin hanging your fabric:
- Prepare the Fabric: Always pre-wash and iron your chosen fabric to prevent future shrinking or puckering once it's on the wall. This ensures a smooth, consistent finish.
- Use Damage-Free Methods: For a temporary or rental-friendly solution, use Command strips or heavy-duty double-sided tape. This allows for easy removal without damaging the walls underneath.
- Consider a Polished Look: For a more permanent and finished appearance, build simple wooden frames (like a canvas stretcher) and staple the fabric tightly around them. This creates a clean, taut panel that can be hung like a piece of art.
- Choose the Right Material: Select fabrics with a tight weave, such as canvas or upholstery fabric, for better durability and opacity. Lighter fabrics may be see-through and less resilient over time.
4. DIY Built-in Storage with Basic Lumber
Custom storage can transform a cluttered basement into an organized, multi-functional space, but bespoke cabinetry is notoriously expensive. A fantastic budget-friendly alternative is to build your own custom storage solutions using basic lumber like 2x4s and plywood or OSB. This approach allows you to create units that perfectly fit your basement's unique dimensions, maximizing every square inch for a fraction of the cost of pre-made or custom-built furniture.
This method empowers you to design and construct everything from entertainment centers to cozy window seats, making it one of the most practical basement finishing ideas on a budget for adding both value and utility.
Why Choose DIY Built-in Storage?
DIY built-ins are the perfect solution for homeowners who need to tackle specific organizational challenges or want a high-end, integrated look without the designer price tag. This idea excels in a variety of applications:
- Custom Entertainment Centers: Design a floor-to-ceiling unit to house your TV, gaming consoles, and media collections, hiding unsightly wires.
- Under-Stair Storage: Utilize the awkward space under the stairs by building custom shelves, drawers, or even a small desk nook.
- Built-in Benches with Cubbies: Create a cozy reading corner or a functional mudroom area with seating that doubles as storage for toys, shoes, or blankets.
Practical Tips for Implementation
Building sturdy and attractive storage is achievable with careful planning and basic woodworking skills. Follow these tips for a successful project:
- Anchor Securely: Always use a stud finder to locate wall studs before anchoring your framing. This ensures your built-ins are stable and can safely support weight.
- Prevent Wood Splitting: Pre-drill pilot holes for all screws. This simple step prevents the wood from splitting, especially when working close to the edges of boards.
- Finish for a Polished Look: Thoroughly sand all surfaces before applying paint, stain, or a clear sealant. A smooth finish makes the final product look professional and intentional.
- Add Ambient Lighting: Consider incorporating inexpensive LED strip lighting under shelves or along the back of an entertainment center to add a high-end, ambient glow.
For more detailed guidance on how to execute such projects effectively, explore these tips on how to finish a basement on a budget.
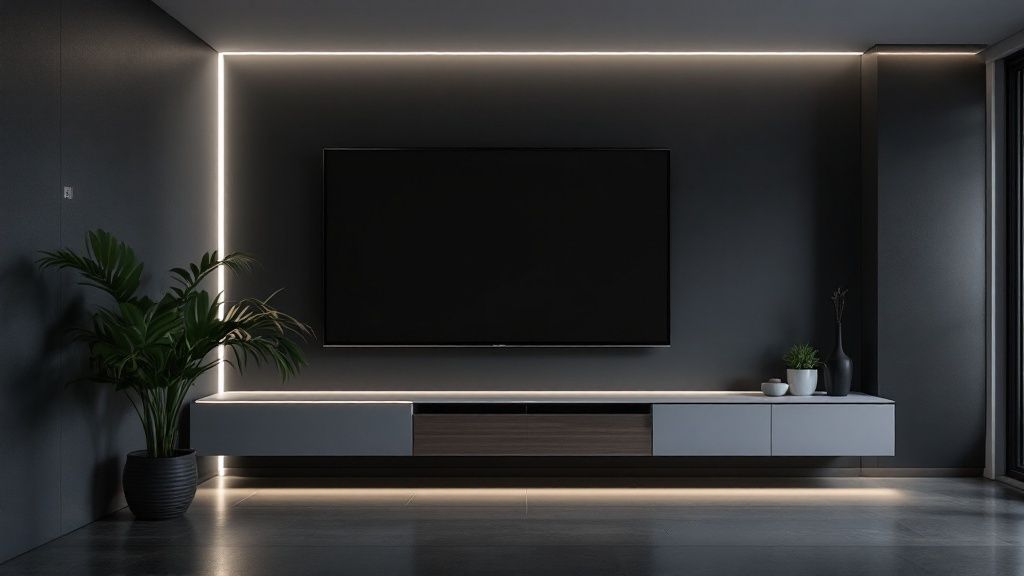
5. Strategic Lighting with LED Strip Lights
Proper lighting is crucial in a basement, but traditional recessed lighting can be costly to install. LED strip lighting offers a modern, affordable, and highly versatile alternative that can dramatically improve both the ambiance and functionality of your space. These flexible, adhesive-backed strips can be placed in discreet locations to create stunning indirect lighting effects that make the basement feel larger, warmer, and more inviting.
The adaptability of these lights is their biggest strength. Modern smart LED strips even offer color-changing capabilities and app controls, allowing you to change the entire mood of the room with a single tap.
Why Choose LED Strip Lights?
This lighting solution is perfect for adding a layer of sophisticated, custom lighting without the high cost of a professional electrician for complex installations. They are one of the best basement finishing ideas on a budget for targeted and accent lighting:
- Home Theater Ambiance: Place strips behind a TV screen or along a soffit to create a soft, cinematic glow that reduces eye strain.
- Basement Bar or Kitchenette: Install them under cabinets or along the edge of a countertop for task lighting that also highlights the design.
- Safety and Style on Stairs: Line the underside of stair treads to illuminate the steps, adding both a crucial safety feature and a high-end look.
Practical Tips for Implementation
A successful installation depends on a little bit of planning. Follow these guidelines for a clean, professional-looking result:
- Clean Surfaces First: Ensure the surface where you plan to stick the lights is clean, dry, and free of dust. Use an alcohol wipe to prep the area for the best adhesion.
- Check LED Density: Look for strips with a higher number of LEDs per foot. This creates a more uniform, continuous line of light rather than a series of noticeable dots.
- Use Channels for Diffusion: For a truly professional finish, install the LED strips inside an aluminum channel with a frosted cover. This diffuses the light, protects the strip, and helps dissipate heat.
- Plan Your Power Source: Before you start sticking anything down, figure out where your power outlets are. You may need to use extensions or plan the strip's path to reach the nearest outlet discreetly.
6. Painted Concrete Floors with Area Rugs
Instead of installing expensive flooring like tile or vinyl plank, one of the most effective basement finishing ideas on a budget is to work with the existing concrete slab. Painting the concrete floor with a durable epoxy or specialized concrete paint creates a clean, sealed, and modern surface. This approach is not only cost-effective but also provides a versatile foundation that can be softened and styled with area rugs.
This method delivers a durable, easy-to-clean finish perfect for the unique challenges of a below-grade environment, while area rugs add warmth, texture, and help define different functional zones. It’s a practical yet stylish solution popularized by the industrial design movement.
Why Choose Painted Concrete Floors?
This flooring solution is perfect for basements that may be prone to moisture issues, as painted concrete is non-porous and won't harbor mold or mildew. It is an excellent choice for a variety of basement uses:
- Modern Basement Home Gyms: An epoxy-coated floor provides a tough, resilient surface that can withstand dropped weights and heavy equipment, plus it's simple to wipe clean.
- Industrial-Style Family Rooms: A sleek, gray painted floor sets the stage for a contemporary or industrial aesthetic. Large, plush area rugs can then create cozy conversation or media viewing areas.
- Workshop and Craft Areas: A durable floor coating resists stains from paint, oil, and other materials, making cleanup effortless and protecting the concrete foundation.
Practical Tips for Implementation
Proper surface preparation is absolutely critical for a long-lasting and professional-looking finish. Rushing this process will lead to peeling and chipping down the road.
- Clean and Etch Thoroughly: Begin by deep cleaning the concrete with a degreaser to remove any oils or grime. Then, use a concrete etching product to open up the pores of the concrete, which allows the primer and paint to bond securely.
- Use the Right Primer: Always apply a primer specifically designed for concrete surfaces. This step is crucial for adhesion and preventing moisture from seeping up and causing the paint to bubble.
- Apply Thin, Even Coats: Whether rolling or brushing, apply the paint in multiple thin, even coats rather than one thick coat. This technique promotes better adhesion and a smoother final appearance.
- Allow for Full Cure Time: Be patient and follow the manufacturer's instructions for curing time. While the floor may feel dry to the touch in a day, it can take a week or more to fully cure and harden enough to withstand heavy use and furniture.
7. Repurposed and Thrift Store Furniture
Furnishing a newly finished basement can quickly escalate costs, but one of the most effective basement finishing ideas on a budget is to embrace the world of secondhand treasures. Sourcing furniture from thrift stores, estate sales, and online marketplaces allows you to acquire high-quality, solid pieces for a fraction of the retail price. This approach prioritizes character and craftsmanship over brand-new, often lower-quality, alternatives.
The secret is to look past the current finish and focus on the item's "bones." A dated coffee table or dresser can be completely transformed with some sandpaper, paint, or stain, creating a custom piece that perfectly suits your basement's aesthetic.
Why Choose Repurposed Furniture?
This strategy is perfect for homeowners who enjoy a bit of DIY and want to create a truly unique space that reflects their personal style. It’s an excellent choice for a variety of basement themes:
- Eclectic Family Rooms: Mix and match different styles and eras to create a comfortable, lived-in feel that’s both stylish and forgiving.
- Mid-Century Modern Lounges: Estate sales are goldmines for authentic mid-century modern pieces like credenzas and armchairs that can be restored to their former glory.
- Farmhouse-Style Entertainment Areas: A vintage buffet can be repainted to serve as a charming media console, or an old farmhouse table can become a rustic craft or game table.
Practical Tips for Implementation
Finding and refinishing secondhand furniture is a rewarding process. Follow these guidelines to ensure success:
- Prioritize Solid Wood: Look for furniture made from real wood rather than particle board or MDF. It is far more durable and much easier to sand, stain, and repaint for a professional-looking finish.
- Inspect for Structural Integrity: Before buying, check for wobbly legs, sticky drawers, and signs of significant damage. Minor cosmetic flaws are easy to fix, but major structural issues may not be worth the effort.
- Plan Your Makeover: Research the best techniques for your specific project. Chalk paint is great for a rustic, no-prep finish, while stripping and re-staining can highlight beautiful wood grain.
- Budget for Supplies: Remember to factor in the cost of sandpaper, primer, paint, brushes, and new hardware when calculating your total savings. These costs are minimal but should be considered.
8. Gallery Wall with Personal Photos and Prints
Transforming bare basement walls into a focal point doesn't require a large budget. One of the most personal and cost-effective basement finishing ideas on a budget is to create a gallery wall using personal photos, affordable art prints, and unique frames. This approach allows you to infuse the space with personality and warmth, telling a story with visuals that are meaningful to you and your family.
The beauty of a gallery wall lies in its versatility. You can curate a collection that reflects your hobbies, travels, and loved ones, making the basement feel like an integrated part of your home rather than a forgotten space.
Why Choose a Gallery Wall?
This decorative solution is perfect for adding character to any basement, regardless of its function. It's a fantastic way to decorate large, empty walls without investing in a single, expensive piece of art.
- Family Recreation Rooms: Display a timeline of family vacations, school pictures, and candid moments to create a warm, nostalgic atmosphere.
- Teen Hangout Spaces: Mix personal photos with band posters, movie prints, and their own artwork for an eclectic, expressive vibe.
- Basement Home Offices: Curate a collection of motivational quotes, abstract art, and inspiring landscape prints to create a focused and creative environment.
Practical Tips for Implementation
A well-executed gallery wall looks curated, not cluttered. Follow these steps to design a beautiful and balanced display:
- Plan the Layout: Before hammering any nails, arrange your framed pieces on the floor. Play with the composition until you find a layout that feels balanced. Take a photo to reference as you hang.
- Use Paper Templates: Trace each frame onto kraft paper or newspaper, cut out the shapes, and tape them to the wall. This allows you to visualize the final arrangement and make adjustments easily without creating unnecessary holes.
- Mix and Match: For a dynamic look, combine different frame sizes, styles, and colors. Incorporate a mix of photographs, prints, and even three-dimensional objects like small shelves or decorative plates to add depth and interest.
- Source Affordable Art: Look for downloadable prints on sites like Etsy, use your own high-resolution photos, or frame sentimental items like children's drawings or postcards. Thrift stores are also a great source for unique and inexpensive frames.
Basement Finishing Ideas Budget Comparison
| Painted Ceiling with Exposed Joists | Low - basic painting skills | Minimal materials ($50-$200) | Industrial, modern look; max ceiling height | Urban lofts, industrial-themed basements | Cost-effective, easy maintenance, quick |
| Luxury Vinyl Plank (LVP) Flooring | Moderate - DIY friendly | Moderate cost ($2-$8/sq ft) | Waterproof, durable floor with wood/stone look | Moisture-prone basements, family rooms | Waterproof, DIY install, variety of styles |
| Fabric Wall Panels and Tapestries | Low - simple hanging methods | Low cost ($20-$100) | Adds color, texture, and acoustic dampening | Bohemian spaces, music rooms, teen bedrooms | Budget-friendly, easy to change, softens space |
| DIY Built-in Storage with Lumber | High - carpentry skills needed | Moderate to high ($100-$500) | Custom, functional storage units | Basements needing organization and storage | Maximizes space, custom fit, value adding |
| Strategic Lighting with LED Strip Lights | Low - easy DIY installation | Low to moderate ($30-$150) | Enhanced ambiance and indirect lighting | Media rooms, bars, stairs | Energy-efficient, customizable, dramatic |
| Painted Concrete Floors with Rugs | Low to moderate - prep and painting | Moderate cost ($100-$300) | Durable, modern floor base with zone flexibility | Home gyms, workshops, industrial-style rooms | Cost-effective, easy maintenance, industrial |
| Repurposed and Thrift Store Furniture | Moderate - sourcing and refinishing | Variable ($200-$800) | Unique, eclectic, high-quality furnishings | Vintage, farmhouse, industrial styled basements | Cost savings, unique character, sustainable |
| Gallery Wall with Photos and Prints | Low - basic framing and hanging | Low cost ($50-$200) | Personalized, warm wall focal points | Family rooms, home offices, teen spaces | Very low cost, customizable, easy to update |
Bringing Your Budget-Friendly Basement to Life
Transforming a cold, concrete basement into a warm, inviting living space is no longer a project reserved for those with massive budgets. As we've explored, a wealth of creative and affordable options can turn this underutilized square footage into a genuine asset for your home. By combining smart material choices with a bit of DIY determination, you can execute a stunning renovation without draining your savings. The key takeaway from these basement finishing ideas on a budget is to focus on high-impact, low-cost solutions that align with your skills and vision.
Key Principles for a Successful Budget Basement Finish
The journey from a blank slate to a finished basement is built on a few core principles. First and foremost is prioritization. Start by ensuring the space is dry and well-prepped. From there, focus on the largest surfaces first, as they create the most significant visual change. The ideas we've covered follow this logic:
- Ceilings and Floors: Options like painting the exposed joists or sealing the concrete floors are incredibly cost-effective ways to establish a foundational aesthetic. Layering in an area rug or installing Luxury Vinyl Plank flooring adds warmth and style without the expense of traditional materials.
- Walls and Lighting: Instead of costly drywall and professional painting, consider unique solutions like large fabric tapestries or DIY wall panels. Combine these with strategic lighting, such as versatile and affordable LED strip lights, to create ambiance and define different zones within the space.
- Furnishings and Decor: This is where your creativity truly shines. DIY built-in storage using basic lumber provides a custom look for less, while sourcing unique furniture from thrift stores and creating a personal gallery wall infuses the space with character that money simply cannot buy.
Your Actionable Next Steps
Feeling inspired? The best way to begin is by creating a simple plan. Start by measuring your basement and setting a realistic budget. Next, select your favorite ideas from this list and map out which projects you can confidently tackle yourself versus those that might require professional help. Remember, while a DIY approach is central to saving money, critical tasks like complex electrical work or significant structural changes are often best left to licensed contractors for safety and code compliance.
Mastering these budget-friendly approaches does more than just save you money; it empowers you to take control of your home's potential. A finished basement significantly increases your property value and, more importantly, enhances your quality of life by providing extra space for family, hobbies, or relaxation. By thinking creatively, you are not just finishing a room, you are crafting a personalized extension of your home that reflects your style and ingenuity.
If you're ready to bring your basement vision to life but want the assurance of professional craftsmanship, our team can help you navigate the process. The experts at Northpoint Construction specialize in transforming basements into beautiful, functional spaces, ensuring your project is completed to the highest standard while respecting your budget. Contact us today to discuss your project and get a personalized estimate.