
Turning your basement into a home office is a fantastic idea, but it’s so much more than just dragging a desk downstairs. To do it right, you need to transform that underutilized square footage into a genuinely comfortable and productive workspace. Get this initial planning stage wrong, and you'll be fighting a losing battle against the classic basement woes.
Blueprint for a Better Workspace
Let's be honest, "basement office" can bring to mind a cold, damp, poorly-lit corner. But with some smart planning, it can become the quietest, most distraction-free room in the house. The secret is tackling the unique challenges of a below-ground space before you even start thinking about furniture.
This is the foundation of your entire project. Rushing this step is a recipe for frustration and expensive fixes down the road. You could end up with a finished space that's unusable because of a persistent chill, a lack of outlets, or poor lighting that gives you a headache by noon.
The Pre-Build Checklist
Before a single hammer swings, you need to give your basement a serious once-over. This isn't just a quick look around; it's a deep dive to spot potential problems and map out your solutions. A solid plan for a basement office always rests on these three pillars:
- Moisture and Climate Control: The absolute number one priority. Sniff for musty smells and look for any signs of water damage. Your plan has to include robust solutions for waterproofing, proper insulation, and ventilation to create a healthy, comfortable environment.
- Electrical and Lighting Needs: Think about your daily workflow. Where will your computer, monitors, and printer go? You’ll need more than just one ceiling light. Plan for a mix of ambient, task, and accent lighting, and make sure you have plenty of outlets exactly where you need them.
- Functional Layout and Flow: How will you actually use the space? Do you need a clean background for video calls? What about storage for files or supplies? Sketching out a simple floor plan is the best way to make every square foot count.
A great basement home office doesn't feel like a basement at all. It feels intentional. The goal is to create a space that is not only functional but also psychologically separate from the rest of the home, allowing for deep, focused work.
Nailing this initial planning phase ensures your investment pays off. If you're keeping a close eye on the budget, our guide on how to finish a basement on a budget has some great tips that fit right in here. By getting these essentials right from the start, you're setting yourself up for a smooth project and an office you'll genuinely enjoy working in.
Solving Basement Moisture and Comfort Issues
Before we even start dreaming about desks and ergonomic chairs, we need to tackle the two classic basement problems: dampness and cold. A truly great basement office is more than just good-looking; it has to be a healthy, comfortable place where you can actually get work done. If you skip over moisture control and insulation, you're signing up for a musty, chilly room that you'll end up avoiding.
First thing's first: play detective. You need to do a thorough inspection of your basement in its current state. Look for the classic red flags of water intrusion—things like dark, wet-looking stains on the concrete, paint that's bubbling or peeling off masonry walls, or a chalky white powder called efflorescence. That powdery stuff is basically mineral salt left behind when water seeps through the foundation and evaporates, and it's a dead giveaway you have a moisture issue.
Don't just slap a coat of paint on it and call it a day. Finding the root cause is everything, and surprisingly often, the problem actually starts outside your house.
Mastering Moisture Control
Getting a basement dry and keeping it that way usually requires a few different tactics working together. I've seen too many people just roll on a coat of "waterproof" paint, only to have it fail a year later because the underlying water pressure from outside was never dealt with.
- Look Outside First: Seriously, start here. Are your gutters clogged and overflowing? Are your downspouts dumping water right next to the foundation? They should be directing water at least six feet away. Also, check the dirt and landscaping around your house—it should slope away from the foundation, not toward it. You'd be amazed how many basement water problems disappear after a weekend of outdoor work.
- Move to Interior Solutions: If the outdoor fixes don't completely solve it, then it's time to work on the inside. For minor, lingering dampness, a high-quality waterproof coating can work well, but you have to apply it to perfectly clean, dry concrete for it to bond properly. This creates a membrane that stops water vapor from getting into your new office.
If you're dealing with persistent, high humidity—that classic damp basement feel—a good dehumidifier is non-negotiable. Modern ones are great; you can set them to maintain an ideal humidity level (aim for between 30-50%) and even run a hose to a floor drain so you never have to think about emptying the bucket.
A dry basement is a healthy basement. This isn't just about feeling comfortable. It’s about preventing mold and mildew from growing behind your new walls, which can cause serious health problems and ruin your drywall, furniture, and electronics.
The Non-Negotiable Role of Insulation
Once you're confident the space is bone-dry, it's time to insulate. This step is absolutely critical for a basement office you'll actually want to use. Those bare concrete walls are like a heat sink, constantly pulling warmth out of the room. Without insulation, your office will be freezing in the winter and your heating bills will go through the roof.
Good insulation also helps with moisture control. Think about it: when the warm, slightly humid air inside your new office hits that cold concrete wall, condensation forms—just like on a cold drink in the summer. That condensation can lead to mold. Insulation acts as a thermal break, keeping the inside surface of your wall warm and dry.
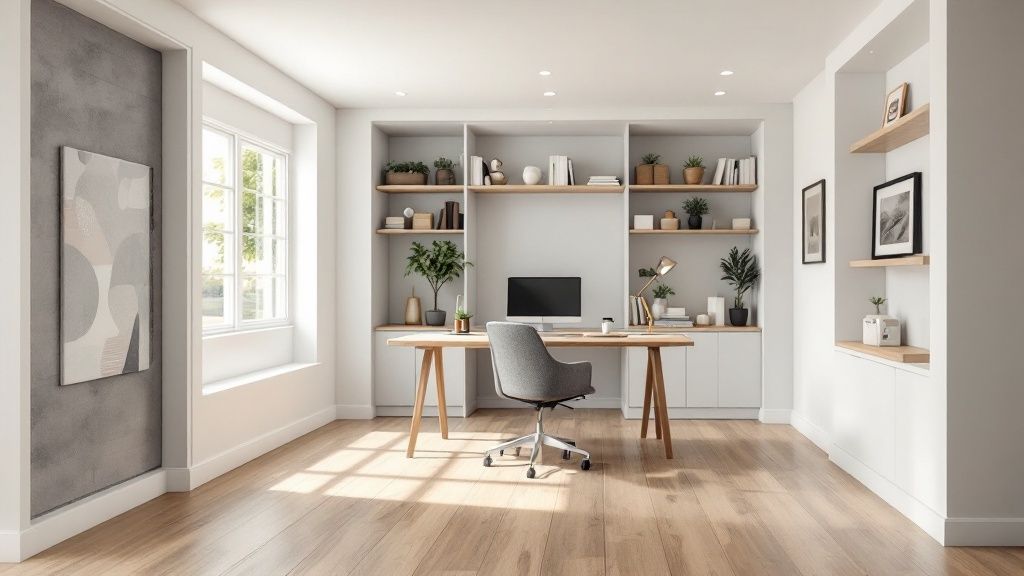
Here’s a great example of how a well-insulated and finished basement office can be transformed with something as simple as good lighting.
You can see how layering different types of light—general ambient lighting, focused task lighting for the desk, and accent lights—makes the space feel warm and inviting, not like a typical dungeon-like basement.
Choosing the right kind of insulation is your next decision. Here’s a quick rundown of the two most popular options for basements.
Choosing Your Basement Moisture Solution
To make the right choice for your basement, it helps to see the pros and cons of each primary method side-by-side. Your decision will likely depend on your budget, DIY comfort level, and the specific conditions of your foundation walls.
| Rigid Foam Board | DIY projects with straight, even foundation walls. | Creates a solid thermal break, is easy to handle and cut, and also acts as a vapor barrier. | Sealing joints and gaps around pipes can be tedious to get perfectly airtight. |
| Spray Foam | Old, irregular stone foundations or for the best possible air seal. | Expands to fill every single nook and cranny, provides a high R-value, and creates a seamless air and moisture barrier. | Requires professional installation and costs significantly more upfront. |
Honestly, a hybrid approach is often the best bet. I've had great success using rigid foam board on the large, flat wall sections and then hiring a pro to spray foam the tricky areas, like the rim joists between the floor joists at the top of the wall. That’s where you get a ton of air leaks.
Getting these fundamentals right—moisture and insulation—is what turns a basic basement into a valuable, enjoyable part of your home. It’s a real investment in your property and your daily work life. And you wouldn't be alone in making it; the global home office furniture market was valued at USD 29.3 billion in 2024 and is projected to hit USD 49.1 billion by 2033. It just goes to show how many people are realizing the benefit of creating a proper workspace at home. You can explore more about these market trends and how they’re shaping what homeowners want.
Planning Your Office Lighting and Power
Now that the essentials of moisture control and insulation are sorted, it’s time for the fun part—the elements that turn a basic basement into a professional-grade workspace. If there are two things that will make or break your basement office, it's the lighting and the electrical plan.
Get these right, and you'll have a bright, energizing space where you can actually get things done. Get them wrong, and you're left with a gloomy cave that kills your motivation.
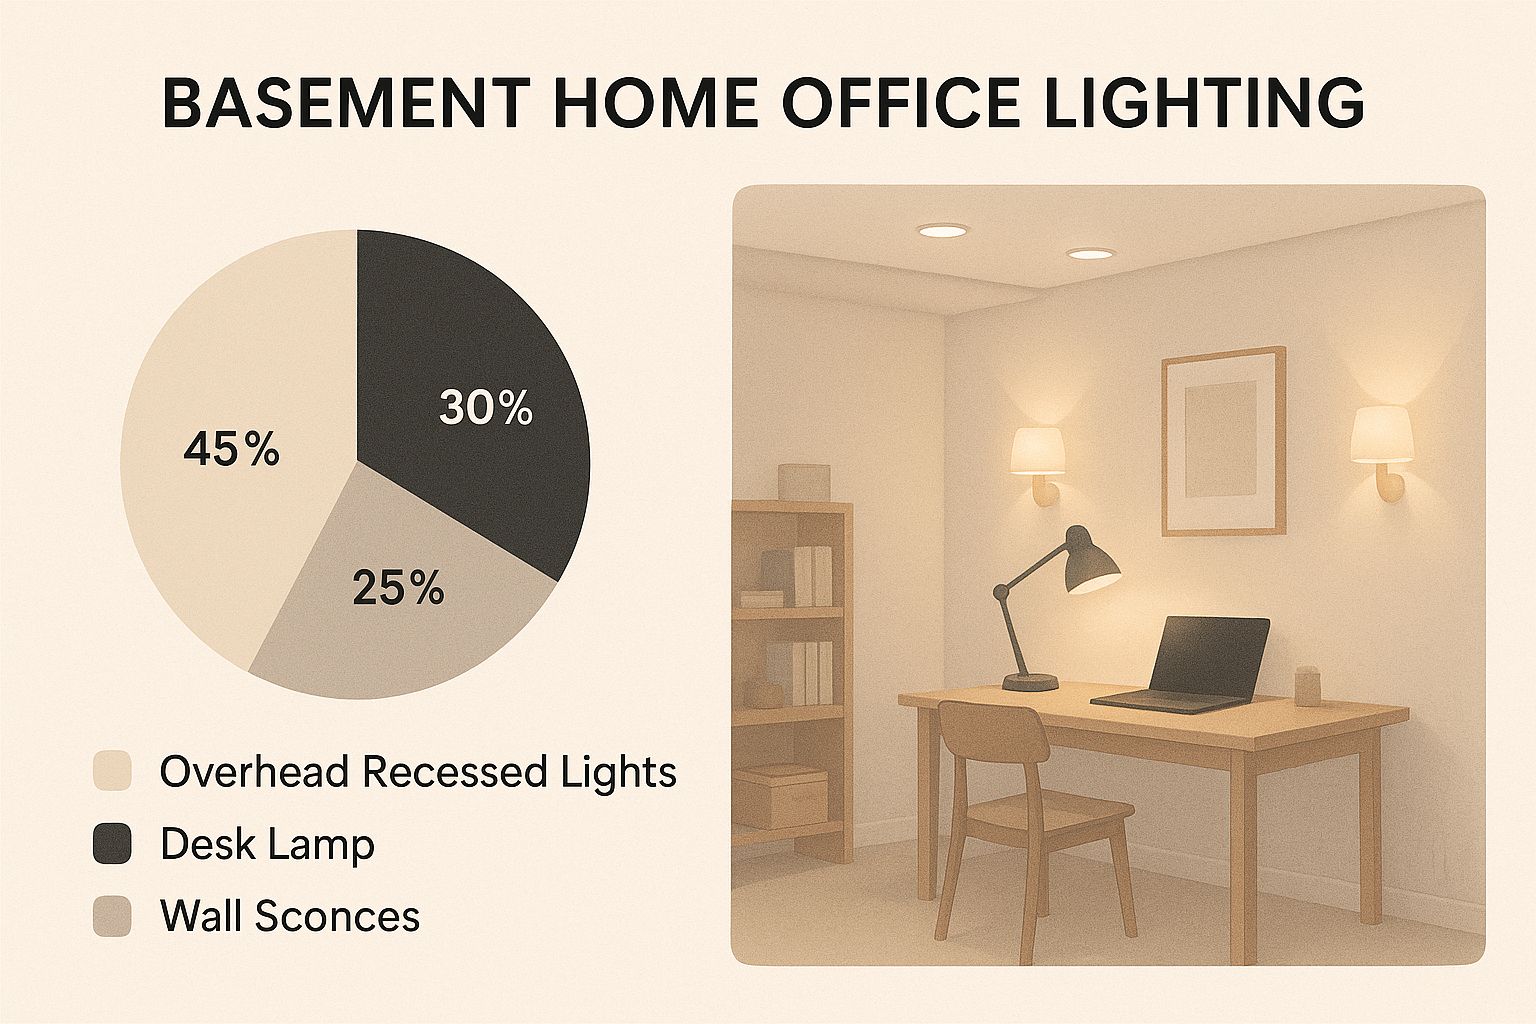
Adopt a Layered Lighting Strategy
First things first: forget that single, sad pull-chain bulb. A truly great basement office needs a layered lighting strategy. This just means using different types of light together to kill shadows, prevent eye strain, and create a genuinely pleasant atmosphere.
A well-lit room always feels bigger and more welcoming, and that effect is amplified in a basement. The goal is to replicate the fullness of natural light with three key layers.
- Ambient Light: This is your foundation—the overall light for the whole room. Recessed can lights are usually the MVP here. They spread even light across the entire space without dropping the ceiling height, which is a huge plus in most basements.
- Task Light: This is the focused light you need to actually work. A high-quality, adjustable desk lamp is an absolute must. It lets you aim a bright beam right where you're typing or reading, saving you from squinting and headaches.
- Accent Light: This is where you add personality. It could be a cool floor lamp in a reading nook, track lighting on a piece of art, or LED strips under your bookshelves. Accent lighting makes the space feel intentionally designed, not just utilitarian.
Combining these three ensures your office is lit properly from corner to corner, getting rid of those dark spots that make basements feel so oppressive.
Pick the Right Bulb Color Temperature
This might seem like a tiny detail, but the color of your lightbulbs has a real psychological effect. It's all measured in Kelvins (K), and it can make a huge difference in your focus.
For a productive office, you want bulbs in the 4000K to 5000K range. This is usually sold as “cool white” or “daylight.” This color temperature closely mimics natural daylight, which helps keep you alert and concentrated. Save the warmer, cozier bulbs (2700K-3000K) for the living room.
Don't underestimate the power of your lightbulbs. The right color temperature can genuinely make you feel more awake and focused during the workday. Switching from a warm, yellow-toned light to a cooler, daylight-toned light can be a game-changer for productivity.
Map Out a Powerful Electrical Plan
Your lighting plan and your electrical layout are two sides of the same coin. A modern home office is hungry for power, and a mess of extension cords is not just an eyesore—it’s a fire hazard. Planning where your outlets will go before the drywall is up is one of the smartest things you can do.
Think through your entire desk setup. You'll need plugs for:
- Your computer or laptop
- One, two, or even three monitors
- A printer
- Phone and device chargers
- Your desk lamp
To handle all that, plan for a quad outlet (a single box with four plugs) or at least two separate outlets behind your desk. A pro tip is to install them a few inches above desk height so you aren't crawling on the floor every time you need to plug something in.
Don't stop at the desk. Do you want a coffee station? A charging valet? A small fridge? Scatter a few more outlets along the other walls. This gives you the flexibility to rearrange the room later without being chained to one spot.
Should You Get a Dedicated Circuit?
Here's a question worth asking your electrician. If you're running a powerful computer, multiple monitors, and other high-draw equipment, putting the office on its own dedicated electrical circuit is a very smart move.
This isolates your office from the rest of the house's electrical system. So, if someone upstairs trips a breaker by running the vacuum and a hairdryer at the same time, your computer won't suddenly shut down in the middle of an important meeting.
A dedicated circuit provides clean, stable power to protect your expensive electronics. It's a relatively minor cost during the framing and electrical phase, but it buys you an incredible amount of peace of mind.
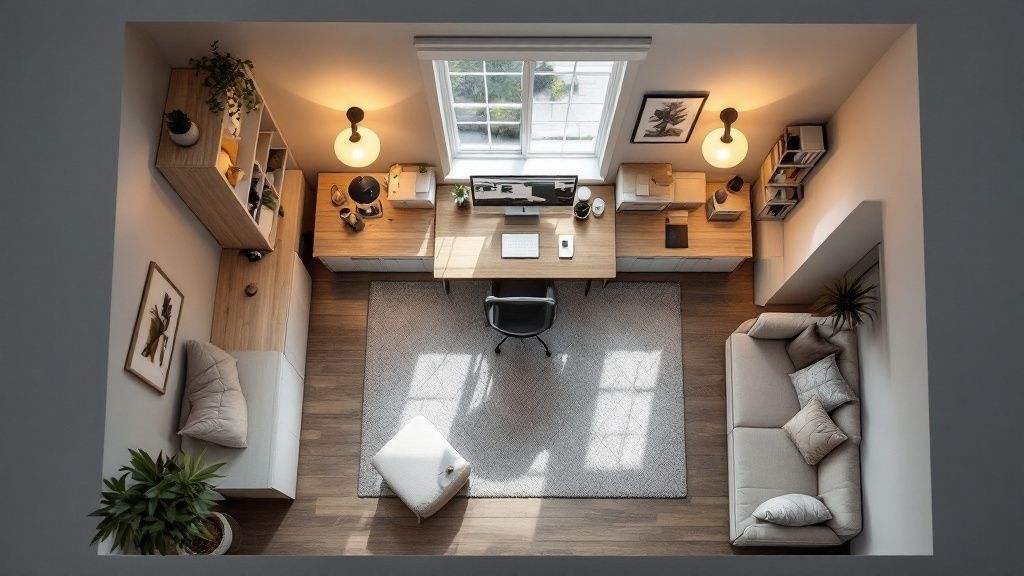
Designing a Functional and Ergonomic Layout
Alright, with the heavy lifting of moisture control, insulation, and electrical out of the way, we get to the fun part. This is where you start shaping that empty basement space into a home office that actually works for you—a place where you can be productive and comfortable for hours on end.
A smart layout is more than just deciding where to put a desk. It's about creating a space that supports your specific workflow and, just as importantly, your physical well-being.
The first thing I always recommend is to think in "zones." Even if you're working with a small footprint, carving out distinct areas for different tasks is a game-changer for focus. You'll obviously have your main desk area for deep work, but what else do you do all day?
For instance, consider setting up a dedicated spot for video calls. It doesn't have to be fancy—a comfortable chair against a clean, well-lit wall is perfect. This simple move stops you from scrambling to hide the mess on your desk five minutes before a meeting and keeps your primary workspace clear and ready for action.
Don't Skimp on Ergonomics
I can't stress this enough: a basement office layout has to be built around ergonomics. The entire point is to make your workspace fit you, not the other way around. Ignore this, and you’re setting yourself up for chronic neck pain, backaches, and other issues that can turn your dream office into a real nightmare.
This goes way beyond just buying a nice-looking chair. It’s about creating a complete system where your chair, desk, and monitor all work together to support a healthy posture.
Here’s where to start:
- The Chair is Your Throne: This is the single most important piece of furniture you'll buy. Look for one with adjustable height, solid lumbar support, adjustable armrests, and seat depth. You should be able to sit with your feet flat on the floor and your knees at a 90-degree angle.
- Get Your Desk Height Right: Most standard desks are about 29-30 inches tall, which is actually too high for many people. If an adjustable-height desk isn't in the budget, adjust your chair so your elbows are at a 90-degree angle when typing, and grab a footrest if your feet are left dangling.
- Mind Your Monitor: The top of your screen should be at or just below eye level—no tilting your head up or down. Position it about an arm's length away to keep eye strain at bay.
Your body is your most important tool at work. Spending a bit more on an ergonomic setup isn't a luxury; it's a non-negotiable for anyone working from home long-term. A few hundred dollars on a great chair and monitor arm today can save you thousands in physical therapy down the road.
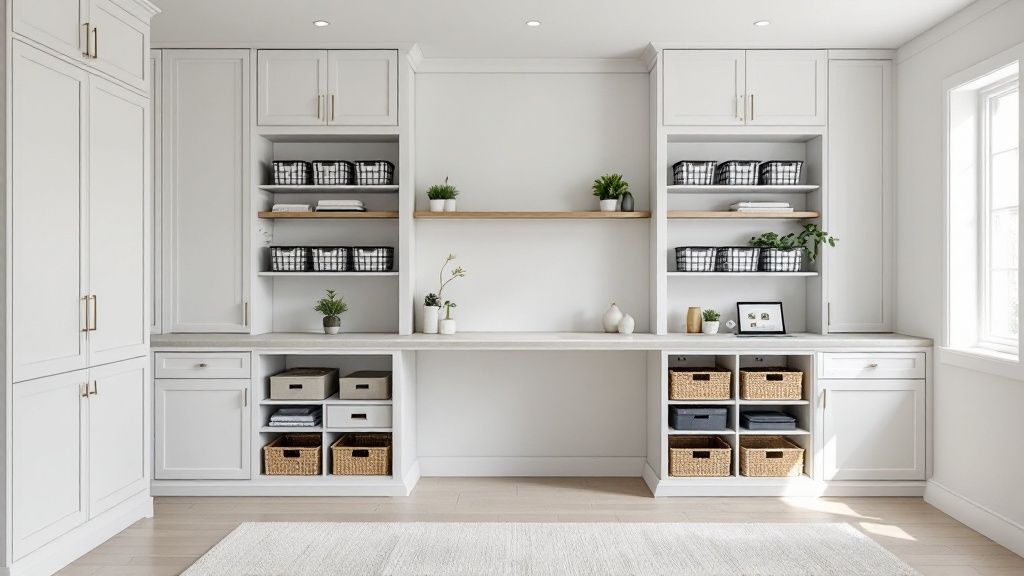
Smart Storage for a Clutter-Free Mind
A cluttered desk leads to a cluttered mind. It’s a cliché because it’s true. In a basement office, where every square foot counts, smart storage is your best friend for staying organized and productive.
My advice? Think vertically.
Instead of bulky, floor-hogging bookcases, go for tall, narrow shelving units. They draw the eye upward, which can make a low-ceilinged basement feel a bit taller, and they pack a ton of storage. For all the stuff you don't need every day—extra paper, old files, supplies—use cabinets with doors. Getting that visual clutter out of sight makes a huge difference, especially for the background that’s visible on your video calls.
This trend toward high-quality, purpose-built office furniture is booming. The global home office furniture market was valued at USD 40 billion in 2018 and is expected to hit USD 60 billion by 2028. People are finally realizing that a dedicated, well-designed workspace is a necessity, not a luxury. You can find more about these office furniture statistics and how people's tastes are changing.
Crafting a Layout That Works for You
Ultimately, there’s no single “best” layout. The right setup depends entirely on your personal work habits, the shape of your room, and where things like windows and support columns are located.
Here’s a quick comparison of two popular approaches I often see:
| Commanding Position | People who like to face the door and see the whole room. | Gives you a sense of control and awareness; great for focus. | Can put your back to a window, which often creates terrible screen glare. |
| Window-Facing View | Anyone who thrives on natural light and having a view. | A real mood-booster and helps reduce eye strain. | Can be distracting if you have a busy view; you'll need good blinds. |
Before you start moving heavy furniture, grab a roll of painter's tape. Map out on the floor where your desk, chair, and shelves will go. This ridiculously simple trick helps you feel the flow of the room and make sure you have enough clearance to move around comfortably.
If you're looking for more inspiration on making your new office feel like a cohesive part of your home, check out these custom home design ideas. The same principles that make a great kitchen—flow, function, and aesthetics—apply directly to your basement office. Your goal is to create a space that feels like a natural extension of how you work, turning it into a true sanctuary for productivity.
Adding the Finishing Touches That Matter
With the heavy lifting done, it’s time for the fun part: bringing your basement home office to life. This is where you transform a well-built room into an inspiring, functional workspace that truly feels like a part of your home. The right flooring, paint, and sound control are what separate a premium office from a basement afterthought.
These final details do more than just look good. They’re critical for comfort, acoustics, and the overall vibe of the space—all of which have a real impact on your productivity and how much you enjoy being down there.
Choosing the Right Basement Flooring
Let’s be honest: basement flooring needs to be tough. It has to handle potential moisture, feel good underfoot, and stand up to an office chair rolling around all day. This is absolutely not the place for traditional solid hardwood.
Instead, you’ll want to look at options that blend modern style with serious durability:
- Luxury Vinyl Plank (LVP): This stuff is the undisputed champion of basement flooring, and for good reason. LVP is 100% waterproof, incredibly tough, and comes in countless realistic wood and stone looks. It’s a floating floor that clicks together, making it a straightforward install.
- Engineered Hardwood: If you really want the authentic feel of wood, engineered hardwood can work. Its layered construction handles humidity shifts better than solid wood, but you absolutely must install a high-quality vapor barrier underneath it. No exceptions.
- Carpet Tiles: For a touch of warmth and excellent sound absorption, carpet tiles are a smart move. Unlike a single roll of carpet, if you spill coffee or a tile gets damaged, you can just pull that one square up and pop in a new one.
I see this mistake all the time: people choose flooring based purely on looks. In a basement, performance has to come first. Your floor is the main barrier between you and the cold, hard concrete, so picking a material with great thermal and moisture-resistant properties is non-negotiable.
Using Color and Decor to Banish the Cave Vibe
Basements have a reputation for feeling dark and cramped, but the right color palette can completely flip that script. Your goal is to make the space feel brighter, bigger, and more energizing.
Think light and airy for your main wall color. Whites, soft grays, and pale blues are fantastic for bouncing around whatever light you have, making the whole office feel more open. But that doesn't mean it has to feel like a hospital room.
A great trick is to paint a feature wall behind your desk in a deeper, more saturated color—think a rich navy or a deep forest green. This adds a ton of visual depth and creates a professional, non-distracting backdrop for all those video calls. Once the drywall is up, this is one of the most cost-effective ways to make a huge impact. You can learn more about what that initial prep work involves in this guide to the costs and process of drywalling a basement.
To counteract that subterranean feeling, bring in some nature. Potted plants that do well in low light, like snake plants or ZZ plants, add life and a welcome splash of green. And hang artwork you genuinely love looking at—it will make the space feel like yours, not just a utility room with a desk in it.
Creating a Quiet Zone for Deep Work
One of the best, and often overlooked, perks of a basement office is the potential for true quiet. But it doesn’t just happen on its own. You need to be intentional about managing sound from the rest of the house and even your own HVAC system.
Effective soundproofing really comes down to two things: adding mass and creating separation.
Strategies for a Quieter Office
| Solid-Core Door | The extra mass blocks way more airborne sound than a cheap, hollow-core door. | Low (Simple replacement) |
| Acoustic Panels | These fabric-covered panels soak up sound waves, cutting down on echo and reverb in the room. | Low (Easy to hang on walls) |
| Area Rugs | A thick rug with a good pad adds a surprising amount of sound absorption, especially over hard flooring. | Low (Simple addition) |
| Insulating Interior Walls | Filling interior wall cavities with sound-dampening insulation stops noise from traveling between rooms. | Medium (Done before drywall) |
Even small changes can have a massive impact. Honestly, just swapping a hollow door for a solid-core one is often the single most effective thing you can do to isolate your office. If you combine that with a few well-placed acoustic panels, you’ll drastically improve sound quality for your calls and make it so much easier to focus. These finishing touches are the final, crucial layer in building a basement office you'll actually love working in.
Answering Your Top Basement Office Questions
Even the best-laid plans can hit a snag. When you're in the middle of a basement office project, a few common questions always seem to pop up. Getting those answered ahead of time means you can keep things moving without getting stuck on a detail that feels bigger than it is.
Let's walk through some of the questions I hear most often from homeowners. Addressing them now will save you a ton of frustration and guesswork down the line.
How Much Does a Basement Office Cost?
This is always the first question, and the honest answer is... it depends. The range is huge. If you're just doing a cosmetic refresh—think new paint, some LVP flooring, and new furniture—you might be in the $2,000 to $5,000 range.
But if you're talking about a full gut-and-remodel with framing, drywall, proper electrical, and insulation, that number jumps significantly. For a project like that, you should probably budget somewhere between $15,000 and $30,000, and sometimes more depending on how big and complex the space is.
The real budget-busters are usually:
- Electrical Work: Bringing in a licensed electrician for new circuits and outlets is a non-negotiable safety expense.
- Egress Window: If your local code requires an egress window for a finished basement (and it often does), that installation alone can run several thousand dollars.
- Plumbing and HVAC: Tying into existing systems or running new lines for heating and cooling will definitely add to your final invoice.
What Do I Do About Low Ceilings?
Ah, the classic basement dilemma. Low ceilings can feel a bit claustrophobic, but you don't have to live with that feeling. The trick is creating the illusion of height.
First, get rid of any light fixtures that hang down. Your best friend here is a set of slim, low-profile recessed LED lights. They sit flush with the ceiling and throw off fantastic light without eating up any precious headroom.
Next, play with paint. Use a light, bright color on the walls, but then paint the ceiling an even brighter, crisper white. It's an old designer's trick, but it absolutely works. It fools the eye into thinking the ceiling is higher and the room is more open than it really is.
How Can I Get a Strong Wi-Fi Signal Downstairs?
A beautiful new office is pretty useless if you can't get online. Concrete walls and floors are the natural enemy of a good wireless signal, but thankfully, this is a pretty easy fix.
The most reliable, set-it-and-forget-it solution is a mesh Wi-Fi system. These come with a main router and a few satellite "nodes" that you place around the house. They create one big, seamless network that punches right through to the basement with a strong, stable signal.
If you're on a tighter budget, a Wi-Fi extender can also do the trick. It simply picks up your existing signal and rebroadcasts it with more power. It might not be as robust as a full mesh system, but for getting a solid signal to one specific room, it's often more than enough.
Don't let a few common hurdles stop you. Every basement has its quirks, from low ceilings to spotty Wi-Fi. The secret to a successful project is anticipating these challenges and having practical, proven solutions ready to go. A little planning here makes a world of difference.
Ready to turn your basement challenges into a beautiful, functional reality? The team at Northpoint Construction specializes in high-quality basement finishing and home remodels. Visit us online to start your project today!