
Best Way to Insulate Rim Joist: The Proven Guide
Rigid foam board combined with thorough air sealing is the best way to insulate a rim joist for most homeowners because it resists moisture and installs without specialized spray equipment. In colder assemblies, plan around R-13 to R-20 equivalent performance, with spray foam as the premium alternative when continuous sealing and irregular framing justify the added cost.
You notice the problem on a winter morning. The basement feels tolerable, but the bedroom floor above it is cold along the outside wall. A draft seems to run around the room, the furnace works harder, and the rim joists at the top of the foundation are still bare, gapped, or stuffed with old fiberglass.
After inspecting hundreds of rim joists in Utah homes, the pattern is consistent. The material matters, but the workmanship matters just as much. A carefully fitted foam board system with sealed edges can outperform a poorly installed premium product, while spray foam can solve difficult gaps that rigid panels can't reach. The best choice balances air sealing, moisture control, climate, access, and budget.
Why Rim Joist Insulation Matters for Your Home
A rim joist, sometimes called a band joist, caps the ends of the floor joists where the floor system meets the foundation wall. It sits around the perimeter of the house, often above an unfinished basement or crawlspace. That location makes it a common weak point in the building envelope.
Consider an older Orem home during a Utah cold snap. The homeowner may not see an obvious opening, but small gaps around framing, wiring, plumbing, and uneven concrete allow cold air to reach the floor assembly. The result is a cold strip around the edge of the first floor, especially in rooms above the basement perimeter. The U.S. Department of Energy identifies defects in this area as a source of heat loss through floors, higher energy costs, and uncomfortable floor temperatures. Its rim joist insulation and air-sealing guidance treats this work as a critical step for floors above unconditioned basements or crawlspaces.
The problem is airflow, not just missing insulation
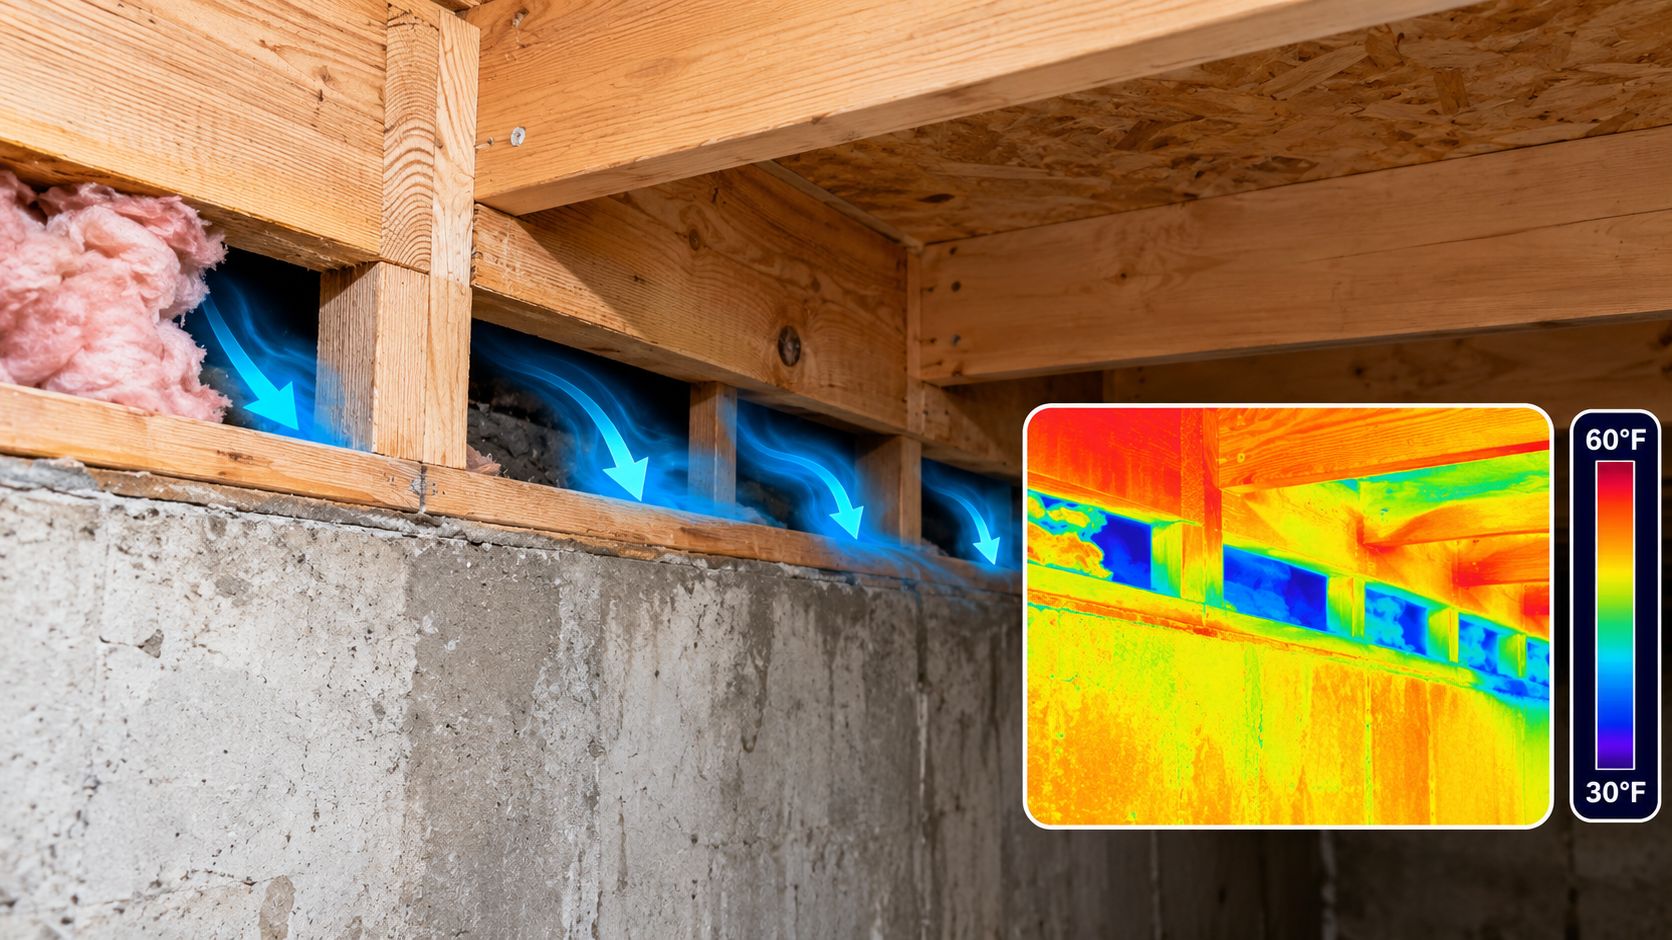
Fiberglass can make a cavity look filled while air still moves through the assembly. If the wood perimeter has gaps, placing a batt in front of those gaps doesn't create a dependable air barrier. Cold air can bypass the insulation, and humid air can reach cold wood or other surfaces where condensation becomes possible.
That distinction changes the project. A rim joist needs both thermal insulation and a continuous air seal. Rigid foam provides the insulating layer, but caulk or compatible spray foam must seal its perimeter. Spray foam combines those functions in one application, which explains its strong performance in irregular bays.
Practical rule: Never judge a rim joist job by how full the cavities look. Judge it by whether air can move around the insulation.
Moisture deserves equal attention. A damp basement, bulk water, plumbing leak, or wet foundation wall should be addressed before the rim joists are enclosed. Homeowners planning broader basement work can also review this basement moisture control guide before covering the perimeter.
Rim joist work isn't a substitute for foundation repair. If settlement, movement, or damaged support is present, correct the structural issue first. Homeowners comparing foundation specialists outside Utah may find this resource on pier and beam repair for Texas homeowners useful for understanding why insulation shouldn't conceal unresolved foundation problems.
Comparing the Top Insulation Methods
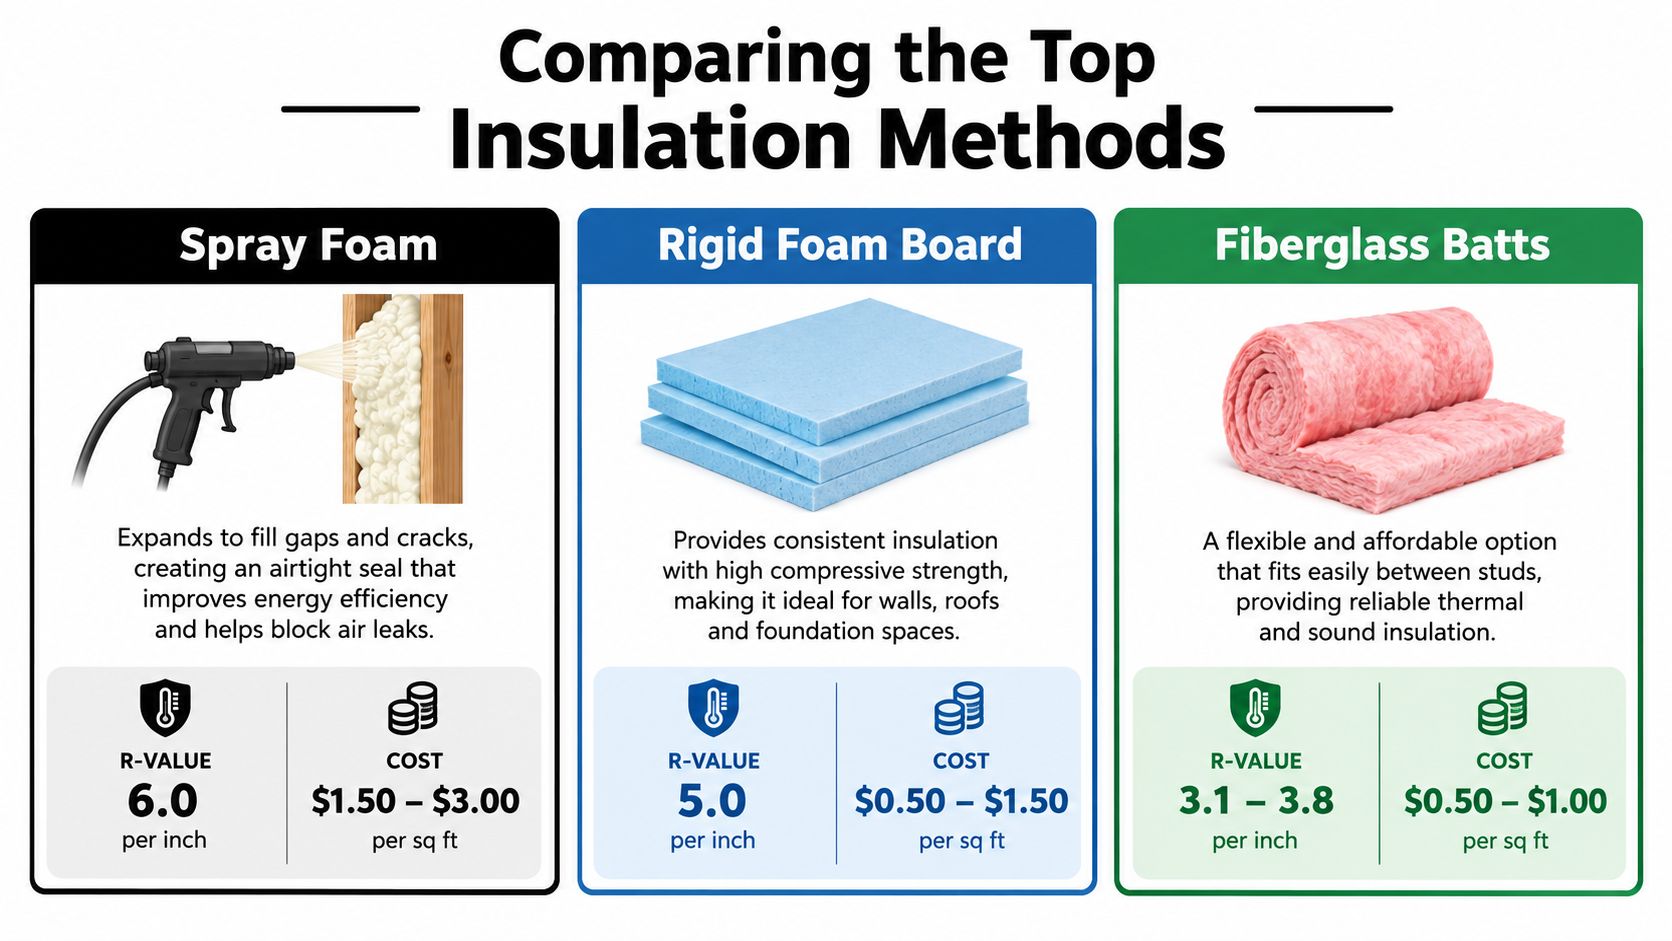
Three approaches appear most often in rim joist projects: spray foam, rigid foam board, and fiberglass batts. They don't perform the same job, and the cheapest material isn't necessarily the lowest-cost solution once air sealing, corrections, and future moisture problems enter the calculation.
Spray foam
Spray foam is the most complete option for complicated framing. It expands around pipes, wires, masonry irregularities, and narrow gaps, creating a continuous air seal when applied correctly. Building Science Corporation describes spray urethane foam as a “critical seal” at rim joists and distinguishes high-density closed-cell foam at about 2 lb/ft³ from low-density open-cell foam at about 0.5 lb/ft³ in its rim joist spray foam guidance.
Closed-cell foam resists moisture better and provides a denser assembly. Open-cell foam can still insulate, but the guidance notes that it may need additional vapor and condensation control in colder DOE climate zones 6 and higher. Spray foam also demands careful preparation, correct thickness, ventilation, and trained application. A bad pass can leave voids, overfill the bay, or create an assembly that doesn't match the building's moisture behavior.
Rigid foam board
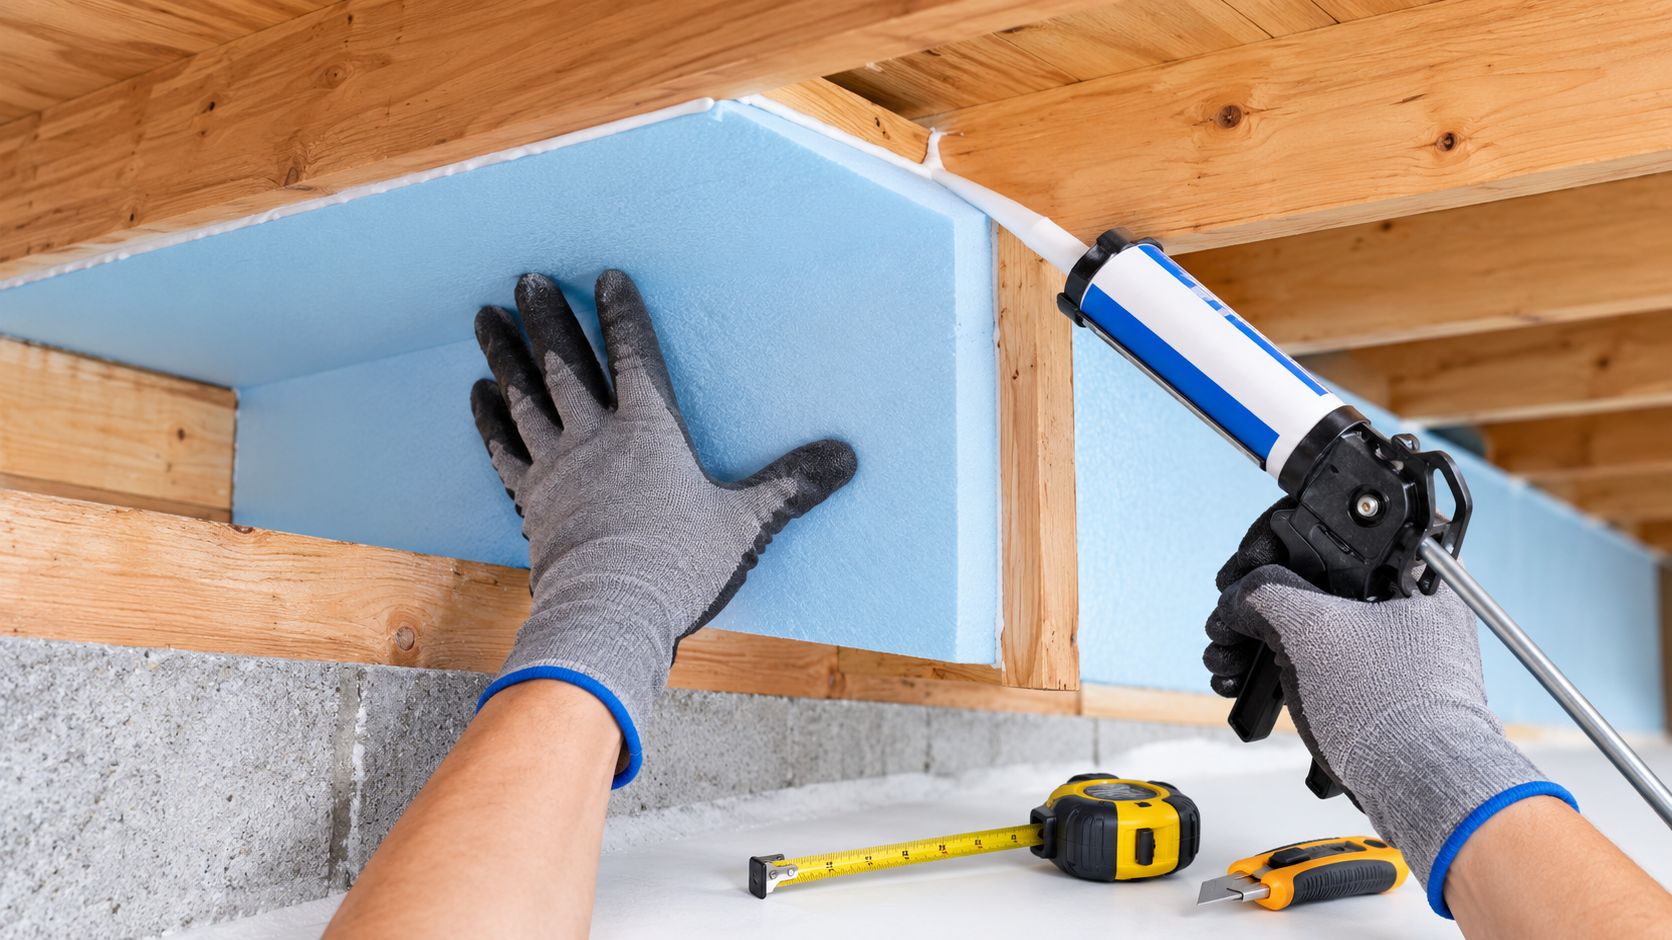
Rigid foam board is the most practical hybrid material for many Utah homeowners. The installer cuts panels to fit each bay, presses them against the rim joist, then seals every edge and penetration with compatible caulk or canned spray foam. The board supplies a moisture-resistant insulating layer, while the sealant supplies the continuity.
Its weakness is execution. A panel that is slightly too small, compressed, bowed, or left unsealed around a pipe doesn't deliver the intended air barrier. The method works well in accessible, reasonably regular cavities, but it takes patience and repeated fitting.
A broader list of top energy-efficient home upgrades can help homeowners place rim joist work alongside other envelope improvements. For basement-specific planning, the basement insulation options guide offers additional context.
Fiberglass batts
Fiberglass is easy to find and familiar to most do-it-yourselfers. It can fill a cavity, but by itself it doesn't stop air movement through the rim joist. Batts also perform poorly when compressed, left loose, or installed against damp surfaces.
Fiberglass becomes more defensible only when paired with a reliable air barrier and careful moisture management. In practice, rigid foam with sealed edges is usually a better DIY direction for rim joists, while spray foam makes more sense when the framing is irregular or the perimeter is difficult to seal manually.
Step-by-Step Installation and Safety Tips
Rigid foam installation rewards accurate measuring more than speed. The objective isn't to force one large sheet across the foundation. It's to create individual, well-fitted panels that follow the framing and leave no open route for air.
Prepare the work area
Start with a visual inspection. Look for wet wood, staining, insect activity, loose mortar, plumbing leaks, and electrical or gas penetrations. Don't cover active moisture or damaged framing. Clean dust and loose debris from the wood so caulk and foam can bond.
Wear safety glasses, work gloves, long sleeves, and respiratory protection appropriate to the product label. Cutting foam creates particles, while expanding foam and sealants can irritate skin and lungs. Provide ventilation, keep ignition sources away from flammable products, and follow every curing and handling instruction.
Use a sharp utility knife or fine-tooth handsaw, a straightedge, a tape measure, a caulk gun, compatible sealant, low-expansion spray foam, and a foam-compatible adhesive if the assembly requires it. Keep a scrap piece nearby for test fitting.
Fit each panel carefully
Measure the width and height of each bay independently. Rim joists rarely stay perfectly uniform around an entire foundation, particularly in older homes. Transfer the measurements to the foam board, mark the cut line clearly, and cut slightly proud only when you can compress the panel without bending it or leaving a path around the edge.
Install the panel against the rim joist rather than leaving a large void behind it. Work around wiring and plumbing without trapping or damaging services. Don't use expanding foam as a substitute for a badly cut panel. Excessive foam can distort the board and make later finishing difficult.
Seal the perimeter
This is the step that separates a durable hybrid installation from a panel display. Run a continuous bead of compatible caulk or sealant where the foam meets the wood, foundation, adjoining panels, and penetrations. Use canned spray foam for irregular openings, corners, and difficult transitions, following the product's expansion guidance.
The Department of Energy specifically recommends sealing the edges of cut rigid foam with caulk or spray foam so the insulation becomes part of a continuous air barrier. Seal around every service penetration, not just the visible outer perimeter. If you can see daylight or move air with a careful hand check after curing, the assembly still needs attention.
The panel provides the resistance. The edge seal provides the performance.
Don't close the wall until the sealant has cured and the area has been checked. Keep combustible materials and exposed foam protected according to local requirements and the product instructions. Where a finished basement is planned, confirm the required thermal or ignition protection before covering the work.
Utah Climate and Code Considerations
Utah homes don't all experience the same moisture conditions. Elevation, winter temperature, basement humidity, snow exposure, and whether the space is heated or unconditioned all affect how the rim joist assembly behaves. A solution that seems adequate in a dry, accessible basement may be less forgiving in a cold crawlspace or a humid below-grade room.
The central Utah lesson is simple: air sealing comes before chasing insulation thickness. Air carries moisture into cold assemblies. If the foam board fits loosely or the edges remain open, adding more board doesn't correct the leakage path. A smaller, carefully sealed panel is more useful than a thicker panel with unsealed edges.
Choose the assembly for the climate
Independent building-science guidance summarized in the DOE rim joist insulation document notes that colder climate zones often need at least R-13 to R-20 equivalent performance and that air-impermeable insulation is preferable to fiberglass or mineral wool alone in this location. That doesn't mean every Utah home should receive the same thickness. It means the target should reflect the local assembly, exposure, and condensation risk.
Open-cell and closed-cell spray foam also behave differently. As noted earlier, Building Science Corporation flags additional vapor and condensation considerations for open-cell foam in colder DOE climate zones 6 and higher. Don't select foam solely by its label or advertised R-value. Ask how the product handles vapor, whether the wood can dry, and what protection is required after installation.
Check code before closing the basement
Building Science Corporation cites International Residential Code provision R314.5.11, which allows exposed spray foam at rim joists without a 15-minute thermal barrier when the thickness is less than 3-1/4 inches. That provision is specific, and it doesn't eliminate the need to verify the current locally adopted code, product approval, and required covering for the finished assembly.
Homeowners converting a basement should coordinate insulation with electrical, fire separation, egress, and finish plans. The Utah basement finishing resource can help frame those broader decisions, but the local building department or qualified contractor should confirm what applies to the specific project.
When to Call Northpoint Construction
DIY rigid foam is reasonable when the basement is dry, the rim joists are accessible, the framing is sound, and you can fit and seal every bay without rushing. It becomes a poor candidate for self-installation when the perimeter is crowded with utilities, the wood is irregular, or the crawlspace has limited ventilation and difficult access.
Older homes can hide problems behind the insulation. A dark stain may indicate past leakage, but it can also point to ongoing condensation or a plumbing issue. Foam that obscures the evidence makes inspection harder. A professional should identify the moisture source, assess the framing, and decide whether insulation should wait.
Situations that justify professional help
- Persistent moisture: Address damp masonry, standing water, leaks, or high humidity before enclosing the rim joist.
- Irregular framing: Uneven bays, stone foundations, masonry ledges, and large penetrations increase the chance of gaps in a cut-and-cobble system.
- Unsafe access: Crawlspaces may contain pests, sharp fasteners, poor air quality, and structural hazards that make extended work unsafe.
- Finished basement plans: Coordinate insulation with thermal protection, wall framing, utilities, fire separation, and future inspection access.
- Uncertain material selection: Cold or mixed-climate assemblies may require a closer look at vapor control rather than a simple material comparison.
A contractor's value isn't limited to installing foam. The useful work includes inspecting the substrate, documenting penetrations, choosing compatible products, and verifying that the final assembly won't trap moisture against vulnerable wood. That's especially important when the rim joist is one part of a larger basement insulation or remodeling project.

Northpoint Construction provides property maintenance, basement finishing, remodeling, and insulation-related construction support for homes in Orem, Provo, Lehi, American Fork, and Saratoga Springs. The right professional should explain why a specific assembly fits the house, not just recommend the most expensive material.
Cost Estimates and Material Guide
A useful rim joist budget starts with the project conditions, not a generic square-foot price. Material quantity depends on the home's perimeter, the number and shape of bays, the required insulation level, and whether existing fiberglass or damaged material must be removed. Labor changes when access is restricted or utilities block the work area.
Rigid foam usually has the lowest material burden among the three main approaches, but it also requires cutting tools, adhesive or sealant, and enough time to fit every panel. The final result depends on edge sealing, so budgeting only for the board can understate the true project.
Spray foam carries a higher material and labor commitment because it requires specialized equipment, surface preparation, ventilation, and trained application. Its value is greatest where it can solve several problems together, including irregular gaps, air leakage, and moisture control. Open-cell and closed-cell products shouldn't be treated as interchangeable, particularly in colder assemblies.
Fiberglass has a low entry cost and simple handling, but it needs a separate air barrier to function properly at the rim joist. If the installer leaves bypasses open, the homeowner has paid for insulation without correcting the draft path. Removing failed or damp fiberglass may also add labor before a better assembly can be installed.
Budget for the complete job
Include these categories in your estimate:
- Inspection and preparation: Moisture diagnosis, cleaning, old insulation removal, and minor substrate repairs.
- Insulation material: Rigid panels, spray foam, or batts selected for the assembly and climate.
- Air-sealing products: Caulk, canned foam, backer materials, and compatible adhesives.
- Protection and finishing: Required thermal, ignition, or wall-covering protection.
- Access and cleanup: Crawlspace preparation, utility coordination, disposal, and final inspection.
Get the contractor to describe the proposed material, sealing method, intended insulation performance, protection requirements, and exclusions in writing. That comparison is more useful than choosing a quote based only on the insulation product name.
Northpoint Construction can inspect rim joists, coordinate moisture and access concerns, and help integrate insulation with basement finishing or broader property maintenance work. Visit Northpoint Construction to discuss a site-specific plan for your Orem, Provo, Lehi, American Fork, or Saratoga Springs home.