

Basement Floor Drain Installation: A Complete Guide
Water gathers beside the water heater after a hard storm. The nearest floor drain is old, partly hidden by storage, and you don't know whether it leads to the sewer, a sump, or nowhere useful at all. If you're finishing the basement, that uncertainty tends to surface just as the concrete work is about to begin.
A dependable basement floor drain installation is more than a grate and a pipe. The drain has to work with the building's elevation, foundation drainage, trap and vent, sump capacity or gravity outlet, and a discharge route that won't send water straight back toward the foundation. Plan those parts together before cutting concrete, and you're far less likely to finish with a drain that moves the problem.
Why a Basement Floor Drain Is a System, Not Just a Hole
A drain grate is the part you see, but it's only the collection point. Water may arrive from a plumbing leak, an appliance, or groundwater gathering around the foundation. Those sources don't always belong in the same drainage route, and the right route depends on the building and local requirements.
For a homeowner dealing with stormwater, the important question isn't just whether water reaches the grate. It's where that water goes next. A drain connected to a system that can't accept the flow may back up, while a sump discharge that empties too close to the house can soak the soil beside the foundation and send water right back toward it.
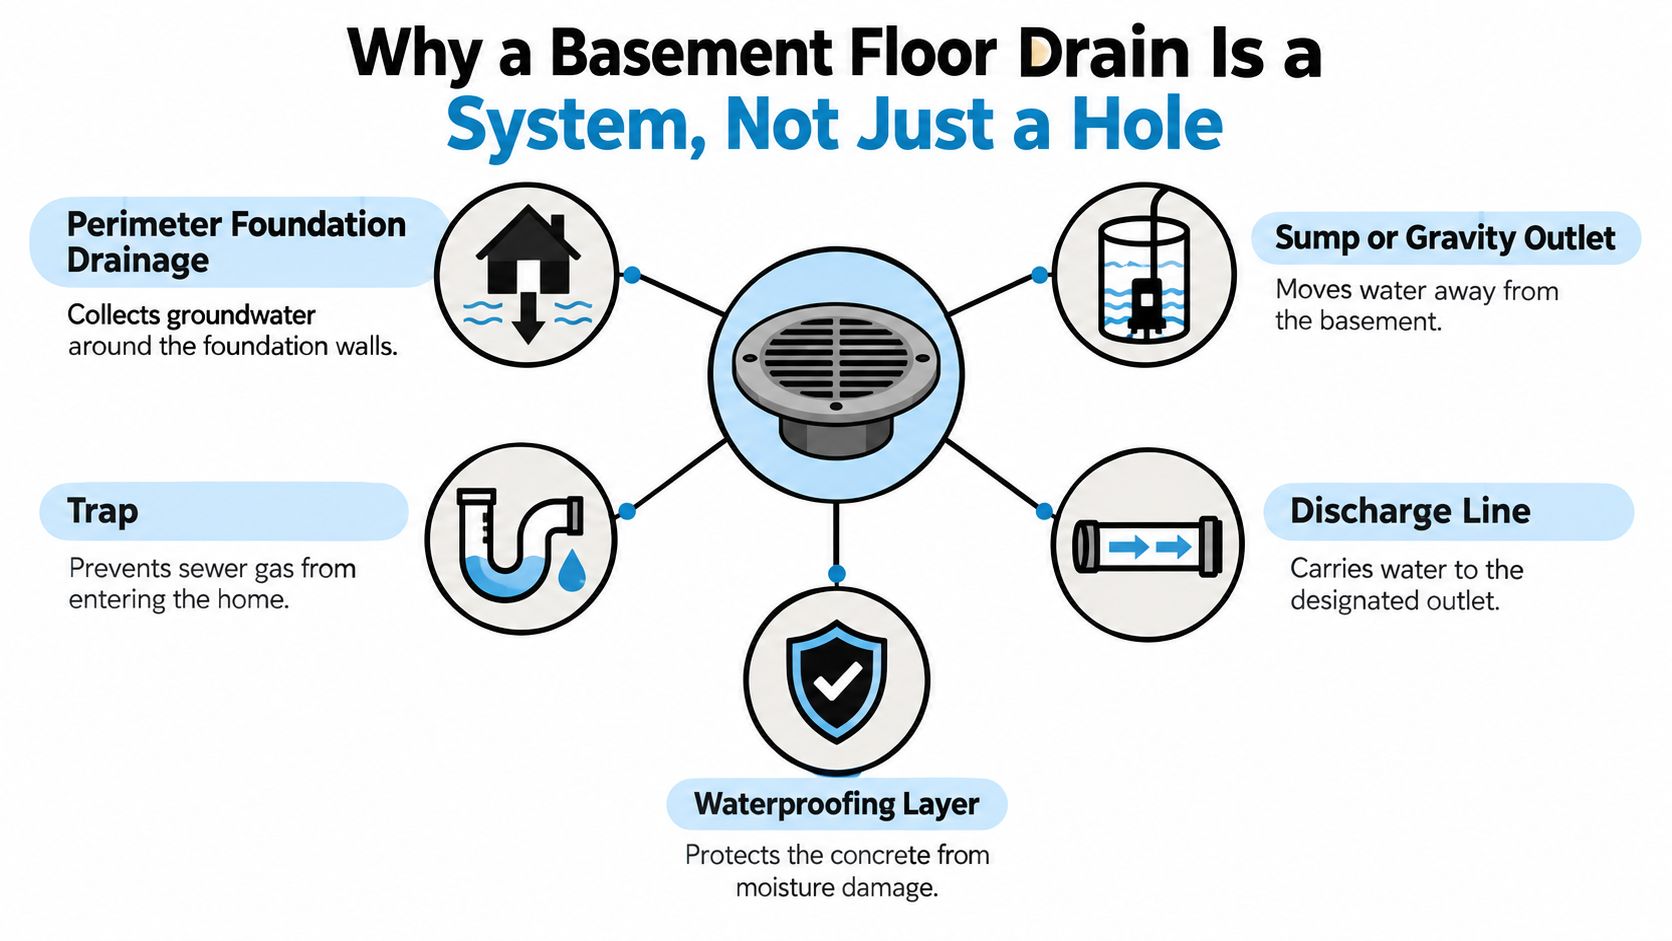
The parts that have to work together
Think of the drain as the visible end of a larger assembly:
- Perimeter drainage collects groundwater around foundation walls and directs it toward an appropriate outlet.
- A gravity outlet or sump carries collected water away, depending on whether gravity drainage is possible.
- A trapped and vented branch drains properly while helping prevent sewer gas from entering the home.
- A discharge route takes water to an approved destination without allowing it to recirculate around the foundation.
- Waterproofing and slab details help keep water and fines from undermining the surrounding floor.
Foundation drainage is not an optional extra in every basement. The 2018 International Residential Code foundation-drainage provisions required perimeter drainage for basement walls retaining earth and next to usable interior space, using a perforated pipe in gravel or an approved equivalent. The system had to drain by gravity to an approved destination or route collected water to a sump for mechanical removal where gravity wasn't possible. Local amendments can be more specific, so a code check matters before work begins.
Practical rule: Don't choose a drain body before you know the drainage route, outlet elevation, and applicable local requirements.
A basement moisture-control plan should address the whole foundation, not just the visible wet spot. This overview of basement moisture control can help you think about the drain alongside other sources of moisture.
Planning the Layout Before You Cut Anything
The cleanest concrete work can't rescue a drain that's set at the wrong elevation or connected to an unsuitable outlet. Before opening the slab, establish how water will travel from the drain to its destination and whether the route is permitted.
Start with the elevations
First, compare the proposed drain outlet with the building drain. Gravity drainage only works when the proposed connection is low enough for water to flow in the required direction. If the outlet isn't lower, you may need a sump arrangement instead. Don't guess from a basement floor's appearance. Check actual elevations and get a plumber involved if the existing piping or sewer relationship isn't clear.
Next, confirm which plumbing code your jurisdiction has adopted and what local amendments apply. A code used as a model doesn't automatically tell you what your local inspector will require. Check permit and inspection requirements before work begins, especially if the project changes the sanitary drainage system.
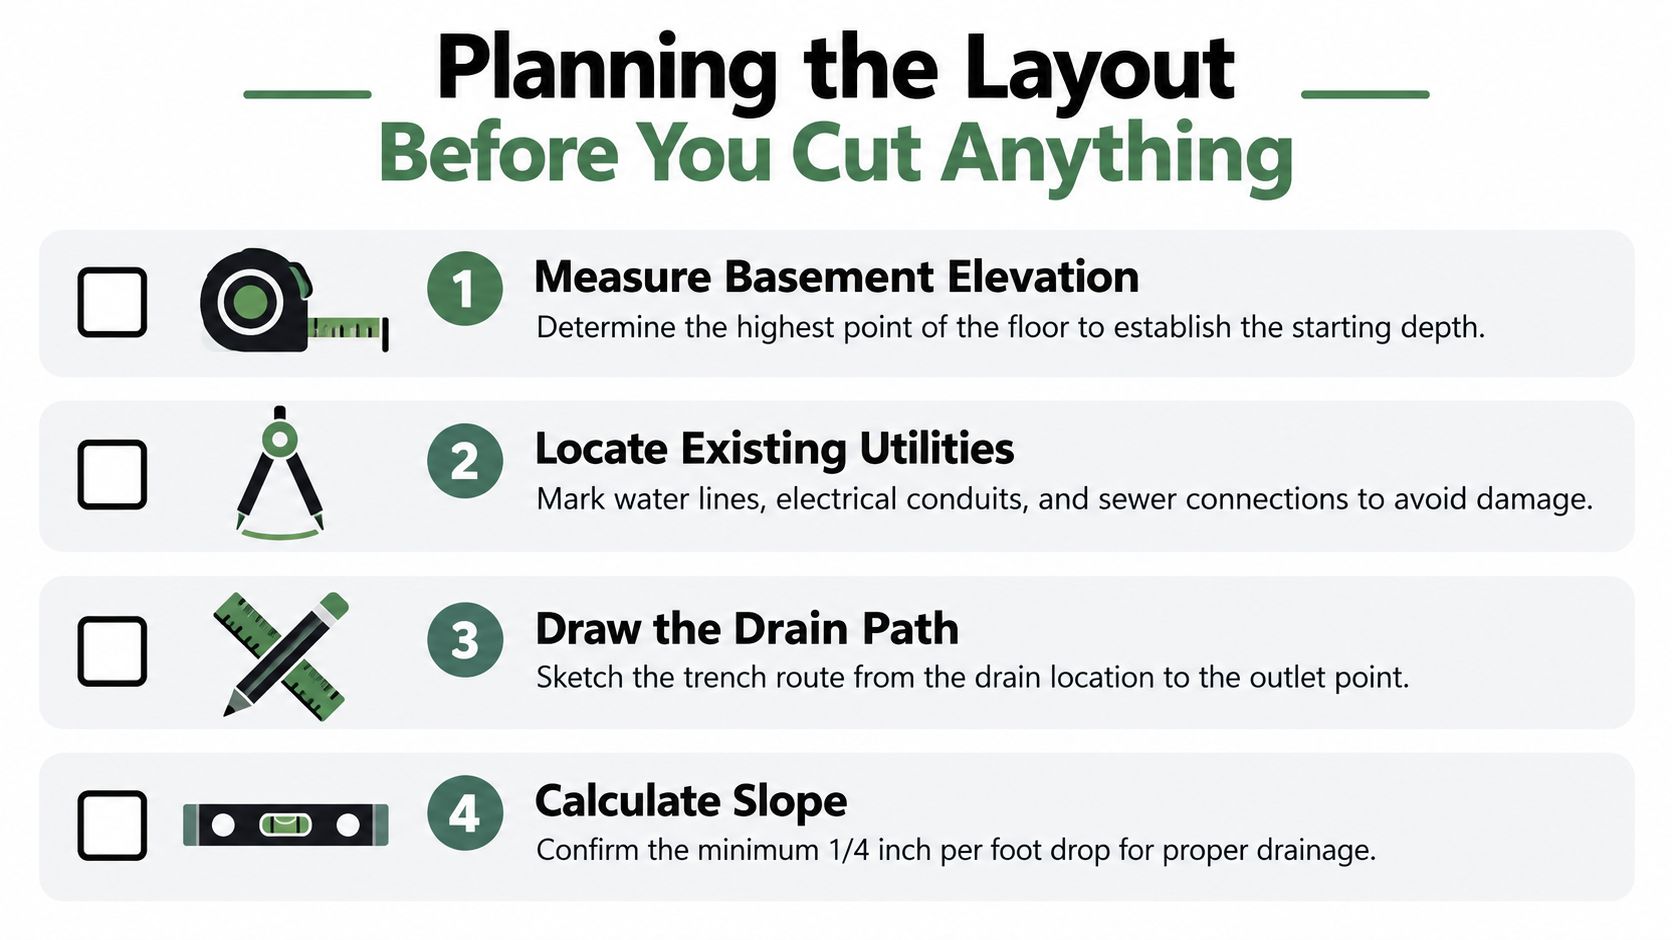
Map the site and set the finished floor
Have underground utilities located before cutting or trenching. In the United States, contact the local utility-locate service before excavation, and don't assume that a marked route shows every private line or conduit inside the home. Review the existing sewer, water, electrical, and other known services as part of the layout.
Then mark the finished-floor elevation and the drain's final position. The drain body and grate need to finish flush with the surrounding concrete. A body set too high leaves water standing around the drain; one set too low creates a depression that can collect sediment and become a trip point.
A drain's final height is set by the finished floor, not by the bottom of the trench.
Plan the slab and pipe route together. The pipe needs a continuous slope that meets the applicable code for the pipe and installation, and the floor should direct surface water toward the drain where that's the intended function. The exact slope isn't safe to assume from a generic diagram.
Before backfill or concrete placement, inspect the rough-in, test the piping using the approved method, and take clear photos showing the route, joints, trap, and connection points. Those records can save time when someone later needs to locate a pipe or make a repair.
Choosing Between Sump, Sewer, and Daylight Discharge
The outlet choice affects how the whole system behaves. A gravity connection can be simple when the elevations, drainage source, and local rules allow it. A sump can handle collected water where gravity isn't possible, but it adds equipment that needs power and maintenance. Daylight discharge can work on a suitably sloped site, provided the outlet doesn't return water to the foundation or create a problem on neighboring property.
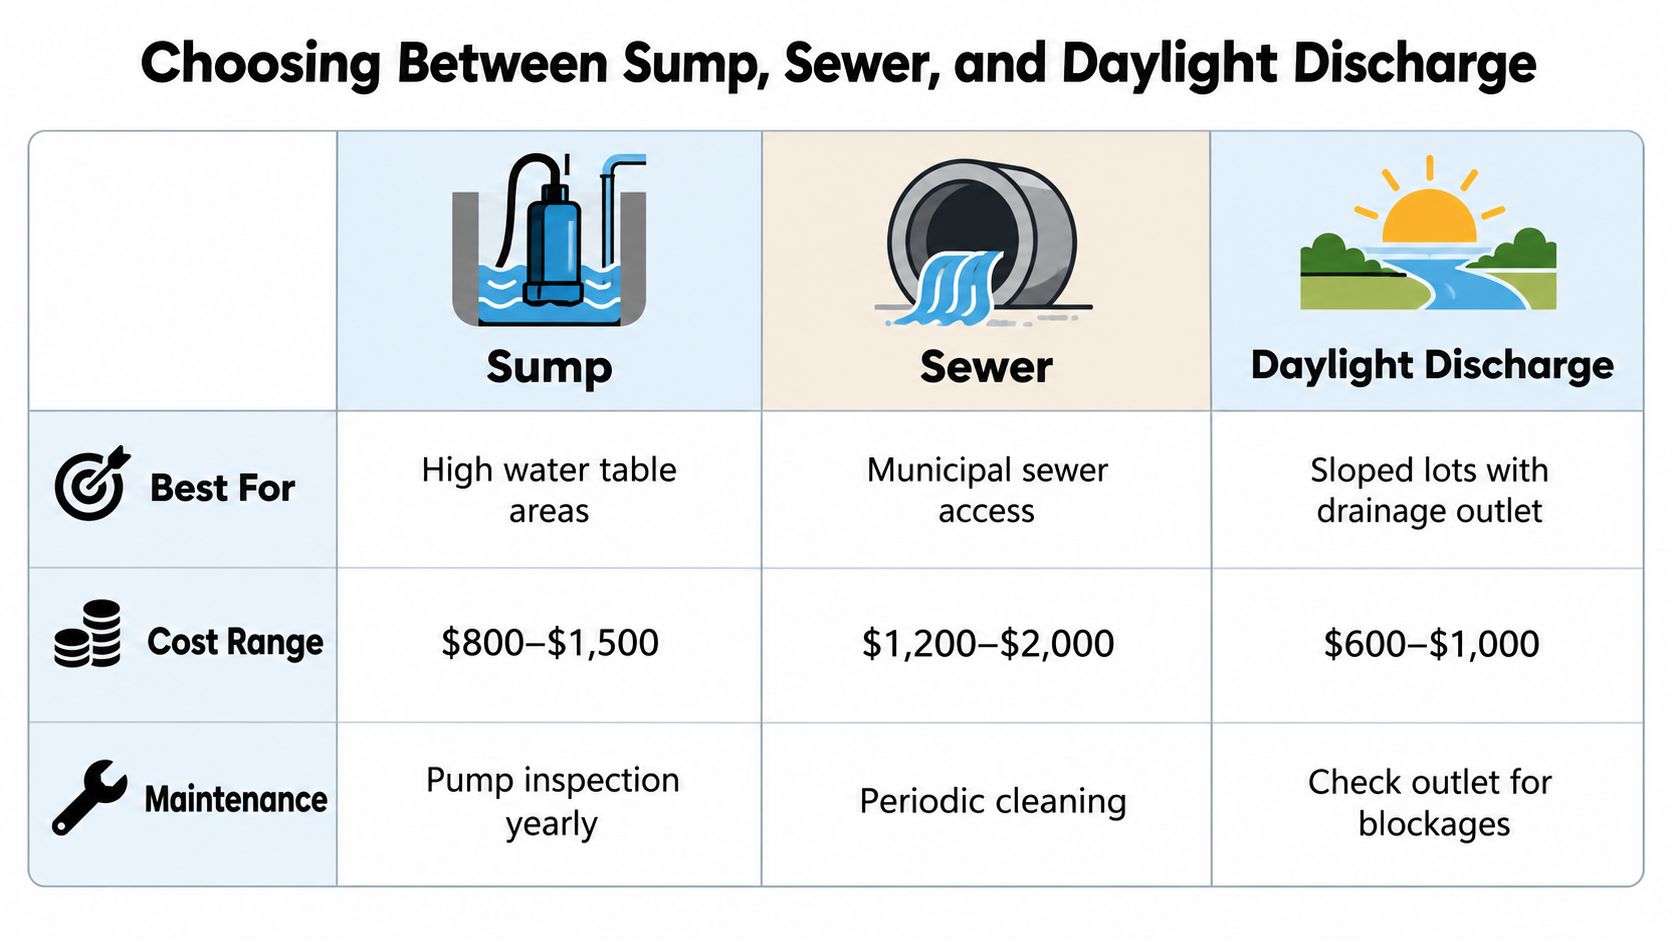
Match the route to the water and site
A sanitary sewer connection isn't automatically the right answer for every basement drain. EPA facility guidance says sump systems should be used only when gravity drainage isn't possible, and limits sump inflow to rainwater, stormwater, and clear water from the lowest floors. Upper-floor drainage should ordinarily flow by gravity to the public sewer. Confirm permitted connections with the local authority rather than combining routes based on convenience.
Gravity to daylight avoids relying on a pump, but it only works if the site provides a suitable fall and an acceptable discharge location. For basement or crawlspace drainage, EPA Indoor AirPlus guidance calls for discharge to daylight at least 5 feet outside the foundation or to an approved sewer system, with 10 feet preferred where practical. The policy record explains that the minimum was reduced from an earlier 10-foot requirement to align with gutter and downspout provisions. The practical reason is straightforward: discharge too close to the wall can wet the surrounding soil and cause the system to cycle again.
Outlet check: Trace the water all the way to its destination. A pipe that exits the foundation isn't finished if the water pools against the house.
Account for outages and upkeep
A sump depends on working equipment and power. EPA guidance recommends alternating duplex pumps connected to backup power where continuity matters. That arrangement adds complexity, but it can provide a more resilient setup in a finished basement or a property where an outage could create serious disruption. Your plumber should size and configure the system for the site and local requirements rather than choosing equipment from a generic chart.
If you're comparing pump options or trying to understand what installation involves, this resource from local restoration pros on sump pumps offers additional context. Use it as background, then confirm your own outlet, electrical, and permit requirements locally.
Excavation, Slope, Trap, and Waterproofing the Rough-In
Once the outlet and layout are settled, the physical work begins. Cutting the slab and opening a trench is the part homeowners notice, but the performance of the installation depends on less visible details: a stable pipe bed, a continuous fall, a correctly connected trap and vent, and a drain body aligned with the finished floor.
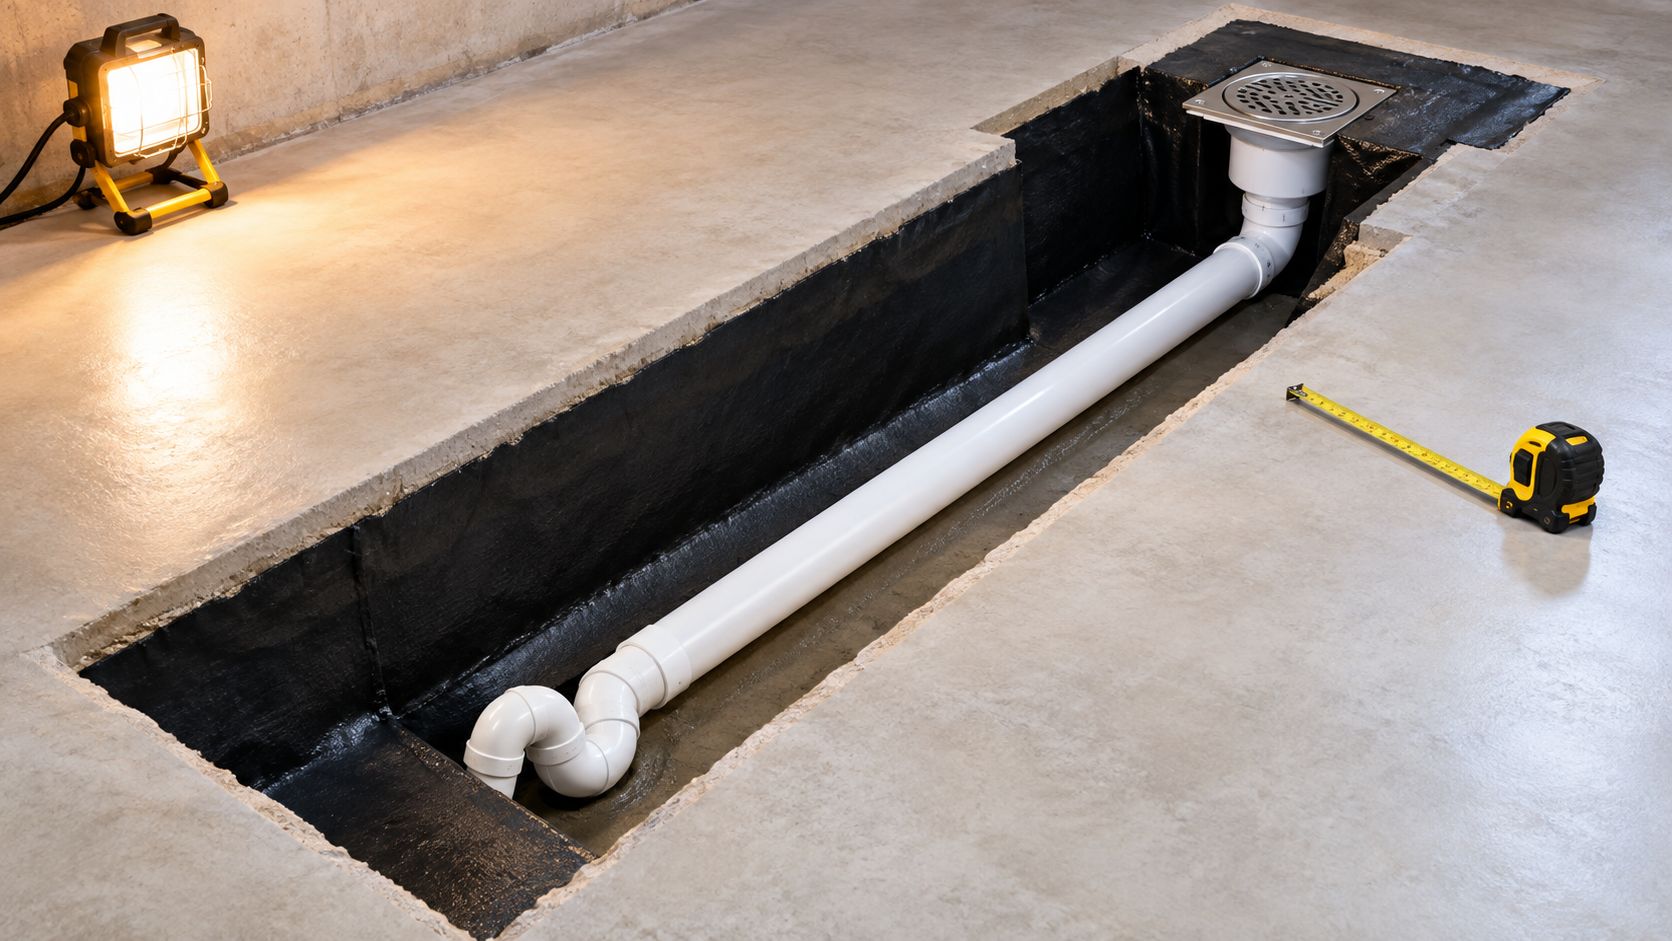
Build a smooth, testable rough-in
Excavate only along the route you've planned, taking care around utilities and existing services. Set the pipe on a stable bed and maintain a continuous slope appropriate to the pipe size and adopted code. A pipe that sags between supports can hold debris and slow drainage; a route that loses its fall can leave water sitting in the line. Don't use a slope figure from a generic illustration as a substitute for checking local requirements.
The drain branch needs an approved trap and a properly vented connection. An untrapped or improperly vented drain can allow sewer gas into the basement, cause siphonage, or drain slowly. The 2024 IRC floor-drain trap provisions describe permitted trap-seal protection pathways, including an ASSE 1018 potable-water trap primer, ASSE 1044 wastewater primer, or ASSE 1072 barrier device. The adopted local code and manufacturer instructions determine which option is appropriate for a particular installation.
Test the rough-in while it's visible. After concrete goes back, a leaking joint or badly placed trap costs far more to reach.
Before the slab is poured, have the piping tested by an approved pressure or water test, inspect the trap and joints, and photograph the installed route. These checks are easier to complete before the work is buried.
Protect the drain-to-slab connection
At the drain body, coordinate the slab opening, any required waterproofing detail, and the gravel or moisture-control layers. The objective is to avoid leaving gaps that let soil fines migrate into the drain or water travel around the drain body and undermine the surrounding concrete. Follow the selected drain manufacturer's installation instructions and the project's approved waterproofing details.
The grate should finish level with the concrete, not with an unfinished slab that will later receive flooring. If a finished floor is planned, establish its thickness before setting the drain elevation. For another perspective on adapting floor-drain work to local conditions, this guide for Florida homeowners provides relevant installation context. A local plumber still needs to confirm the correct details for your house and jurisdiction. For a plain-language explanation of what gets installed before walls or concrete are closed, see this overview of rough-in plumbing.
When a Backwater Valve Is the Right Call and When It Backfires
A backwater valve can help protect a basement drain from sewage reversing through the line, but “install one everywhere” isn't sound advice. The key question is whether the drain sits below the level at which a public sewer backup could reach the building. That decision depends on elevations and the sewer layout, not just on whether the home has a basement.
For a basement below the elevation of the municipal sewer or an upstream manhole, have the drain's elevation assessed against the likely backup level and the building's flood-level rim. Ask the sewer authority or a qualified plumber to confirm the relevant reference points, permit rules, and protection requirements. The valve needs to be listed for its intended use and installed in the direction of flow.
Put access ahead of concealment
A valve that can't be inspected or cleaned is a future service problem. It should remain accessible after the basement is finished, with an access cover or cleanout that allows a plumber to reach the mechanism. Sediment, roots, or drain-cleaning equipment can interfere with the flap, so burying the valve under finished flooring defeats an important part of the protection.
Before closing walls or covering the access point, operate the flap, flush downstream fixtures, and check that the closure moves freely and isn't obstructed. Record the test and the valve location for future maintenance.
Understand the trade-off
A closed valve blocks reverse flow, but it can also prevent wastewater from leaving the building through that protected route. If people keep using fixtures while the valve is closed, water can back up inside the home instead. That's why installing a valve on the entire building drain without evaluating the branches can create trouble: higher fixtures may lose their path to drain when the valve shuts.
The right protection may apply only to selected fixtures or drainage routes. The choice should be made before pouring concrete or installing flooring, while the drain, sump arrangement, and sanitary routing can still be assessed together. A floor-drain installation field guide discusses the elevation and access questions that homeowners and property managers should raise with their plumber. Don't treat the valve as a cure for a blocked private building sewer, either. When it closes, continued fixture use can still create an internal backup.
Costs, Maintenance, and Knowing When to Call a Pro
A useful project budget starts with the work required at your property, not a generic price range. Costs depend on how much concrete must be opened, where the existing drain and sewer sit, whether gravity drainage is possible, what permits and inspections apply, and whether a sump or backwater protection is needed. Ask for a written scope that identifies the outlet, trap and vent work, testing, concrete restoration, and access for future maintenance.
For a basement finish, coordinate the drain before framing, flooring, or built-ins cover the slab. Northpoint Construction works on basement finishing and property maintenance, which can help owners coordinate drainage work with a broader project. Whether you hire one contractor or separate trades, make sure the plumber's route and access points are documented before another crew closes the work.
Keep the system serviceable
Maintenance should follow the equipment installed and the manufacturer's instructions. Keep the drain grate clear, confirm the trap-seal protection is operating as intended, and arrange inspection of any backwater valve. For a sump system, test the pump and check the discharge line for blockages; don't wait for a storm to find out the pump can't move water.
Watch how the system behaves during normal use and after wet weather. Soggy soil beside the foundation can point to a discharge problem. A pump that runs repeatedly or seems unable to empty the basin deserves attention, as do recurring drain backups and persistent sewer odors.
Call a licensed plumber if water backs up repeatedly, the drain gurgles when other fixtures run, the discharge route is unclear, or you suspect a sewer surcharge. Those symptoms call for diagnosis, not another round of guessing.
Permit and licensing rules vary by jurisdiction, and work on sanitary piping, pumps, or backwater protection may require permits, inspections, and a licensed trade professional. Check before you start. A plumbing inspection checklist can help you organize what to verify, but it doesn't replace local approval or an on-site assessment.
The best time to resolve a drainage uncertainty is before concrete, flooring, and finished walls make the route difficult to inspect. If you're planning a basement finish or need help coordinating drainage and property maintenance in the Orem area, contact Northpoint Construction to discuss the scope, site conditions, and how the work can fit into your project.