

Kitchen Remodel How to: Plan and Execute Your Project
You've saved inspiration photos, compared cabinet colors, and started picturing the finished island. Then a contractor asks whether the sink should move, the electrician identifies an outdated circuit, and the cabinet supplier mentions a lead time you hadn't planned for. That's the point where a kitchen remodel stops being a decorating project and becomes a construction project.
A practical kitchen remodel how-to plan starts with scope, sequence, permits, and decision-making discipline. The most attractive finish won't compensate for a poor layout, inaccessible storage, an undersized electrical system, or a budget weakened by changes made after demolition. In Utah County, local permitting and inspection procedures also need to shape the plan before work begins, not after the crew arrives.
Setting a Realistic Kitchen Remodel Budget and Scope
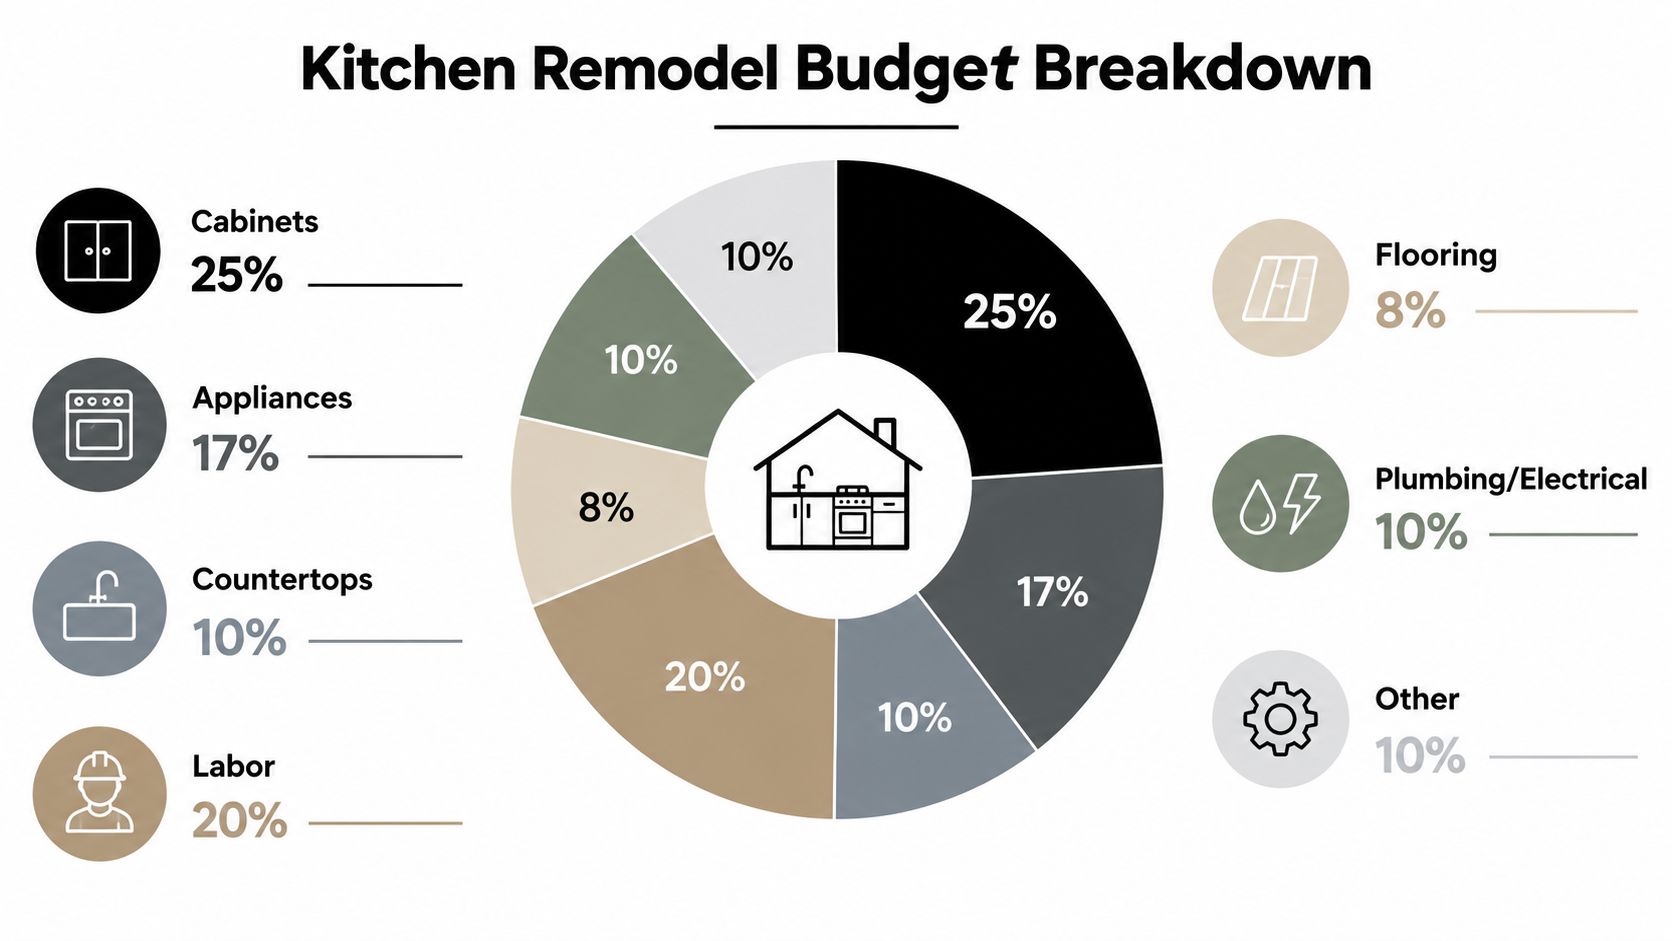
A kitchen budget becomes useful only when it reflects the work behind the finishes. Replacing cabinet doors, painting walls, and installing new hardware is a very different project from removing walls, relocating plumbing, upgrading electrical circuits, and ordering custom cabinetry.
National remodeling benchmarks illustrate the spread. A minor kitchen remodel is commonly benchmarked at about $28,458, while a major midrange remodel is about $82,793 and a major upscale remodel is about $164,104, according to published kitchen renovation cost benchmarks. Another summary places many homeowner projects between $14,589 and $41,554, with an average near $26,943, while larger makeovers can reach $65,000 to $130,000 or more from the same source.
Those figures aren't interchangeable quotes. They show why a contractor needs a defined scope before offering a meaningful estimate. A surface-level update usually keeps walls, utility locations, and cabinet footprints largely intact. A reconfiguration adds design, demolition, framing, rough plumbing, electrical work, inspections, finish installation, and coordination between several trades.
Separate the refresh from the rebuild
Labor and infrastructure can outpace the visible materials. Moving a sink may require new supply lines, a drain adjustment, cabinet modifications, flooring repair, and inspection coordination. A larger range may require a different electrical or gas arrangement. Custom cabinetry can also affect the entire sequence because measurements, shop drawings, fabrication, delivery, and installation must align.
A useful scope document should answer these questions:
- Layout: Are walls, doors, windows, and cabinet locations changing?
- Utilities: Will the sink, dishwasher, range, refrigerator, lighting, or outlets move?
- Cabinetry: Are you refinishing existing boxes, buying stock cabinets, or ordering custom work?
- Surfaces: Which flooring, backsplash, countertop, trim, and paint decisions are fixed?
- Equipment: Have appliance dimensions, ventilation requirements, and delivery dates been confirmed?
- Protection: How will adjacent rooms, floors, dust, and household access be managed?
Use a written project brief rather than a collection of screenshots. Include a measured plan, a finish schedule, appliance specifications, assumptions about existing conditions, and a list of items excluded from the contractor's price. This kitchen remodel cost breakdown can help organize the categories before you compare proposals.
Practical rule: Don't start demolition until you know what replaces every major item being removed, who supplies it, and when it will arrive.
Protect the budget from ambiguity
The most expensive sentence in a remodel is often, “I thought that was included.” Ask whether the estimate includes design work, permit fees, demolition disposal, patching, temporary protection, appliance installation, finish plumbing, painting, and cleanup. Ask how the contractor handles concealed damage, owner-supplied materials, substitutions, and work that fails inspection.
Give yourself a clear decision point. If the budget cannot support the full reconfiguration, preserve the existing utility locations and improve storage, lighting, surfaces, and hardware instead of starting an incomplete rebuild. A smaller finished project is usually more useful than a larger project paused with exposed walls and missing components.
Designing a Functional Layout and Securing Permits
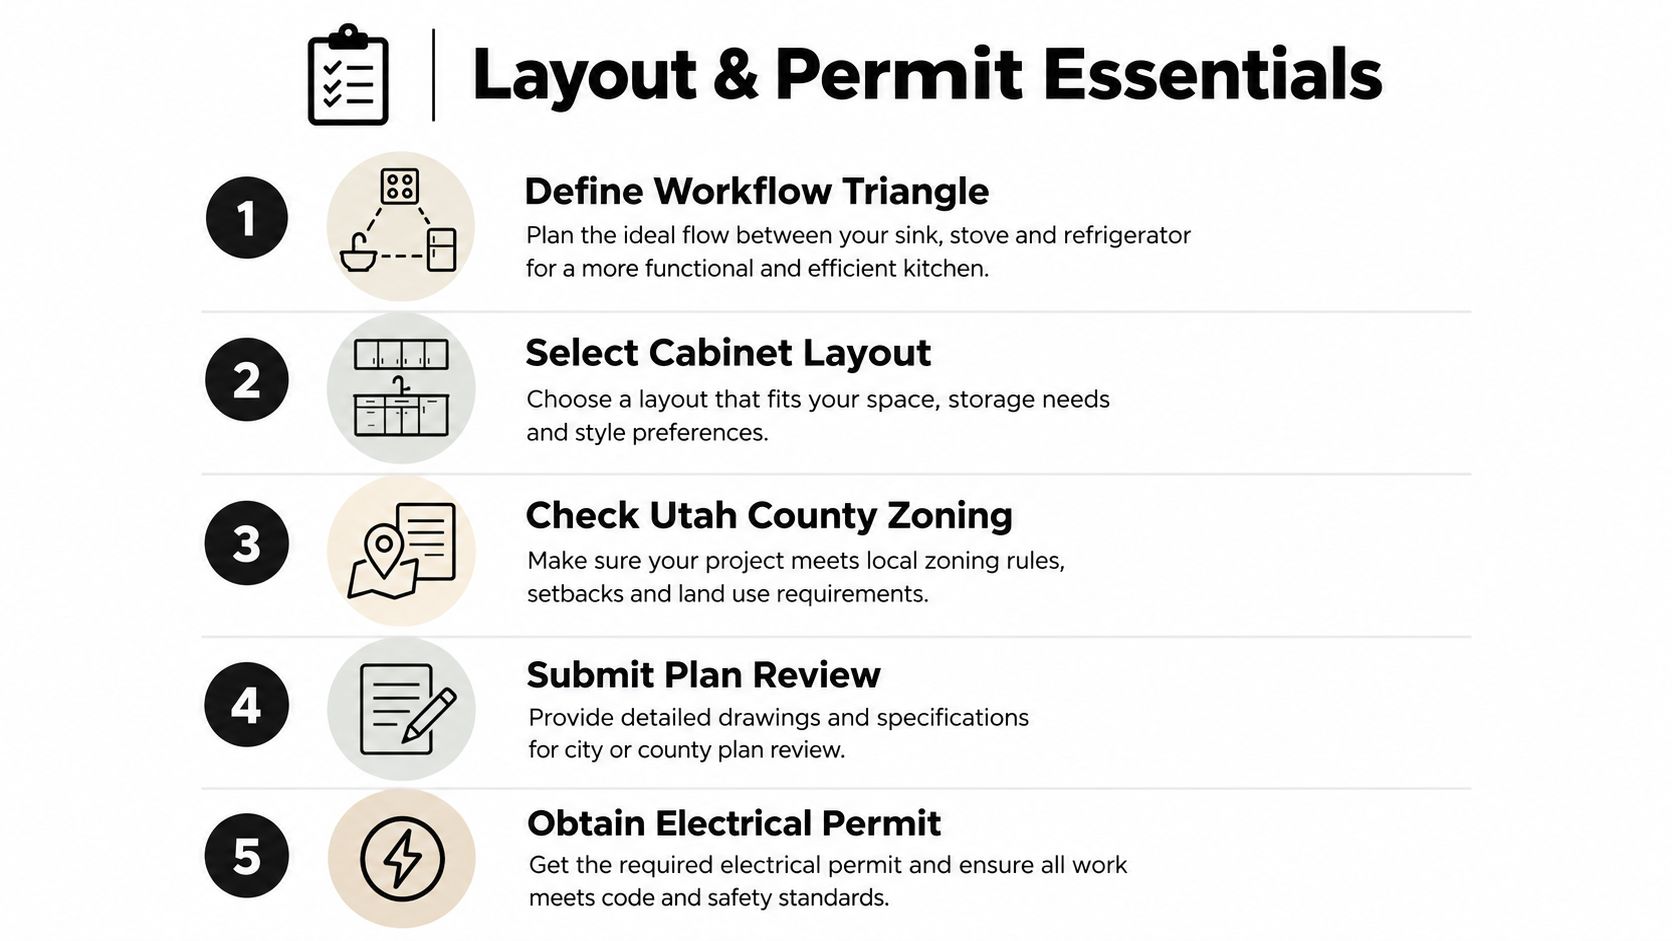
A kitchen should be designed around movement before appearance. Start by recording how people enter, unload groceries, prepare food, use the sink, load the dishwasher, serve meals, and gather. Mark pinch points, door swings, appliance clearances, and the places where two people regularly work at the same time.
The planning sequence matters:
Write the brief. List household routines, storage problems, cooking habits, entertaining needs, and accessibility concerns.
Measure the room. Record wall lengths, ceiling height, windows, doors, soffits, vents, outlets, plumbing points, and structural elements.
Draw layouts to scale. Test an island, peninsula, galley, or L-shaped arrangement on paper or in a design tool before ordering anything.
Place appliances early. Confirm refrigerator door swing, dishwasher position, range clearance, hood requirements, microwave location, and service access.
Review the utilities. Match cabinet plans to plumbing, electrical, lighting, ventilation, and any gas requirements.
Lock decisions before pricing. A contractor needs a stable plan to price labor, materials, inspections, and sequencing accurately.
Design for the next decade
A trend-led kitchen can look dated or become difficult to use when household needs change. Recent Houzz kitchen trends research reports that 52% of renovating homeowners modify the kitchen layout, while 53% address current or future special needs. Among those addressing special needs, 90% include accessibility features, according to the same source.
Those figures support a practical design direction. Plan clear routes, reachable storage, strong task lighting, stable work surfaces, and controls that don't require awkward bending or stretching. A homeowner may not need every accessibility feature immediately, but adding flexibility during an open-wall renovation is often easier than attempting the same work later.
Use ergonomic targets as starting points, not rigid rules. Industry kitchen guidance commonly places work counters at 34 to 36 inches, dining surfaces around 30 inches, and bar counters at 36 to 42 inches, as described in this kitchen remodeling planning guide. Confirm the final dimensions against the people who'll use the room, especially if someone uses a mobility aid or prefers seated preparation.
Treat permits as part of the design
In Orem, Provo, Lehi, American Fork, and nearby Utah County communities, permit requirements can vary by jurisdiction and by the work proposed. Cosmetic work may follow a different path from structural changes, new circuits, service upgrades, plumbing relocation, gas work, ventilation changes, or alterations that affect life-safety conditions.
Confirm the requirements with the city or county having authority over the property. Ask who submits the plans, which drawings are required, whether structural review applies, and when rough-in and final inspections occur. This construction permit requirements resource is a useful starting point, but it shouldn't replace direct confirmation with the local building department.
Don't cover walls before required inspections are complete. Keep approved plans, permit records, inspection results, product documentation, and any revised drawings in one project file. That record can protect the homeowner during future repairs, refinancing, insurance questions, or resale.
Hiring the Right Contractor in the Orem and Provo Area
A kitchen contractor isn't just the person directing demolition. The right general contractor coordinates the designer, cabinet supplier, electrician, plumber, countertop fabricator, flooring installer, inspectors, and homeowner. In a remodel with several dependencies, that coordination often determines whether the schedule stays orderly or collapses into idle days and rushed substitutions.
Local experience matters in Utah County because the approving jurisdiction, inspection calendar, utility procedures, and common housing conditions differ from one municipality to another. A contractor who regularly works in Orem may understand that city's process well, while a project in Provo, Lehi, or American Fork may require different submission steps or inspection coordination. That doesn't mean a local contractor can skip verification. It means the contractor is more likely to recognize which questions need answers before work starts.
Compare contractors by process, not just photographs
A polished portfolio shows the result, but it doesn't reveal how the company handled concealed conditions, change orders, failed deliveries, or inspection corrections. Ask each candidate to describe a comparable project from planning through closeout.
Look for:
- A Utah license and current insurance: Request documentation and confirm that the business and individuals performing regulated work are properly qualified.
- A written proposal: The document should define materials, allowances, exclusions, payment milestones, schedule assumptions, and responsibility for permits.
- A project manager: One person should own communication, coordination, site access, and decisions.
- Trade relationships: Ask who performs plumbing, electrical, HVAC, cabinetry, countertops, and finish work.
- Change-order procedures: The contractor should explain how pricing and schedule effects are approved before extra work begins.
- References for occupied homes: A kitchen remodel requires dust control, daily cleanup, communication, and respect for the household.
Use a contractor hiring checklist while interviewing. Call references with specific questions. Did the contractor return messages? Were allowances realistic? Did invoices match approved work? How did the company handle a surprise behind the wall?

Put money and communication in writing
Avoid a payment arrangement that leaves the homeowner paying most of the contract before the work is complete. Tie progress payments to visible milestones such as approved rough-ins, cabinet installation, countertop completion, and final punch-list resolution. The contract should also state who owns materials purchased with deposits and what happens if an item is discontinued or delayed.
For plumbing questions, a homeowner may also consult a specialized resource such as Total Plumbing & Hot Water Systems to understand the kind of plumbing service scope that can affect a renovation. The contractor still needs to coordinate the actual Utah project with appropriately qualified local trades and the applicable authority.
Northpoint Construction is one local option that provides home remodels and related construction services in Orem, Provo, Lehi, American Fork, and Saratoga Springs. Evaluate it by the same standards as any other contractor, including licensing, insurance, proposal clarity, references, communication, and permit responsibility.
Navigating the Construction Phase and Material Lead Times
Demolition day feels productive because the old kitchen disappears quickly. The difficult part comes afterward, when the project depends on inspections, measurements, fabrication, deliveries, and several trades arriving in the correct order.
A full remodel commonly involves 6 to 12 weeks of construction, while the complete process can extend to 3 to 6 months once design, permitting, ordering, and inspections are included, according to this kitchen remodeling timeline guide. HGTV's guidance places full renovations involving plumbing and electrical changes at 3 to 5 months, with planning for the entire process potentially reaching 6 months, from the same reference.
Follow the critical path
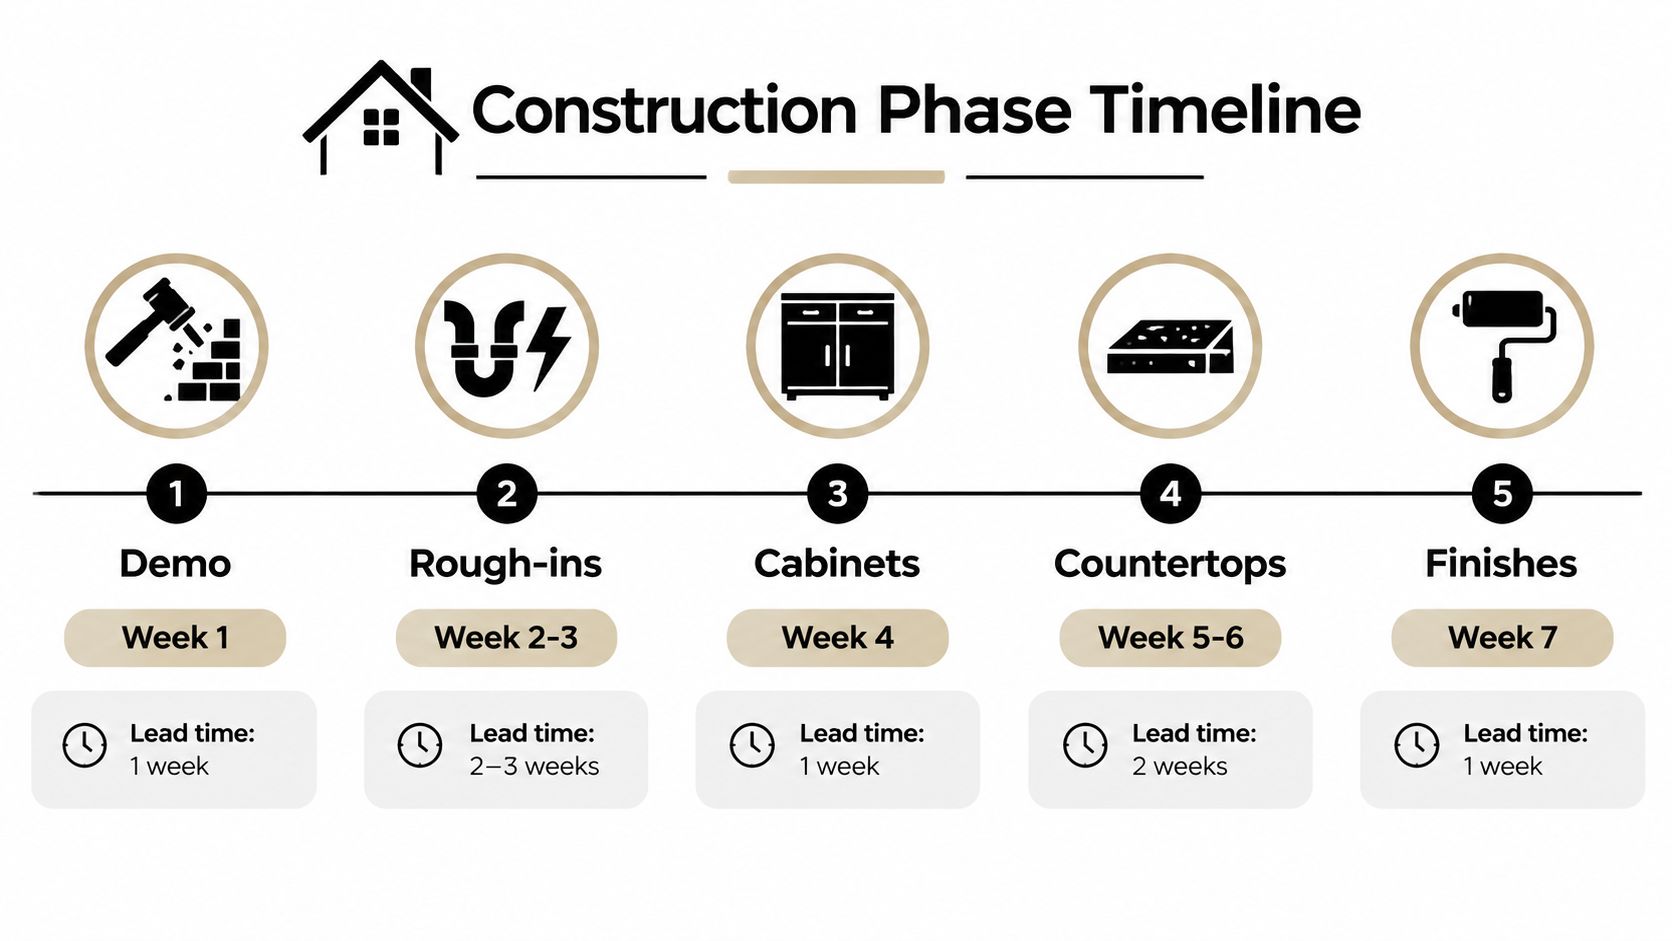
The sequence usually looks something like this:
- Demolition and discovery: Remove cabinets, finishes, and selected wall surfaces. The crew confirms framing, plumbing, wiring, moisture conditions, and unexpected obstacles.
- Framing and rough-ins: Complete structural adjustments and run plumbing, electrical, ventilation, and other concealed services. These installations must be ready for inspection before walls close.
- Wall and floor preparation: Install insulation where required, close approved walls, repair substrates, and establish flat, sound surfaces for cabinets and flooring.
- Cabinet installation: Set the boxes, level the runs, fit fillers and panels, and verify appliance openings. Small measurement errors can affect countertops and appliance fit.
- Countertop templating and installation: Fabricators measure after cabinets are stable. The finished counter may not arrive immediately, particularly when the material requires fabrication.
- Finish work: Install backsplash, plumbing fixtures, lighting, hardware, trim, appliances, paint, and final adjustments.
The actual work may be moving forward even when the room looks unfinished. A cabinet installer can't complete the job if the cabinet order is incomplete. A countertop fabricator can't template accurately before the cabinets are installed and leveled. An electrician may need to return after cabinetry, backsplash, or lighting decisions are confirmed.
Plan for life without the kitchen
Set up a temporary kitchenette before demolition. A folding table, compact refrigerator, microwave, electric kettle, washable storage bins, and a dishwashing station can keep daily life manageable. Protect a route from the entrance to the temporary setup, and ask the contractor how workers will control dust between the work zone and occupied rooms.
Track materials in a shared schedule rather than relying on memory. Record the item, supplier, specification, order date, expected arrival, inspection requirement, and person responsible for checking it. Confirm appliance dimensions when products arrive, and inspect cabinets, fixtures, and surfaces before installation.
Delays often come from custom materials and lead times, not from demolition or framing. Moderate projects may take 6 to 10 weeks on site, while major high-end renovations can run 12 to 20 or more weeks, according to the same timeline reference. A contractor who communicates the reason for a delay and identifies its effect on the critical path is managing the project. A contractor who stops responding is creating a second problem.
Avoiding Common Remodeling Mistakes and Change Orders
A change order isn't automatically a warning sign. Hidden water damage, unsafe wiring, deteriorated framing, and code corrections can justify additional work. The mistake is treating every change as harmless, especially when the crew is already waiting, walls are open, and a replacement decision must be made immediately.
Published remodel coverage reports that roughly 40% of kitchen remodels go over budget, while another report places the share of homeowners exceeding planned spending in 2025 at about 37%. A separate survey found 44% went over budget by at least $5,000, and contractor survey data indicates change orders can increase budgets by an average of 10%, according to this overview of kitchen remodel mistakes and costs. These figures come from different reports and shouldn't be combined into a personal forecast, but they point to the same management problem: unclear decisions become expensive once work is underway.
Freeze the decisions that affect other trades
Cabinet color can sometimes wait. Appliance dimensions, sink location, electrical placement, ventilation, flooring transitions, and wall openings usually can't. Before demolition, create a decision register with the selected product, model number, dimensions, finish, supplier, approval date, and delivery status.
Require written approval for changes. Each change order should state:
- What changes: Describe the affected room, material, or trade.
- Why it changes: Identify an owner request, concealed condition, discontinued product, design correction, or inspection requirement.
- Price effect: Show added labor, materials, disposal, taxes, and credits for deleted work.
- Schedule effect: State whether the change affects ordering, inspections, fabrication, or the completion date.
- Authorization: Include signatures or written approval before the contractor proceeds, except where immediate action protects the property.
A change made on paper is a decision. A change made verbally while the crew is working is a dispute waiting to happen.
Don't confuse allowances with confirmed prices
An allowance is a placeholder, not a guarantee. If the contract includes an appliance, countertop, tile, or fixture allowance, ask what specification the amount assumes and how installation is priced. A low allowance can make the initial proposal look attractive while leaving the homeowner responsible for the difference later.
Build a communication routine with a short weekly meeting or written update. Review completed work, upcoming decisions, deliveries, inspection status, open questions, and risks. Photograph concealed plumbing and electrical work before insulation or drywall covers it. That record helps future maintenance and gives everyone a shared reference when the finished room differs from the original drawing.
Final Walkthrough and Post-Remodel Maintenance
The final walkthrough should test the kitchen as a working system, not just confirm that the paint looks even. Turn on every light, operate each switch, run water at every fixture, open every drawer, test appliance clearances, and inspect the transitions where new work meets existing floors, walls, ceilings, and trim.
Walk the room with the approved plans and finish schedule. Check cabinet alignment, door reveals, hardware placement, countertop seams, backsplash joints, caulk lines, paint coverage, flooring damage, appliance panels, and ventilation operation. Use painter's tape to mark defects and keep a written punch list that identifies the location, responsible trade, and expected correction.
Test the systems before final payment
Have the contractor demonstrate shut-off valves, appliance controls, exhaust operation, lighting controls, and any water filtration or waste-disposal equipment. Test GFCI outlets using the test and reset buttons, and ask a qualified electrician to correct anything that doesn't operate as intended. Don't remove protective film from a product until you've inspected it, but don't leave the film in place longer than the manufacturer allows.
Request the closeout package:
- Permit and inspection records: Keep approved documents with the property files.
- Warranties: Save manufacturer warranties for appliances, cabinets, countertops, plumbing fixtures, flooring, and specialty hardware.
- Product records: Record model numbers, finishes, colors, suppliers, and care instructions.
- As-built information: Keep updated drawings or marked-up plans showing plumbing, electrical, ventilation, and structural changes.
- Maintenance contacts: Note who supplied or installed components that may need adjustment or repair.
Don't make the final payment just because the crew has removed its tools. Follow the contract's payment terms, but hold unresolved punch-list items to the process agreed in writing. A professional closeout gives the contractor a fair opportunity to correct work and gives the homeowner a documented record of what was delivered.
Maintain the investment deliberately
Natural stone requires the care recommended for its specific surface and sealer. Wipe spills promptly, use appropriate cleaners, and avoid treating an acidic or abrasive product as a universal kitchen cleaner. For engineered surfaces, tile, grout, and laminate, follow the manufacturer's instructions rather than relying on a generic internet remedy.
Inspect cabinet hinges, drawer slides, seals, and pulls during routine cleaning. Tighten loose hardware before it damages the cabinet face, and address doors that begin rubbing instead of forcing them open. Clean appliance filters and ventilation components according to their manuals, and keep access panels clear for service.
Store the digital project file in more than one secure location. Include photographs behind the walls, receipts, permits, warranties, care sheets, paint information, and final plans. The finished kitchen is easier to protect when the homeowner knows what was installed, where it came from, and how it was intended to operate.
Northpoint Construction helps homeowners plan and execute kitchen remodels in Utah County, including layout improvements, storage upgrades, cabinet and appliance coordination, lighting, and construction sequencing. Visit Northpoint Construction to discuss your scope, permitting needs, and a practical path from the first measured plan to final walkthrough.